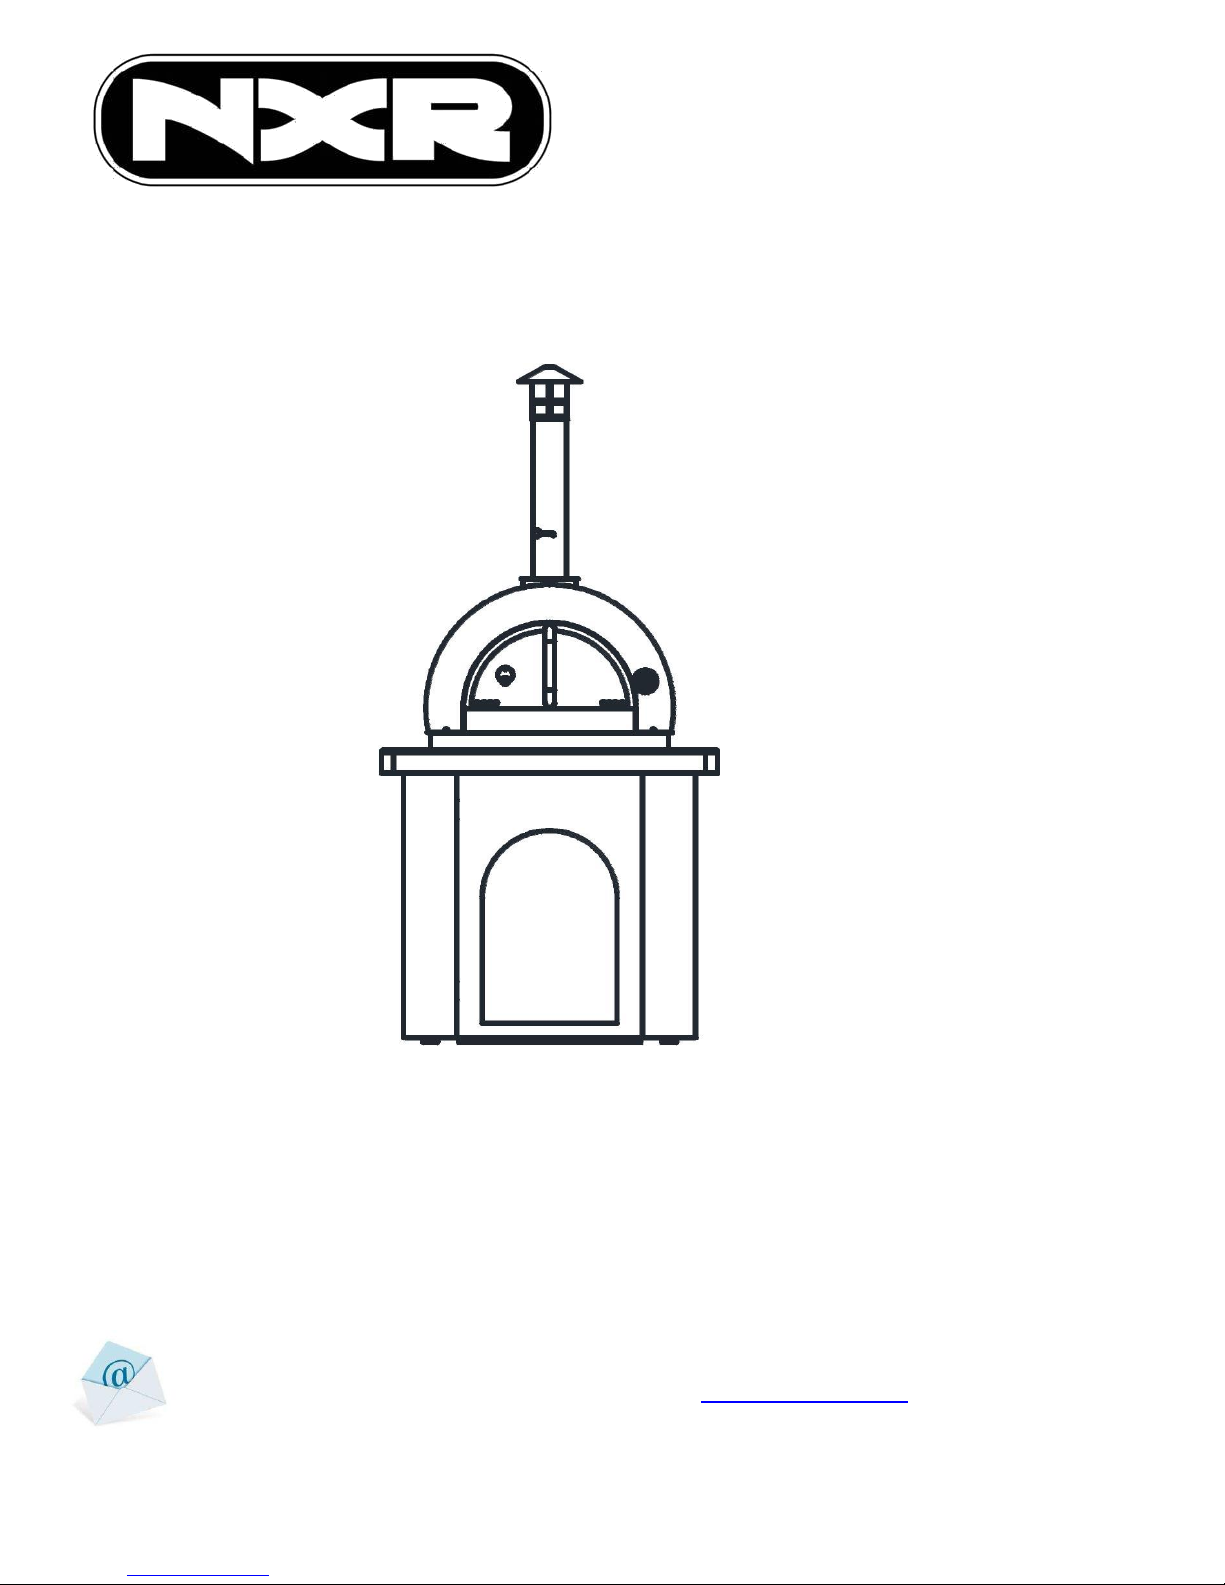
NXR P80-02 User manual
ITM. / ART. 924780
Model: P80-02
Wood Burning Pizza Oven Care & Assembly Instructions
IMPORTANT, RETAIN FOR FUTURE REFERENCE: READ CAREFULLY
Warning:
This product is intended for outdoor use only.
Read the manual carefully and completely before use.
Warning: accessible parts may be very hot, keep out of reach of children.
Do not move the device during use.
Not intended to be installed in or on boats.
Keep this manual for future reference.
Never operate this appliance unattended.
Questions, problems, and/or missing parts? Before returning to your retailer,
please send an email to our customer service department: nxrcs@duro-global.com
or prefer to speak to a live agent in the USA; call 001-888-909-8818 (International calling rates will apply)
Monday-Friday 9AM-5PM PST; Languages Spoken: English.
2
Table of Contents
Safety Instruction.......................................................................................................................... 3
Pizza Oven Exploded View..................................................................................................... 4
Pizza Oven Parts list................................................................................................................... 5
Pizza Oven Packing Information........................................................................................ 6
Pizza Oven Base Installation (Parts from box 2/2)............................................... 7-11
Install the Pizza Oven Top to the base (Parts from box 1/2)......................... 12-14
Start Cooking Pizza.....................................................................................................................15-16
Troubleshooting.............................................................................................................................17
Ordering Parts.................................................................................................................................. 18
Limited Warranty...........................................................................................................................19-20
Thank you for purchasing the NXR wood burning pizza oven.
We appreciate your business and we recommend that you read this entire
owner's manual before operating your new appliance for the first time. Take a
look at our safety instructions prior to use. This manual contains instructions on
how to properly install and set up your new pizza oven, as well as insights into
great features that our product offers. Please keep this manual for future
reference.
Thank you,
Duro Corporation Inc.
TABLE OF CONTENTS
3
INSTALLING YOUR NXR WOOD BURNING PIZZA OVEN REQUIRES 2 OR MORE PEOPLE.
NEVER INSTALL HEAVY PRODUCTS BY ONE PERSON; DOING SO CAN CAUSE SERIOUS
INJURY.
NEVER ALLOW CHILDREN TO OPERATE THE PIZZA OVEN.
NEVER LEAVE CHILDREN UNATTENDED WHEN THERE IS A FIRE BURNING.
ACCESSIBLE PARTS MAY BE VERY HOT, KEEP AWAY FROM CHILDREN.
DO NOT MOVE THIS PIZZA OVEN DURING USE.
DO NOT STORE EMPTY, FULL OR SPARE GAS CYLINDERS IN, UNDER OR NEAR THIS
PIZZA OVEN.
NEVER STORE GASOLINE OR HAZARDOUS MATERIALS INSIDE THE PIZZA OVEN BASE.
NEVER USE GASOLINE OR OTHER FLAMABLE VAPOROUS LIQUIDS TO START YOUR
PIZZA OVEN.
PLEASE KEEP ALL FLAMMABLE LIQUIDS AT A SAFE DISTANCE FROM THE OVEN.
USE GOOD QUALITY WOOD TO BURN THE PIZZA OVEN.
PROTECTIVE GLOVES ARE RECOMMENDED WHEN HANDLING PARTICULARLY HOT
COMPONENTS.
MAKE SURE ALL PACKING MATERIALS HAVE BEEN REMOVED FROM THE GRILL.
NEVER LEAVE THE PIZZA OVEN UNATTENDED WHILE COOKING.
NEVER LEAN OVER OR TOUCH THE PIZZA OVEN DOME WHILE THE PIZZA OVEN IS IN
USE.
SAFETY INSTRUCTIONS
Always check local building codes on governing outdoor appliance
installations before starting. Make sure that the area around the oven is free of
dry vegetation and wood structures are at least 10 feet away from your new
NXR wood burning pizza oven.
Before cleaning, allow 1 hour for your NXR wood burning pizza oven to cool.
Use a dry brush and wet mop to clean; use only soap and water. Never use
solvents.
4
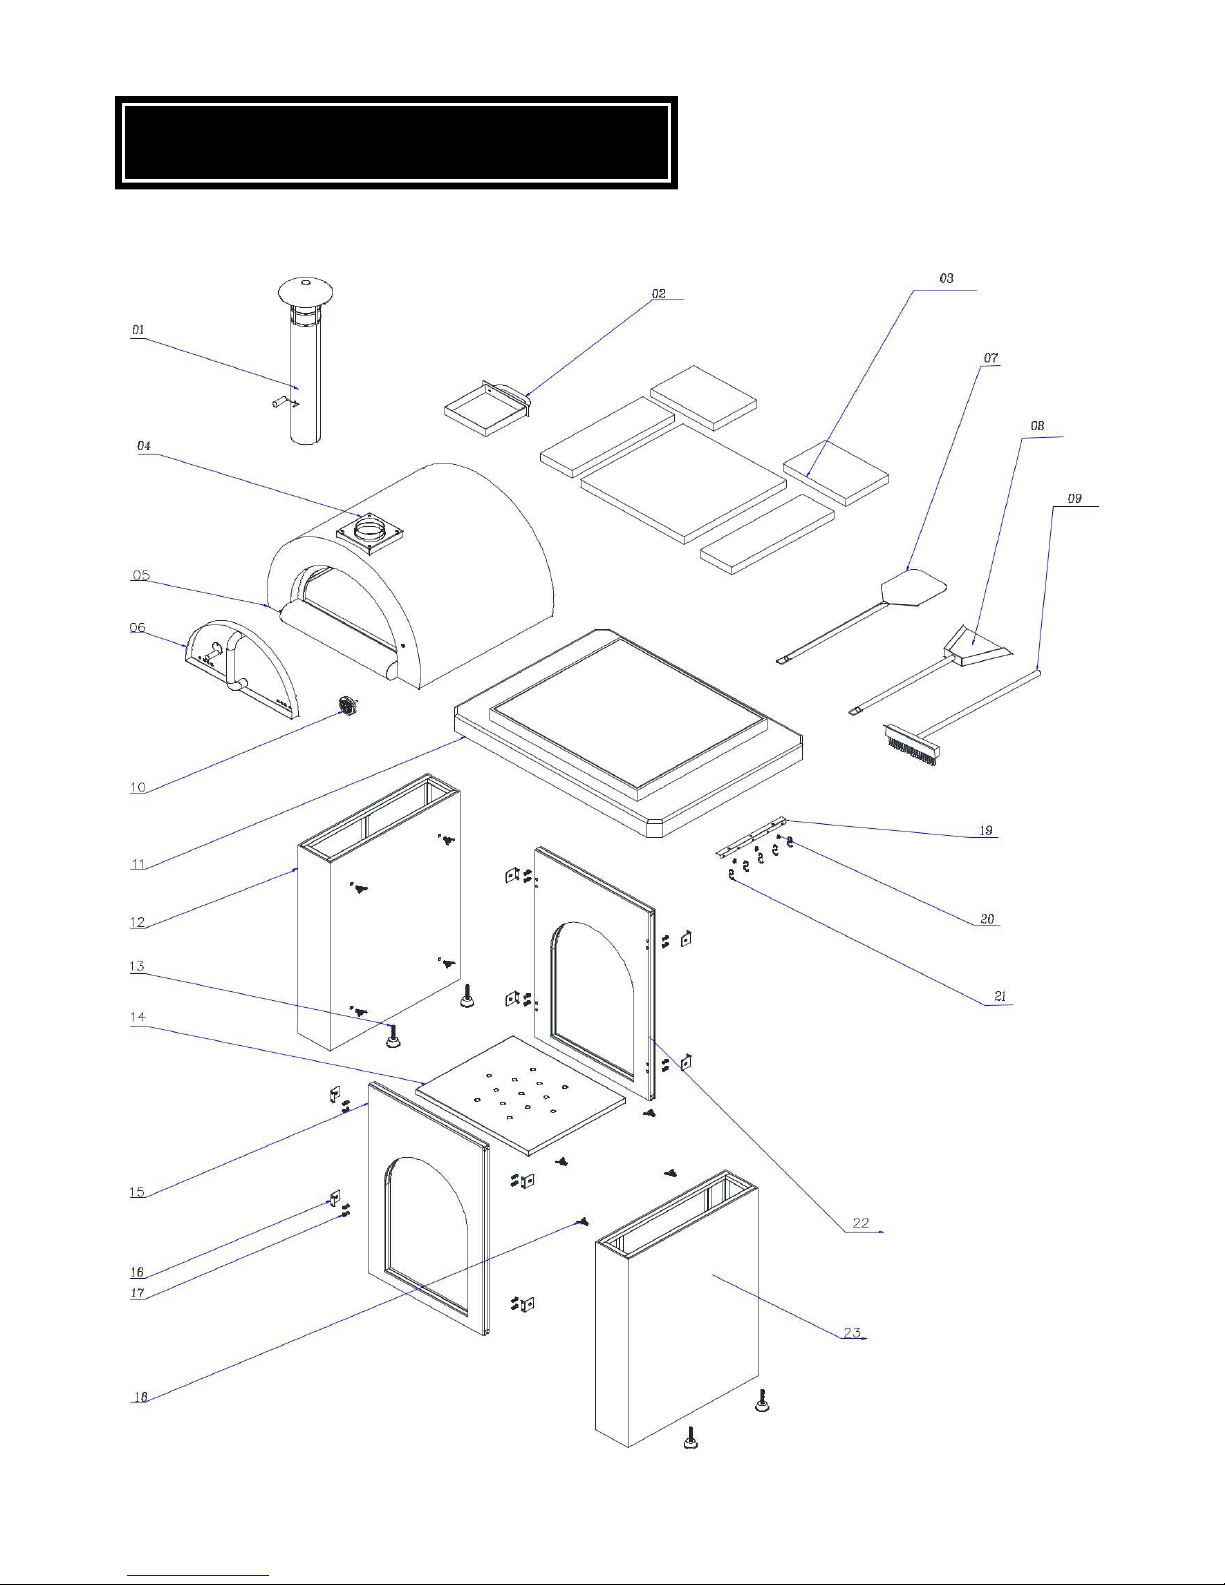
PIZZA OVEN EXPLODED VIEW
5
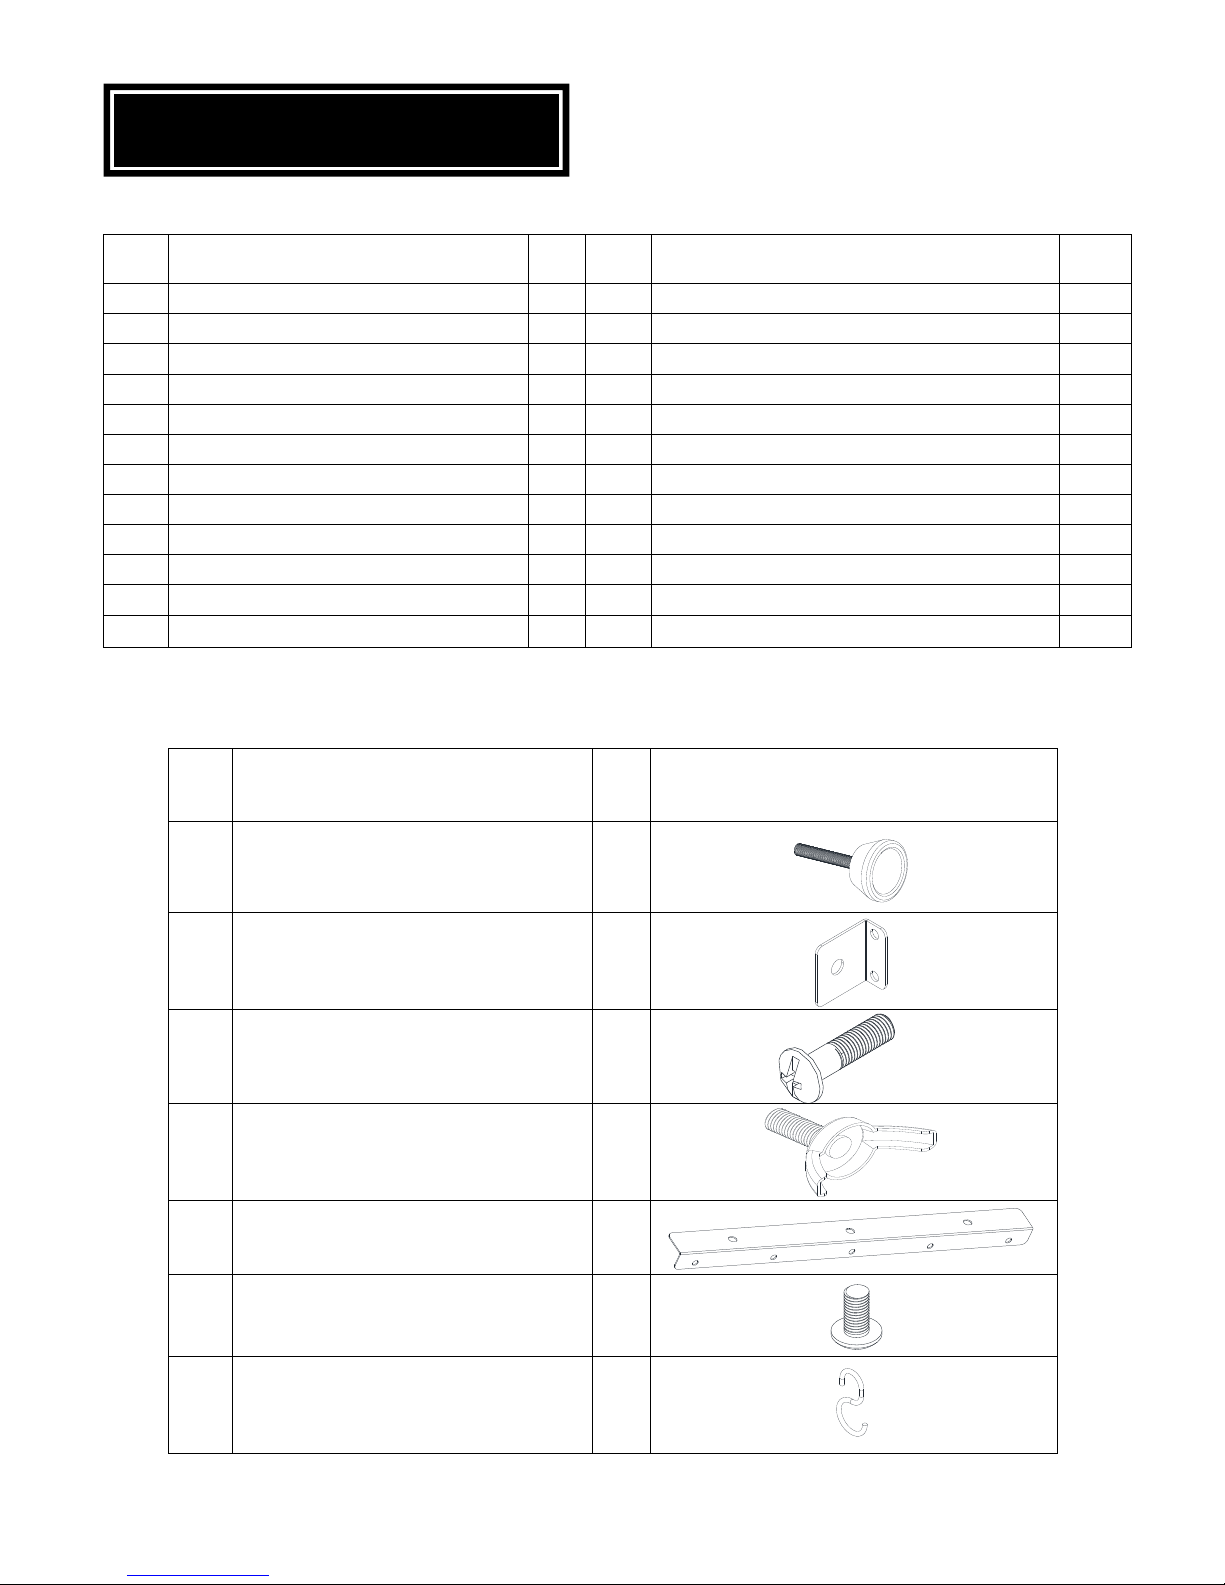
Part
NO.
Part name
Qty
Part
NO.
Part name
Qty
01
Chimney
1
13
Left and right side panel feet
4
02
Dust tray
1
14
Wood holder
1
03
Pizza Stone (Pre-installed)
5
15
Front panel
1
04
Chimney holder (Pre-installed)
1
16
Panel connectors
8
05
Pizza oven dome
1
17
1/4”-20 Philip's head screw
16
06
Pizza oven door
1
18
5/16”-20 Butter fly shape screw
8
07
Pizza peel
1
19
Hooks bracket
1
08
Pizza shovel
1
20
1/4”-12 Philip's head screw
3
09
Pizza oven brush
1
21
Hooks for (pizza peel, shovel, brush)
5
10
Temperature gauge
1
22
Back panel
1
11
Porcelain tile counter top
1
23
Right side panel
1
12
Left side panel
1
List
Parts in Hardware bag that in the base packing box
Part
NO.
Part name
Qty
Part NO.
13
Left and right side panel feet
4
16
Panel connectors
8
17
1/4”-20 Philip's head screw
16
18
5/16”-20 Butter fly shape screw
8
19
Hooks bracket
1
20
1/4”-12 Philip's head screw
3
21
Hooks for (pizza peel, shovel,
brush)
5
PIZZA OVEN PARTS LIST
6
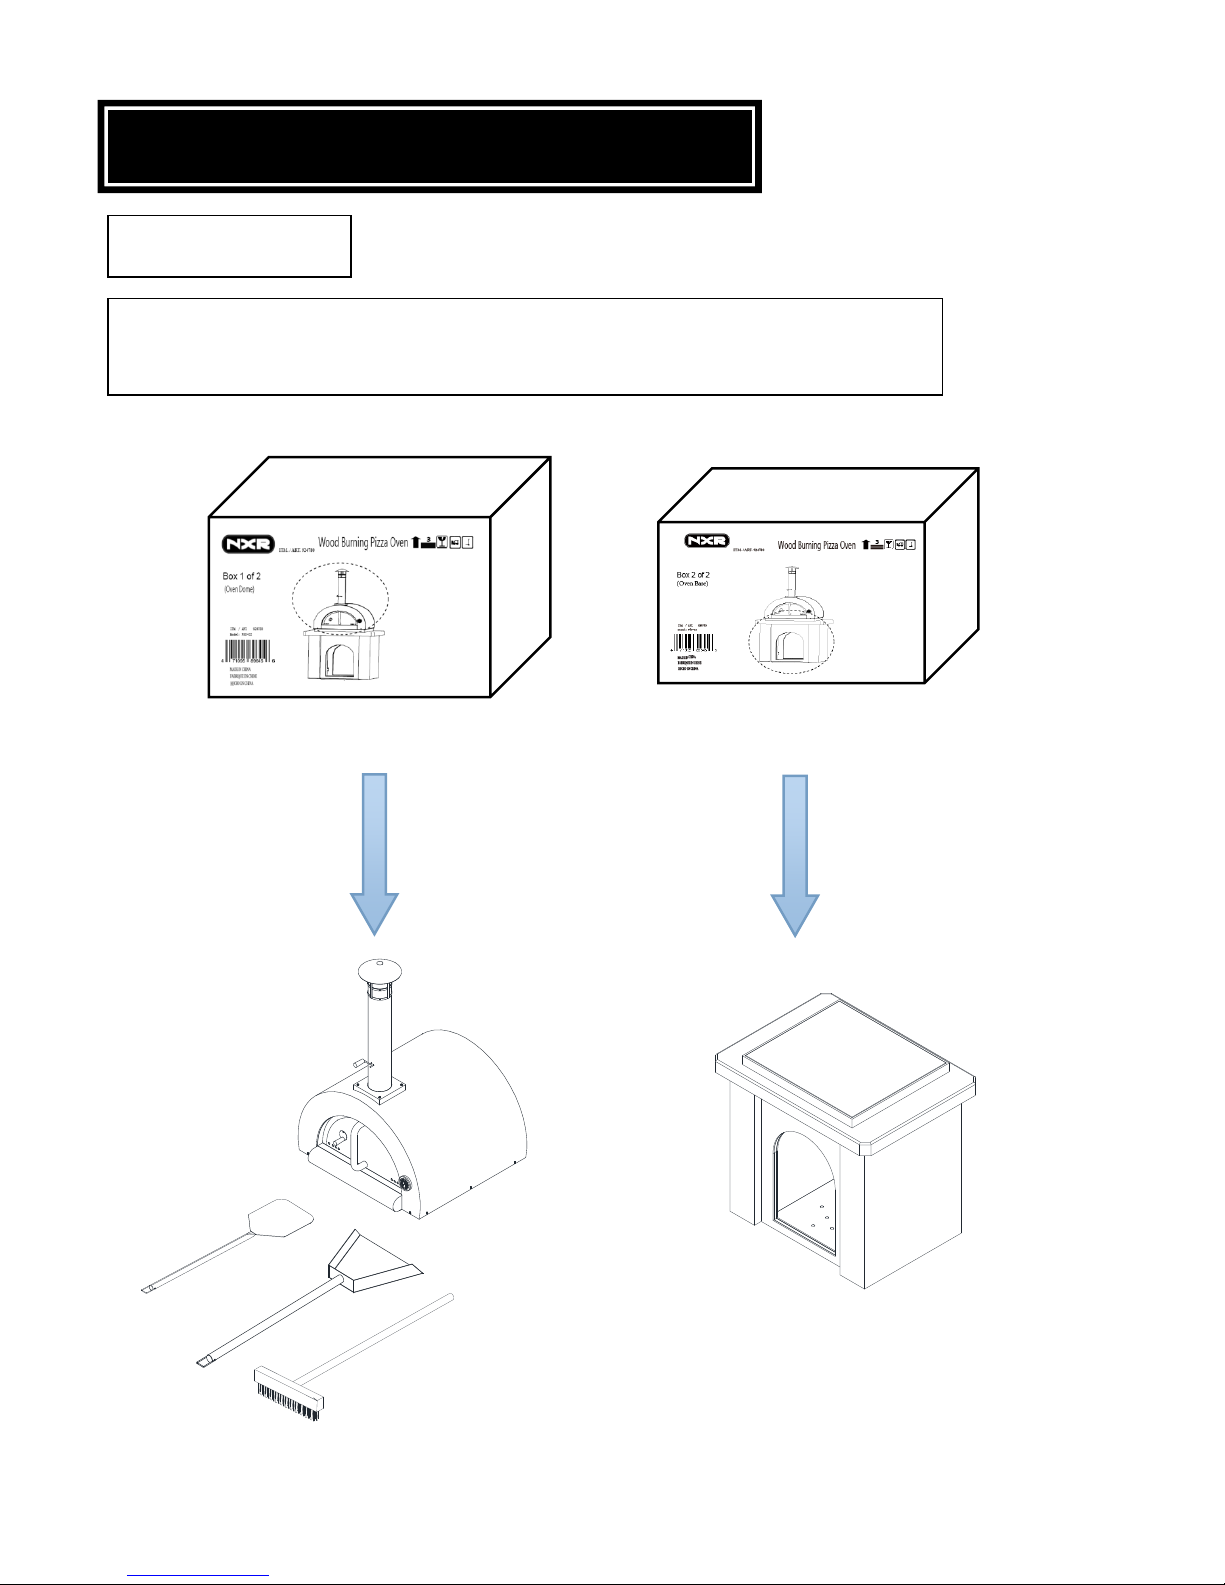
Box 1 of 2: Pizza Oven Dome Box 2 of 2: Pizza Oven Base
IMPORTANT
Please Note: Your pizza oven will be packed in 2 boxes.
When delivered, please verify you received both boxes.
PIZZA OVEN PACKING INFORMATION
7
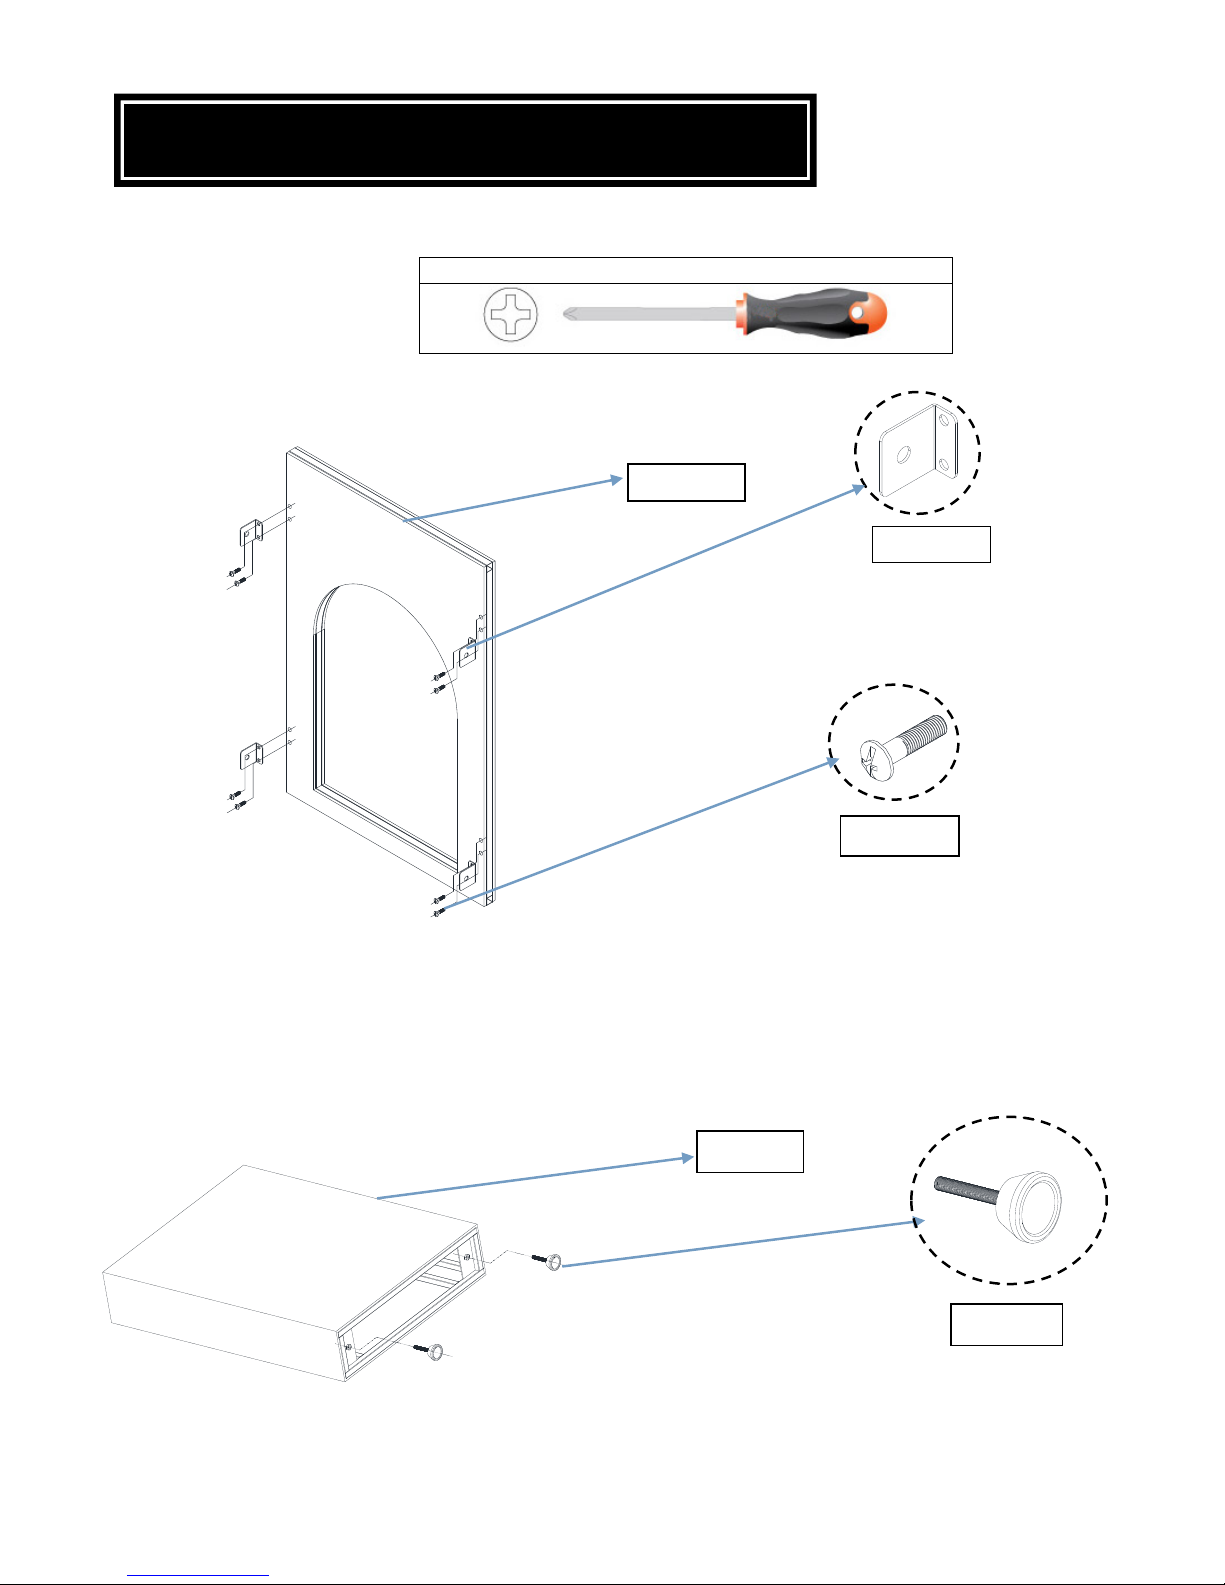
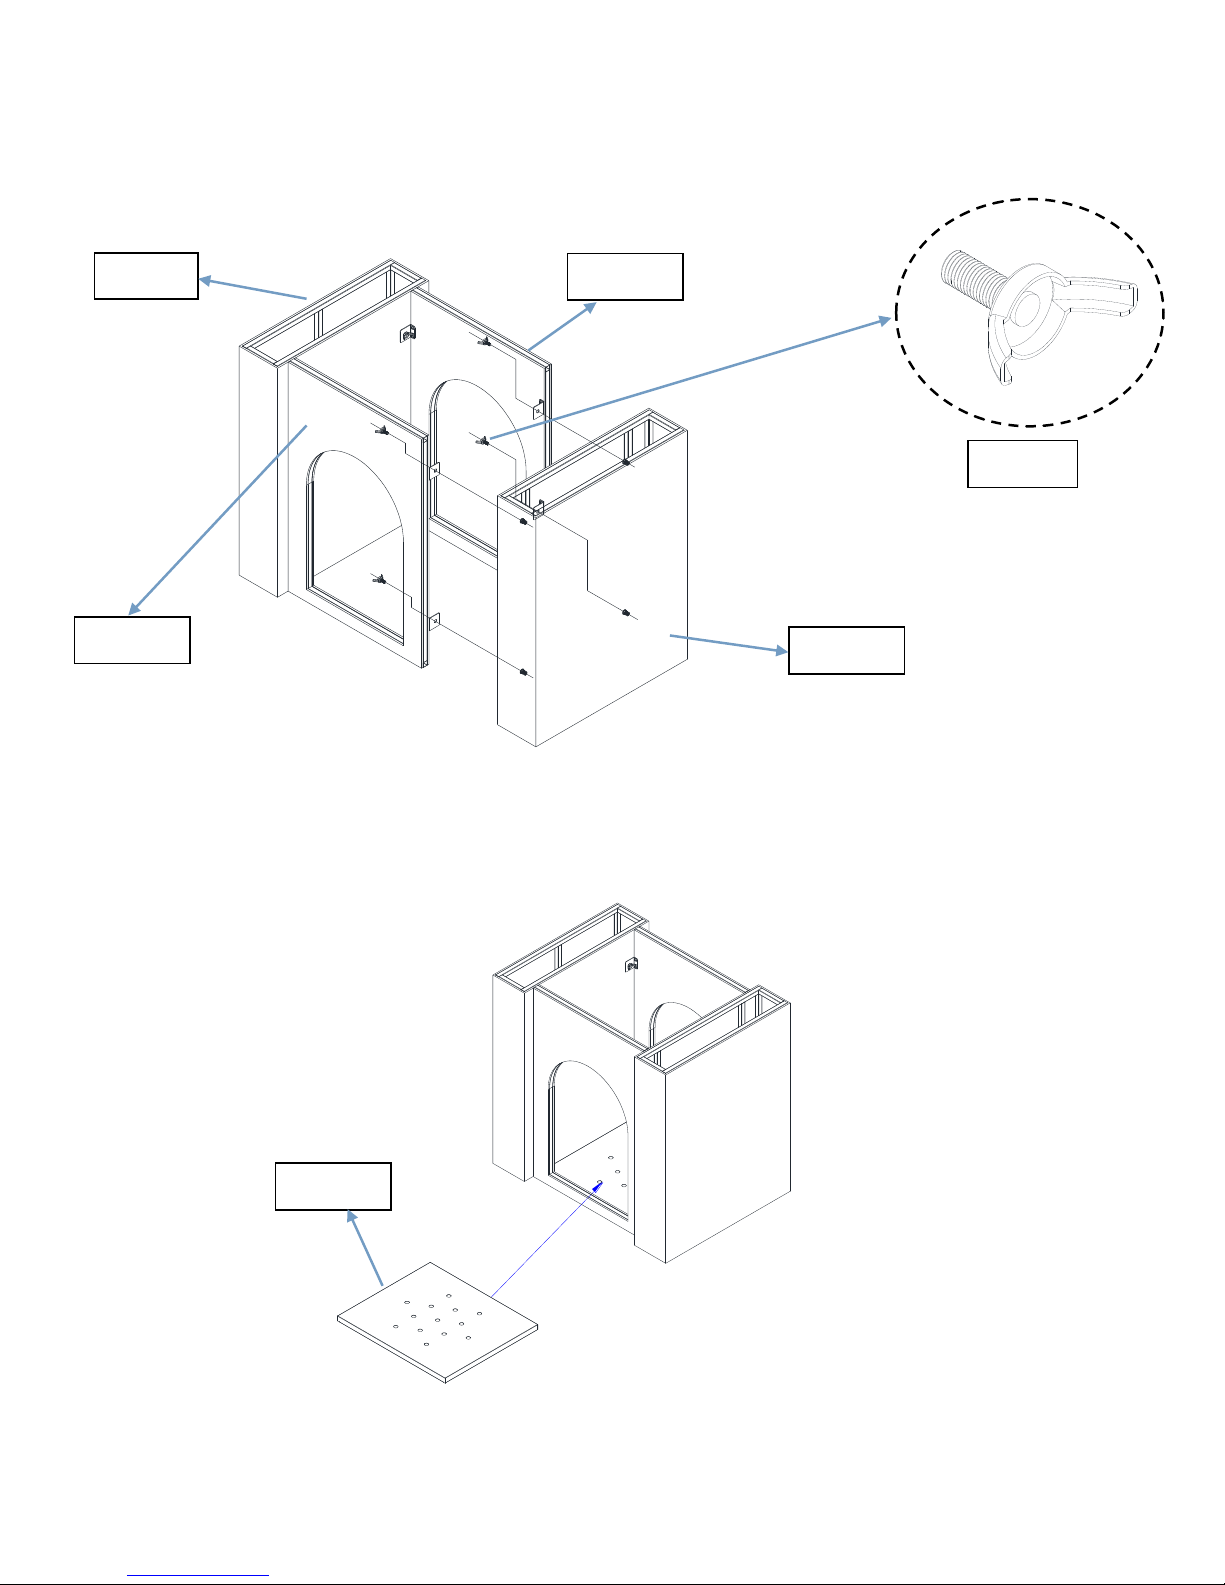
Step 1: Connect the 4 piece connector (part 16) onto the base Back panel by 8 piece 1/4”-20
Philip's head screw (Part 17).
Step 2: Same as step 1, connect the 4 piece connector (part 16) onto the base Front panel (part 15).
Step 3: Assemble the 2 feet for the left side panel (by hand turning in).
Step 4: Same as step 3, assemble the 2 feet for the right side panel (part 23) by hand turning in.
Tool needed: Phillips screwdriver (not included)
Pizza Oven Base Installation (Parts from box 2)
Part 16
Part 17
Part 22
Part 13
Part 12
8
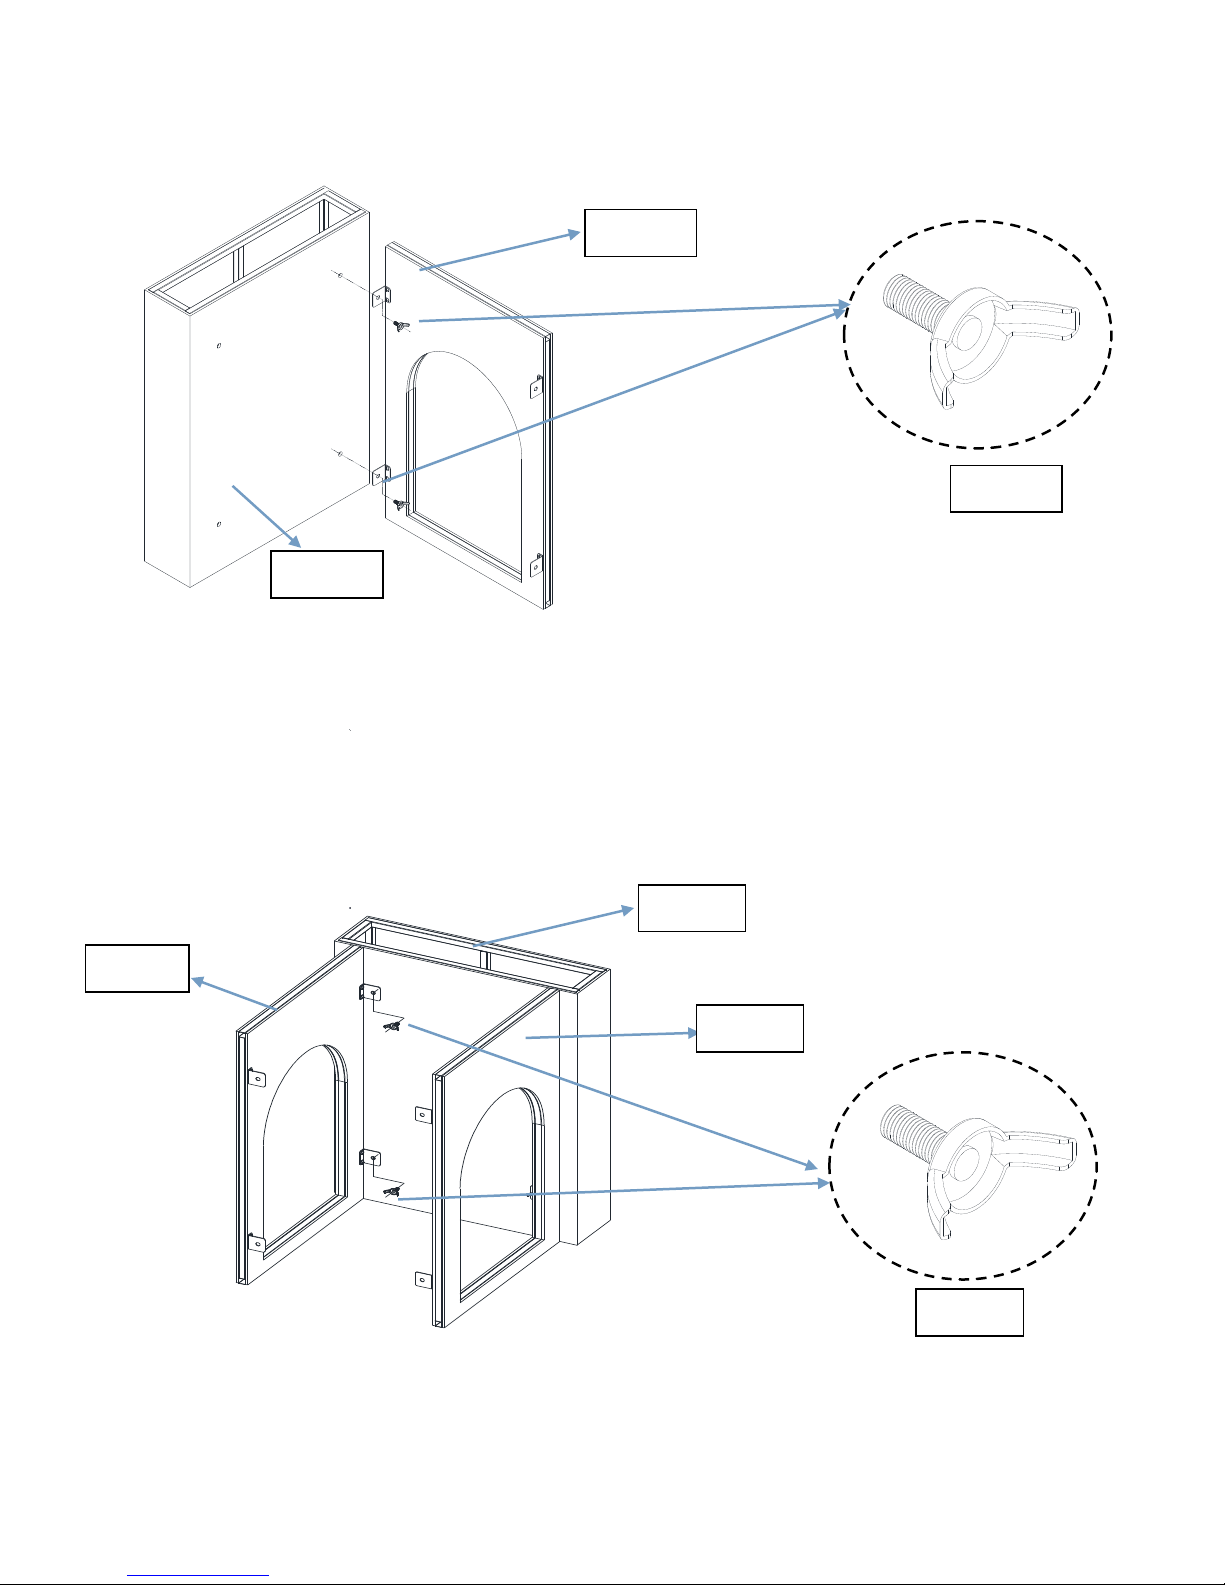
Step 5: Connect the back panel to the left pane with 2 of the butterfly shape screws.
Step 6: Use the same method as step 5, connect the front panel to the left side panel with 2 of the butter
fly shape screws (by hand turning in).
Part 18
Part 22
Part 12
Part 22
Part 15
Part 12
Part 18
9
Step 7: Connect the right panel with 4 of the butterfly shape screws by hand turning in.
Step 8: Place the wood holder into the pizza oven base.
Part 12
Part 23
Part 22
Part 22
Part 18
Part 14
10
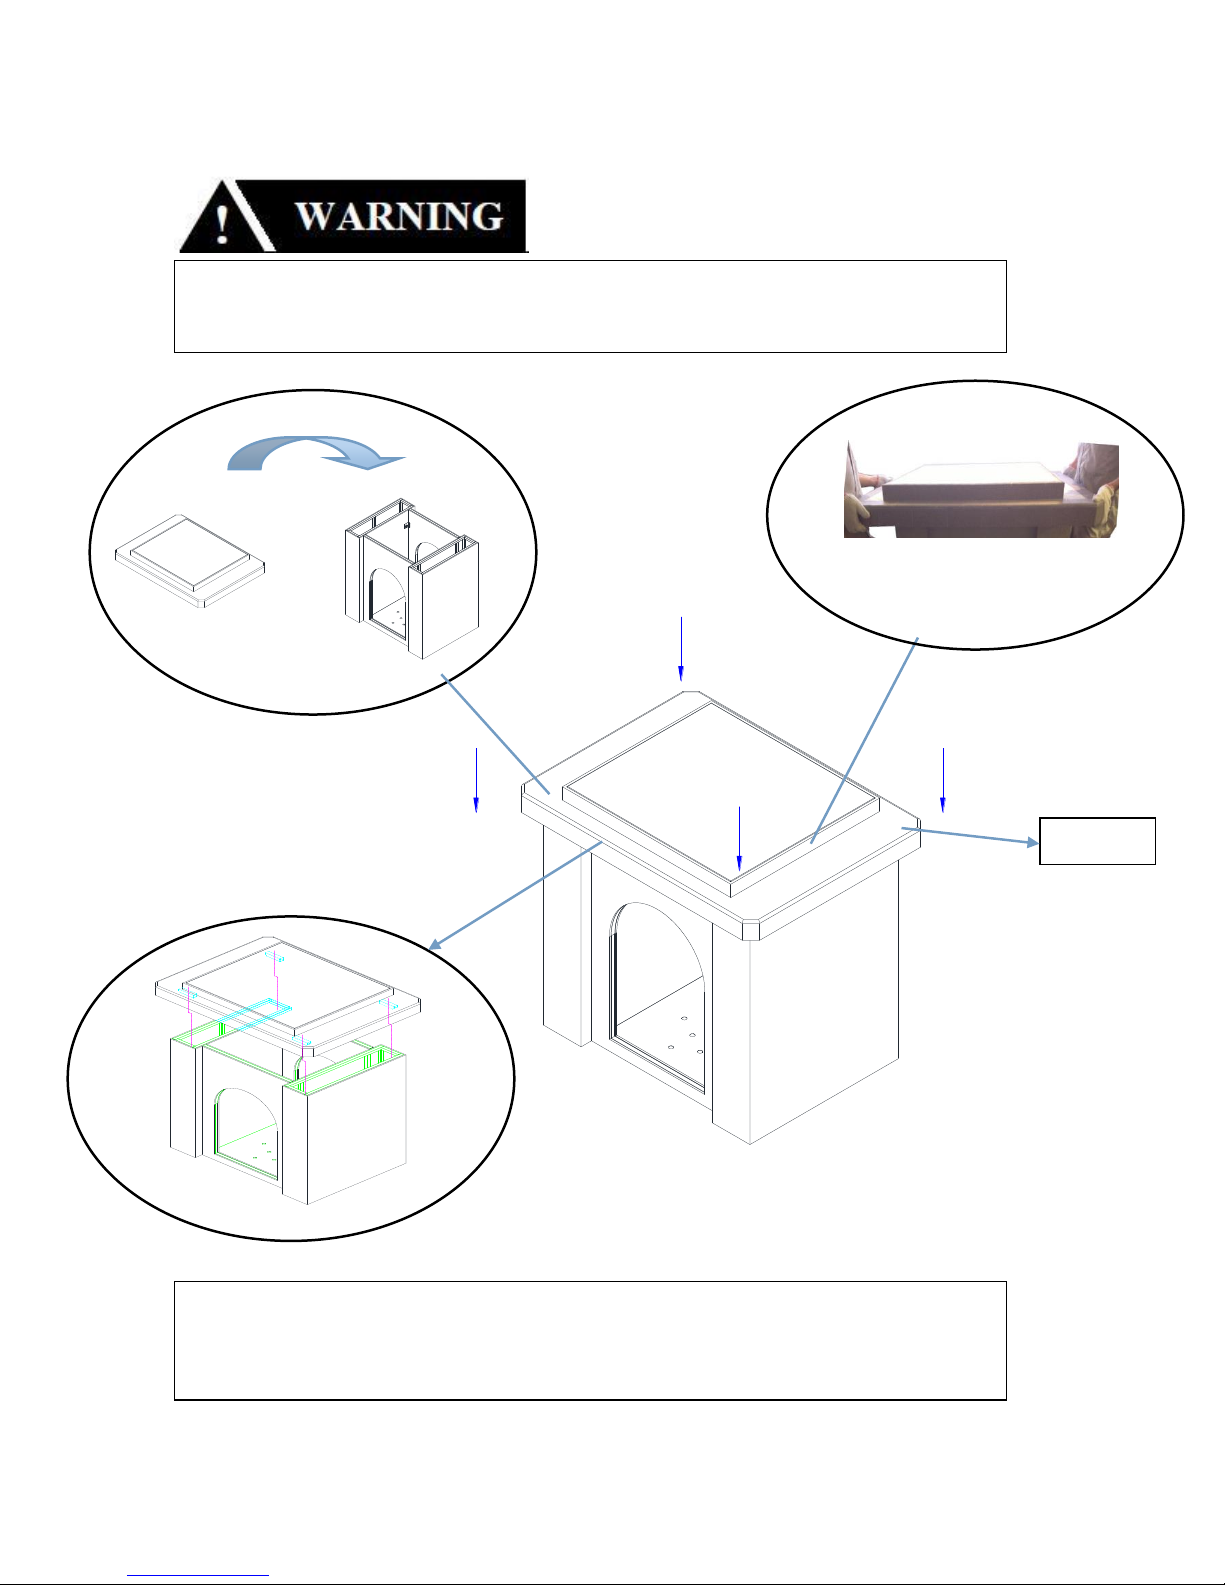
Step 9: Install the counter top on the pizza oven base.
.
The counter top is very heavy and requires at least 2
people to carry and put onto the pizza oven base board.
By adjusting the counter top position, please make sure the 4
blocker on the bottom of the counter top are fully insert into the
left & right side panel holes, and the counter top is horizontal.
Part 11
Table of contents
Popular Kitchen Appliance manuals by other brands

Tayama
Tayama TYG-35AF instruction manual

AEG
AEG 43172V-MN user manual

REBER
REBER Professional 40 Use and maintenance

North American
North American BB12482G / TR-F-04-B-NCT-1 Assembly and operating instructions

Presto
Presto fountain popper instruction manual

Westmark
Westmark 1035 2260 operating instructions


