Artusi AWC45X User manual

1
INSTRUCTION MANUAL
WINE CELLAR SEAMLESS FRAME
Model: AWC18X、AWC2X、AWC45X、AWC165X、AWC166X
To ensure proper use of this appliance and your safety, please read the following instructions
completely before operating this appliance.

2
1. IMPORTANT SAFETY INSTRUCTIONS
WARNING
Before the appliance is used, it must be properly positioned and installed as described in this manual. So
read the manual carefully. To reduce the risk of fire, electric shock or injury when using the appliance,
follow basic precautions.
To avoid a hazard due to instability of the appliance,if must be fixed in a ccordance with the instructions.
SAFETY PRECAUTIONS
Carefully inspect the appliance. If you discover any faults, stop the installation and contact the
vendor.
In the event that the appliance is damaged on delivery, contact the supplier immediately.
The packaging material is recyclable and is marked with a recycling symbol. For disposal, follow
the local regulations. Packaging materials (plastic bags, polystyrene parts, etc.) must be kept out
of the reach of children, because they present a possible source of danger.
When disconnecting the appliance, pull on the plug, not on the cable.
Any repairs and work on the appliance should only be carried out by the customer service
department, as unauthorized work could prove highly dangerous for the user. The same applies
to changing the power cable.
If the supply cord is damaged, it must be replaced by the manufacturer,
its service agent or similarly qualified persons in order to avoid a hazard.
Do not stand on the base, drawers or doors or use them to support anything else.
Do not allow flames or sources of ignition to enter the appliance. When transporting and
cleaning the appliance, ensure that the refrigerant circuit is not damaged. In the event of
damage, make sure that there are no ignition sources nearby
Keep the room well ventilated.
This appliance is not intended for use by persons (including children) with reduced physical,
sensory or mental capabilities or lack of experience and knowledge unless they have been given
initial supervision or instruction concerning use of the appliance by a person responsible for their
safety. Children should be supervised to ensure that they do not play with the appliance.
Do not store explosives or sprays using combustible propellants such as butane, propane,
pentane, etc., in the appliance.
Electrical components might cause leaking gas to ignite. You may identify such sprays by the
printed contents or a flame symbol.
Do not use electrical devices inside the appliance.
Before you throw away your old appliance: Take off the door. Leave the parts in place so that
children may not easily climb inside.

3
When disposing of your appliance, please choose an authorized disposal site.
This appliance is equipped with a power cord having a grounding wire with a grounding plug.
The plug must be plugged into an outlet that is properly installed and grounded
Do not under any circumstances cut or remove the third (ground) prong from the power cord.
Do not use an adapter plug with this appliance.
If the
supply
cord is damaged, it must be replaced by the manufacturer, its service agent or similarly
qualified persons in order to avoid a hazard.
This appliance is intended to be used in household and similar applications such as:
staff kitchen areas in shops, offices and other working environments;
farm houses and by clients in hotels, motels and other residential type environments;
bed and breakfast type environments;
catering and similar non-retail applications.
WARNING: Keep ventilation openings, in the appliance enclosure or in the built-in structure, clear of
obstruction.
WARNING: Do not use mechanical devices or other means to accelerate the defrosting process, other
than those recommended by the manufacturer.
WARNING: Do not damage the refrigerant circuit.
WARNING: Do not use electrical appliances inside the food storage compartments of the appliance,
unless they are of the type recommended by the manufacturer.

4
2. INSTALLATION INSTRUCTIONS
ATTENTION
If the appliance is transported in a horizontal position, the oil from the compressor may leak into the
cooling circuit. For this reason, allow the appliance to rest in a vertical position for 12 hours before
turning it on, so that the oil flows back into the compressor.
Remove the external packaging, remove the protective plastic film from the surface of the appliance (if
used) and clean the external parts of the appliance with a cleaner designed for this purpose. Do not use
steel wool or any coarse agents, which could irreparably damage the surface of the appliance.
IMPORTANT
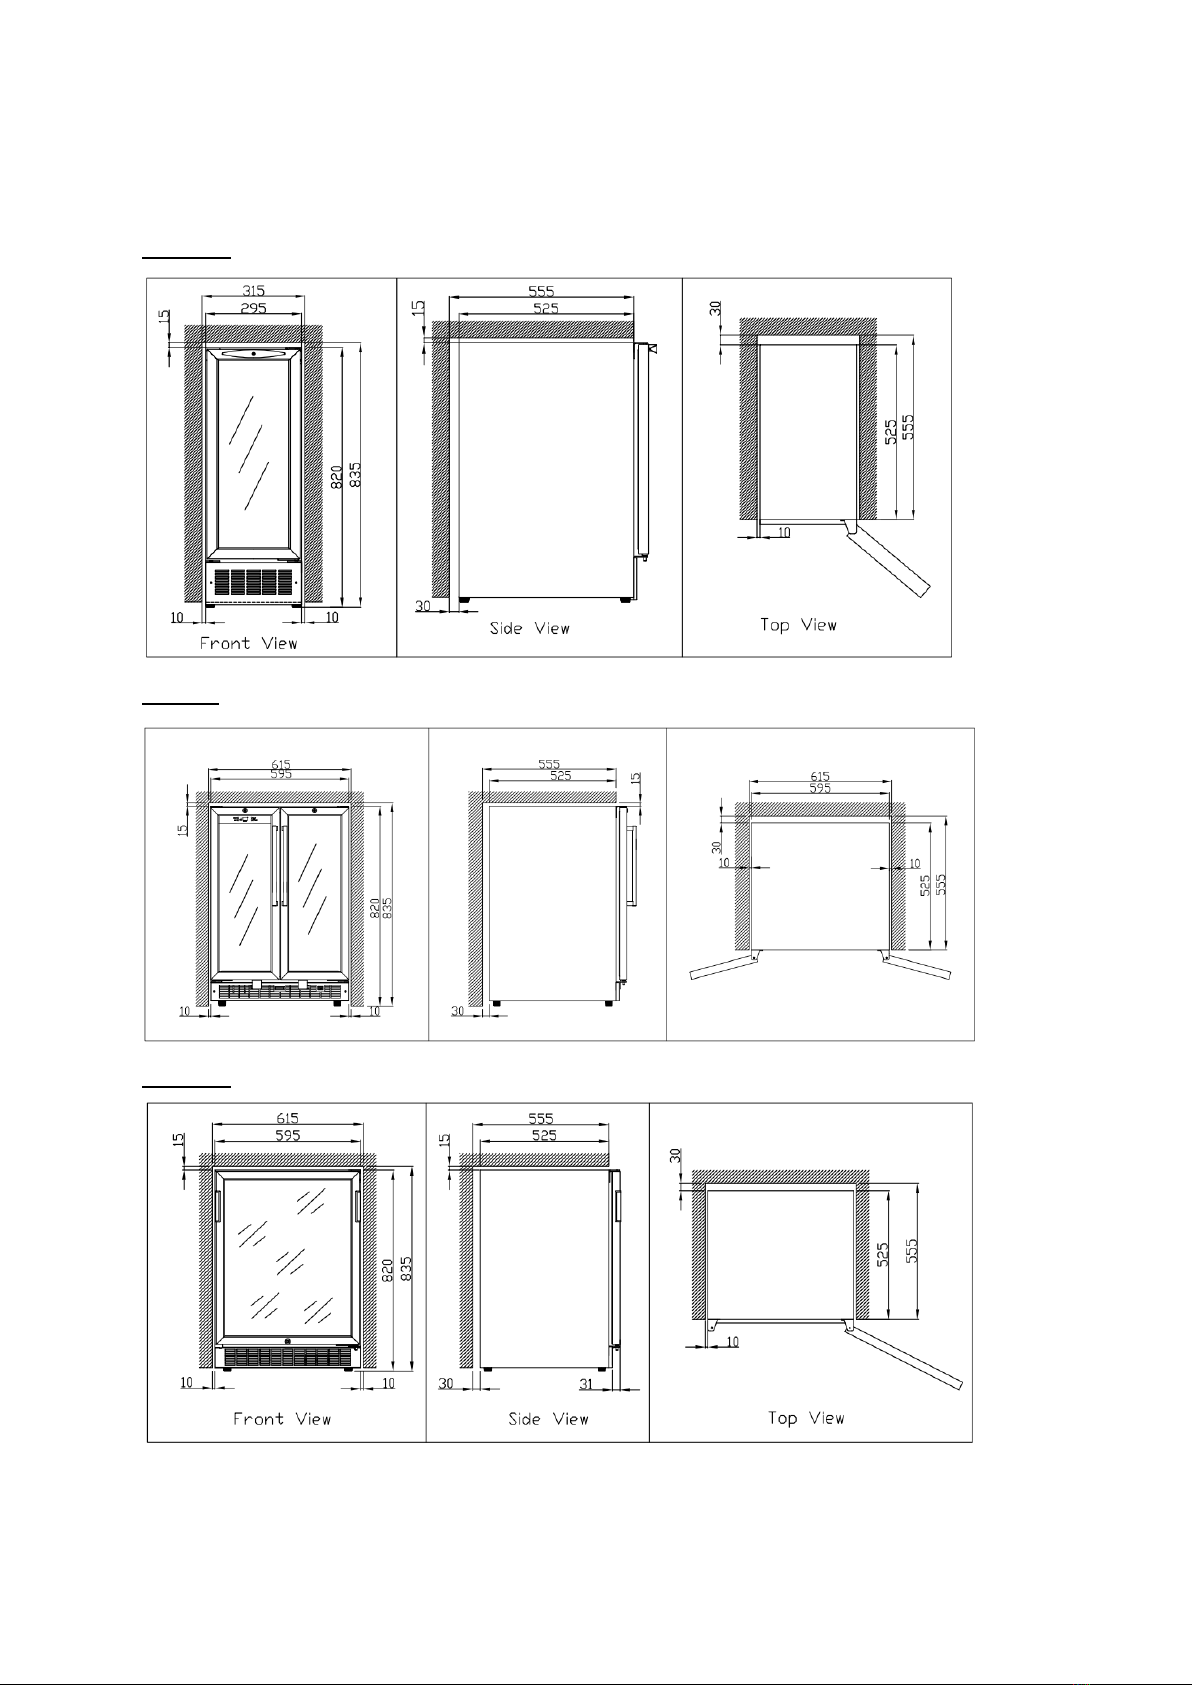
This unit can be installed as either built-in or free-standing unit. For free-standing installation, allow at
least 4” of clearance at the back, sides and top of the unit to permit the proper air circulation to cool the
compressor and condenser. For built-in installation, certain clearances are necessary for optimal
operation. In this case, allow 3/16” on both sides, 2” at the rear and 1/16” at the top to ensure proper
ventilation. Take care that the air vent at the front of the appliance is never covered or blocked in any
way.
BEFORE INSTALLATING OF YOUR APPLIANCE
The placement of the appliance must meet the requirements in the section operating conditions
and must include a stable floor with a load-bearing capacity corresponding to the weight of the
appliance.
Level the appliance using the adjustable feet. Ensure there is a gap between the bottom edge of
the appliance and the ground, so that there is sufficient circulation of air. This will ensure the
optimal performance of the cooling system.
Check whether any coolant circulation pipes have been damaged during the installation.
Use the appliance only for the purposes for which it has been designed.
The appliance must be located on a rigid and even surface. In this way you will ensure free
circulation of the coolant and effective operation of your appliance.
If possible, place the appliance in a cool, well ventilated and dry room.
Do not locate the appliance in direct sunlight or in a room with a high ambient temperature, or in
the vicinity of any sources of direct heat, such as a radiator or oven. This would cause the
compressor to work harder, resulting in a substantially higher power consumption level.
5
3. OPERATING YOUR APPLIANCE
OPERATING CONDITIONS
Proper operation of the appliance is guaranteed only if the following conditions are met:
The temperature in the room where the appliance is located conforms to the climate class
stated on the appliance’s rating label.
Maximum ambient relative humidity: RH75%.
The appliance must be placed at a sufficient distance from heat sources ( e.g., ovens, central
heating, direct sunlight, etc.).
The appliance must be located in such a place that it is protected against the effects of weather.
Regular maintenance is performed according to the instructions in this user’s manual.
The ventilation openings on the appliance must not be covered.
Correct installation (e.g. leveling, the capacity of the system corresponds to the specifications
on the rating label of the appliance).
COMMANDS
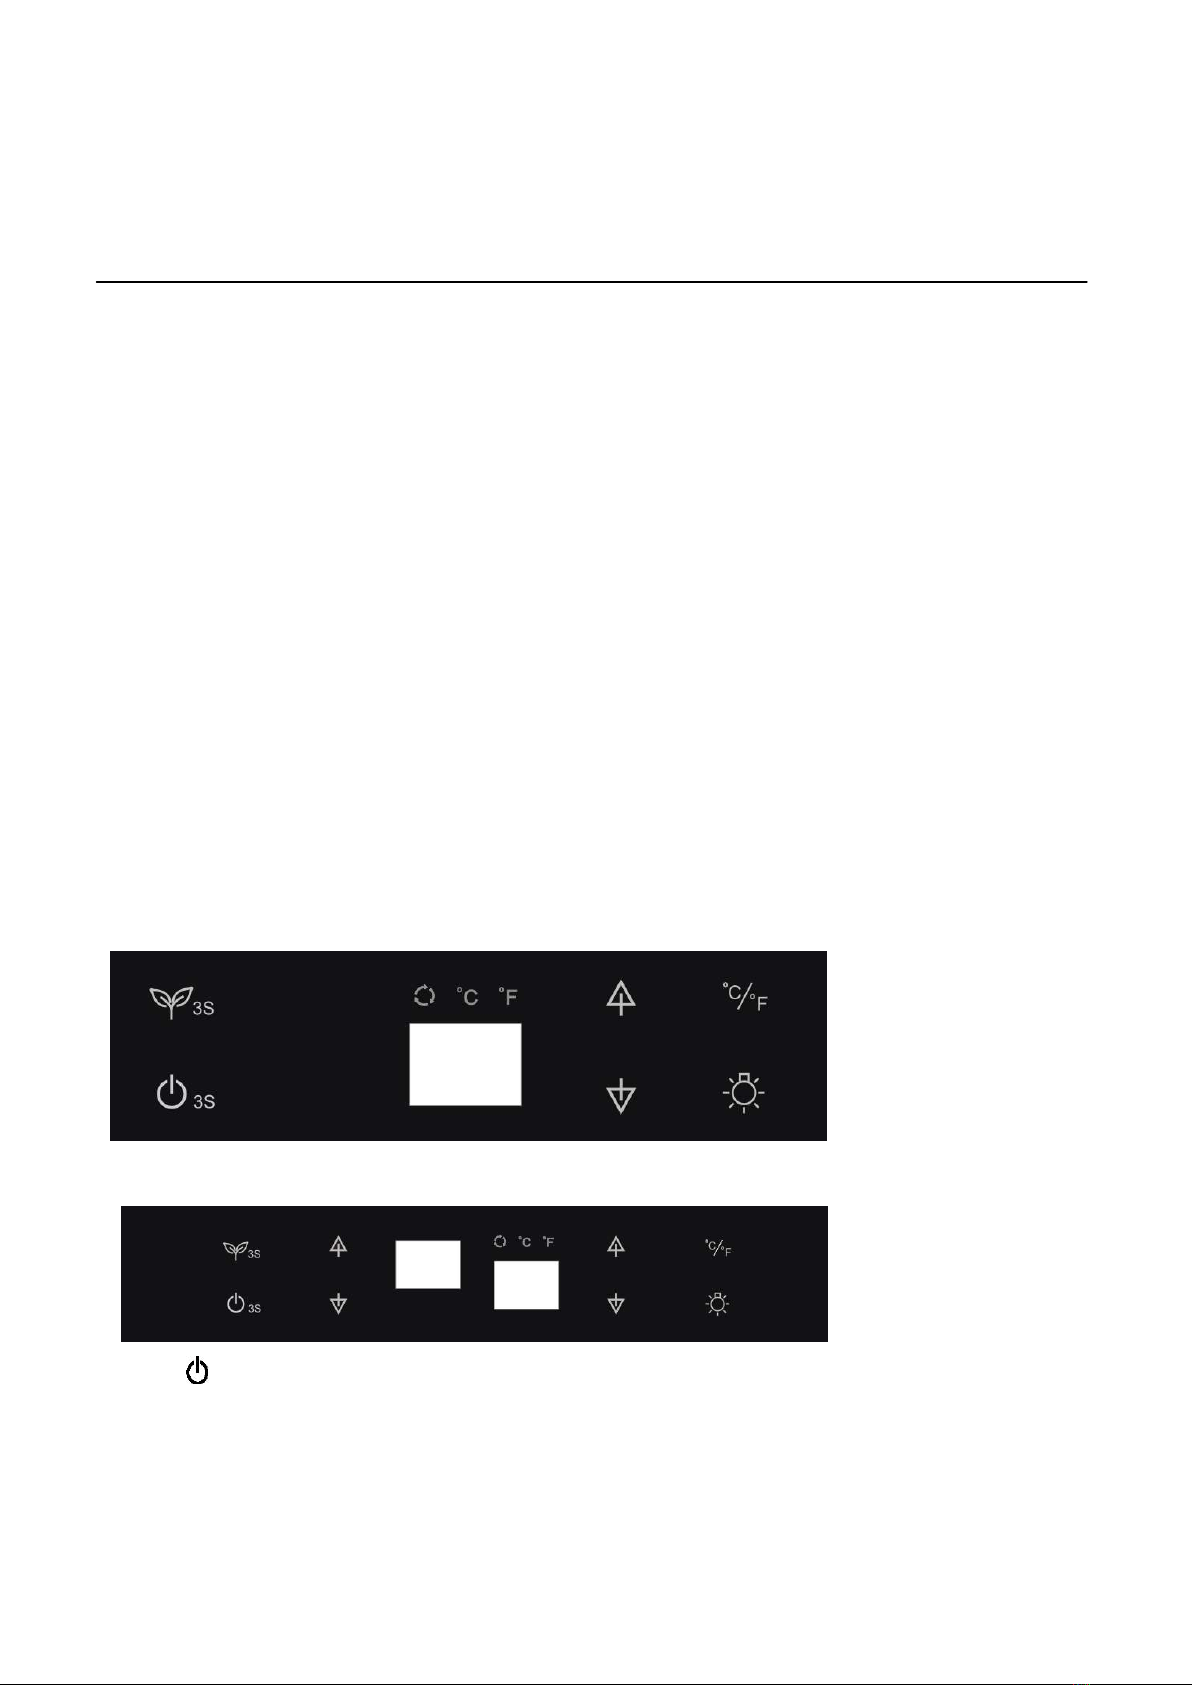
AWC18X、AWC2X
AWC165X、AWC166X
“ ” button to turn the unit ON and OFF, press and hold this button for approximately
3 seconds.

6
“ ” button Energy conservation button: Pressing this button for 3 seconds will turn the energy
conservation mode ON or OFF. In this mode, the LED light and display will turn off, and
the °C/°F light will be on.
“ “ indicator light: shows that the compressor is in operation.
“ ” button: It is used to increase (warm) the temperature in steps of 1°F (or 1°C).
“ ” button: It is used to decrease (cool) the temperature in steps of 1°F (or 1°C).
“°C/°F” button : press this button to switch the indicator light between° C/°F.
“ ” button: turns the interior light ON and OFF. If you use this button, the light is no longer
controlled by the switch, and remains ON.(Light button is useless when Energy conservation
button is on ) LED display Display screen shows the temperature setting.
WINE STORAGE
If you are storing wine for long periods of time, it should be stored at a temperature of between 10°C
and 14°C (50°F and 57°F). The following drinking temperatures are recommended for the various
types of wine:
Red wines: 57°F to +64°F (+14°C to +18°C)
Rosé wines: 50°F to +54°F (+10°C to +12°C)
White wines: 46°F to +54°F (+8°C to +12°C)
TEMPERATURE SETTINGS
The zone temperature may have a difference of +/- 5°F (+/- 3ºC) from the setting depending on
loading and ambient conditions. For example, placing your unit in extreme cold or hot conditions
may cause interior temperatures to fluctuate.
TO SET THE TEMPERATURE:
Use the / buttons to set the desired temperature. Each time the / buttons are
pressed, the temperature will increase / decrease by 1°F (or 1°C).

7
When you press the button once, the temperature will increase or decrease by 1°F (or 1°C). If
you try to go beyond the minimum/maximum value that can be established, the display will
jump to the lowest/highest adjustable temperature value automatically. If a button is not
pressed for 5 seconds, the LED will stop flashing and the setting mode will be exited.
You can set the temperature in the range of 39°F to 64°F (or 4°C to 18°C) .
FUNCTIONS
Temperature Memory Function
If the power is suddenly lost, the set temperature will be saved by the unit. Once the power is back on,
the unit will be at the same set temperature.
TEMPERATURE ALARM FUNCTION
If the interior temperature is higher than 73°F (23°C), “HI” is shown on the display panel and the
buzzer alarm sounds continuously after one hour. This indicates that the inner temperature is too
high, and you should look for the reason. If the inner temperature is lower than 32°F (0°C), “LO” is
shown on the display panel; the alarm and the malfunction indicator light go on at the same time.
NOTES
If too many bottles are put in at once or the door has not been closed tightly, the unit will display the
"HI" signal on the display panel. This is normal. Please wait 5 minutes after closing the door and
“HI” will disappear.
It is normal that the cabinet shows “HI” or “LO” from time to time. If it occurs frequently or lasts for a
long time, you can restart the unit by unplugging it, then re-plugging after 5 minutes. If the problem
occurs again after restarting, please contact customer service.
Before reconnecting the power, wait 3 to 5 minutes. Otherwise you could damage your appliance. If
you attempt to start the appliance before the end of this time delay, the appliance will not turn on.
If you turn on the appliance for the first time or after a restart, or after it has been out of
operation for a long time, there may be a temperature difference between the temperature inside
the appliance and that on the LED display. This is a normal event caused by the duration of the
activation period. Leave the appliance turned on for several hours and the temperatures will
stabilize during operation.
8
AWC45X
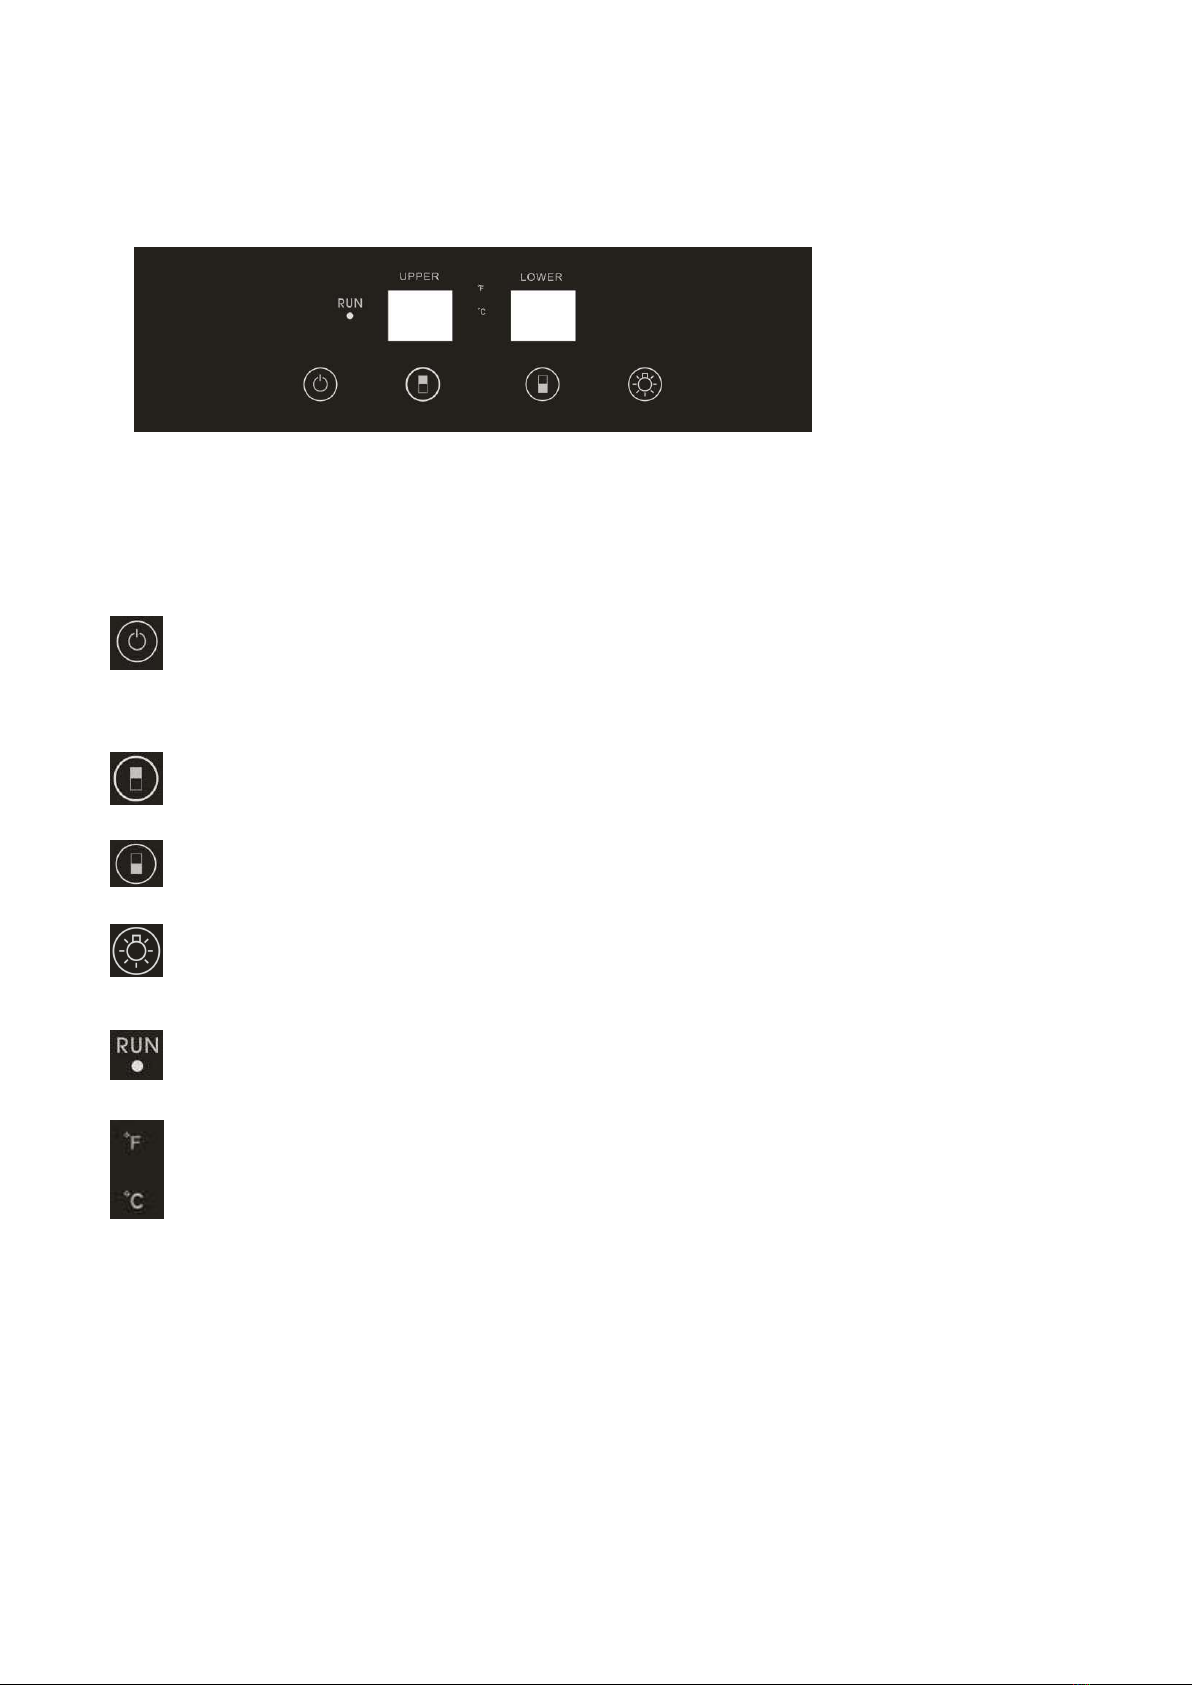
This wine cooler has a temperature range from 5°C to 18°C. The upper zone has a temperature range
of 5°C to 12°C, the lower zone has a temperature range of 12°C to 18°C
SELECTOR BUTTONS
POWER BUTTON: Press and hold down for three seconds to power your unit on, once
pressed the “Run” indicator light will illuminate to indicate the unit is on and running. Press and
hold for three seconds again and the unit will power off and the “Run” Indicator light will turn off .
UPPER ZONE TEMPERATURE: It is used to decrease (cool) the temperature in steps
of 1°F (or 1°C) for upper department
LOWER ZONE TEMPERATURE: It is used to decrease (cool) the temperature in steps
of 1°F (or 1°C) for lower department
INTERIOR LIGHT: Press this button to turn on the interior LED light. Press again to turn
the light off .
When lit, the unit is in cooling mode.
This unit can be displayed in Fanrenheit or Celsisus. To change between press and hold
the upper and lower zone temperature buttons at the same time for five seconds. A sound will
then beep and the indicator light will illiuminate next to desired temperature setting.
9
SHELVES
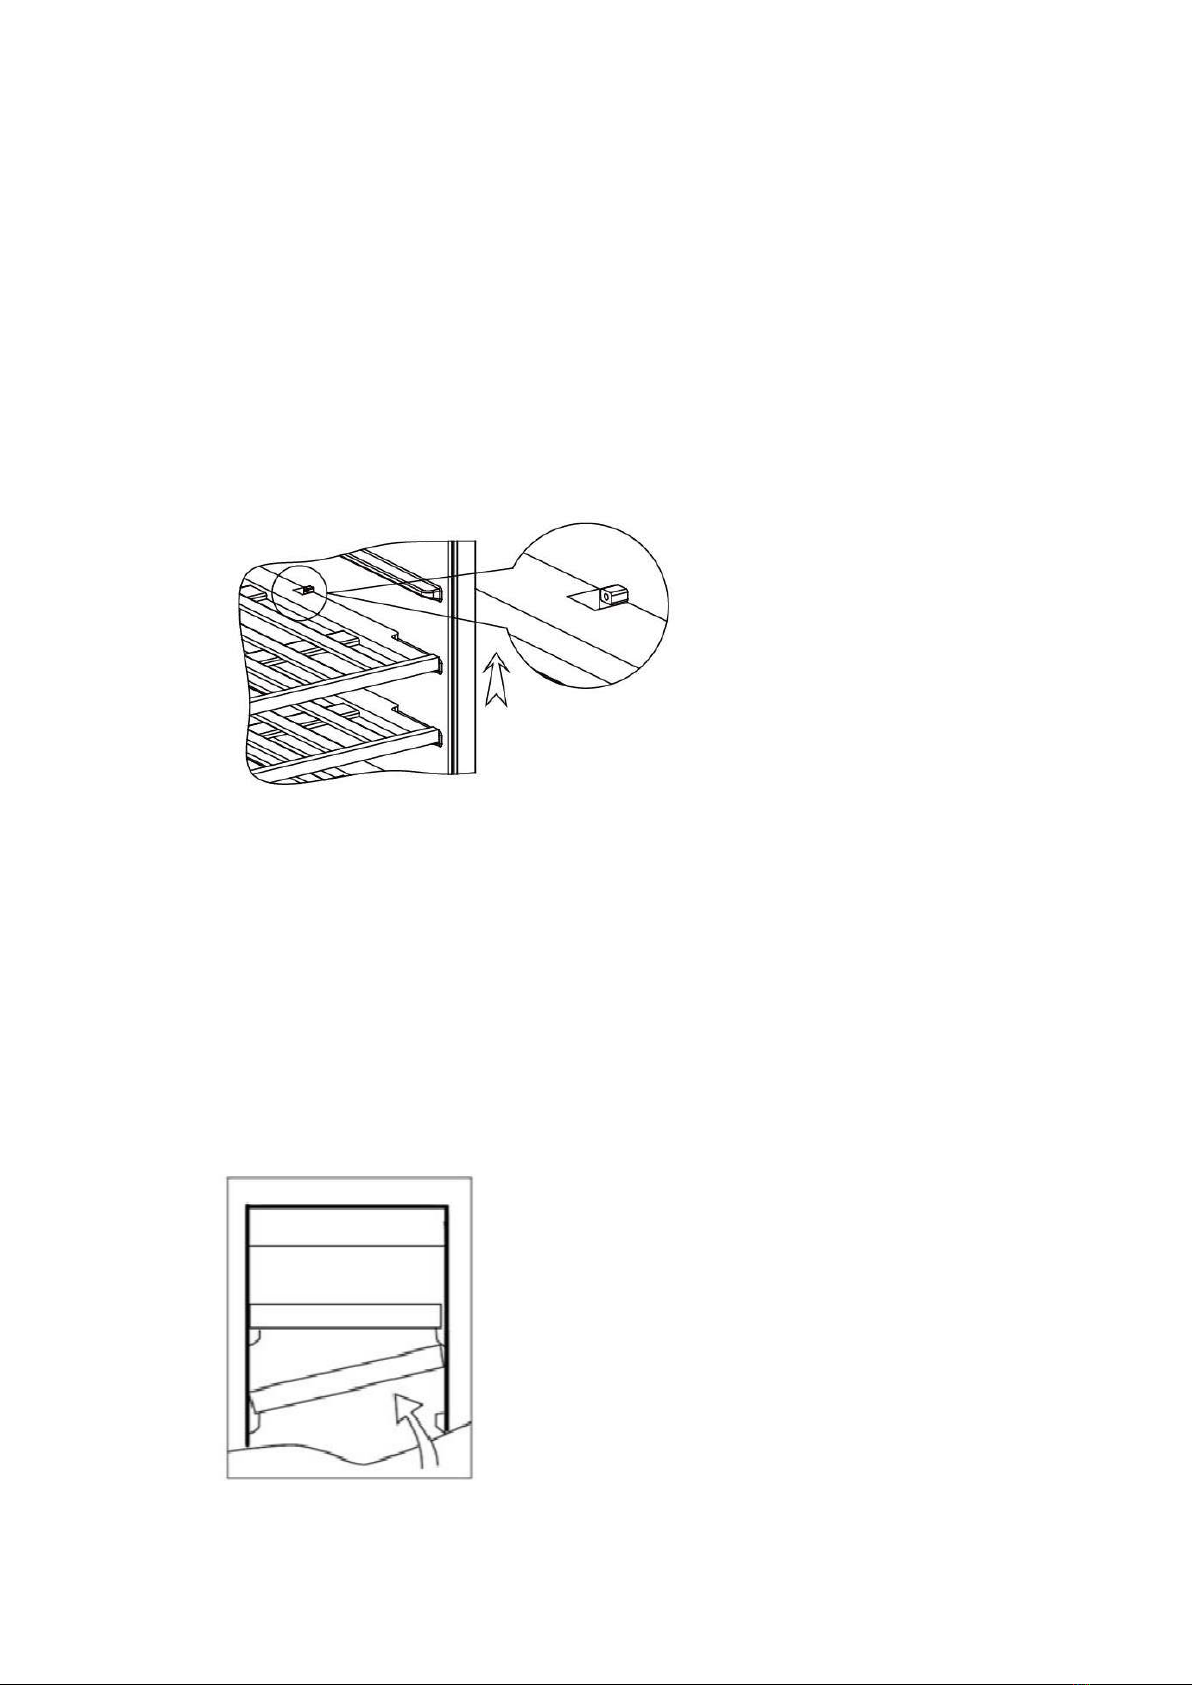
AWC165X、AWC166X
Open the door completely.
If necessary,make sure you remove all the contents sitting on the shelf.
Pull the shelf forward until the notch aligns with the metal post on each side of the shelf track.
Lift the shelf until both notches pass through the posts.
Continue to pull the shelf forward until it is completely removed from the inner compartment.
AWC18X、AWC2X、AWC45X
To prevent damaging the doors or gasket seals, open the doors wide when removing the shelves.
When removing any of these shelves out of the rail compartment, you must lift (from the rear)
and pull it towards you. To re-install, ensure the shelf is resting securely on the support brackets
and push shelf inward until it locks into place.
IMPORTANT: Do not cover the gap of glass shelves with aluminum foil or any other TYPE OF
material that will prevent adequate air circulation within the cabinet.
10
Installation specifications for built-in purposes
AWC18X
AWC2X
AWC45X
This manual suits for next models
4
Table of contents
Other Artusi Kitchen Appliance manuals


Popular Kitchen Appliance manuals by other brands

Tayama
Tayama TYG-35AF instruction manual

AEG
AEG 43172V-MN user manual

REBER
REBER Professional 40 Use and maintenance
North American
North American BB12482G / TR-F-04-B-NCT-1 Assembly and operating instructions

Presto
Presto fountain popper instruction manual

Westmark
Westmark 1035 2260 operating instructions