
General PalmScope DCS950 User manual

The PalmScope™
COMPACT RUGGED
VIDEO INSPECTION
SYSTEM
USER’S MANUAL
DCS950
Please read this manual carefully and
thoroughly before using this product.

• Long, flexible-obedient probe with
9mm diameter camera head
penetrates tight, hard-to-reach spaces
• 2.7 in. (69mm) high contrast color LCD
• Four camera-lighting L Ds produce
bright, crisp video
• Four screen controls for brightness,
1 to 4X zoom, 180° image flip
• Powered by four “AAA” batteries
(not included)
• On-screen low battery icon
• C and RoHS approved
• 1 year limited warranty
SAFETY I STRUCTIO S
Do not use The PalmScope to inspect
environments known or suspected to
contain exposed electrical wiring.
Do not use it in the presence of
flammable or explosive gases.
Never use the system to perform
medical inspections.
3
TABLE OF CO TE TS
Key Features . . . . . . . . . . . . . . . 2 –3
Safety Instructions . . . . . . . . . . . . . 3
What’s in the Package . . . . . . . . . . . 4
Product Overview . . . . . . . . . . . 4 –6
Setup Instructions . . . . . . . . . . 6 – 10
Install Batteries . . . . . . . . . . . 6 –7
Prepare the Probe . . . . . . . . . 7 –9
Attach Thread Protector
or Accessory . . . . . . . . . . . 9 – 10
Operating Instructions . . . . . . 10 – 12
Quick Start Procedure . . . . 10 – 12
Specifications . . . . . . . . . . . . 12 – 13
Maintenance Tips . . . . . . . . . 13 – 14
Warranty Information . . . . . . 14 – 15
Return for Repair Policy . . . . . . . . . 16
Guide de L'Utilisateur . . . . . . 18 – 35
Manual del Usuario . . . . . . . . 37 – 54
KEY FEATURES
• Fits in your pocket or clips to your belt
• Probe coils inside case for storage
• Drop-proof from height of 1m (39 in.)
2

Fig. 1. The PalmScope, the four probe
tip accessories, and the nylon pouch
with belt clip
Inside the pouch is a small plastic bag
containing the following probe tip
accessories:
A. Pickup hook B. 45° mirror
C. Magnetic pickup D. Thread protector
Fig. 2. The controls, indicators and
back of The PalmScope
A. LCD
B. button. Increases brightness of
L D lights
C. button. Inverts video
180°
D. button. Powers
unit on and off
5
WHAT’S I THE PACKAGE
The PalmScope and its accessories
come in a blister pack. In addition to the
instrument, the package contains:
• A plastic bag containing the four probe
tip accessories: the 45° mirror, pickup
hook, magnetic pickup, and thread
protector
• A nylon pouch with a belt clip
• This user’s manual
PRODUCT OVERVIEW
Fig. 1 shows The PalmScope and its
accessories. Fig. 2 shows the positions
of its display, controls and
physical structures.
Familiarize yourself with
their names and functions
before moving on to the
Setup Instructions and
Operating Instructions.
4

To install batteries,
Use a Phillips-head screwdriver to
loosen the two screws securing the
battery compartment cover (Fig. 2,
Callout N). Remove the cover and set
it aside.
Load four “AAA” batteries into the
compartment, using the polarity
markings within it as a guide
Replace the battery compartment cover
and secure it by tightening the Phillips-
head screws.
PREPARE THE PROBE
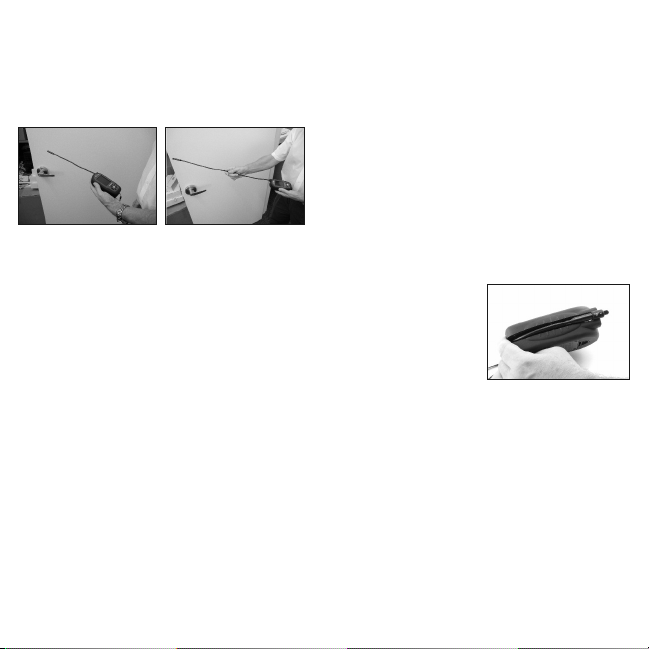
To gain access to
the probe, flip the
PalmScope over so
its back faces you,
place your thumb
and index finger at
the positions marked
OPE (Fig. 2, Callout L), and gently
squeeze the latches (see figure above).
The clamshell case will pop open.
Note that the probe is tightly wrapped
within a twisting channel that makes
two full turns around the inside of the
clamshell. The probe can be uncoiled
7
. button. nlarges video
frame up to 4X. ach
button press increases
zoom level by factor of
0.5
F. button. Decreases
brightness of
4 camera L D lights
G. Lanyard attachment bar
H. Lens cap
I. Camera head
J. Flexible-obedient
probe
K. Probe exit port
L. Clamshell latches
M. Battery compartment
N. Battery compartment
screws
SETUP I STRUCTIO S
INSTALL BATTERIES
The PalmScope’s battery compartment
(Fig. 2, Callout M) is accessible from the
back of the unit.
6
N
K
L
M
interlock prevents The PalmScope from
being powered on with the clamshell
open.
To re-coil the probe,
watch the video clip posted at
https://www.youtube.com/watch?v=UCQ
WypOX75c
It’s important to note that when re-
coiling the probe from either its short or
long extended length, you must wrap it
very tightly within the channel. If the
camera head has not cleared the probe
exit port as you
finish wrapping the
probe (see photo
at right), you will
not be able to
squeeze the clamshell shut. You must
start over.
ATTACH THREAD PROTECTOR
OR ACCESSORY
The PalmScope comes with four
accessories that screw onto the camera-
tipped end of the probe. ach accessory
has a specific purpose:
• The 45° mirror lets the probe see
around corners.
98
to either of two working lengths (see
photos below). Unwrapping only one full
turn will make the probe 12.5 in. long.
Unwrapping both turns will make the
probe 24 in. long.
ach length incurs a tradeoff of probe
reach vs. probe rigidity. A longer probe is
obviously better for inspecting distant
objects. But when uncoiled to its
maximum length of 24 in., the probe
sags from its own weight, preventing it
from being extended horizontally. If the
12.5 in. length is sufficient to reach most
of your inspection targets, select that
shorter length; at 12.5 in., the probe is
light enough to be extended horizontally.
Whichever probe length you choose,
before you can use the unit you must
re-coil the unextended section of probe
within the channel inside the clamshell
and then squeeze the clamshell shut. To
protect the internals of the unit from
being damaged by a fall, an electrical

first time, carefully peel off and discard
the plastic film protecting the LCD.
2. Remove the black rubber lens cap
(Fig. 2, Callout H) from the end of the
probe.
3. Press and hold the button (Fig. 2,
Callout D) for at least 3 seconds to
power on the unit and illuminate
the LCD.
4. Point the camera-tipped end of the
probe at the target of interest, pushing
the probe through holes or bending
the probe around objects if necessary.
Avoid bending the delicate probe
excessively; this will damage it.
5. Press the button (Fig. 2, Callout B)
to increase the brightness of the
camera’s L Ds
6. Press the button (Fig. 2, Callout F)
to decrease the L Ds’ brightness
7. Press the button (Fig. 2, Callout C)
to flip the video (rotate it 180°). Press
the button again to undo the
inversion. Use the arrow stenciled on
the camera head to orient video up
and down (for example, to read text or
serial numbers).
11
• The pickup hook lets you retrieve
otherwise inaccessible items seen by
the probe—for example, a wedding
ring accidentally dropped down a sink
drain.
• The magnetic pickup lets you retrieve
lost or dropped metal objects—nuts
and bolts, for example—located by the
probe.
• The thread protector keeps the camera
head and its threads from being
scratched or damaged by anything the
probe bumps into.
Attach the thread protector before you
use The PalmScope for the first time.
Remove it before attaching any of the
three other accessories. Reattach the
thread protector after removing an
accessory. Never expose the threads of
the probe tip to the dangers of an
inspection session.
OPERATI G
I STRUCTIO S
QUICK START PROCEDURE
1. Before you use the PalmScope for the
10

Camera Head Diameter: 9mm (0.35 in.)
Probe Length & Type: 2 ft. (0.6m)
flexible-obedient
Camera Field of View: 60°
Camera Depth of Field: 1 in. to 10 ft.
(25mm to 3m)
Camera Light Source: 4 adjustable-
brightness white L Ds
Impact Resistance: From height of 1m
(39 in.)
Probe/Camera Head Water & Dust
Resistance Level: IP67
Battery Life: >3 hours (typical)
Operating Temperature/Humidity: 32° to
113°F (0° to 45°C) @ 5 to 95% RH
Dimensions: 5.4 x 2.9 x 1.5 in.
(136 x 73 x 39mm)
Weight of Grip: 9 oz. (250g)
Power Source: Four “AAA” batteries
(not included)
MAI TE A CE TIPS
• The camera at the tip of the probe is a
sensitive, sophisticated device. Do not
use the probe as a hammer or to clear
debris.
13
8. Press the button to enlarge the
video frame. The first press of the
button enlarges the frame 50%,
corresponding to a zoom level of 1.5X.
“X 1.5” will appear in light blue at the
bottom right of the screen. Push the
button several times to zoom in closer
at a level of 2.0X, 2.5X, 3.0X, 3.5X and
4.0X. The next push of the button
reverts to normal size (1X) viewing.
To power off The PalmScope, press and
hold the button for at least 3 seconds.
The PalmScope is designed to be
powered for several hours by the same
set of four “AAA” batteries. A (low
battery) icon will appear on-screen when
the total battery charge drops below an
operational threshold. To replace the
batteries, follow the procedure on
pages 6 and 7 of this manual.
SPECIFICATIO S
Display Size/Type: 2.7 in. (69mm)
diagonal TFT color LCD
Display Resolution: 320 x 240 pixels
Monitor Controls: 180° flip, 1X to 4X
zoom in 6 steps, brightness + and –
12

one year from the date of purchase.
General will replace or repair the
defective unit, at its option, subject to
verification of the defect.
This warranty does not apply to defects
resulting from abuse, neglect, accident,
unauthorized repair, alteration, or
unreasonable use of the product.
Any implied warranties arising from the
sale of a General product, including but
not limited to implied warranties of
merchantability and fitness for a
particular purpose, are limited to the
above. General shall not be liable for loss
of use of the product or other incidental
or consequential damages, expenses, or
economic loss, or for any claim of such
damage, expenses, or economic loss.
State laws vary. The above limitations or
exclusions may not apply to you.
We encourage you to register your
product online. General will extend your
warranty an additional 60 days if you
register at
www.generaltools.com/ProductRegistry.
15
• Do not insert or bend the probe by
force. Over-bending any section of the
probe to a radius of less than 2 in.
(50mm) many permanently damage
delicate internal cables.
• Remember to power off The
PalmScope after each inspection
session.
• Do not get water on the LCD.
• Do not bring the camera into contact
with acid, fire or hot objects by using
the probe in a corrosive or extremely
hot environment.
• Avoid getting oil or gas on the camera
head by shutting off vehicles during
inspections.
• If condensation forms inside the
camera lens, let it evaporate before
using the system again.
• Remove the batteries if planning to
store the unit for months or longer.
WARRA TY I FORMATIO
In the U.S, General warrants its
instruments and accessories against
defects in material or workmanship for
14

17
GENERAL TOOLS
& INSTRUMENTS
80 White Street ew York, Y 10013-3567
PHO E (212) 431-6100 FAX (212) 431-6499
TOLL FREE (800) 697-8665
e-mail: [email protected]
www.generaltools.com
DCS950 User’s Manual
Specifications subject to change without notice
©2014 GENE AL TOOLS & INST UMENTS
NOTICE - WE A E NOT ESPONSIBLE
FO TYPOG APHICAL E O S.
MAN# DCS950
7/22/14
General Tools & Instruments
GeneralToolsNYC
RETUR FOR
REPAIR POLICY
very effort has been made to provide
you with a reliable product of superior
quality. However, in the event your
instrument requires repair, please
contact our Customer Service to obtain
an RGA (Return Goods Authorization)
number before forwarding the unit via
prepaid freight to the attention of our
Service Center at this address:
General Tools & Instruments
80 White Street New York, NY 10013
212-431-6100
Remember to include a copy of your
proof of purchase, your return address,
and your phone number and/or e-mail
address.
16

TABLE DES MATIÈRES
Caractéristiques principales . . . 19 – 20
Consignes de sécurité . . . . . . . 20 – 21
Contenu de l'emballage . . . . . . . . . . 21
Vue d'ensemble du produit . . . . 21 – 24
Instructions de mise en marche
. 24 – 28
Insertion des piles . . . . . . . . . . . . . 24
Préparation de la sonde . . . . . 25 – 27
Installation du protecteur de
filetage ou d'un accessoire
. . . 27 – 28
Instructions d'utilisation . . . . . . 29 – 31
Procédure de démarrage
rapide . . . . . . . . . . . . . . . . . 29 – 31
Spécifications . . . . . . . . . . . . . 31 – 32
Conseils d'entretien . . . . . . . . . 32 – 33
Renseignements concernant
la garantie . . . . . . . . . . . . . . 33 – 34
Politique de retour pour réparation . . 35
CARACTÉRISTIQUES
PRI CIPALES
• Se range dans la poche ou s'agrafe à
la ceinture
• La sonde s'enroule dans le boîtier
pour le rangement
19
SYSTÈME
D'INSPECTION VIDÉO
COMPACT ROBUSTE
PalmScopeMC
GUIDE DE L'UTILISATEUR
DCS950
Lisez attentivement le présent guide
avant d'utiliser ce produit.
18
Table of contents
Languages:
Other General Measuring Instrument manuals

General
General XL4 MKII User manual

General
General DSM8925 User manual

General
General FD08 User manual

General
General DAMP60 User manual

General
General CT6235B User manual

General
General DAF3009 User manual

General
General CDM77535 User manual

General
General WDCFM8912 User manual

General
General MM7 User manual

General
General PCT2236B User manual

General
General PTH8707 User manual

General
General DT4208SD User manual

General
General DT4208SD User manual

General
General GMK-05-MB User manual

General
General UV254SD User manual

General
General MM9 User manual

General
General MM1E User manual

General
General DTH3007SD User manual
General
General UV512C User manual

General
General DLAF930S User manual


