Vortex Razor HD 4000 GB Instruction manual

QUICK START MANUAL
2 3
RAZOR®HD 4000 GB
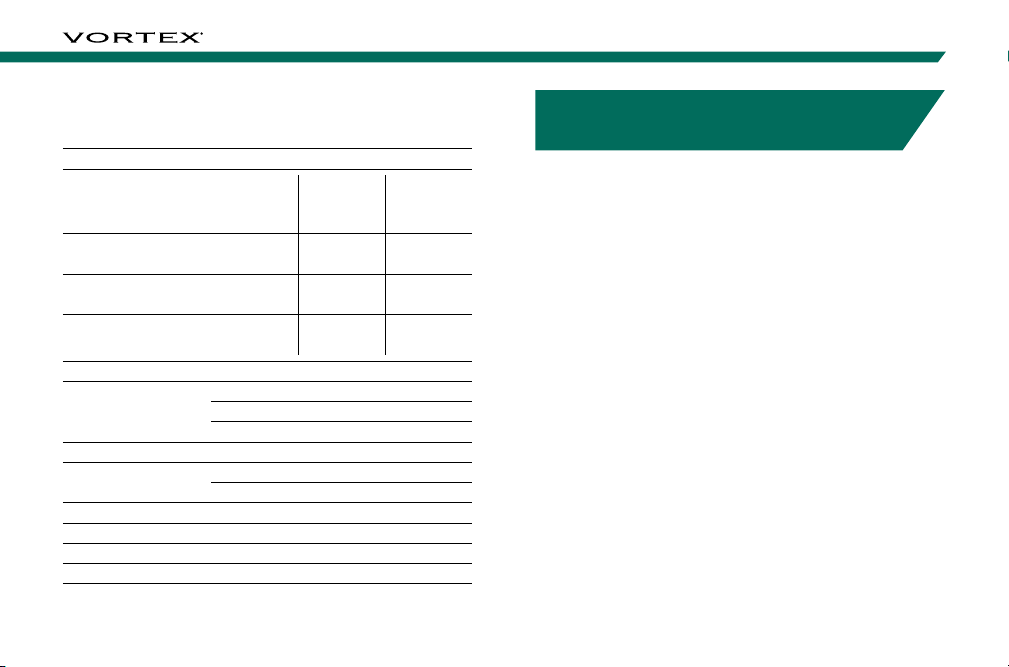
Specifications
MAGNIFICATION 7x
OBJECTIVE LENS 25mm
MAX
REFLECTIVE
RANGE
TREE RANGE DEER RANGE
NORMAL MODE Up to 2400 yds.
(2195m)
Up to 1800 yds.
(1646m)
Up to 1600 yds.
(1463m)
NORMAL MODE (SCAN) Up to 2400 yds.
(2195m)
Up to 2200 yds.
(2012m)
Up to 2000 yds.
(1829m)
ELR MODE Up to 4000 yds.
(3658m)
Up to 2500 yds.
(2286m)
Up to 2200 yds.
(2012m)
MINIMUM RANGE 5 yds. (4.5m)
ACCURACY
± 0.5 yds. @ <200 yds.
± 1 yd. @ ≥200 yds. & ≤1000 yds.
± 2 yds. @ >1000 yds.
MAXIMUM ANGLE READING ± 70°
FIELD OF VIEW Linear @ 1000 yds. 341'
Angular 6.5°
EYE RELIEF 19mm
BATTERY TYPE CR2
LENGTH, HEIGHT, WIDTH 4.4" (111.8mm), 3.2” (81.3mm), 1.9” (48.3mm)
WEIGHT W/ BATTERY 10.1 oz. (286.3g)
RAZOR®HD 4000 GB
BALLISTIC LASER RANGEFINDER
The Razor®HD 4000 GB is an essential companion for
the extreme hunter, and shooter. The angle compensated
ballistic laser rangefinder features four targeting modes
(Normal, First, Last, and ELR) and two ranging modes,
Horizontal Component Distance Mode (HCD) and Ballistics
Mode (BAL), for any ranging environment. Using an array
of built-in environmental sensors in conjunction with the
state-of-the-art GeoBallistics®solver and patented Vortex®
Wind Bearing Capture Mode, the Razor®HD 4000 GB will
raise your level of long-range precision shooting ability to a
new height.
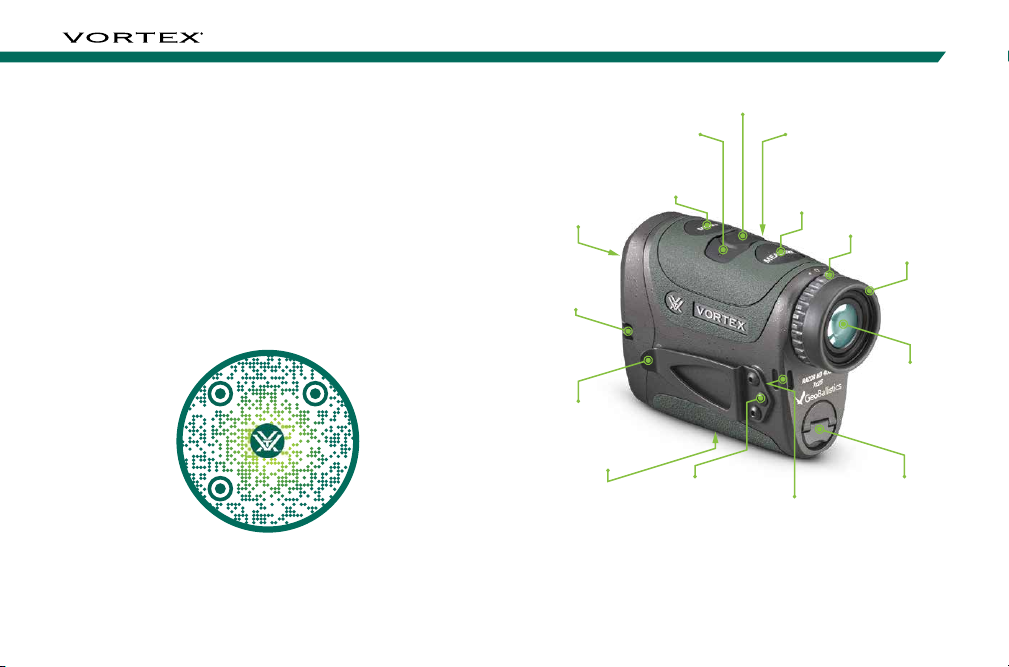
The Razor®HD 4000 GB pairs, via Bluetooth®, with your
mobile device and the GeoBallistics®App. Scan QR code
on the next page to download the GeoBallistics®App with
your Apple or Android device.
4 5
RAZOR®HD 4000 GB
In order to have accurate compass readings with your
Razor®HD 4000 GB, it is highly recommended to
calibrate the Razor®HD 4000 GB during initial setup
and should be re-calibrated every time you significantly
change location, typically 30 miles or more. Calibration
must be performed outside and away from large metal
structures or objects. See the Product & Ballistic Manual
via the QR code for more information on how to calibrate
your Razor®HD 4000 GB using the GeoBallistics®App.
Scan the QR code below to access the Product &
Ballistics Manual and instructional videos.
M
A
N
U
A
L
S
A
N
D
I
N
S
T
R
U
C
T
I
O
N
A
L
V
I
D
E
O
S
Measure
Button
Right Hand Wind
Direction Button
Left Hand Wind
Direction Button
Wind Bearing Capture Button
Menu Button
Utility Clip
Objective Lens
Environmental
Sensor
Tripod Adapter
Socket
Utility Clip
Plate
Battery
Compartment
Wrist Lanyard
Attachment Socket
Diopter
Focus Adjustable
Eyecup
Ocular Lens
Images are for representation only.
Product may vary slightly from what is shown.

6 7
RAZOR®HD 4000 GB
BASIC OPERATION
Battery Installation and Replacement
To insert a new battery, flip up
the finger tab on the Battery Cap
and unscrew, counterclockwise,
to remove. Insert a CR2 battery
with the positive side (+) facing
outwards. Reinstall Battery Cap
and ensure it is tightly closed.
Power Up
Once the battery is installed, the Razor®HD 4000 GB is in
ready condition – the normal power-off condition when not
ranging. To power up the Razor®HD 4000 GB from ready
condition, press and release the “Measure” button. The
HCD or BAL ranging screen will display. The auto-shutoff
feature can be adjusted to 30, 45, 60, or 180 seconds.
See the Auto-Shutoff section on page 16.
Battery Cap
Low Battery Icon
The Low Battery Icon displays
once the battery reaches 25%
life and stays on until there is no
power or the battery is replaced.
Adjust the Eyecup
The Adjustable Eyecup on the Razor®HD 4000 GB
twists in and out so any viewer can see the full field and
enjoy comfortable viewing and ranging – with or without
eyeglasses. When not using eyeglasses or sunglasses, it is
recommended to keep the eyecup fully extended. For best
viewing when wearing eyeglasses, twist eyecup in to allow
closer contact to your glasses.
Focus
Adjust the Diopter
until the image is
sharp. Make note of
this Diopter setting in
case you need to set
it again.
Low Battery
Diopter Focus
Adjustable
Eyecup

8 9
RAZOR®HD 4000 GB
Attaching the Wrist Lanyard
The Lanyard provides a secure way
to carry your rangefinder.
Utility Clip
The Razor®HD 4000 GB comes with a Utility Clip on the
unit’s left-hand side. You can switch the side of the Utility
Clip by unscrewing the 2mm hex screws on the left-hand
side, and the 2mm hex screws on the right-hand side of the
unit. Reinstall the Utility Clip on the right-hand side of the
unit and the Utility Clip Plate on the opposite side of the
unit with the 2mm hex screws.
2mm
Hex Screws
Utility Clip
Loop Lanyard
through one of the
Attachment Sockets
MODE SELECTION
Changing Modes on the Razor®HD 4000 GB
The Razor®HD 4000 GB is factory set to the angle
compensating HCD Range Mode, Normal Target Mode,
Brightness Level 4, default Auto-Shutoff at 30 seconds,
and distance to the target displayed in Yards.
To Change Modes
Press and release the
“Measure” button to power
on the unit, and then press
and hold the “Menu”
button for at least four
seconds. Once the Mode
Selection screen displays,
release the button.
As you progress through
Mode Selection, you may
exit at any time and save
your settings by pressing
and holding the “Menu” button for at least four seconds —
The unit will then return to the power-up condition.
Use the “Menu”
button to activate
the Mode/Display
Selection displays.
Use the “Measure”
button to toggle
through each Mode
Selection options.

10 11
RAZOR®HD 4000 GB
Last Mode
This mode displays the farthest distance when panning and
scanning. It is ideal for ranging a specific target behind a
group of objects, such as rocks, trees, brush, etc.
Scanning and Panning from Left to Right
Initial range
captured on trees.
Range captured on
closer elk.
Scanned to further
trees. Range remains
locked on closer elk.
Scanning and Panning from Left to Right
Initial range
captured on trees.
Range captured on
farther elk.
Scanned to closer
trees. Range remains
locked on farther elk.
Target Mode Selection
The Razor®HD 4000 GB provides four target modes:
Normal Mode, First Mode, Last Mode, and Extended Laser
Range (ELR) Mode.
After activating the Mode Selection, press the “Measure”
button to toggle between Normal Mode, First Mode, Last
Mode, and Extended Laser Range (ELR) Mode. Press the
“Menu” button to save your desired choice and continue
through to the Ranging Mode Selection screen.
Normal Mode
The Razor®HD 4000 GB comes preset to Normal Mode.
This is the standard mode providing the target’s range
with the strongest range result. Normal Mode is the
recommended target mode for most situations.
First Mode
This mode displays the closest distance when panning
and scanning. It is ideal for ranging a smaller target in
front of other larger or more reflective objects.

12 13
RAZOR®HD 4000 GB
Extended Laser Range (ELR) Mode
This mode allows for ranging smaller, less reflective targets
at extended distances. It is ideal for ranging when Normal
Mode is unable to obtain a desired range. A longer response
time may be required to receive the desired range. For best
results, it is recommended to be used on a tripod.
Ranging Mode Selection
Choose Between the HCD and BAL Modes
Press the “Measure” button to toggle between the HCD
and BAL displays. Press the “Menu” button to save your
desired choice and continue through to the Range Unit
Selection screen.
BAL ModeHCD Mode
HCD Mode
The Horizontal Component Distance Mode (HCD) will be
your primary mode when not using the on-board ballistic
solver. The yardage number displayed is the critical
horizontal component distance. The displayed HCD
yardage number is corrected for shot angle and needs
no extra user input; shooters simply use the appropriate
level ground bullet drop for the range displayed and shoot.
Archers use the appropriate level ground sight pin for the
range displayed.
Note: To correctly account for wind, you need to know the line
of sight distance to the target as it is based on how far the arrow
or bullet travels to the target. This can be achieved using the
BAL Mode.
Horizontal Component
Distance: 385 Yards
500 Yard Line of Sight

14 15
RAZOR®HD 4000 GB
BAL Mode
When in Ballistics (BAL) Mode,
an additional number is displayed
above the range number. This
number is slope incline shown
in degrees.
This number is automatically
calculated into the wind/drop
solution provided in the display and in the GeoBallistics®
App. If you are not using the on-board solver, enter the
slope incline number into ballistic programs or field cards
to help calculate precise bullet drop in mountainous
terrain. To use the Razor®HD 4000 GB on-board ballistic
solver, you need to be in BAL Mode.
Range Unit Selection
Press the “Measure” button to toggle between the
Yards and Meters display. Press the “Menu” button to
save your desired choice and move to the Brightness
Selection screen.
MetersYards
Brightness Selection
Choose Between Five Brightness Settings
The Razor®HD 4000 GB features
five Brightness Settings. Press the
“Measure” button to toggle through
the five Brightness Settings. Press
the “Menu” button to save your
desired setting and move to the
Auto-Shutoff screen.

16 17
RAZOR®HD 4000 GB
Auto-Shutoff
The Razor®HD 4000 GB offers
four Auto-Shutoff program options:
30 seconds, 45 seconds, 60
seconds, and 180 seconds. Press
the “Measure” button to select
the Auto-Shutoff time. If you are
in HCD Mode, this will be the
last Mode Selection. Press and
hold the “Menu” button for four
seconds to save and exit Mode Selection. Press the “Menu”
button to save your desired choice and return to Target
Mode Selection or continue through to Profile Selection
screen (BAL Mode only).
Ballistic Profile Selection (Only Available in BAL Mode)
Select the Ballistic Profile for the wind/drop solution to be
displayed when in BAL Mode. Press the “Measure” button
to toggle between the three different profile selections: “A”,
“B”, or “C”. See Ballistic Profile Information in the Product
& Ballistics Manual via the QR code on the next page for
more information and how to set up and select a Ballistic
Profile. Press the “Menu” button to save your desired
choice and continue through to the Bluetooth®Selection
screen (BAL Mode only).
Profile A Profile B Profile C
P
R
O
D
U
C
T
&
B
A
L
L
I
S
T
I
C
S
M
A
N
U
A
L

18 19
RAZOR®HD 4000 GB
Bluetooth®Selection (Only Available in BAL Mode)
The Razor®HD 4000 GB is equipped with a Bluetooth®
chip to allow the unit to wirelessly pair with Kestrel®
wind meters and the GeoBallistics®App. Navigate to the
Bluetooth®display in the menu and press the “Measure”
button to turn Bluetooth®on/off. Press the “Menu”
button to save your desired choice and continue through
to the Temperature Selection screen (BAL Mode only).
Note: The Bluetooth®icon (
) will blink when looking for a
connection and remain on when connected to a compatible
peripheral device once you exit the menu.
Bluetooth
®
On Bluetooth
®
Off Bluetooth
®
On Example
Temperature Selection (Only Available in BAL Mode)
Temperature can be displayed in Celsius (˚C) or Fahrenheit
(˚F). Navigate to the Temperature display in the menu and
press the “Measure” button to select “C” or “F.” Press the
“Menu” button to save your desired choice and continue
through to the Pressure Selection screen (BAL Mode only).
CelsiusFahrenheit
Other manuals for Razor HD 4000 GB
1
Table of contents
Other Vortex Measuring Instrument manuals

Vortex
Vortex Viper HD 3000 User manual

Vortex
Vortex BLUEONE BWO 155ZM User manual

Vortex
Vortex Diamondback HD 2000 User manual

Vortex
Vortex Razor HD 4000 User manual

Vortex
Vortex Impact 850 User manual

Vortex
Vortex Viper HD 3000 User manual

Vortex
Vortex IMPACT 4000 Instruction manual

Vortex
Vortex Crossfire HD 1400 User manual

Vortex
Vortex Razor HD 4000 GB User manual

Vortex
Vortex Razor HD 4000 User manual


