Shakmat Bishop's miscellany User manual

DUAL STEPPED CV/GATE RECORDER
BUILDING GUIDE

Table of Contents
01. Components List + Tools
02. Panel Sides
03. Important Note
04. Step by Step Assembly
04_1. Diodes
04_2. Flat Resistors
04_3. Capacitors
04_4. Quartz
04_5. 78L05
04_6. Standing Resistors
04_7. Jack Connectors
04_8. IC Sockets
04_9. Power Supply Header
04_10. Potentiometers
04_11. LEDs
04_12. Switches
04_13. ICs
04_14. Testing

01. Components List + Tools
Resistors
6,8 kΩ
X14 — Pack 1/5
x12 on V2 kit
100 kΩ
X6 — Pack 2/5
1 kΩ
X4 — Pack 1/5
1 MΩ
X2 — Pack 1/5
22 Ω
X1 — Pack 1/5
33 kΩ (V2 kit only)
X2 — Pack 2/5
Capacitors
22 pF
X2 — Pack 2/5
C1, C2
100 nF
X1 — Pack 1/5
C3
Diodes
1N4148
X9 — Pack 2/5
D1 → D9
1N4742 Zenner
X1 — Pack 1/5
D10
Quartz
16 MHz
X1 — Pack 2/5
Q1
Switches
X4 — Pack 3/5
S1 → S4
Switches Nuts
X4 — Pack 4/5
On switches
Potentiometers
X2 — Pack 3/5
P1, P2
Potentiometers Nuts
X2 — Pack 4/5
on potentiometer
M3 Screws
X4 — Pack 4/5
on panel
Chroma Caps Knobs
X2
on potentiometers
PCB
X1 — Pack 5/5
Aluminum Panel
X1 — Pack 5/5
Power Ribbon Cable
X1
Tools
Soldering Iron
Solder
Cutting Pliers
Masking Tape
Multimeter
LEDs
Green LED
X2 — Pack 2/5
L1, L2
IC’s
8 Pin IC Socket
X1 — Plastic Tubbing or bag
IC3
LM358 OpAmp
X1 — Plastic Tubbing
on IC3
14 Pin IC Socket
X1 — Plastic Tubbing or bag
IC4
MCP4922
X1 — Plastic Tubbing
on IC4
28 Pin IC Socket
X1 — Plastic Tubbing or bag
IC1
ATMEGA328
X1 — Plastic Tubbing
on IC1
78L05
X1 — Pack 2/5
IC2
Miscellanous
Power Supply Header
X1 — Pack 2/5
PSH
Jack Connectors
X16 — Pack 3/5
J1 → J16
Jack Knurled Nuts
X16 — Pack 4/5
on jack connectors

02. Panel Sides
The front of the PCB is the one with the switches, jack connectors
and potentiometers on it. The top of the board is the connectors
side, the bottom is the switches side. Almost all the components
goes to the front of the PCB. Here is a list of the components that
goes to the rear side :
• 1 x 8 pin socket + IC
• 1 x 14 pin socket + IC
• 1 x 28 pin socket + IC
• Power supply header
Front Rear
SHAKMAT MODULAR
BISHOP’S MISCELLANY V1.1
D3
D9
R11
J10
R17
J6 J7
R4
J8
R21
R12
J11
R13
J12
R14
R18
J14
J1
R24
R22
D7
J9
D5
J13
R1
D10
P1
D8
J15
J16
D4
D2
PSH
IC1
D1
R2
C3
P2
R15
R16
R25
L1
R19
R20
Q1
R27
R5
R23 R3S1 S3 S4S2 R6
R7 R8J5 J3 J4 R10J2 R9
IC2
C2
C1
D6
R26
L2
IC4
IC3

If you feel you're going to build this kit without looking at the steps, just
remember this : don't solder the switches without placing them into the
front panel first. If you don't want the final PCB & front panel assembly
becoming a real pain, do this, seriously. We also strongly recommand to
have a look to the step 04_10 that require unexpected cuts on the poten-
tiometers.
There's two kind of diodes : 9 tiny
ones (1N4148) and a bigger one
(Zenner 1N4742) that goes to
the left of LENGTH potentiome-
ter.
Diodes orientation has to match
the PCB silkscreen. The white
line on the silkscreen has to
match the black bar on the com-
ponent, as show here :
03. Important Note
04. Step by Step Assembly
04_1. Diodes
White line
on PCB
Black line on
component
1N4148
X9 Pack 2/5
A
A
A
AAAA
A
A
A
Zenner B
B
X1 Pack 1/5
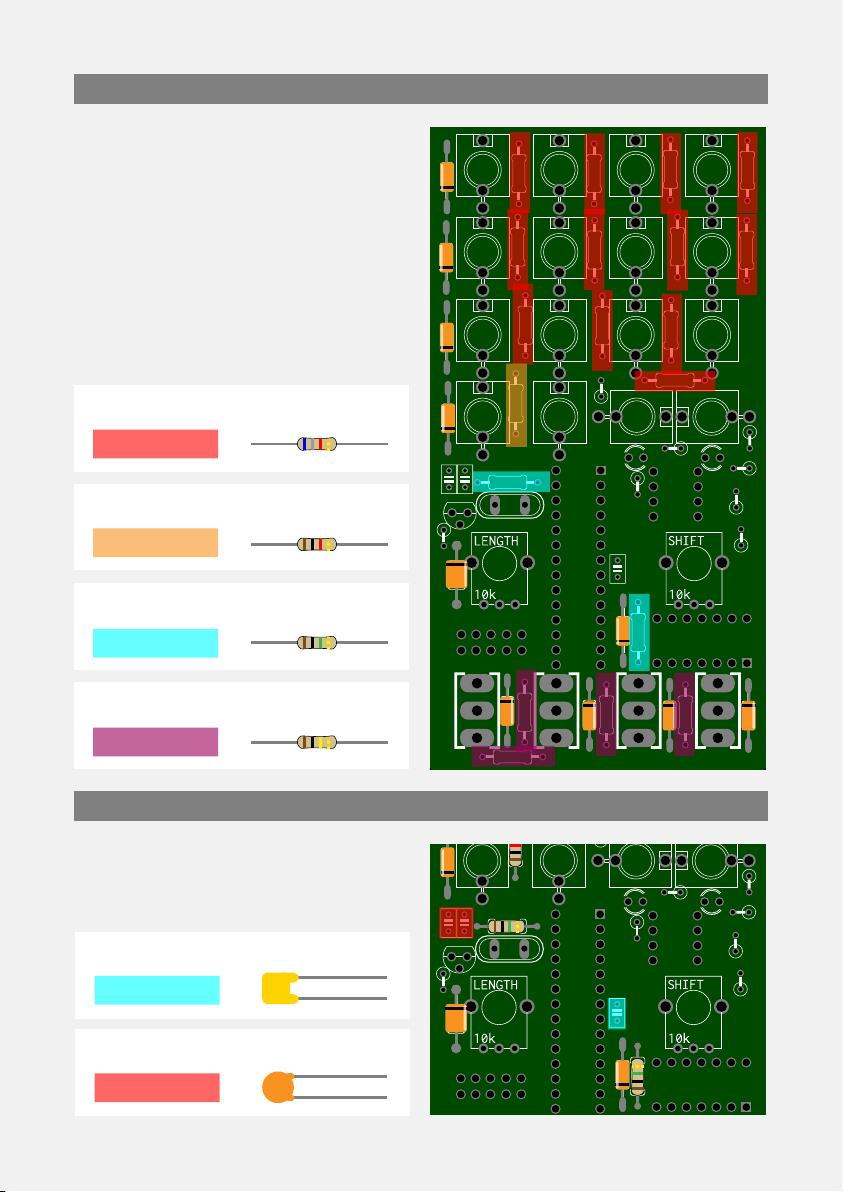
Quite simple, Two 22pf, in red on
the picture, and one 100nF in blue.
Here's a picture of the PCB with
placement of the flat resistors by
value. There’s no polarity to observe
with resistors, so you can solder
them no matter the way. Once
soldered, you’ve to cut the excess of
the resistor legs with a pair of
cutting p!iers. This has to be done
for most of the build’s components.
04_3. Capacitors
04_2. Flat Resistors
6.8k
1k
1M
X12
A
B
C
X1
X2
AAAA
A
A
A
A
AAA
A
B
C
C
DD D
D
100nF
22pF
X1
A
A
B
BB
X2
Pack 1/5
Pack 2/5
Pack 1/5
Pack 1/5
Pack 1/5
100k D
X4 Pack 2/5

The quartz has to lay flat and fits
the shape on the PCB silkscreen.
04_4. Quartz
16 MHz
X1 Pack 2/5
Bend the middle leg of the 78L05,
then place the component on the
PCB, like shown on the silkscreen.
04_5. 78L05
78L05
X1 Pack 2/5
Only one leg of the
resistor have to be
bent before solde-
ring. Don’t bend the
leg too high or it will
cause short-circuit
with the panel :
04_6. Standing Resistors
1k A
D
X3 Pack 1/5
X1 Pack 1/5
22
100k C
X2 Pack 2/5
33k
X2 Pack 2/5
B
6.8k
X2 Pack 1/5
OR
B B
A
A
A
B
B
C
C
D

Now, let’s flip the PCB and solder
the three IC’s sockets. Be attentive
to their orientation. The notch on
the silkscreen (marked in red on the
picture) as to match the notch on
the socket. Be careful not to miss
any of the tiny socket legs or to
bridge two of them with solder.
04_8. IC Sockets
X3 Plastic tubbing
There are 16 jack connectors, that
have to sit tight and flush with the
PCB. Be sure to push them all the
way through before soldering. A
good way to do so is by pushing the
PCB from behind on your table
while all the jack connectors are in
place but unsoldered.
04_7. Jack Connectors
X16 Pack 3/5
Jack
SHAKMAT MODULAR
BISHOP’S MISCELLANY V1.1

Let's go back to the front side. First you'll have to remove a little bit of metal
on the potentiometer as shown in the picture. Then you can solder them.
04_10. Potentiometers
Solder only one leg of the header,
verify that it’s flush with the PCB &
then solder the 9 other legs.
04_9. Power Supply Header
X2 Pack 4/5
Cut
X1
Header
Pack 3/5

Remove the front panel, put the
LEDs into place in the PCB. Be very
careful to get them the right way
around. The longer leg goes into
the hole marked with a plus in the
picture.
Before soldering the legs, put the
front panel on. Finger tighten the
nuts on the jack, switches and pots.
Put the LEDs into place pointing
through the holes in the front
panel, and align them flush. A good
way to do this is to stick a small
piece of masking tape covering the
LEDs holes helping them to stay in
place.
First, finger tighten the switches on the panel with their nuts. Then
assemble the panel with the PCB while the switches are mounted. Finally
solder the legs.
04_11. Switches
04_12. LEDs
+
LED
POLARITY
!
-+-
+-
LED
X2
1
1 1
Pack 2/5
Masking
tape
Table of contents
Other Shakmat Measuring Instrument manuals


