LINSHANG LS251D User manual

Shenzhen Linshang Technology Co., Ltd.
3/12/2022 Page 1 of 8
LS251D
Leeb Hardness Tester
User Manual V1.3
Please read this manual carefully before using and reserve it for reference.

Shenzhen Linshang Technology Co., Ltd.
3/12/2022 Page 2 of 8
I. Product Introduction
The Leeb hardness tester detects hardness based on the Leeb hardness measurement principle and
can measure the hardness of a variety of metal materials. The tester adopts advanced digital probe
technology, digital signal processing is done directly on the probe, which is not easily disturbed and
provides excellent testing accuracy. The probe has a built-in direction sensor, which automatically
compensates for the measurement error in different impact directions. The instrument has a variety of
built-in hardness systems, which can be converted between Leeb (HL), Vickers (HV), Brinell (HB), Shore
(HS), Rockwell (HRA), Rockwell (HRB), Rockwell (HRC) and tensile strength (σb). The instrument
adopts an impact device D suitable for assessing the hardness of common metal materials.
Standards for the product:
GB/T 13794.1 Metallic materials-Leeb hardness test-Part 1: Test method
GB/T 13794.2 Metallic materials-Leeb hardness test-Part 2: Verification and calibration of
hardness tester
GB/T 13794.2 Metallic materials-Leeb hardness test-Part 3: Calibration of reference blocks
GB/T 13794.4 Metallic materials-Leeb hardness test-Part 4: Tables of hardness values conversion
JB/T 9378-2001 Industry standard of Leeb hardness tester
JJG 747-1999 Verification regulation of Leeb hardness tester
II. Parameters
Probe Impact device D
Hardness Scales HL, HV, HB, HS, HRA, HRB, HRC
Measurement Range HLD: (170-960); HV(83-976); HB(30-651); HRC(17.6-
68.5); HS(26.4-99.5); HRB(13.5-100); HRA(60-85.8)
Resolution 1HL
Accuracy ±6 HL
Repeatability 6HL
Display 240 * 16 dot matrix LCD

Shenzhen Linshang Technology Co., Ltd.
3/12/2022 Page 3 of 8
Power Supply 2 AA alkaline dry batteries
Host Size 142*72*28 mm
Probe Size 148*31*25 mm
Weight 247g
Working Temperature Range -10~50℃,0~85%RH(no condensation)
Storage Temperature Range -10~60℃,0~85%RH(no condensation)
III. Features
1. The tester uses advanced digital probe technology, digital signal processing directly on the probe to
complete, which is not easy to interfere with and provides excellent test accuracy.
2. Built-in direction sensor, automatically compensates for the measurement error of different impact
directions.
3. Providing a variety of hardness scales to switch, no more tedious manual check table
4. QC inspection, the tester can set upper and lower limits to determine whether the incoming material
is qualified and achieve rapid detection of incoming material.
5. Statistics function, the tester can automatically count the maximum value, minimum value, and
average value of the last 9 measured values.
6. Users can calibrate the standard parts to eliminate the error.
7. Low power consumption, powered by 2 AA alkaline batteries and it can work continuously for more
than 100 hours.
IV. Operation
1. Power on/off
Power on:
Short press button, the version and the serial number of the tester are displayed on the screen after
powering on, and then the instrument will enter the measurement interface and the measured values
before powering off are displayed.

Shenzhen Linshang Technology Co., Ltd.
3/12/2022 Page 4 of 8
Power off:
Long press the button to shut down the tester or click the “Shutdown” option in the menu, the
instrument will automatically shut down when the time without any operation is longer than the auto-
shutdown time.
2. Measurement
Loading:
Push down the loading sleeve of the probe to lock the impact body.
Positioning:
Press the probe firmly against the surface of the object to be measured and keep it still.
Measurement:
Press the release button on the top of the probe to measure the hardness of the object.
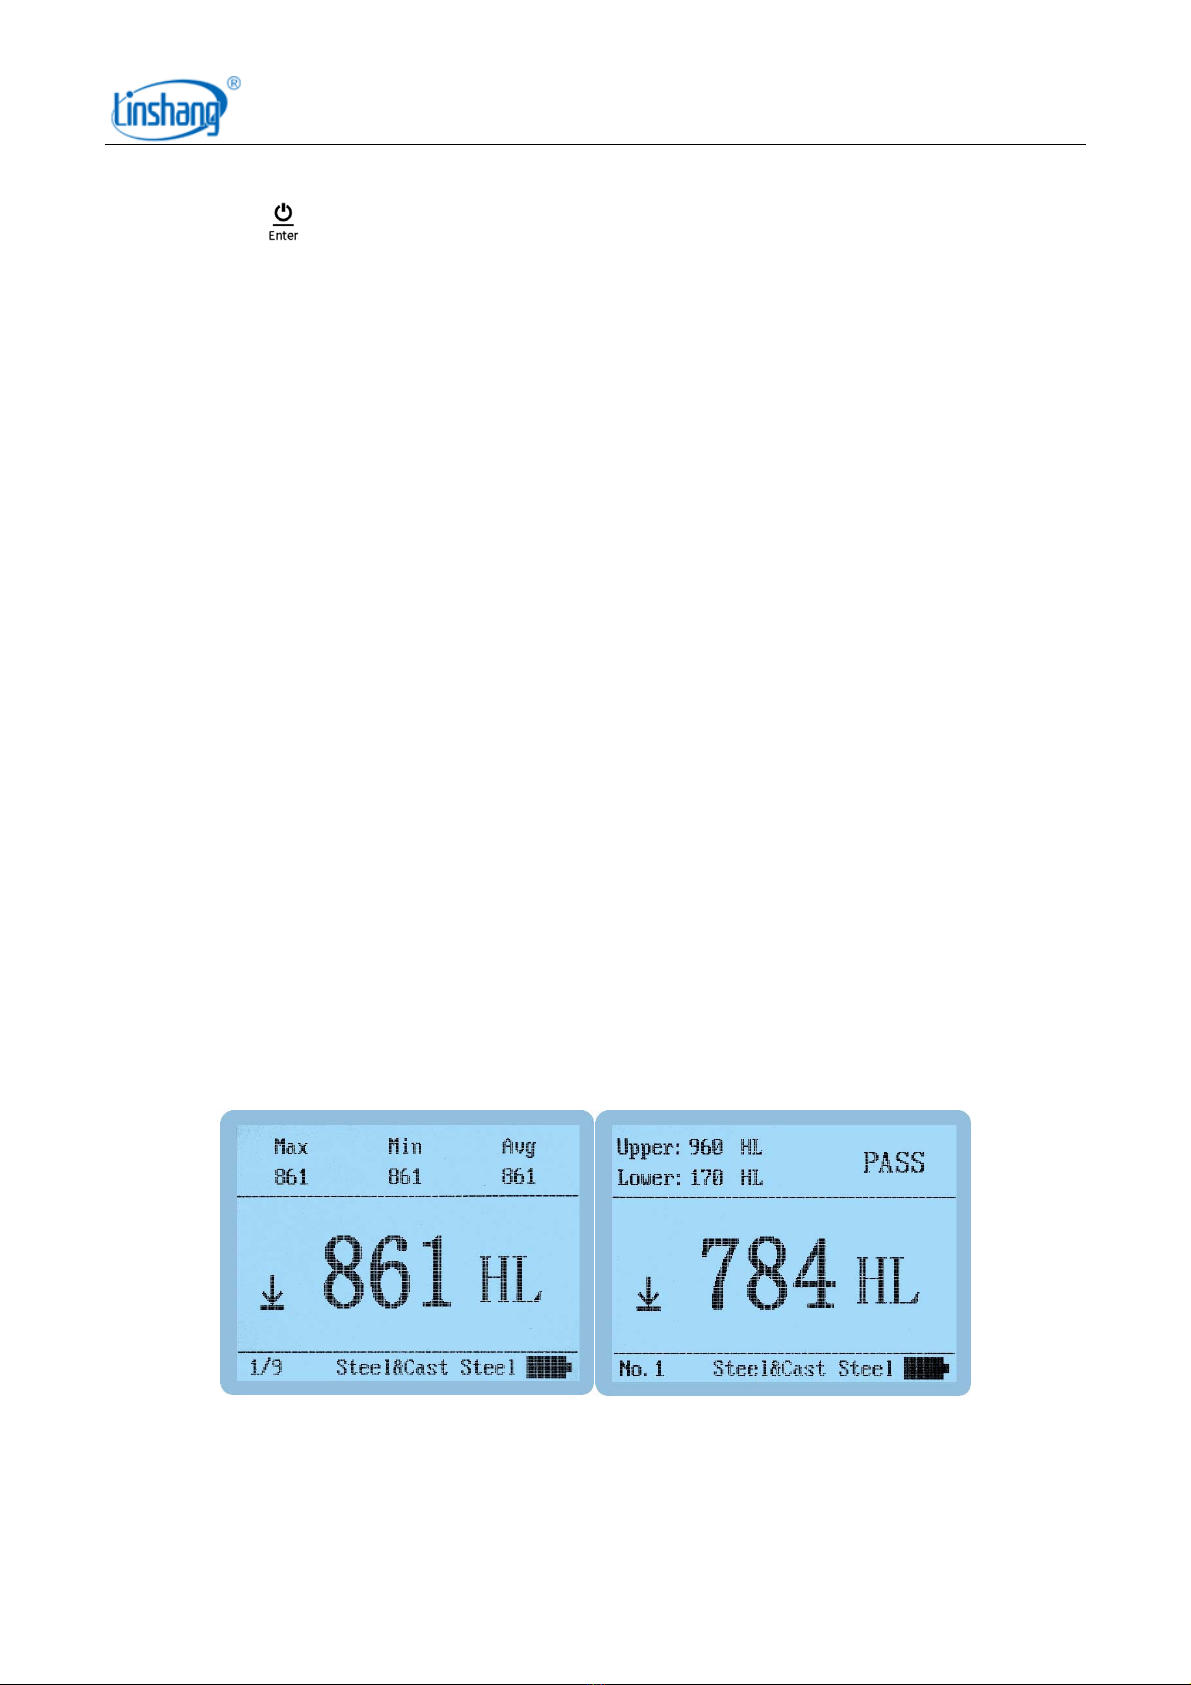
There are two measurement modes:
(1) Statistics mode
The interface of statistics mode is shown below (left). The instrument displays the maximum value,
minimum value, and average value of current statistics as well as the number of valid data. The
number of statistics is the last 9 valid measurement data, and when there are less than 9 data, the
actual amount of data prevails.
(2) QC mode
The QC mode interface is shown in the figure below (right), and the instrument judges whether the
measured value is qualified according to the set upper and lower limits.
Statistics mode QC mode

Shenzhen Linshang Technology Co., Ltd.
3/12/2022 Page 5 of 8
3. Setup and Calibration
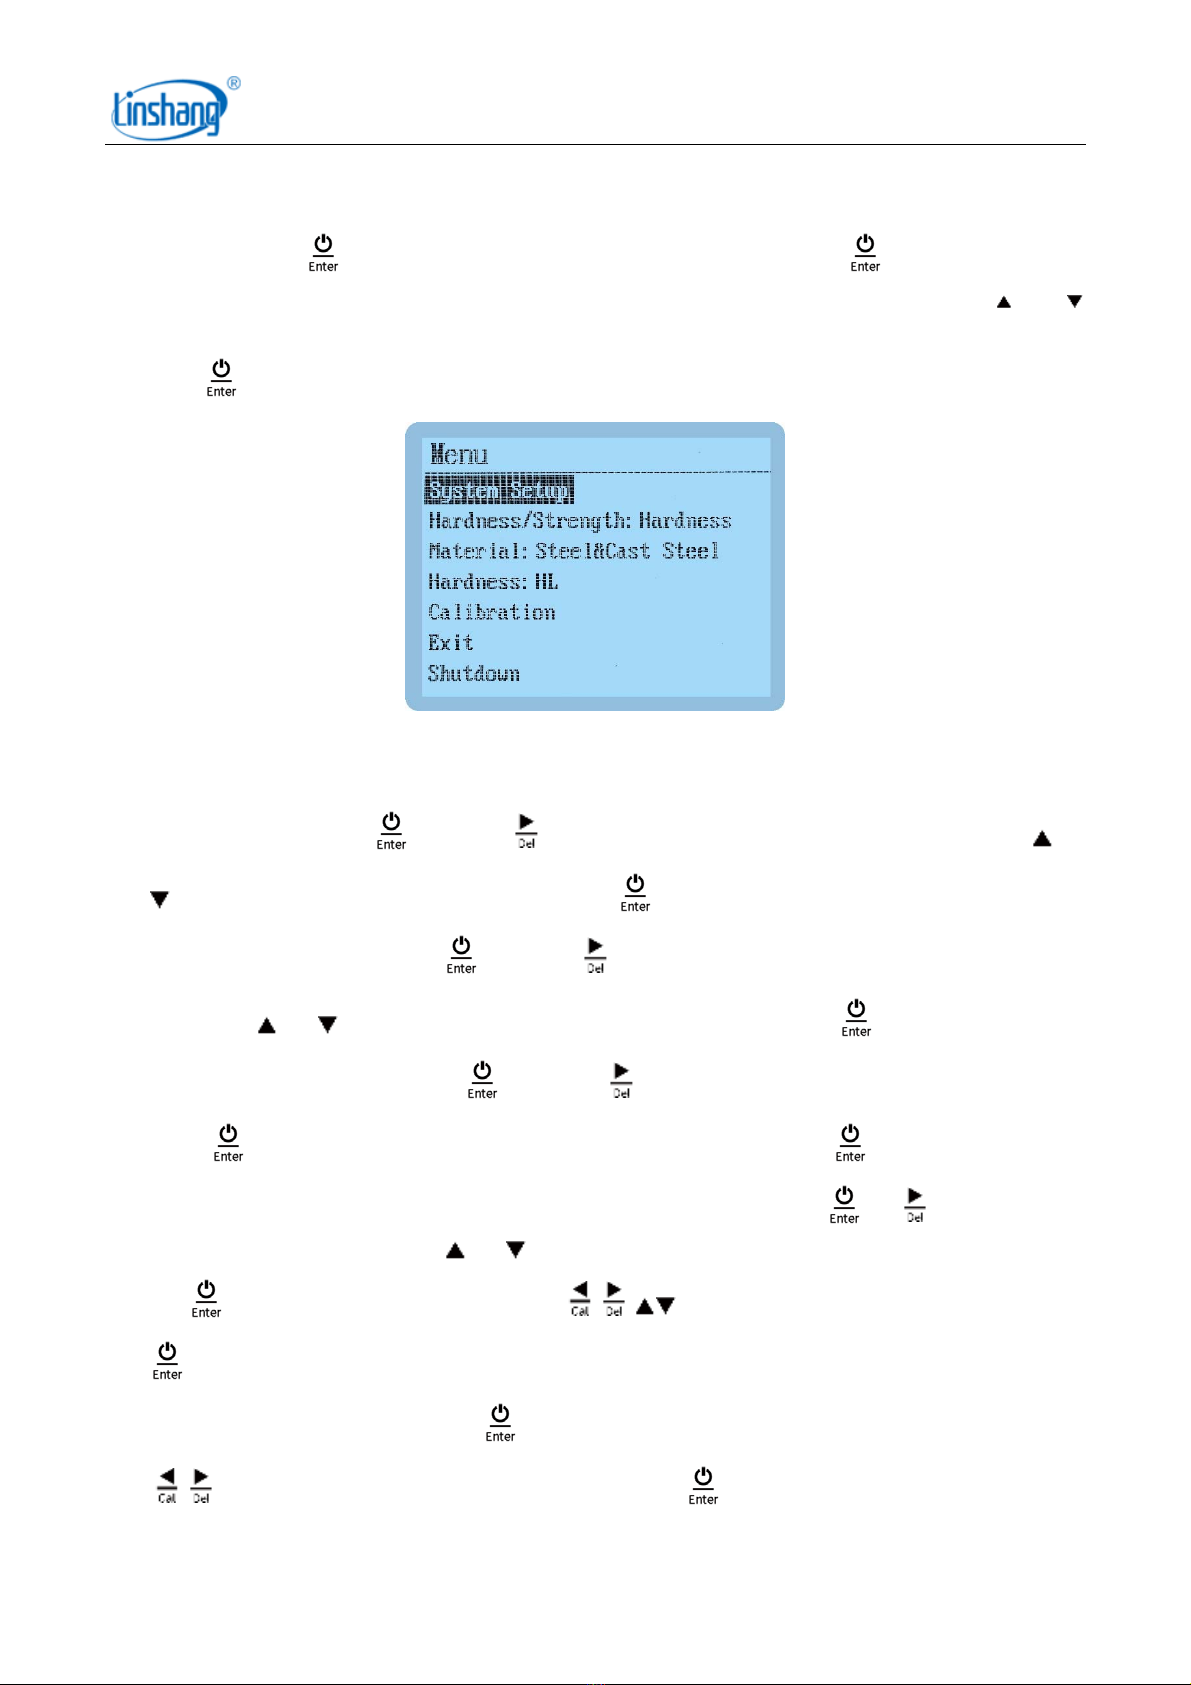
Press and hold the button for 3 seconds in the off state or press the button briefly in the
measurement state to enter the Main Menu of the instrument with seven sub-options, press the and
briefly to select [System Setup, Hardness/Strength, Material, Hardness, Calibration, Exit, Shutdown], short
press the button to confirm the selection.
(1) System Setup
Language: Short press button or button to enter the language option and press the or
button to select the right language, then press button to confirm your selection.
Auto power off: short press the button or button to enter the shutdown time selection, short
press the or button to select the shutdown time, short press the button to confirm.
Mode selection: short press the button or button to enter the mode selection interface,
press button to select the measurement mode, then short press the button to confirm.
Limit setting: Limit setting is only displayed in QC mode, short press the or button to enter
the limit setting interface, press or button to select [upper/lower limit/return] option, short press
the to confirm your option, short press to modify the value, finally, short press the
button to confirm the whole setting.
Restore factory settings: Press the button briefly to enter the restore factory selection interface.
button can toggle the [Yes/No] option, press the button briefly to confirm

Shenzhen Linshang Technology Co., Ltd.
3/12/2022 Page 6 of 8
the option and return to the setting interface.
(2) Hardness/Strength
Short press button to enter hardness/strength selection interface, and short press the or
button to select [hardness/strength], then short press the button to confirm the selection.
(3) Material
Short press the button to enter the material selection interface, short press the button
to select the corresponding material, then press the button to confirm the option and return to the
setting interface.
(4) Hardness Unit
The hardness unit is only displayed in hardness measurement mode, press the button briefly to enter
the hardness unit selection interface, press the or to select the hardness unit, press the
button briefly to confirm.
(5) Calibration
Short press the button to enter the calibration interface, the screen prompts [Please measure the
standard hardness block] and flashes, then you can measure the standard hardness block (single or
multiple times). After measurement, the cursor moves to the actual value area, then press or button
to adjust the actual value to the standard value of the hardness block. Short press the button to end
the adjustment, and press the or to select [Cancel]/[Back]/[Save] options.
Select [Cancel] and press button briefly to return to the calibration screen and wait for the
measurement again.
Select [Back], short press button to not save the calibration data and exit the calibration screen.
Select [Save], press button briefly to save the current calibration data, and exit the calibration
interface.
(6) Exit

Shenzhen Linshang Technology Co., Ltd.
3/12/2022 Page 7 of 8
Short press button briefly to exit the main interface and enter the measurement interface.
(7) Power off
Short press button to power off the instrument.
4. History Records
In the measurement mode, press or briefly to view the historical data in the browse interface. The
instrument stores 9 sets of data totally, and the oldest recorded value is automatically deleted when there
are more than 9 sets of data. Record 1 is the earliest test data, and so on backward. Recorded data is not
lost when the instrument is turned off.
When pressing button to view the data, the data record number is increasing from the first one to the
last one; when pressing button to view the data, the data record number decreases from the maximum
to the minimum.
In the history view mode or measurement mode, press button briefly and the screen will show a data
deletion prompt, press button briefly to select [Yes] to delete all recorded data.
5. Quick access to the calibration interface
In measurement mode, short press the button to check historical data. The gauge stores 9 sets of data.
When more than 9 sets of data are stored, the earliest recorded value is automatically deleted, and “No.1”
is the last test data. Recorded data will not be lost after powering off.
V. Attentions
1. The surface of the test object shall not be too rough, and it needs to be flat, smooth, free of oil and
grease, transmitting a metallic luster.
2. The minimum mass of the test object is 5Kg, and the minimum thickness is 25mm. For objects whose
weight and thickness do not meet the requirements, the test must be coupled with solid bracing.
3. The maintenance of the impact device. After using the device about 1000-2000 times, the user needs
to use a nylon brush to clean the instrument's conduit and impact body. When cleaning, the user needs
to unscrew the support ring of the catheter first, then remove the impact body, insert the nylon brush
into the catheter in a counterclockwise direction, then pull out the bottom and repeat five times, and
finally put the impact body and support ring.


Shenzhen Linshang Technology Co., Ltd.
3/12/2022 Page 8 of 8
4. After use, the impact body should be loosened.
5. The use of various lubricants is strictly prohibited in the impact device.
6. When measuring, the distance between any two indentations should not be less than 3mm, and the
distance between the center of the indentation and the edge of the object to be measured should not
be less than 5mm.
7. When the device displays “Low Battery”, batteries should be replaced.
VI. Packing list
No. Product Name Quantity Unit
1 Leeb Hardness Tester 1 Set
2 Standard Leeb hardness block 1 pcs
3 Nylon Brush 1 pcs
4 Small support ring 1 pcs
5 1.5V AA alkaline battery 2 pcs
6 User Manual 1 pcs
7 Certificate / Warranty card 1 pcs
VII. Service
1. The gauge has one-year warranty. If the gauge works abnormally, please send the whole gauge to
our company for maintenance.
2. Provide users with spare parts and lifelong maintenance services.
3. Provide the users with the gauge calibration service.
4. Free technical support for the long term.
Manufacturer: Shenzhen Linshang Technology Co., Ltd.
Website: www.linshangtech.com
Service hotline: +86-755-86263411
Email: sales21@linshangtech.com
Table of contents
Other LINSHANG Measuring Instrument manuals

LINSHANG
LINSHANG LS163 User manual

LINSHANG
LINSHANG LS196 User manual

LINSHANG
LINSHANG LS193 User manual

LINSHANG
LINSHANG LS191 User manual

LINSHANG
LINSHANG LS201 User manual

LINSHANG
LINSHANG LS236 User manual

LINSHANG
LINSHANG LS171 User manual

LINSHANG
LINSHANG LS110 User manual

LINSHANG
LINSHANG LS300 User manual

LINSHANG
LINSHANG LS230 User manual

LINSHANG
LINSHANG LS170 User manual

LINSHANG
LINSHANG LS108 User manual

LINSHANG
LINSHANG LS182 User manual

LINSHANG
LINSHANG LS233 User manual

LINSHANG
LINSHANG LS120 User manual

LINSHANG
LINSHANG LS301 User manual

LINSHANG
LINSHANG LS212 User manual

LINSHANG
LINSHANG LS192 User manual

LINSHANG
LINSHANG LS123 User manual

LINSHANG
LINSHANG LS108A User manual