CAB 5326C User manual

Assembly Instructions
5326C
Made in Germany
Vacuum-Belt Applicator

2 2
Family Type
Vacuum-Belt Applicator 5326C
Edition: 12/2019 - Part No. 9009758
Copyright
This documentation as well as translation hereof are property of cab Produkttechnik GmbH & Co. KG.
The replication, conversion, duplication or divulgement of the whole manual or parts of it for other intentions than its original
intended purpose demand the previous written authorization by cab.
Editor
Regarding questions or comments please contact cab Produkttechnik GmbH & Co. KG.
Topicality
Due to the constant further development of our products discrepancies between documentation and product can occur.
Please check www.cab.de for the latest update.
Terms and conditions
Deliveries and performances are effected under the General conditions of sale of cab.
Assembly Instructions
for the following products
Germany
cab Produkttechnik GmbH & Co KG
Karlsruhe
Phone +49 721 6626 0
www.cab.de
USA
cab Technology, Inc.
Chelmsford, MA
Phone +1 978 250 8321
www.cab.de/us
Taiwan
cab Technology Co., Ltd.
Taipei
Phone +886 (02) 8227 3966
www.cab.de/tw
China
cab (Shanghai) Trading Co., Ltd.
Guangzhou
Phone +86 (020) 2831 7358
www.cab.de/cn
France
cab Technologies S.à.r.l.
Niedermodern
Phone +33 388 722501
www.cab.de/fr
Mexico
cab Technology, Inc.
Juárez
Phone +52 656 682 4301
www.cab.de/es
China
cab (Shanghai) Trading Co., Ltd.
Shanghai
Phone +86 (021) 6236 3161
www.cab.de/cn
South Africa
cab Technology (Pty) Ltd.
Randburg
Phone +27 11 886 3580
www.cab.de/za

3
1 Introduction............................................................................................................................................4
1.1 Instructions...............................................................................................................................................4
1.2 Intended Use............................................................................................................................................4
1.3 Safety Instructions....................................................................................................................................4
1.4 Safety Markings .......................................................................................................................................5
1.5 Environment.............................................................................................................................................5
2 Product Description...............................................................................................................................6
2.1 Important Features...................................................................................................................................6
2.2 Technical Data..........................................................................................................................................6
2.3 Overview..................................................................................................................................................7
2.4 Contents of Delivery.................................................................................................................................8
3 Mounting.................................................................................................................................................9
4 Adjustments .........................................................................................................................................10
4.1 Setting the Angle to the Printer ..............................................................................................................10
4.2 Settings within the Setup of the Printer..................................................................................................10
4.3 Signals ....................................................................................................................................................11
5 Operation..............................................................................................................................................12
5.1 Standard Operation................................................................................................................................12
5.2 Cleaning.................................................................................................................................................12
6 Error Messages....................................................................................................................................13
6.1 Error Messages of the Printer................................................................................................................13
6.2 Error Messages of the Applicator...........................................................................................................13
7 Licences................................................................................................................................................14
7.1 Declaration of Incorporation...................................................................................................................14
7.2 EU Declaration of Conformity.................................................................................................................15
Table of Contents

4 4
1 Introduction
1.1 Instructions
Important information and instructions in this documentation are designated as follows:
Danger!
Draws attention to an exceptionally great, imminent danger to your health or life due to hazardous
voltages.
!
Danger!
Draws attention to a danger with high risk which, if not avoided, may result in death or serious injury.
!
Warning!
Draws attention to a danger with medium risk which, if not avoided, may result in death or serious injury.
!
Caution!
Draws attention to a danger with low risk which, if not avoided, may result in minor or moderate injury.
!
Attention!
Draws attention to potential risks of property damage or loss of quality.
i
Note!
Advice to make work routine easier or on important steps to be carried out.
Environment!
Gives you tips on protecting the environment.
Handling instruction
Reference to section, position, illustration number or document.
Option (accessories, peripheral equipment, special ttings).
Time Information in the display.
1.2 Intended Use
• The device is manufactured in accordance with the current technological status and the recognized safety rules.
However, danger to life and limb of the user or third parties and/or damage to the device and other tangible assets
can arise during use.
• The device may only be used for its intended purpose and if it is in perfect working order, and it must be used with
regard to safety and dangers as stated in the operating manual.
• The device applicator mounted on a cab printer of the Hermes C series is intended exclusively for applying
suitable materials that have been approved by the manufacturer. Any other use or use going beyond this shall be
regarded as improper use. The manufacturer/supplier shall not be liable for damage resulting from unauthorized
use; the user shall bear the risk alone.
• Usage for the intended purpose also includes complying with the manual, including the manufacturer‘s mainte-
nance recommendations and specications.
i
Note!
The complete and current version of the documentation can be found in the Internet.
1.3 Safety Instructions
!
Attention!
Initiation, adjustments and changing of parts are to be performed by qualied service personnel only.
• Before mounting the delivered components disconnect the printer from the power supply and close the shutoff
valve of the applicator.
• Only connect the device to other devices which have a protective low voltage.
• Switch off all affected devices (computer, printer, accessories) before connecting or disconnecting.

5
1 Introduction
• In operation, moving parts are easily accessible. This applies especially for the zone, where the pad is moved
between the starting and the labelling position.
• During operation do not reach into that zone and keep long hair, loose clothes, and jewelry distant. Before any
manipulations in those areas, close the shutoff valve.
• The device may only be used in a dry environment, do not expose it to moisture (sprays of water, mists, etc.).
• Do not use the device in an explosive atmosphere.
• Do not use the device close to high-voltage power lines.
• Perform only those actions described in this operating manual.
Work going beyond this may only be performed by trained personnel or service technicians.
• Unauthorized interference with electronic modules or their software can cause malfunctions.
• Other unauthorized work on or modications to the device can also endanger operational safety.
• Always have service work done in a qualied workshop, where the personnel have the technical knowledge and
tools required to do the necessary work.
• There are various warning stickers on the device. They draw your attention to dangers. Warning stickers must
therefore not be removed, as then you and other people cannot be aware of dangers and may be injured.
1.4 Safety Markings
1
1: Warning of damage by rotating parts!
Fig. 1 Safety marking
1.5 Environment
Obsolete devices contain valuable recyclable materials that should be sent for recycling.
Send to suitable collection points, separately from residual waste.
The modular construction of the applicator enables it to be easily disassembled into its component parts.
Send the parts for recycling.

6 6
2 Product Description
2.1 Important Features
• For operation in a system the I/O interface of the printer can be used.
!
Attention
Don't move the transport belt or - roller by hand or by an other outside power.
Danger of destruction of the electronic control.
•
2.2 Technical Data
Technical Data Vacuum-Belt Applicator 5326C
Label width mm 46-174
label height mm 40-356
Product during labeling in motion ¢
Labeling on the product from top ¢
from below ¢
from the side ¢
Vacuum belt speed mm/s 100 - 500
Cicle time aprox.1) labels/min. 30
1) Calculated at 100 mm label height / print speed of 100 mm/s
Table 1 Technical Data


8 8
2 Product Description
2.4 Contents of Delivery
2
1
2
Fig. 3 Contents of delivery
1 Mounted applicator
2 Screws to connect the applicator to the printer
3 Documentation
i
Note!
Please keep the original packaging in case the applicator must be returned.
!Attention!
The device and printing materials will be damaged by moisture and wetness.
Set up label printer with applicator only in dry locations protected from dampness and splashes.

9
3 Mounting
6
2
7
3 4 51
Fig. 4 Mounting applicator on printer
!Attention!
Initiation, adjustments and changing of parts is to be performed by qualied service personal only.
Initiation/Service Manual Applicators
!
Attention!
Disconnect the printer from the power supply before mounting the applicator!
Ensure the printer is standing rmly in a secure position!
To clean the applicator and printer it's sometimes necessary to turn away or even dismount the applicator from the
printer.
Do not adjust the setting screws, throttle valves or other alignment elements. This will enable use of the applicator
directly after cleaning.
Turning away & dismounting the applicator
1. Loosen the screws (6) from the lower attachment (7) rst.
2. Support the applicator and loosen screws (5). The applicator will drop due to its own weight.
3. Move the applicator forward a little to disconnect SUB-D 15 connector (3).
4. Lift the applicator off the printer.
Remounting the applicator
5. Lift the applicator onto the printer and connect SUB-D 15 male connector (1).
6. Slide in and settle the applicator via the connection (7). Line up holes (4) of the mounting plate and to holes (2) of
the printer.
7. Insert and tighten the Screws (5).
8. Insert and tighten the Screws (6).
10 10
4 Adjustments
iNote!
The alignment of the applicator to the printer is set to the factory standard and should not be altered to
ensure reliable label transportation. Only the Angle to the printer as well as the pinch roller should be
adjusted.
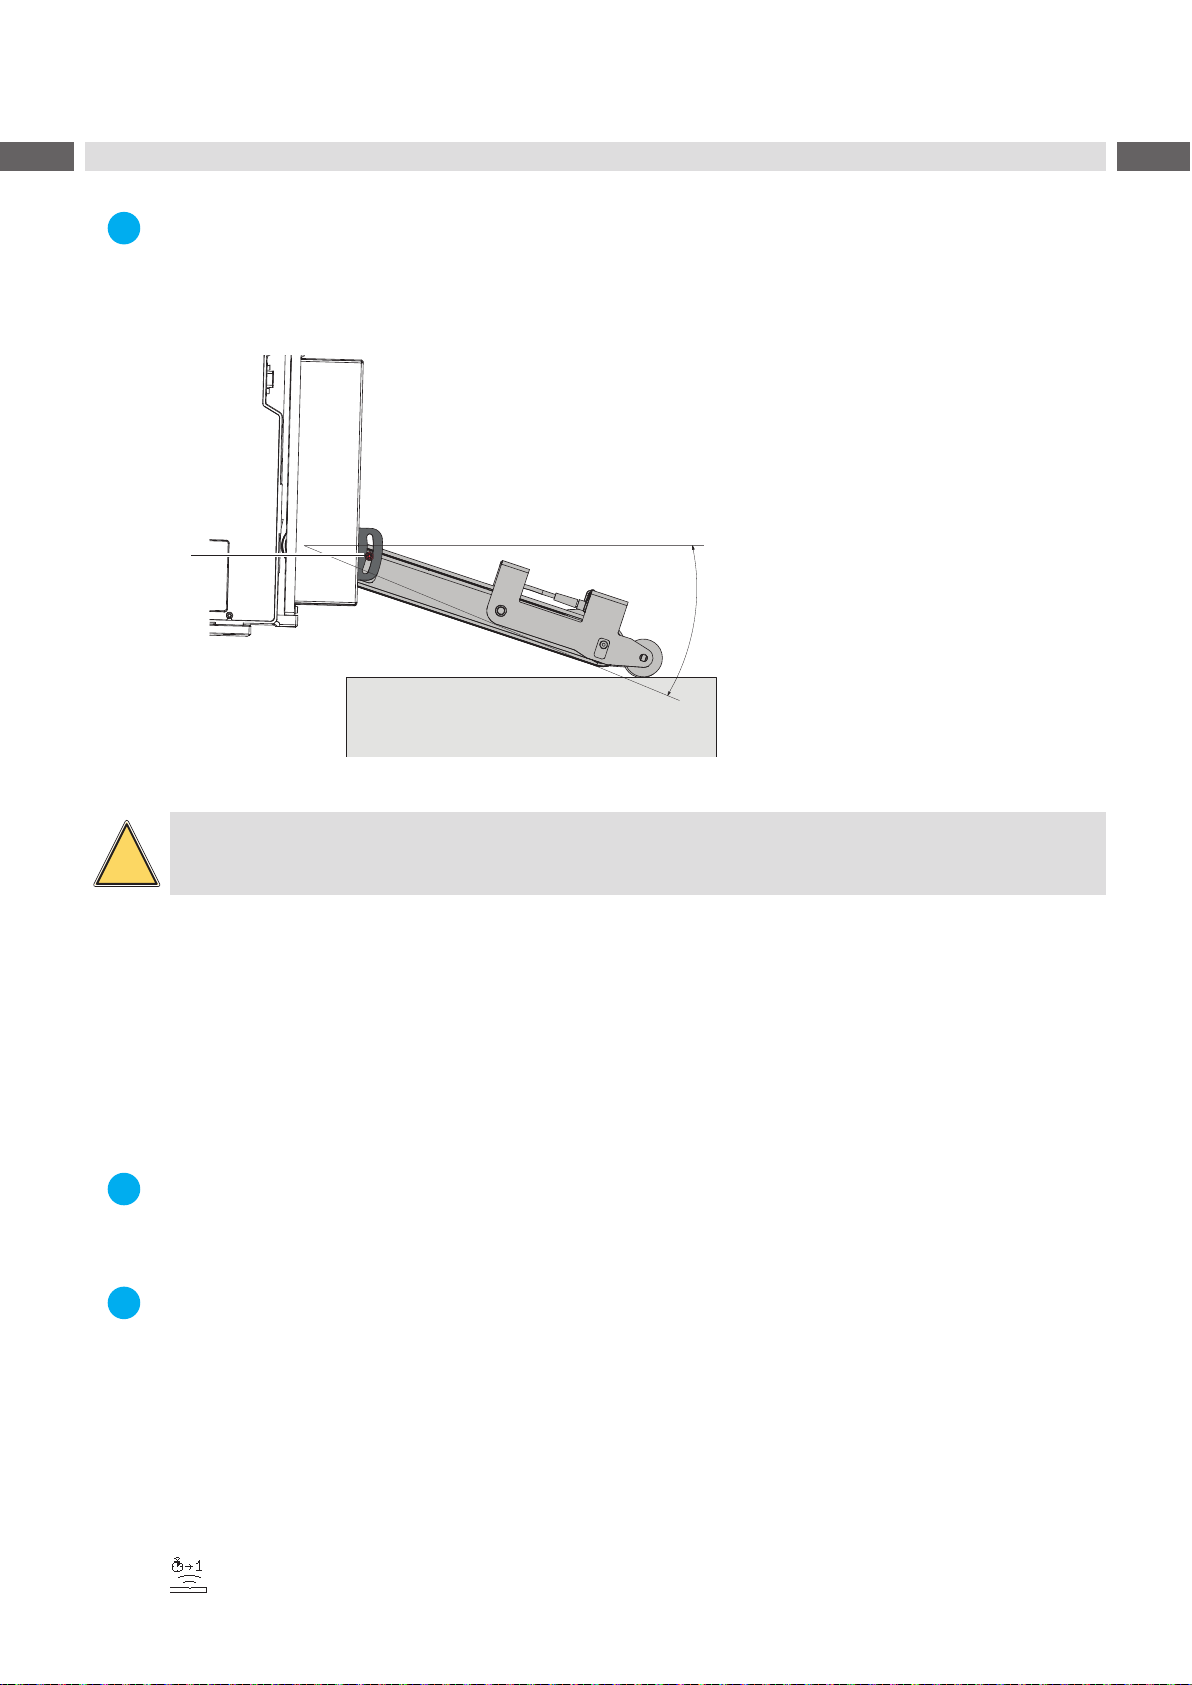
4.1 Setting the Angle to the Printer
1
max 30°
Fig. 5 Downward angle of the applicator to the printer
!
Warning!
Be aware when you loosen the screws (1)! The device will drop due to its own weigh.
Loosen screws (1) to adjust the angle and so the distance between printer and pinch roller.
Place a product and adjust the angle of the device. Tighten screws (1) .
4.2 Settings within the Setup of the Printer
The conguration parameters of the applicator can be found in the menu Setup > Machine param.
Speed
iNote!
The speed of the belt and the label transport speed can be set via the parameter Support del. off.
The value is displayed in ms and not, the actual value used, mm/s.
iNote!
It's necessary to set the exact the values visible in the table.
In case of a deviations the standard value of 100 will be used.
Parameter to set the speed of the belts.
The four available values are:
100 ms : 100 mm/s speed of the transport belt
150 ms : 150 mm/s speed of the transport belt
220 ms : 220 mm/s speed of the transport belt
300 ms : 300 mm/s speed of the transport belt
500 ms : 500 mm/s speed of the transport belt
> > Support del. off
Table of contents
Other CAB Industrial Equipment manuals


