Vega VEGAPULS 62 User manual

Quick setup guide
Radar sensor for continuous level
measurement of liquids
VEGAPULS 62
Modbus and Levelmaster protocol
Document ID: 47114

2
Contents
VEGAPULS 62 • Modbus and Levelmaster protocol
47114-EN-210621
Contents
1 For your safety ......................................................................................................................... 3
1.1 Authorised personnel ....................................................................................................... 3
1.2 Appropriate use................................................................................................................ 3
1.3 Warning about incorrect use............................................................................................. 3
1.4 General safety instructions............................................................................................... 3
1.5 EU conformity................................................................................................................... 4
1.6 NAMUR recommendations .............................................................................................. 4
1.7 Radio license for Europe .................................................................................................. 4
1.8 Radio license for USA ...................................................................................................... 4
1.9 Environmental instructions ............................................................................................... 5
2 Product description ................................................................................................................. 6
2.1 Conguration.................................................................................................................... 6
3 Mounting................................................................................................................................... 7
3.1 Mounting preparations ..................................................................................................... 7
3.2 Mounting preparations - Parabolic antenna...................................................................... 9
3.3 Mounting instructions ..................................................................................................... 10
4 Connecting to power supply and bus system .................................................................... 11
4.1 Connecting..................................................................................................................... 11
4.2 Wiring plan ..................................................................................................................... 12
5 Set up the sensor with the display and adjustment module............................................. 14
5.1 Insert display and adjustment module............................................................................ 14
5.2 Parameter adjustment .................................................................................................... 14
5.3 Menu overview ............................................................................................................... 17
6 Set up with smartphone/tablet, PC/notebook via Bluetooth ............................................. 19
6.1 Preparations................................................................................................................... 19
6.2 Connecting..................................................................................................................... 20
6.3 Sensor parameter adjustment........................................................................................ 20
7 Supplement ............................................................................................................................ 22
7.1 Technical data ................................................................................................................ 22
Information:
This quick setup guide enables quick setup and commissioning of
your instrument.
Youcanndsupplementaryinformationinthecorresponding,more
detailed Operating Instructions Manual as well as the Safety Manual
thatcomeswithinstrumentswithSILqualication.Thesemanualsare
available on our homepage.
Operating instructions VEGAPULS 62 - Modbus and Levelmas-
ter protocol: Document-ID 41362
Editing status of the quick setup guide: 2021-06-10

3
1 For your safety
VEGAPULS 62 • Modbus and Levelmaster protocol
47114-EN-210621
1 For your safety
1.1 Authorised personnel
All operations described in this documentation must be carried out
onlybytrained,qualiedpersonnelauthorisedbytheplantoperator.
Duringworkonandwiththedevice,therequiredpersonalprotective
equipment must always be worn.
1.2 Appropriate use
VEGAPULS 62 is a sensor for continuous level measurement.
Youcannddetailedinformationabouttheareaofapplicationin
chapter " Product description".
Operational reliability is ensured only if the instrument is properly
usedaccordingtothespecicationsintheoperatinginstructions
manual as well as possible supplementary instructions.
1.3 Warning about incorrect use
Inappropriate or incorrect use of this product can give rise to applica-
tion-specichazards,e.g.vesseloverllthroughincorrectmounting
or adjustment. Damage to property and persons or environmental
contaminationcanresult.Also,theprotectivecharacteristicsofthe
instrument can be impaired.
1.4 General safety instructions
This is a state-of-the-art instrument complying with all prevailing
regulations and directives.The instrument must only be operated in a
technicallyawlessandreliablecondition.Theoperatorisresponsi-
ble for the trouble-free operation of the instrument. When measuring
aggressive or corrosive media that can cause a dangerous situation
iftheinstrumentmalfunctions,theoperatorhastoimplementsuitable
measures to make sure the instrument is functioning properly.
Thesafetyinstructionsinthisoperatinginstructionsmanual,thena-
tional installation standards as well as the valid safety regulations and
accident prevention rules must be observed by the user.
Forsafetyandwarrantyreasons,anyinvasiveworkonthedevice
beyond that described in the operating instructions manual may be
carried out only by personnel authorised by the manufacturer. Arbi-
traryconversionsormodicationsareexplicitlyforbidden.Forsafety
reasons,onlytheaccessoryspeciedbythemanufacturermustbe
used.
Toavoidanydanger,thesafetyapprovalmarkingsandsafetytipson
the device must also be observed.
The low transmitting power of the radar sensor is far below the inter-
nationallyapprovedlimits.Nohealthimpairmentsaretobeexpected
with intended use.The band range of the measuring frequency can
be found in chapter " Technical data".

4
1 For your safety
VEGAPULS 62 • Modbus and Levelmaster protocol
47114-EN-210621
1.5 EU conformity
ThedevicefullsthelegalrequirementsoftheapplicableEUdirec-
tives.ByaxingtheCEmarking,weconrmtheconformityofthe
instrument with these directives.
The EU conformity declaration can be found on our homepage.
Electromagnetic compatibility
Instrumentsinfour-wireorEx-d-iaversionaredesignedforuseinan
industrialenvironment.Nevertheless,electromagneticinterference
from electrical conductors and radiated emissions must be taken into
account,asisusualwithclassAinstrumentsaccordingtoEN61326-
1.Iftheinstrumentisusedinadierentenvironment,theelectromag-
netic compatibility to other instruments must be ensured by suitable
measures.
1.6 NAMUR recommendations
NAMUR is the automation technology user association in the process
industry in Germany. The published NAMUR recommendations are
acceptedasthestandardineldinstrumentation.
ThedevicefullstherequirementsofthefollowingNAMURrecom-
mendations:
• NE 21 – Electromagnetic compatibility of equipment
• NE53–Compatibilityofelddevicesanddisplay/adjustment
components
• NE107–Self-monitoringanddiagnosisofelddevices
For further information see www.namur.de.
1.7 Radio license for Europe
The instrument was tested according to the latest issue of the follow-
ingharmonizedstandards:
• EN 302372 - Tank Level Probing Radar
It is hence approved for use inside closed vessels in countries of the
EU.
UseisalsoapprovedinEFTAcountries,providedtherespective
standards have been implemented.
Foroperationinsideofclosedvessels,pointsatofinannexEof
EN302372mustbefullled.
1.8 Radio license for USA
ThisapprovalisonlyvalidforUSA.Hencethefollowingtextisonly
available in the English language.
This device complies with Part 15 of the FCC Rules. Operation is
subject to the following two conditions:
• Thisdevicemaynotcauseinterference,and
• Thisdevicemustacceptanyinterference,includinginterference
that may cause undesired operation of the device

5
1 For your safety
VEGAPULS 62 • Modbus and Levelmaster protocol
47114-EN-210621
Thisdeviceisapprovedforunrestricteduseonlyinsideclosed,sta-
tionaryvesselsmadeofmetal,reinforcedberglassorconcrete.
Changesormodicationsnotexpresslyapprovedbythemanufac-
turer could void the user’s authority to operate this equipment.
1.9 Environmental instructions
Protection of the environment is one of our most important duties.
That is why we have introduced an environment management system
with the goal of continuously improving company environmental pro-
tection.Theenvironmentmanagementsystemiscertiedaccording
to DIN EN ISO 14001.
Pleasehelpusfullthisobligationbyobservingtheenvironmental
instructions in this manual:
• Chapter " Packaging, transport and storage"
• Chapter " Disposal"

6
2 Product description
VEGAPULS 62 • Modbus and Levelmaster protocol
47114-EN-210621
2 Product description
2.1 Conguration
Thetypelabelcontainsthemostimportantdataforidenticationand
use of the instrument:
2
1
15
13
14
12
11
5
3
6
4
7
8
10
9
Fig. 1: Layout of the type label (example)
1 Instrument type
2 Product code
3 Approvals
4 Power supply and signal output, electronics
5 Protection rating
6 Measuring range
7 Process and ambient temperature, process pressure
8 Material wetted parts
9 Hardware and software version
10 Order number
11 Serial number of the instrument
12 Data matrix code for VEGA Tools app
13 Symbol of the device protection class
14 ID numbers, instrument documentation
15 Reminder to observe the instrument documentation
The type label contains the serial number of the instrument. With it
youcanndthefollowinginstrumentdataonourhomepage:
• Product code (HTML)
• Delivery date (HTML)
• Order-specicinstrumentfeatures(HTML)
• Operating instructions and quick setup guide at the time of ship-
ment (PDF)
• Order-specicsensordataforanelectronicsexchange(XML)
• Testcerticate(PDF)-optional
Move to " www.vega.com"andenterinthesearcheldtheserial
number of your instrument.
Alternatively,youcanaccessthedataviayoursmartphone:
• Download the VEGA Tools app from the " Apple App Store" or the
" Google Play Store"
• ScantheDataMatrixcodeonthetypelabeloftheinstrumentor
• Enter the serial number manually in the app
Type label
Serial number - Instru-
ment search

7
3 Mounting
VEGAPULS 62 • Modbus and Levelmaster protocol
47114-EN-210621
3 Mounting
3.1 Mounting preparations
The instrument is also available in versions with an antenna whose
diameterislargerthantheprocesstting(thread,ange).Insuch
casestheantennamustbedisconnectedfromtheprocesstting
before mounting.
Proceed as follows:
1. Loosenthehexagonsocketscrews(3)ontheantennasocket
withanAllenwrench(size3)
2. Remove the antenna (4)
Note:
The plastic cone may not be pulled out of the antenna socket.
3. Insert the antenna from below into the vessel socket and secure it
againstfallingo
4. Retightentheantennawithhexagonscrewstotheantenna
socket;max.torqueseechapter"Technical data"
Note:
Theradarsensorwithrinsingairconnectionorwithantennaexten-
sionhasanotchontheantennasocketforpolarization.Thisnotch
mustbealignedwiththemarkingontheprocesstting.
4
3
5
1
2
Fig. 2: Dismounting of the horn antenna
1 Markingontheprocesstting
2 Marking at the antenna socket
3 Screw locking device
4 Hexagon socket screws
5 Antenna
Caution:
A secure hold of the antenna is only ensured with the untwist guard.
The untwist guards inserted on site must hence be used again.
Dependingontemperaturerangeandantennamaterial,theseare
Horn antenna

8
3 Mounting
VEGAPULS 62 • Modbus and Levelmaster protocol
47114-EN-210621
spring rings according to DIN 217 or wedge lock washers according
to DIN 25 201.
Proceed as follows:
1. ClampVEGAPULS62withtheange,e.g.inabenchvice
2. Holdtheconnectionpiece(1)withawrenchontheatsurfaces
(widthacrossats22mm)
3. Loosen counter nut (3) completely with a wrench (width across
ats36mm)inthedirectionoftheantenna
4. Loosen compression nut (2) completely with a wrench (width
acrossats41mm)inthedirectionoftheantenna
5. Removetheparabolicantenna(4)axially
6. Mountsensorangeontheadapterangeandfastenittightly
7. Check if the O-ring seal is present on the connection piece and
make sure it is not damaged.
Note:
A damaged O-ring seal must be replaced: FKM (SHS FPM 70C3
GLT),FFKM(Kalrez6375)
8. Remount the parabolic antenna (4)
9. Fastencompressionnut(2)withawrench(widthacrossats41),
max.torqueseechapter"Technical data"
10. Fastencounternut(3)withawrench(widthacrossats36),max.
torque see chapter " Technical data"
Note:
Ontheversionwithrinsingairconnection,makesurethattheholes
intheantennaandintheprocessttingcoincide.Thisensuresasuf-
cientairow(theairisledthroughtheholestothefeedsystem.A
rinsing of the whole parabolic antenna is not intended).
1
2
3
4
Fig. 3: Dismounting, parabolic antenna
1 Connection piece
2 Compression nut
3 Counter nut
4 Parabolic antenna
Parabolic antenna

9
3 Mounting
VEGAPULS 62 • Modbus and Levelmaster protocol
47114-EN-210621
3.2 Mounting preparations - Parabolic antenna
The instrument is also available in versions where the antenna has
adiameterlargerthantheprocesstting(thread,ange).Withsuch
versionstheantennamustbedisconnectedfromtheprocesstting
before mounting. Proceed as follows:
1. ClampVEGAPULS62withtheange,e.g.inabenchvice
2. Holdtheconnectionpiece(1)withawrenchontheatsurfaces
(widthacrossats22mm)
3. Loosen counter nut (3) completely with a wrench (width across
ats36mm)inthedirectionoftheantenna
4. Loosen compression nut (2) completely with a wrench (width
acrossats41mm)inthedirectionoftheantenna
5. Removetheparabolicantenna(4)axially
6. Mountsensorangeontheadapterangeandfastenittightly
7. Check if the O-ring seal is present on the connection piece and
make sure it is not damaged.
Note:
A damaged O-ring seal must be replaced: FKM (SHS FPM 70C3
GLT),FFKM(Kalrez6375)
8. Remount the parabolic antenna (4)
9. Fastencompressionnut(2)withawrench(widthacrossats41),
max.torqueseechapter"Technical data"
10. Fastencounternut(3)withawrench(widthacrossats36),max.
torque see chapter " Technical data"
Note:
Ontheversionwithrinsingairconnection,makesurethattheholes
intheantennaandintheprocessttingcoincide.Thisensuresasuf-
cientairow(theairisledthroughtheholestothefeedsystem.A
rinsing of the whole parabolic antenna is not intended).
1
2
3
4
Fig. 4: Dismounting, parabolic antenna
1 Connection piece
2 Compression nut
3 Counter nut
4 Parabolic antenna

10
3 Mounting
VEGAPULS 62 • Modbus and Levelmaster protocol
47114-EN-210621
3.3 Mounting instructions
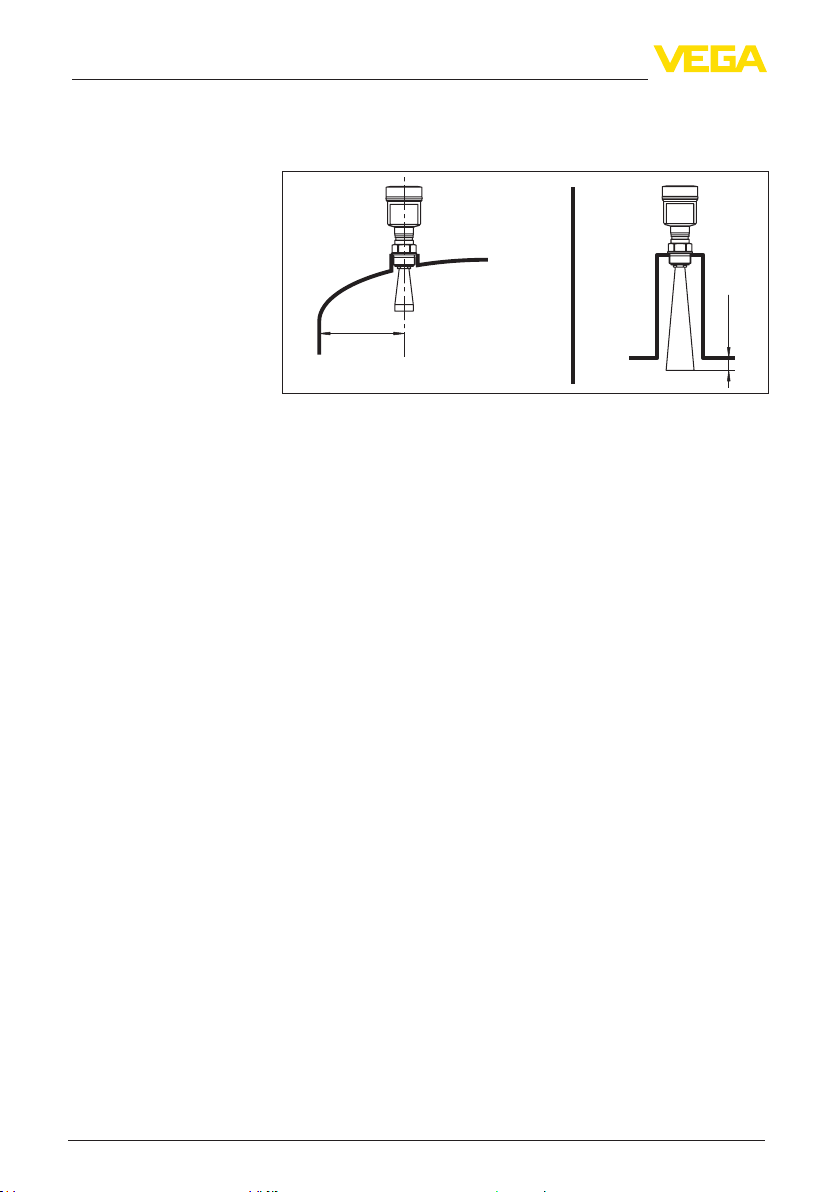
1. Distancefromthevesselwall>200mm,theantennashould
protrude > 10 mm into the vessel
ca. 10 mm
> 200 mm
(7.87
")
Fig. 5: Distance of the antenna to the vessel wall/vessel ceiling
2. Note min. socket diameter depending on the socket length
For further information see chapter " Mounting".
Mounting
Other manuals for VEGAPULS 62
15
Table of contents
Other Vega Measuring Instrument manuals

Vega
Vega VEGAPULS 67 User manual

Vega
Vega VEGATOR 112 User manual

Vega
Vega VEGAPULS PS6x.UD series Installation instructions

Vega
Vega VEGABAR 17 User manual

Vega
Vega VEGABAR 54 User manual

Vega
Vega VEGAFLEX FX-E.80H User manual

Vega
Vega VEGAPULS 63 User manual

Vega
Vega VEGACAL 63 User manual

Vega
Vega VEGABAR 86 User manual

Vega
Vega VEGAFLEX 81 User manual

Vega
Vega VEGADIS 61 User manual

Vega
Vega ALT-5 User manual

Vega
Vega VEGAVIB 63 User manual

Vega
Vega VEGABAR 17 User manual

Vega
Vega VEGACAP 63 User manual

Vega
Vega VEGACAP 65 User manual

Vega
Vega EL 11 User manual

Vega
Vega VEGASON 61 User manual

Vega
Vega VEGAPULS WL 61 User manual

Vega
Vega VEGABAR 86 User manual