RigExpert Stick XPro User manual

01.04.2023, 18:55
User’s Manual | RigExpert™
https://rigexpert.com/products/antenna-analyzers/stick-xpro/users-manual/
1/15
User’s Manual
RigExpert Stick XPro.
Users Manual
“Every job needs the right tool”
The Stick XPro is a vector analyzer for antennas and cables. It enables users to measure different parameters of antennas, cables,
lines, lters, and more within the frequency range of 100 kHz to 1000 MHz.
The compact and lightweight design of the Stick XPro analyzer makes it ideal for use both at home and in the eld.
The main parameters of the Stick XPro analyzer:
Turning on the analyzer.
The Stick XPro analyzer can be turned on in several ways: –by pressing the key. – when connecting the analyzer to a PC via a USB cable (the analyzer will
turn on automatically). – by long-pressing one of the keys : Important! At the same time, the analyzer will turn on and activate the
measurement mode to which the pressed key corresponds.
You can turn off the analyzer from any mode by long pressing the key.
Show less
Main menu.
After turning on the analyzer, using the key a screen with the main menu of the analyzer is available for the user.
Important! Unlike the Stick 230 analyzer, the Stick XPro analyzer has three main screens with menus.
Screen switching is carried out by short pressing of key.
In addition to service information, at the top of the screen (battery charge, the indication of connection to a PC, charger, Bluetooth connection), the screen
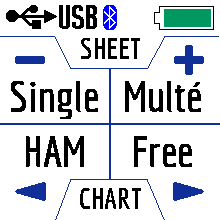
displays 4 main measuring functions of the analyzer:
Operating frequency: 100 kHz – 1000 MHz
Size: 185 * 40 * 33 mm (7,3 in x 1,6 in x 1,3 in)
Weight: 185 grams (6.5 Oz) (unpacked, with battery installed)
Type of antenna connector: N-type
Number of Enter Keys: 6
Display: color TFT, 220 * 220 pixels.
Type of battery used: Li-ion 18650 (included)
PC Connector Type: USB 2.0 Type-C
Charging Port Type: USB Type-C
Bluetooth Availability: Yes, Bluetooth ver. 4.2 BLE Single-mode, Class B
Battery Charge Time: 3 hours.
RF Power: -10 dBm (at 50 Ohm load)
Minimum frequency step: 1 kHz
Operating temperature: -20…40 °C (-4…104 °F)
Конфиденциальность -
Условия использования
EN UK JA
Every job needs the right tool
Home Where to buy Where to service The RigExpertCare™ HAM Radio Sponsorship
Products Downloads DigiFest News & Press Company
Search here..

01.04.2023, 18:55
User’s Manual | RigExpert™
https://rigexpert.com/products/antenna-analyzers/stick-xpro/users-manual/
2/15
Singe Multé
HAM Free
The Singe and Multé modes display the measurement result as numbers, while the HAM and Free modes display the measurement results as numbers and
charts.
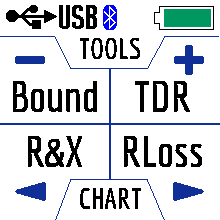
Bound TDR
R&X RLoss
The TDR, R&X and RLoss modes display the result in the form of charts and numbers, and the Bound mode in the form of numbers and color indication.
StubT cLen
cImp cLoss
The cImpand cLoss modes display the result in the form of charts and numbers, and StubT and cLenmode in the form of numbers and color indication.
When you press in the Main Menu, 13 information screens will be available.
The rst 12 screens will briey talk about the main measuring functions of the analyzer (Single, Multé, HAM, Free and others). By pressing the key, you can
switch to the corresponding measurement mode.
On the thirteenth screen when you press the key, you will enter the Settings menu.

01.04.2023, 18:55
User’s Manual | RigExpert™
https://rigexpert.com/products/antenna-analyzers/stick-xpro/users-manual/
3/15
Show less
Single mode.
Single is a measurement of all parameters. The mode is started by pressing the key.
After pressing the key, the measurement will start automatically. This is indicated by a ashing antenna icon located at the top of the screen.You can stop the
measurement by pressing once.You can resume the measurement by pressing once.
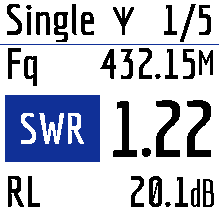
In Single mode, the analyzer has 5 screens with information.
The rst screen displays:
The second screen displays:
The third screen displays:
Important! Sometimes inductance or capacitance values are displayed with a minus sign. It would seem to be contrary to the laws of physics. But no, in
RigExpert analyzers, the minus sign next to the value indicates how much inductance or capacitance you need to add to the circuit in order to compensate for
the reactive component of the impedance.
On the fourth screen are displayed:
The fth screen displays:
working frequency
SWR value
return loss value
working frequency
|Z| value
value of active (R) and reactive (X) resistance (taking into account the sign) for the series mode
working frequency
|Z| value
inductance (L) and capacitance (C) value for series mode
working frequency
magnitude
value of active (R) and reactive (X) resistance (taking into account the sign) for parallelmode
working frequency
phase value
inductance(L)and capacitance(C)value for parallel mode

01.04.2023, 18:55
User’s Manual | RigExpert™
https://rigexpert.com/products/antenna-analyzers/stick-xpro/users-manual/
4/15
Screens switch among themselves by pressing keys.
There are two ways to change the value of the operating frequency:
A single press of the key saves the change and returns to Single mode.
A single press of the key returns to Single mode without saving changes.
The help menu is accessible by pressing and holding the key and then selecting the Help mode with the keys.
Show less
Multé mode.
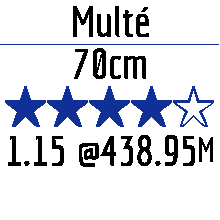
Multéis a new mode, in which you can quickly assess how well your antenna works on different HAM bands. The result is displayed as stars. The smaller the
SWR of the antenna in the range, the more stars.
Table of the dependence of the number of stars on the SWR:
5 – SWRfrom 1.0 to 1.1
4 – SWR from1.1 to 1.15
3 – SWR from1.15 to 1.3
2 – SWR from1.3 to 1.7
1 – SWR from 1.7 to 3.0
The SWR over 3 analyzer in Multé mode ignores.
If, after scanning, the analyzer didn’t nd a single resonance, then this means that either your antenna has a minimum SWR of more than 3, or the antenna or
coaxial cable is damaged.
Restarting this mode is possible by pressing any key except key.
After successful measurement in Multé mode, the following information will be displayed on the analyzer screen:
If there are more than one results detected by the analyzer, then the screens are switched using the keys.
When you press the keys on one of the results screens, the analyzer switches to HAM mode on the same band.
keystrokes and A single press changes the frequency value minimally. If you press and hold the keys, the frequency will change continuously
with an accelerated step.
pressing and holding the key for 2 seconds. After that, an information window will appear on the analyzer screen.Press key again. A window will
appear on the analyzer screen with the setting of the operating frequency. The keysselect the cursor position to change units, tens, hundreds,
thousands of kHz, and the keyschange the value.
band
number of stars (out of 5)
a minimum value of SWR and the frequency at which this value was found

01.04.2023, 18:55
User’s Manual | RigExpert™
https://rigexpert.com/products/antenna-analyzers/stick-xpro/users-manual/
5/15
A long press of the key will bring up the Help menu.
Show less
HAM mode.
This mode allows you to measure and display the SWR antenna chart on the analyzer screen on one of the xed HAM radio bands such as:
2.2 km, 630 m, 160 m, 80 m, 60 m, 40 m, 30 m, 20 m, 17 m, 15 m, 12 m, 11 m, 10 m, 6 m, 2 m, 70 cm.
Enabling this mode is possible either from the main menu by pressing the keyor when the analyzer is off by a long press of the same key. The
measurement will be performed automatically in the range that was used in the previous measurement.
To repeat the measurement, press once.To measure in a cycle, press the key two times at short intervals.A long press of the key will bring up the
Help window.
You can change the measuring range using the keys.
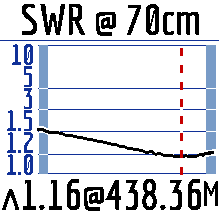
In HAM mode, the SWR icon and the range over which the measurement is carried out are displayed at the top of the screen.
In the center of the screen, a chart of the SWR values for the range is displayed.
The value of the minimum SWR found and the frequency at which this value was found are displayed at the bottom of the screen.
Important! To the left and right of the graph are two vertical stripes. They indicate going out of range. Sometimes the resonance of the antenna may be out of
range, but very close to the beginning or end. In such cases, the analyzer will determine the resonance beyond the limits of the ranges.
When you press the or keys the analyzer switches to Free mode with the center frequency of measurement corresponding to the center frequency
of the selected range:

01.04.2023, 18:55
User’s Manual | RigExpert™
https://rigexpert.com/products/antenna-analyzers/stick-xpro/users-manual/
6/15
You can exit the mode in the main menu by briey pressing the key.
Show less
Free mode.
This is a classic SWR measurement mode with plotting in a user-dened frequency band.
This mode is useful for survey measurement of the antenna in a wide frequency range or for measuring the SWR in a very narrow predetermined area.
In Free mode, the following is displayed on the analyzer screen:
There are two ways to set the center of the measurement frequency:
The keysselect the cursor position to change units, tens, hundreds, thousands of kHz, and the keys change the value.
Setting the measurement bandwidth by pressing the keys.
The minimum bandwidth is 10 kHz.
A quick double press of the key will cause a measurement in a loop.To stop click key.
To exit the mode, briey press key.
Show less
Analyzer memory usage.
The Stick XPro analyzer has 24 memory cells for storing measurement results from any graphic modes, such as HAM, Free, R&X, Return Loss.
To save the measurement results into memory after plotting the graph, press and hold the key. Then pressthe key (Save).
Use the keys to select an empty memory slot and press the key.
at the top of the screen: the value of the center frequency of the measurement and the width of the measurement band.
in the middle of the screen: SWR chart
at the bottom of the screen: the SWR value under the marker (solid vertical line) and the minimum of the SWR found (dashed vertical line).
keys. Pressing the key once will change the frequency discretely to a certain value. Pressing and holding the key will cause an accelerated
continuous change in frequency.
long press After press, a window will be available with a choice of setting the center frequency, exit or calling Help.Press briey and enter the
frequency setting menu.

01.04.2023, 18:55
User’s Manual | RigExpert™
https://rigexpert.com/products/antenna-analyzers/stick-xpro/users-manual/
7/15
You can name the cell (maximum 13 characters). Use the keys to select a character, the key to adding a character, and the key to
delete a character.
Loading results from memory is similar, instead of the key, use the key.
Important! In HAM mode, you can only load measurements that have been taken and saved in this mode.
Show less
Bound mode.
In this mode, you can quickly check your antenna for “pass/fail”
The measurement is performed at one frequency.
Set in the settings (long press of the key) the value of the operating frequency.
You can select the measured parameter (SWR or RL) by simultaneously pressing the arrow keys.
Here, set the value below which the measurement will be considered “good”.
This mode is convenient when you tune the antenna and at the same time visually follow the readings on the analyzer screen. Large print and color alarms will
not let you miss out on the best results.

01.04.2023, 18:55
User’s Manual | RigExpert™
https://rigexpert.com/products/antenna-analyzers/stick-xpro/users-manual/
8/15
Show less
TDR mode.
Time Domain Reectometers (TDR) are electronic instruments used for locating faults in transmission lines.
A short electrical pulse is sent over the line, and then a reected pulse is observed. By knowing the delay between two pulses, the speed of light, and the cable
velocity factor, the DTF (distance to fault) is calculated. The amplitude and the shape of the reected pulse give the operator idea about the nature of the fault.
Time Domain Reectometers (TDR) are electronic instruments used for locating faults in transmission lines.
A short electrical pulse is sent over the line, and then a reected pulse is observed. By knowing the delay between two pulses, the speed of light, and the cable
velocity factor, the DTF (distance to fault) is calculated. The amplitude and the shape of the reected pulse give the operator idea about the nature of the fault.
Instead of a short pulse, a “step” function may be sent over the cable.
Unlike many other commercially-available reectometers, Stick XPro does not send pulses into the cable. Instead, another technique is used. First, R and X (the
real and the imaginary part of the impedance) are measured over the whole frequency range (up to 1000 MHz). Then, the IFFT (Inverse Fast Fourier Transform) is
applied to the data. As a result, impulse response and step response are calculated.
This method is often called a “Frequency Domain Reectometry”, but the “TDR” term is used in this document since all calculations are made internally and the
user can only see the nal result.
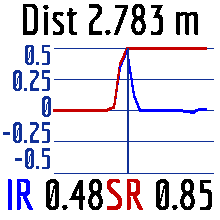
The vertical axis of the resulting chart displays the reection coecient: Γ= -1 for short load, 0 for matched impedance load (ZLoad=Z0), or +1 for open load. By
knowing the cable velocity factor, the horizontal axis is shown in the units of length. Single or multiple discontinuities can be displayed on these charts. While the
Impulse Response chart is suitable for measuring distance, the Step Response chart helps in nding the cause of a fault.
Connect the cable to the analyzer and click the key. Do not forget to set the vel. factor of the cable used in the settings.

01.04.2023, 18:55
User’s Manual | RigExpert™
https://rigexpert.com/products/antenna-analyzers/stick-xpro/users-manual/
9/15
Use the keys to change the vertical scale.
Use the keys to change the position of the cursor on the chart.
Show less
Return Loss mode.
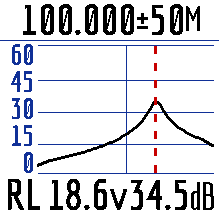
A mode that almost completely corresponds to the SWR mode. RL is the ratio of signal power or reection coecient expressed in decibels.
In RL mode, the following is displayed on the analyzer screen:
There are two ways to set the center of the measurement frequency:
at the top of the screen: the value of the center frequency of the measurement and the width of the measurement band.
in the middle of the screen: RL chart
at the bottom of the screen: the RL value under the marker (solid vertical line) and the max of the RL found (dashed vertical line).
keys. Pressing the key once will change the frequency discretely to a certain value. Pressing and holding the key will cause an accelerated
continuous change in frequency.
long press After press, a window will be available with a choice of setting the center frequency, exit or calling Help.Press briey and enter the
frequency setting menu.

01.04.2023, 18:55
User’s Manual | RigExpert™
https://rigexpert.com/products/antenna-analyzers/stick-xpro/users-manual/
10/15
The keysselect the cursor position to change units, tens, hundreds, thousands of kHz, and the keys change the value.
Setting the measurement bandwidth by pressing the keys.
The minimum bandwidth is 10 kHz.
A quick double press of the key will cause a measurement in a loop.To stop click key.
To exit the mode, briey press key.
Show less
R&X mode.
R&X mode displays values of active and reactance in a user-selected frequency range.
Set the center frequency of the measurement by long-pressing the key.
The frequency band is changed by pressing the keys.
Set the full range by simultaneously pressing the and keys.
The R&X mode works in two modes:
Standard. In this mode, changing the shift of the cursor with the keys will cause repeated measurement and redrawing of the chart.
In pan mode, you can move the cursor left and right without redrawing the chart. This is convenient when you need to quickly view the R X values in a certain
frequency range.
This mode is entered by simultaneously pressing the and keys.
Exit the mode – quickly press the key.
Show less
Stub tuner.
The Stub tuner mode is designed to help making or checking 1/4-λ or 1/2-λ coaxial stubs.
Connect either open or short circuited cable to the analyzer and press the keyto start.
Table of contents
Other RigExpert Measuring Instrument manuals

RigExpert
RigExpert AA-650 ZOOM User manual

RigExpert
RigExpert Stick Pro User manual

RigExpert
RigExpert ZOOM series Mounting instructions

RigExpert
RigExpert AA-3000 ZOOM User manual

RigExpert
RigExpert AA-170 User manual

RigExpert
RigExpert AA-2000 ZOOM User manual

RigExpert
RigExpert AA-1500 ZOOM User manual

RigExpert
RigExpert AA-35 ZOOM User manual

RigExpert
RigExpert REAMP User manual

RigExpert
RigExpert AA-55 ZOOM Mounting instructions