Revez HD-TRIO User manual


1
Preface
Please read this manual carefully before using your Digital Satmeter for the first time.
This operating manual will help you in the
ЬAppropriate,
ЬSafe
ЬFavorable
The technical specifications and operating methods included in this manual are subject to changes without notice. In case of
any inquires after a period of usage, please contact the manufacturer.
Safety Precaution
Please read the safety instructions carefully before operating the device.
Please follow all warnings and instructions on the equipment and in the operating manual.
Safety of persons
Ensure that nobody can be hurt by falling tools or parts of the sate antenna during the adjustment and installation of the
antenna. For own security, use a rope on sloping roofs.
Attention for adapter
The devise should only be operated with the supplied AC adapter at the mains. Do not open the meter or the included AC
adapter. There is danger of life through electric shock! Wrong usage of the ports can lead to the destruction of the measuring
device.
Proceed carefully with the measuring device:
ЬAvoid low temperatures (below 0 °C) or to high humidity.
ЬThe TFT display can be damaged by mechanical impacts.
ЬAvoid excessive input voltages. Please refer to the technical data
Do not operate with the device:
ЬIf it has visible damage,
ЬIf there are loose parts in the device,
ЬIf the device was located outdoors or in damp rooms a extended period of time.
Main Supply:
Before operating, please check the units operating voltage is 90~240V AC 50/60Hz.
Overload:
Do not overload a wall outlet, extension cord or adapter, neither use damaged power cord or touch it with wet hand as this
may result in electric shock.

2
Liquid:
The receiver shall not be exposed to dripping or splashing water, and that no objects filled with liquids, such as base, shall be
placed on the apparatus.
Ventilation:
Keep the slots on top of the receiver uncover to allow sufficient airflow to the unit. Do not put the receiver on soft furnishings
or carpets. Do not expose there receiver to direct light or do not place it near a heater or in humid conditions. Do not stack
other electronic equipments on top of the receiver.
Cleaning:
Plug out the receiver from the wall outlet before cleaning. Clean the receiver by a soft cloth or mild solution of washing-up
liquid (no solvents).
Location:
Put the receiver indoor in order to avoid lightening, raining or sunlight.
Uncover:
Do not remove the cover, to reduce the risk of electric shock. Contact qualified and licensed service personnel to repair the
receiver, or contact your dealer.


6
Red: the product is power on
Green: the product is power off
4. LOCK light
˖
This light will be on when signal is locked
5.13V/18V light: Indicate the 13V/18V
6. Function key
˖
Made of 4 keys, F1 - F4
7. Arrow key and OK key
˖
Press the Arrow key to select the right item then press OK key to confirm
8. SYSTEM key
˖
Enter the settings menu, you can set all system parameters products
9. AV IN key:
Use this product as a television
10. FIND key:
Enter the menu of measurement signal, you can measure the signal about transponder quickly.
11. MENU key:
Enter the main menu
12. EXIT key
˖
Exit from the present menu and back to the previous menu
13. SCAN key
˖
In the S2 modelˈit is blind scanˈin the T and C modelˈit is auto search
14. USB Port:
One USB Host Port
15.HDMI Port
˖
Use HDMI line connect to TV
15.ON/OFF
˖
Switch the battery on/off
III. Connection with Other Device
The following chapter shows you the connections among product, ANT and other equipment, please read this
first if you are not sure about the connection, and it will guide you to the correct connection.

7
You can connect one receiver directly to the ANT IN.
IV. Detailed operation Guide
You should installation the receiver when powering on your product for the first time after purchase.
4.1 Powering On
1. Connect the power cord of the product to a wall outlet.
2.Power on by pressing the POWER button on the panel.
4.2 Satellite
Main Menu-> satellite
Press OK enter the satellite model
4.2.1 TP Search
Main Menu-> Satellite -> TP Search
Press OK enter the TP search, first, you should select satellite, in this picture, you also can delete, move, and rename the
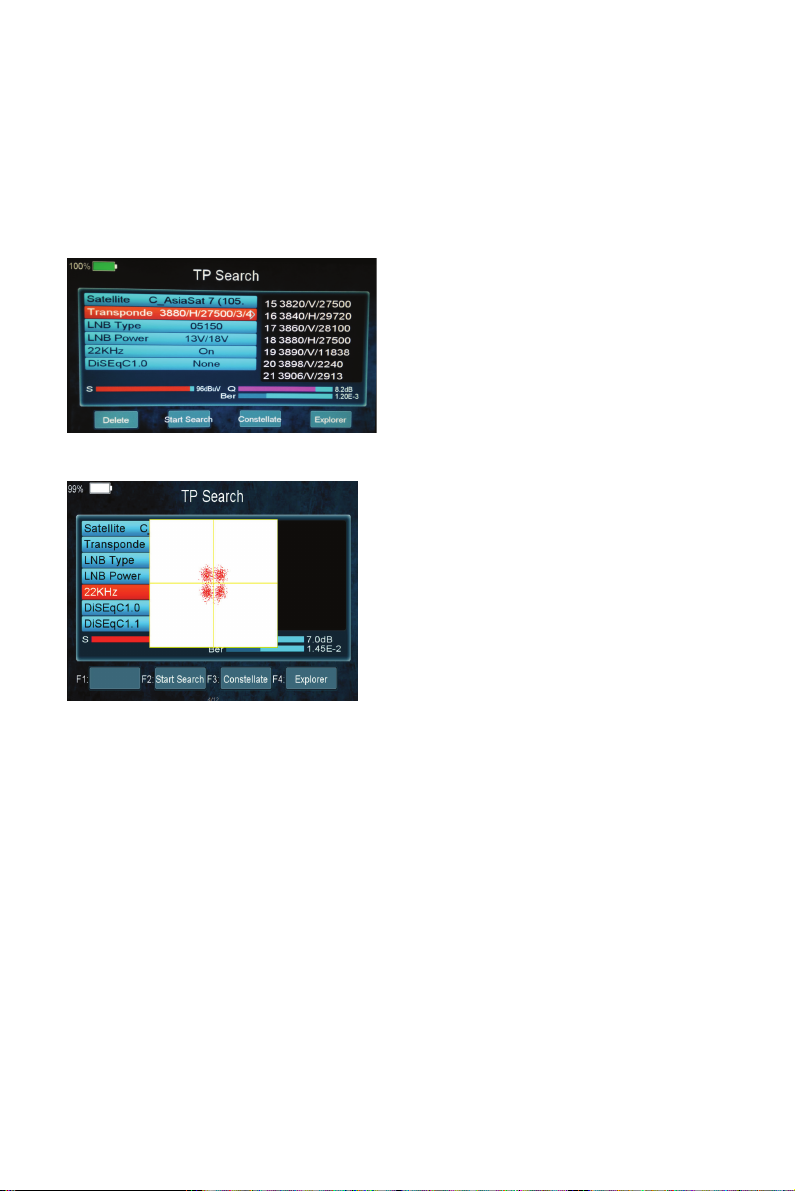
8
satellite. When you fixed on a satellite, then press OK the following window will appear. Use [
S
/
T
]button to move cursor,
it’ll show the satellite name, Transponder , LNB , 22KHz, DiSEqC port . When all parameters confirm, press F2 button search the
channels. You also can press F1 to delete the satellite, or press F3 to view the constellation, or press F4 to explorer the signal
information.
you can display constellation by F3 button.
4.2.2 Satellite IDE.
Main Menu-> Satellite ->Satellite IDE.
If you don’t know the signal information of some usual sat, in this menu, please wait a moment, it will find the satellite
identify.
4.2.3 Packet Control
Main Menu-> Satellite -> Packet Control
In this menu, you can know the strength and quality of each transponder under the satellite.
Table of contents


