Reef Factory RFLK01 User manual

ver. 2.0.1
Level keeper
User Manual
Dear customer, thank you for your purchase.
ENGLISH
www.reeffactory.com
Table of Contents
I. Assembly of the device………………………………………………………………………………….…………………………..3
II. Initial configuration…………………………………………………………………………………….…………………………….6
III. Configuration of the device operation.....................................................................................................10
IV. Calibrating the device…….……….………………………………………………………………..……..……....………….…12
V. Additional features of the device……………………………………………………………..……………..…………………15
VI. Resetting the Device……..….………………………………………………..……………………..………..………………….16
VII. Changing the access password to the device……………..…………………..…………...…………..……………….16
VIII. Replacing the fuses ....................................................................................................................…..……17
IX. Device update…………………………..…………..………..……………………………………..……………………………...18
X. Information and Warnings…………….……………..………………………….……………….……………..……………….19
XI. Warranty conditions………………………….……………………….…………………………….………………..……………21
XII. Technical information…………………….………………………………………………………..……………………………23
XIII. Knowledge base and technical support…………..………………………………………..……………………….……24
IMPORTANT INFORMATION! Please read the entire user manual very carefully before setting
up and using the device. There may be slight differences in the content between what is
presented on the screen of the device and the descriptions in the manual.
User manual Level keeper ©Reef Factory 2022
2
I. Initial setup
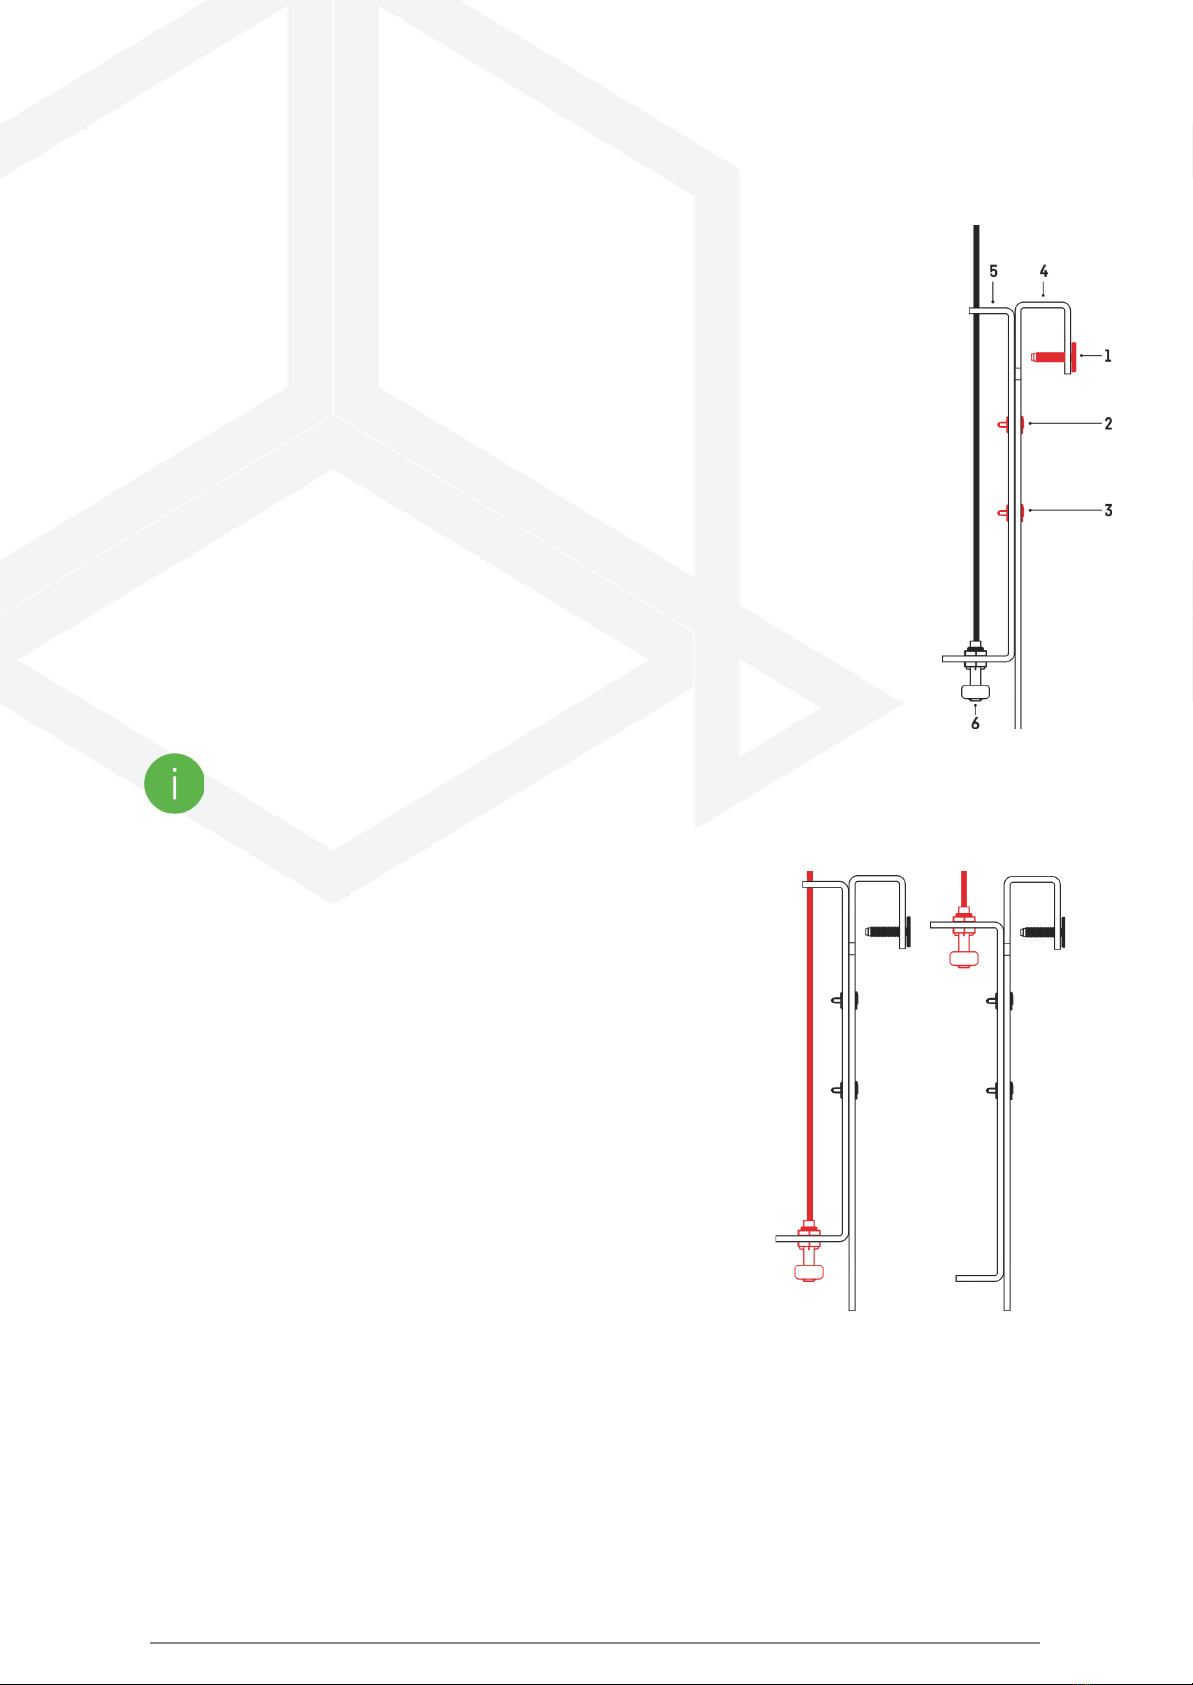
Prepare the liquid level sensor
Connect the hook (part no. 4) to the probe holder (part no. 5) with the fixing screws and nuts
(key 2 and number 3).
Then insert the sensor with the cable (part 6) and the holder (part 5) as shown in the picture.
To do this, unscrew the top nut enough to insert the sensor into the holder (part 5), insert
the sensor, and then re-tighten the nut.
Hang the entire sensor on the aquarium wall and gently tighten the stabilizing screw (No. 1)
ATTENTION! Be careful not to twist the parts too tightly so as not to damage them.
Mount the level sensors in the tank
The level sensors should be mounted in the tank in such a way that they
correctly indicate the liquid level. Depending on the height of the water
in the aquarium, they can be mounted in two ways.
If you have a low water level in your tank, you can install a level sensor as
shown in the picture on the left.
However, if your tank has a high water level, you can mount the sensor
as shown in the picture on the right.
User manual Level keeper ©Reef Factory 2022
3

Connect the circulation pump and wires to the unit.
One of the floats should be installed about 5 cm higher than the
other, and the sensors should be as far apart as possible (see
picture opposite). This allows for additional control of the water
level.
Connect the control wires of the sensors to the inputs on the
device.
Connect the refilling system device to the socket marked with a
drop.
Depending on your tank, adjust the parameters of the
pump to replenish evaporated water to your needs. Pay
attention to the lift height so that the pump is able to lift the water column to the correct height
and the eciency of the device.
If you are using direct top-up water from the RO/DI filter, you can use the solenoid valve. In this
case, be sure to use a high-end solenoid valve that only opens when power is applied. Using an
inappropriate solenoid valve may overflow the aquarium.
The maximum output load of the device is 500 W.
Hang the device.
The device can be hung using the supplied pegs and mounting
screws. The holes for hanging the device are located on the
back of the device.
In order not to make a mistake with the appropriate distances
for holes in the surface, on which you want to mount the
device, you can use the template that has been attached to
the manual.
The device should be hung where it cannot be splashed with water and the humidity is low.
User manual Level keeper ©Reef Factory 2022
4

Connect the device to the power supply.
Using the power cord
included in the set, connect the device to the
main socket.
Insert the power cord into a tightly fitting socket, and
make sure that the cord is not loose.
User manual Level keeper ©Reef Factory 2022
5

II. Initial configuration
To connect the device to your account using the Smart Reef app, the device
must be connected to power and within range of your home network, and
your phone or tablet. You can download the app from the Play store and the
App store.
1. open the Smart Reef app on your mobile device and log in.
If you do not already have a Smart Reef account,
select “Create a free account”.
Enter the email address you want to use in the Smart Reef application
as well as the password, and then repeat it.
If you don't want to, log in every time you launch the application,
check “Keep me logged in”.
2. Create your aquarium in the Smart Reef app.
If you do not have your aquarium yet, use the option
“Add an aquarium” in the lower left corner of the screen and provide the
necessary information.
If you already have your aquarium in the Smart Reef app,
proceed to the next step.
User manual Level keeper ©Reef Factory 2022
6

3. Add the device to your Smart Reef account
From the list of aquariums or the list of devices
in the lower right corner of the screen,
select “add device.”
Allow the app to use your exact location when
using the app. This allows the app to connect devices
to Wi-Fi networks more easily.
Select from the scrolling list the device you want to add to your
Smart Reef account and press “NEXT”.
User manual Level keeper ©Reef Factory 2022
7

4. Set up a Wi-Fi connection to your home router.
Enter the exact Wi-Fi network name of your home router.
Then enter the password for your home router, if required,
and press “NEXT”.
Pay attention to uppercase and lowercase characters.
NOTE: Special characters may not be supported if the name
or password for your router contains such characters,
change them in your router's settings.
NOTE: Reef Factory devices only support the 2.4 GHz Wi-Fi
network band. If your router generates 2.4 GHz and 5 GHz
bands, indicate the name of the 2.4 GHz network.
Select “SCANNING” to scan the QR code on
the device, then allow the Smart Reef app to
access the camera while using the app.
After pressing “SCAN”, hover your phone's
camera over the QR code to scan it, or
manually enter the device's serial number
and select “CONNECT”.
You can find the serial number on
the device, on the packaging and as
the generated Wi-Fi network.
The serial number starts with RF, an
abbreviation of the device name, and
a string of digits.
User manual Level keeper ©Reef Factory 2022
8

Allow the Smart Reef app, to temporarily connect
to set up a Wi-Fi network.
Congratulations! The device has been correctly added to your Smart
Reef account and will appear in the list of devices within 60 seconds.
User manual Level keeper ©Reef Factory 2022
9

III. Device operation configuration.
Use the slider to set how often the device should check whether it is
necessary to refill the tank with liquid:
-function disabled - the cyclic refilling function will be disabled
-60 minutes mode - this mode will cause a specific amount of water to be
refilled to the tank every 60 minutes
-30 minutes mode - this mode will cause a specific amount of water to be
refilled to the tank every 30 minutes
-10 minutes mode - this mode will cause a specific amount of water to be
refilled to the tank every 10 minutes
User manual Level keeper ©Reef Factory 2022
10
Table of contents
Other Reef Factory Measuring Instrument manuals


