Optika Italy HRD Series User manual
Model
HRD-300N
HRD-400N
HRD-500N
HRD Series
INSTRUCTION MANUAL
v 1.1 2017

Page 2
Summary
1. Introduction
2. Display and Buttons
3. Preparation before use
4. Boot and Calibration
5. Measurement
6. Scale converting and temperature system converting
7. System shutdown
8. Maintenance and preservation
9. Troubleshhoting guide
Page 3
1. Introduction
Portable Digital Refractometers are microprocessor-based with laboratory accuracy to be able to accurately
and instantly measure the refractive index(RI) , concentration and other parameters for many kinds of liquids;
these instruments have a friendly operation pattern and display eld as well as an automatically temperature
compensation system, including 3 models. Comparing with the traditional hand held ones they are much faster,
more accurately, and clearly in measurements.
Instrument and spare part
The instrument includes:
1 refractometer
1 dropper
1 removable shell
1 AAA 1.5V battery
Before operating the instrument, please read carefully this manual.
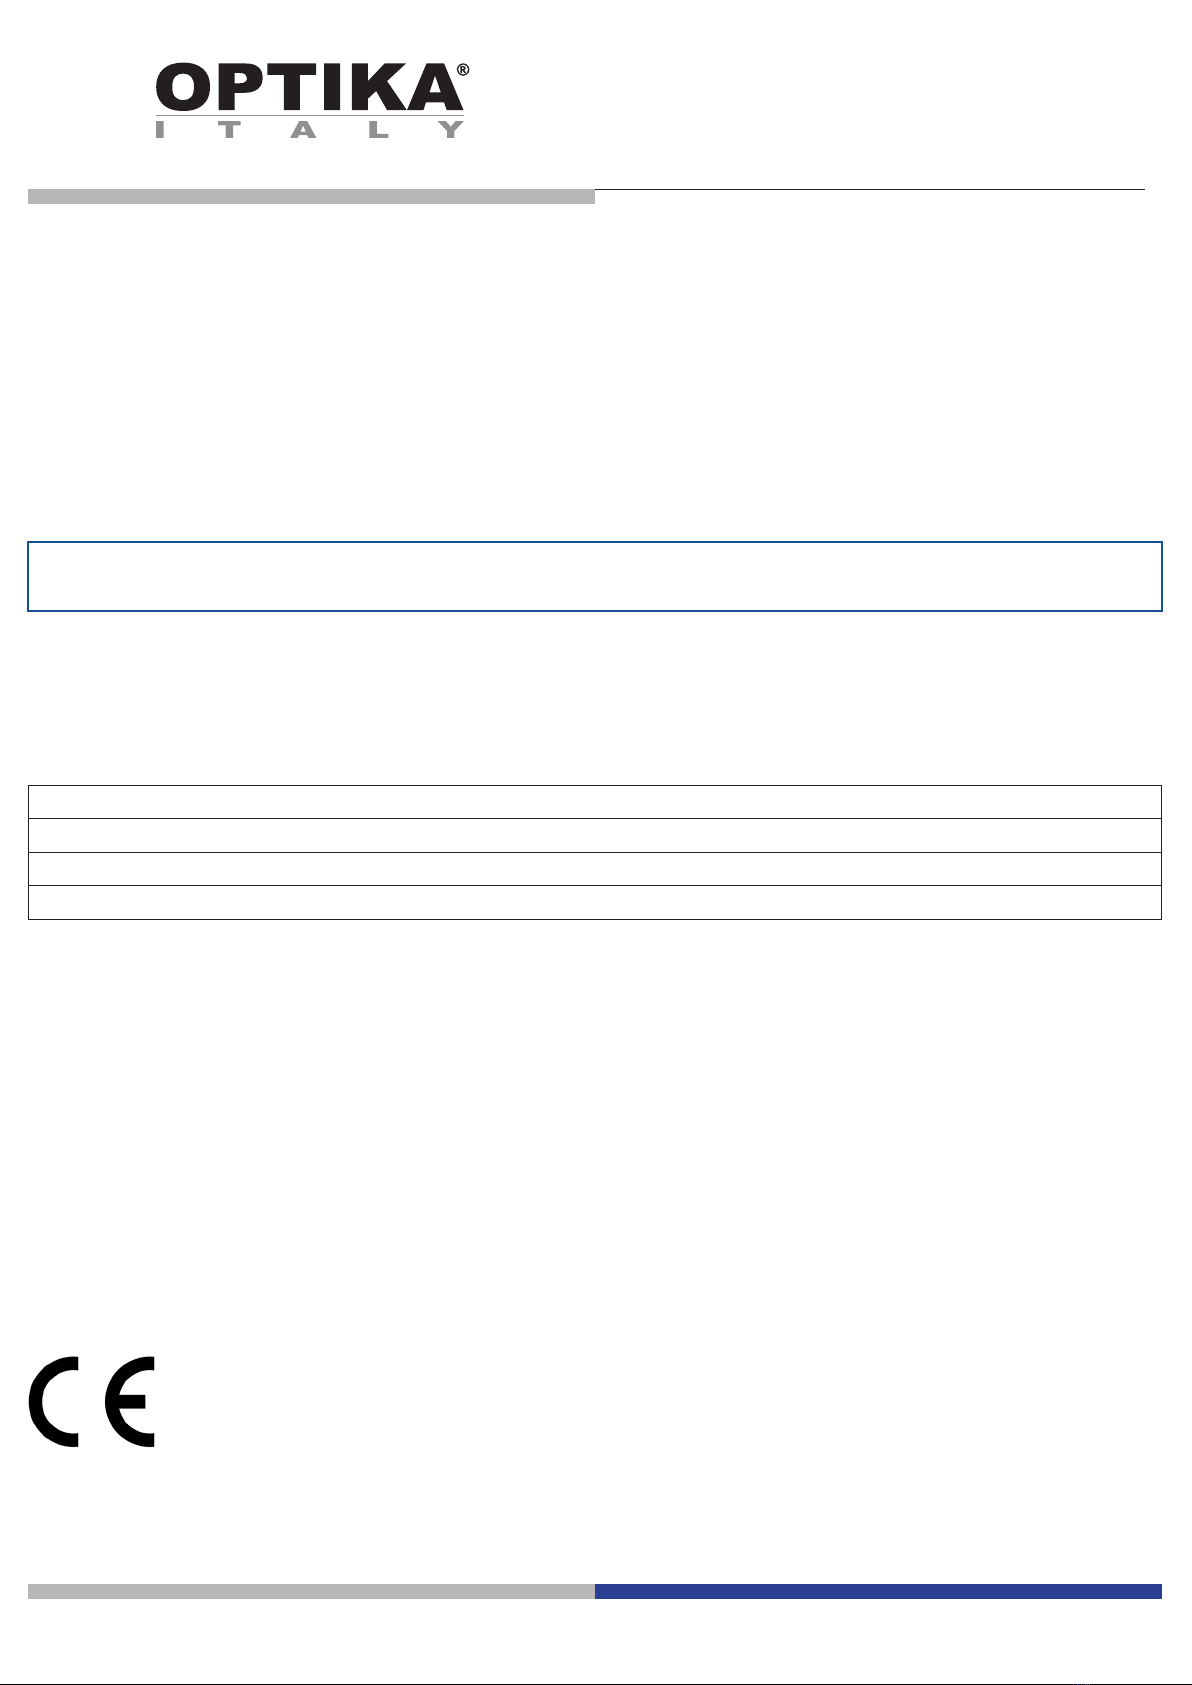
Panel description (Fig.1)
1. Stainless steel plate
2. Prism
3. Keypad
4. LCD display screen
5. Battery compartment
6. Removable shell
7. Battery compartment cover
Fig.1
Page 4
2. Display and Buttons
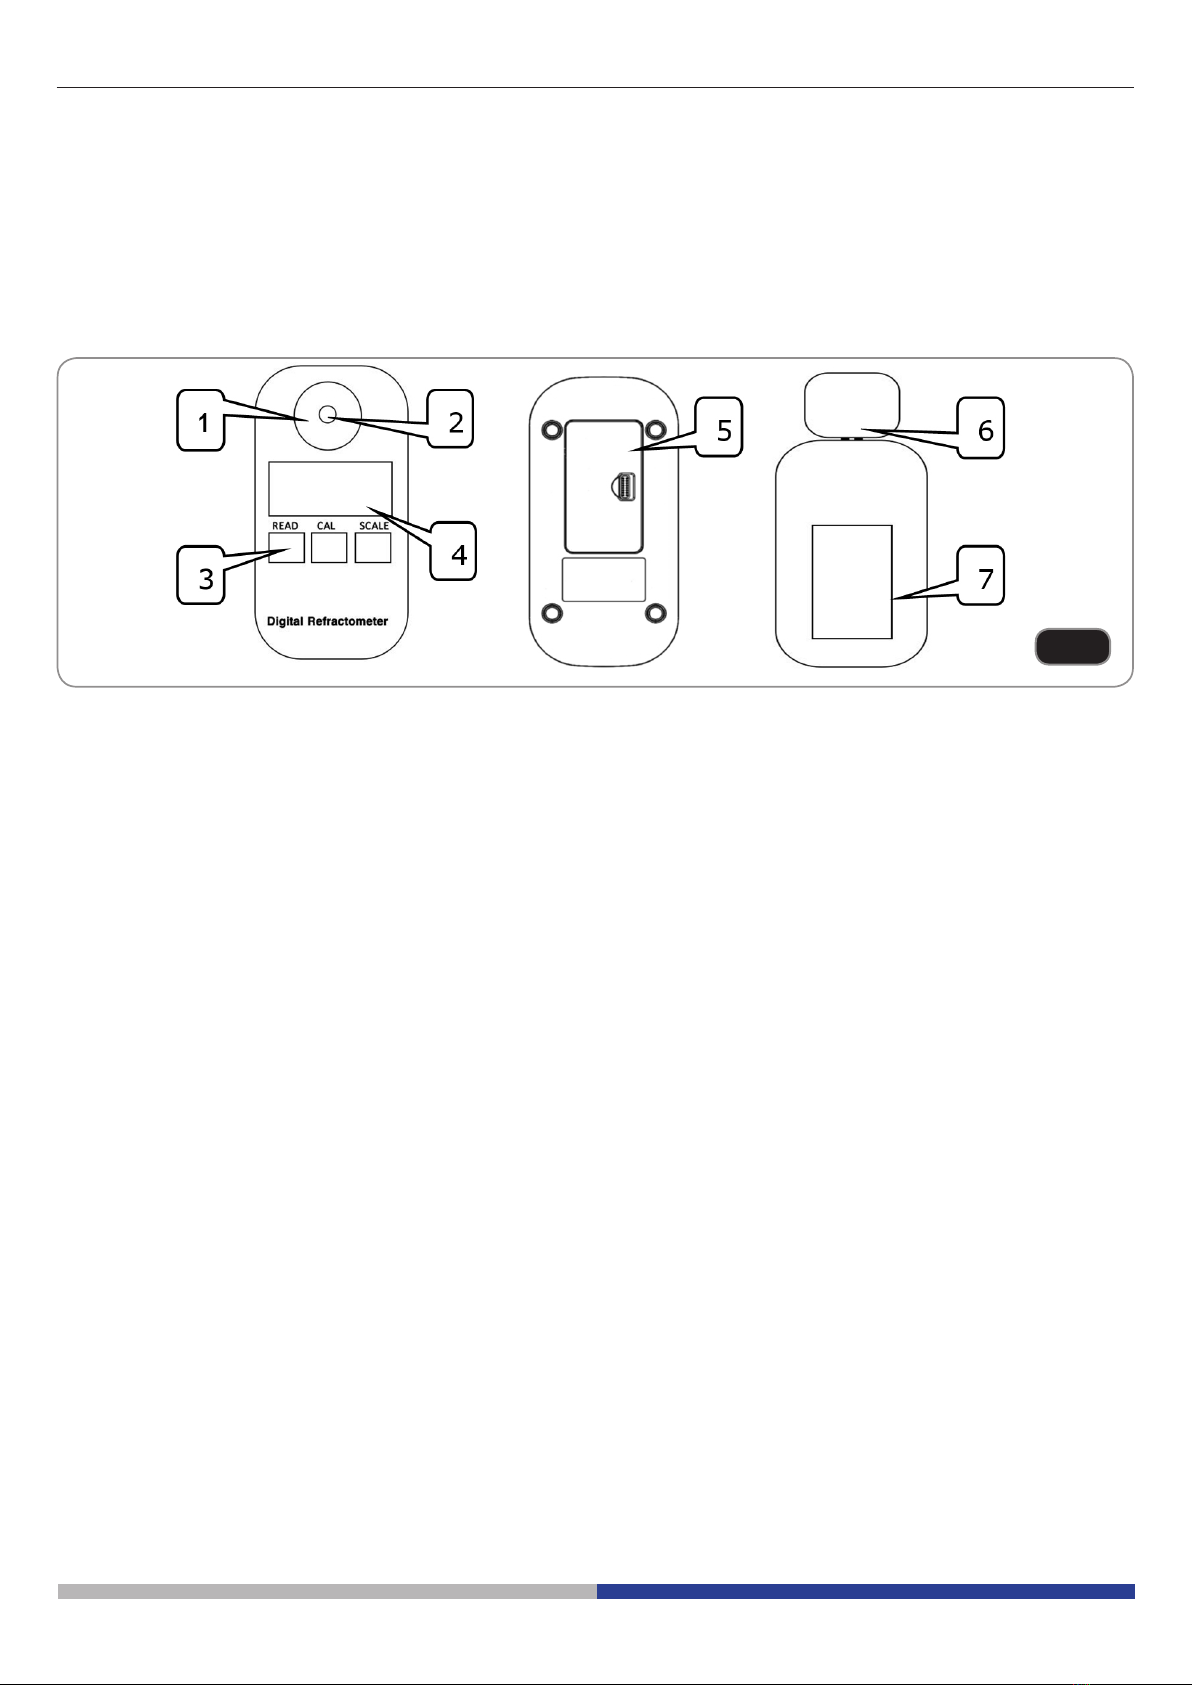
1. Display
This LCD screen has three main display areas, which are instrument display area, temperature display area,
and muti-function display area and others. (Fig.2)
1. Battery level
2. Instrument display area
3. % or ‰ unit
4. Refractive index (RI) display
5. Temperature display
6. Multi-function display
Note: Battery charge symbols table
2. Buttons
On the instruments three buttons are available (Fig.3):
1. “READ” button: booting / measurement.
2. “CAL” button: for entering calibration mode “ZERO POINT”
3. “SCALE” button: for converting dierent scales / converting temperature system between Celsius and
Fahrenheit.
Battery level Battery charge symbol
80%-100%
50%-80%
20%-50%
20%
Fig.2
Fig.3
Page 5
3. Preparation before use
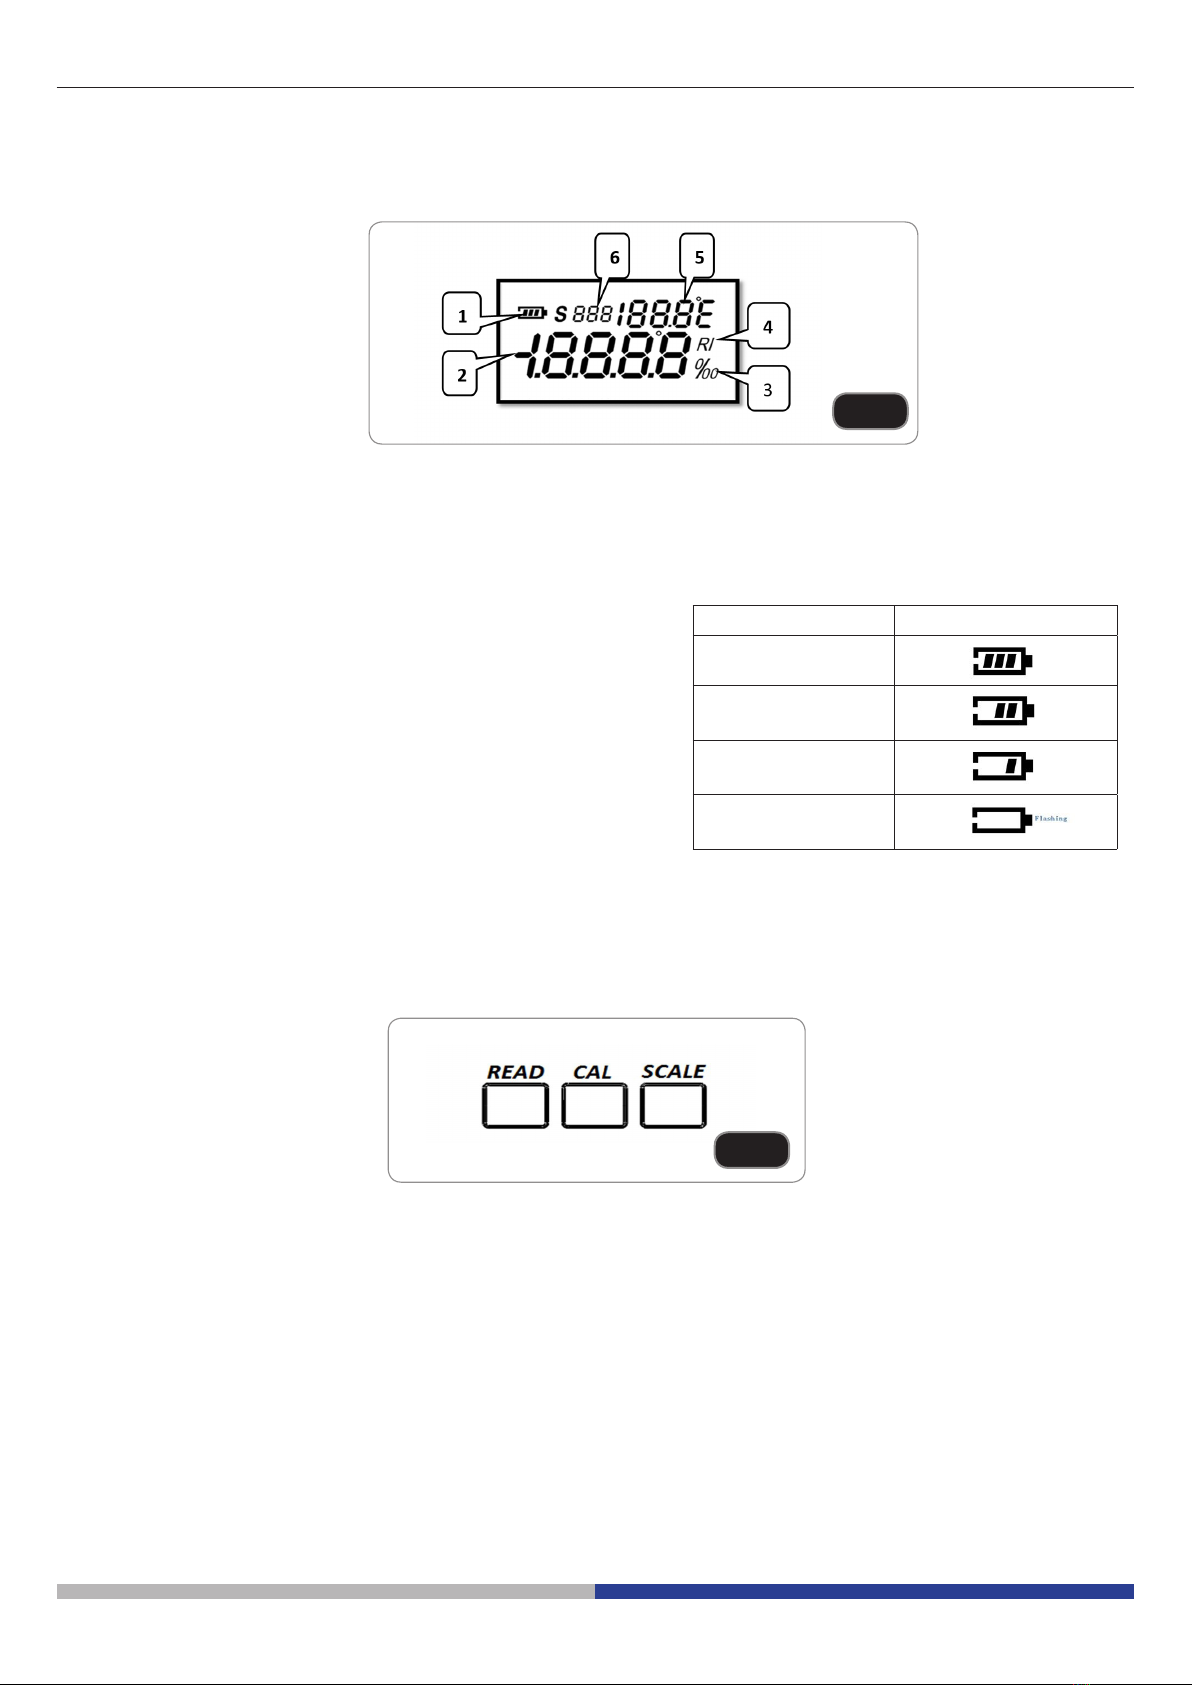
1. Install the battery (Fig.4)
Open the battery compartment by pushing the cover’s lock along the direction of the arrow.
Insert the battery supplied, respecting polarity.
Close the battery compartment.
4. Boot and Calibration
1. Boot
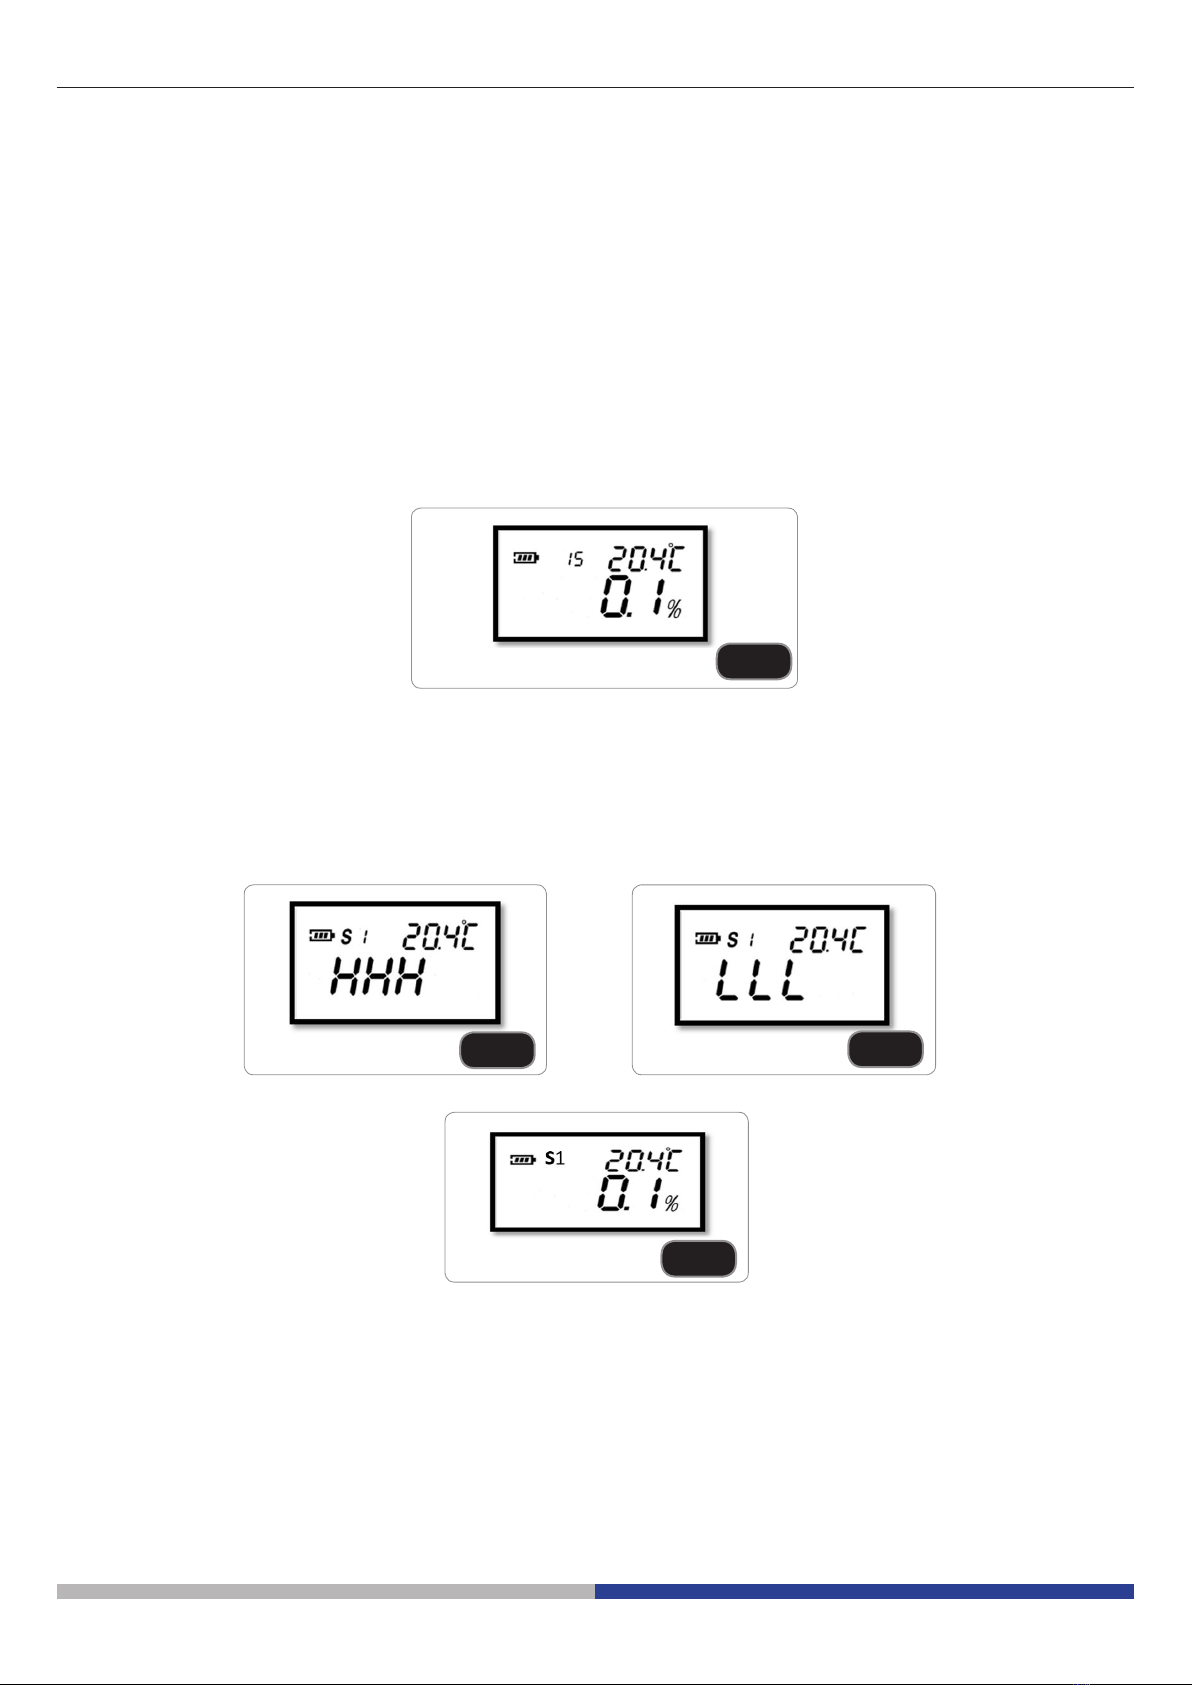
Press “Read” button for 1 second. The instrument would switch on and start boot (Fig.5).
Note:
1. The multi-function display area would show the current scale number. For example: S01 is expressed for the
rst scale.
2. When used outdoor, please avoid the strong sunlight to lest aecting measurement accuracy. Otherwise,
install and cover the removable shell to resist the strong light.
3. Before dripping into the sample liquid, please clean the sample plate with soft clean cloth or soft paper.
4. Please keep the instrument in a stable and still statement and position.
5. Please ensure instrument, environment and sample are in the same temperature level before measuring.
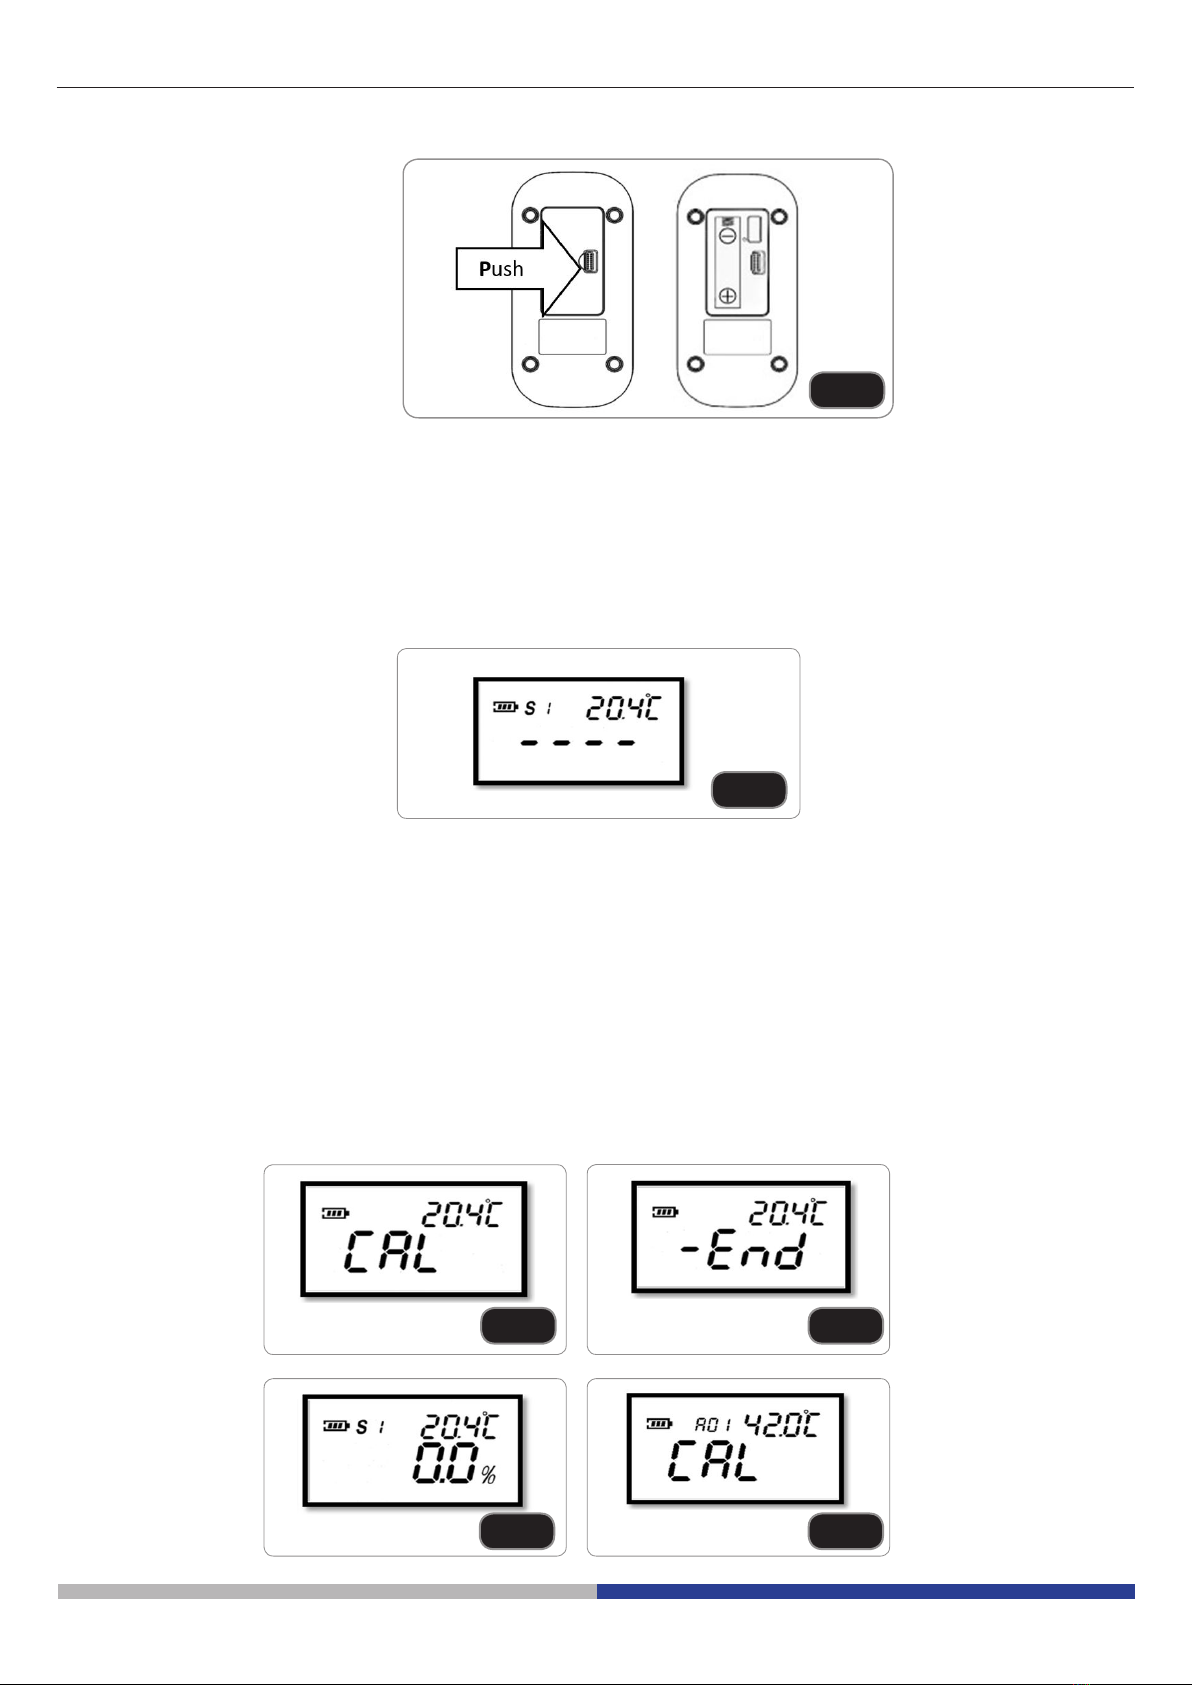
2. Calibration
Fig.4
Fig.5
Fig.6 Fig.7
Fig.9Fig.8
Page 6
1. Drip 4 ~ 5 drops of distilled water in sample plate.
2. Press “CAL” button for 2-3 seconds till see the ‘CAL’ ashing. See Fig. 6.
3. Press “CAL” button once again during the ‘CAL’ ashing and look at the display as shown in Fig. 7: calibration
is nished and the value is 0.0% (see Fig. 8).
If no any operations for 10 seconds the instrument would return back to booting status.
If fail to complete the calibration, multi-function display area would show an Error Code (see Fig. 9).
Note:
1. If multi-function area show code A01 that means calibration temperature exceed the limitations, other error
codes could be checked in the chapter 9. Troubleshooting Guide.
2. Instrument support only distilled water calibration.
5. Measurement
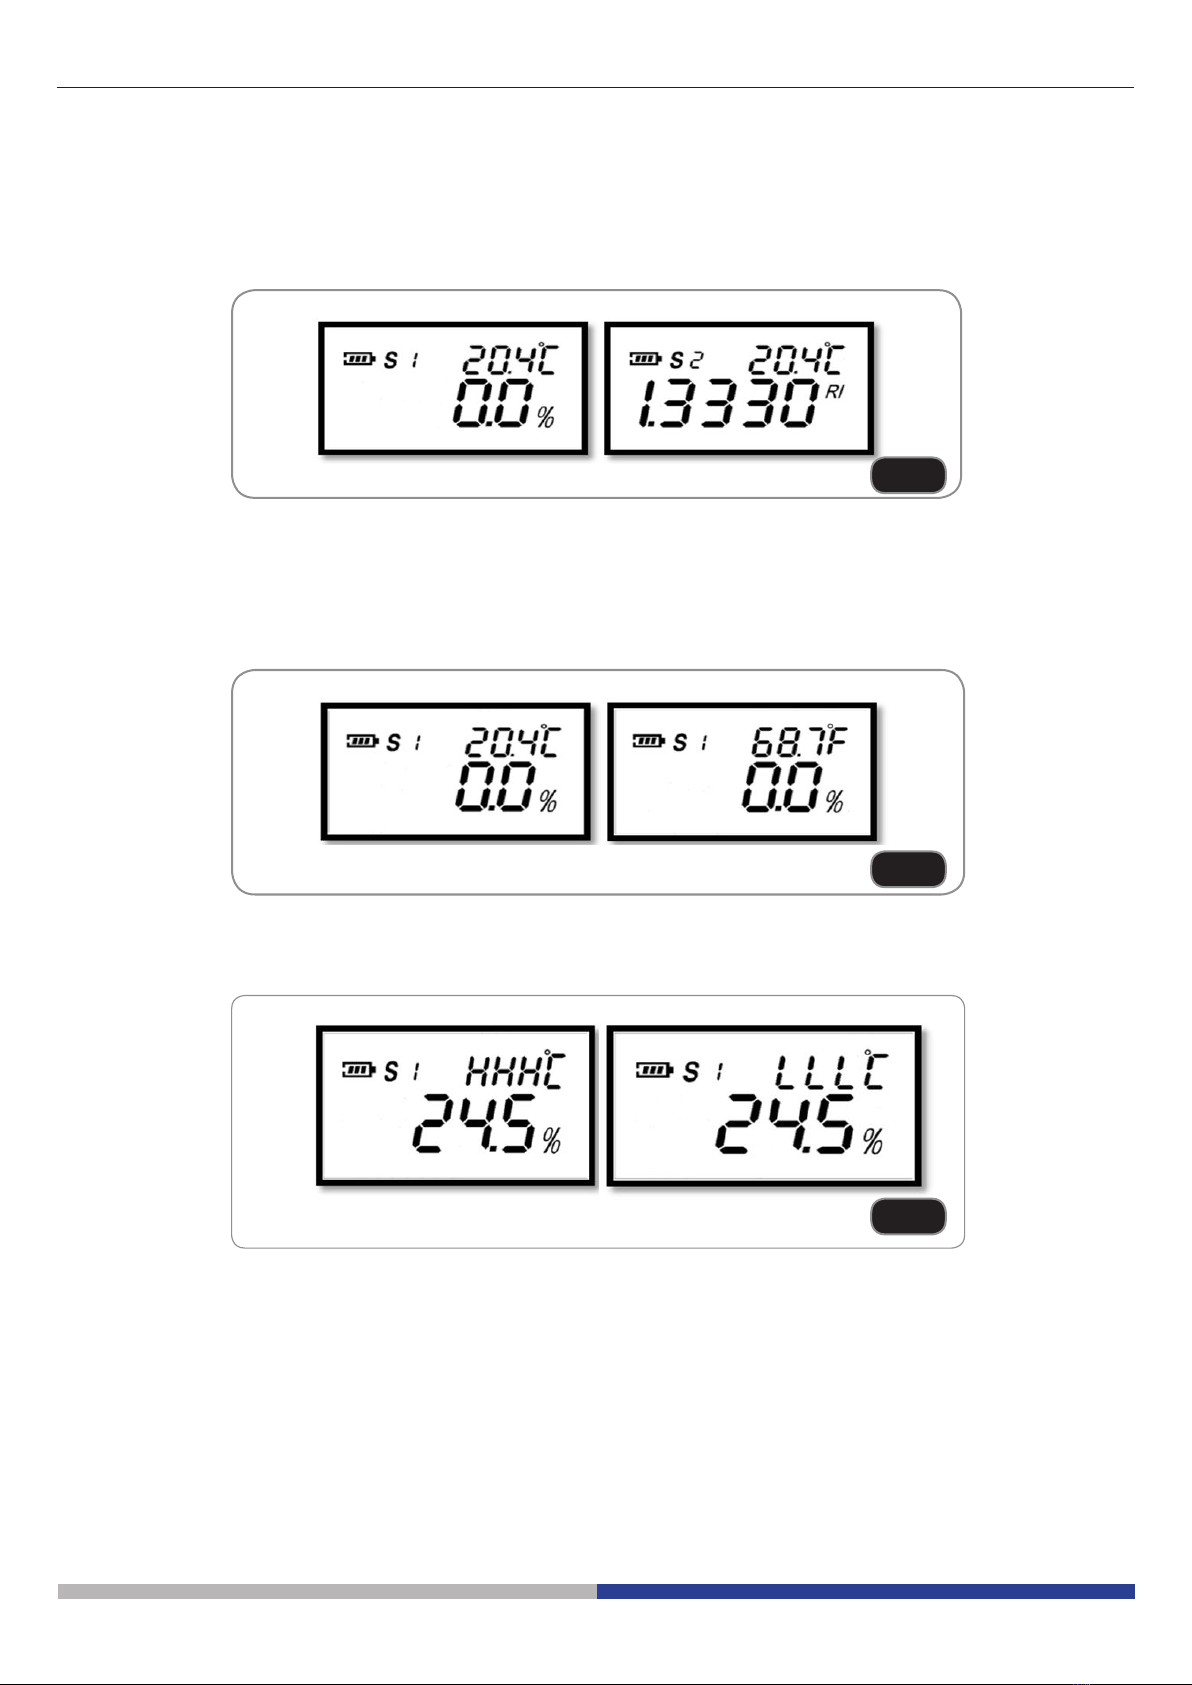
After the calibration, clear the distilled water and dry the sample plate, drip 4 ~ 5 drops of sample, press quickly
1 second the “Read” button, the instrument would give the current value accordingly.
After automatic temperature compensation, see Fig. 10. If exceeding the measuring scope, ‘HHH’ or ‘LLL’ would
shows in the host display area, see Figg. 11 and 12.
If press the “Read” button for 2 seconds, the instrument would make the automatic measurements upon
programmed times (default 15times), the nal value is the average of 15 times’ measurement, see Fig. 13.
After measurements, the multi-functions display area would return back to display scale status.
Note: multi-function area would show remaining times during the automatic measurement.
Fig.10
Fig.11 Fig.12
Fig.13
Page 7
6. Scales converting and temperature systems converting
1. Scales converting
The meter oers maximum 10 scale marks measure scale: Press the “‘Scale” button each second can convert
the scales and the values. (Fig.14)
2. Temperature system converting
The meter oers temperature units which are Celsius (0.0 ~ 50.0 °C) and Fahrenheit (32.0 ~ 122.0 °F).
Press “Scale” button for 2 seconds, temperature unit will be converted. (Fig.15)
If exceed the temperature limitations, the signs “HHH” or “LLL” would shows. (Fig.16)
7. System shutdown
1. If without any operations for 1 minute, the instrument would be automatically shut o.
Fig.14
Fig.15
Fig.16
Page 8
8. Maintenance and preservation
1. Please clean and wash the sample plate with distilled water and dry it with soft cleaning cloth or paper towel
after nishing the measurement of one kind sample.
2. Never leave remains and residuals of samples in the sample plate for long time.
3. After nishing measurements of corrosive liquid, please clean the sample plate as quick as possible to avoid
irreparable damage of the prism and metal surface of the plate.
4. Please use soft cleaning cloth or paper towel to clean the sample plate to avoid scratching the prism’s glass.
5. Keep dropper and cleaning cloth to be clean and dry under the preservation.
6. If no using the instrument for a long time, please remove the battery, and store in a cool and dry environment.
Value range Accuracy Resolution
Temperature 0.0 ~ 40.0°C ±0.5°C 0.1°C
32.0 ~ 104.0°F ±0.9°F 0.1°F
Dimensions 121 X 58 X 25 (mm)
Net weight 90 g (excluding battery)
ERROR CODE Instructions
A01 Beyond the scope of calibration temperature: 0.0°C ~ 40.0°C
A02 During calibration, no solution or solution wrong
A03 This instrument has a hardware failure.
9. Troubleshooting guide

Pagina 9

This manual suits for next models
3
Table of contents
Languages:


