Frontier Labs BAR-LT User manual

BAR-LT
Quick Start Guide
Version 1.0

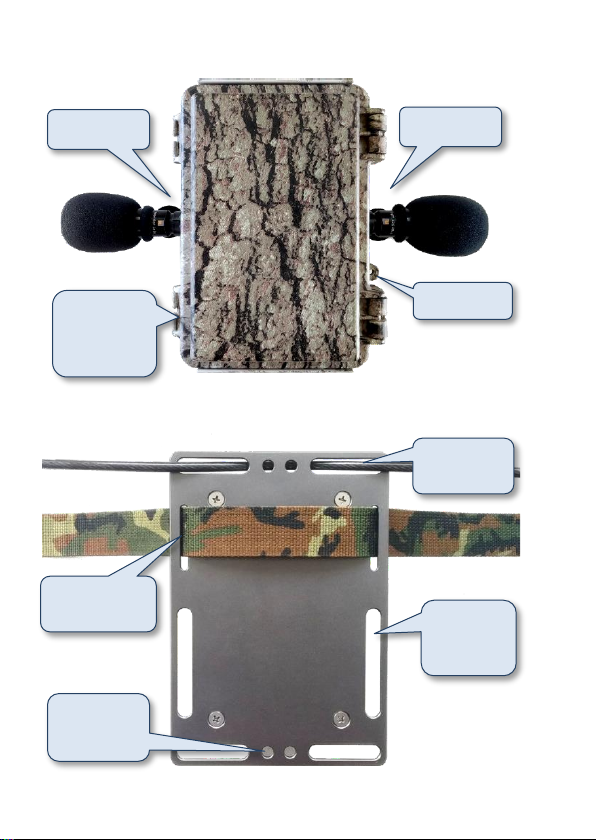
External
power input
(12V or 6V)
Slot for the
mounting strap
Holes for
mounting
screws
Mic A input
Mic B input
Slot for a
cable lock
Lock ring
Slots for
mounting
bolts
FRONT
BACK

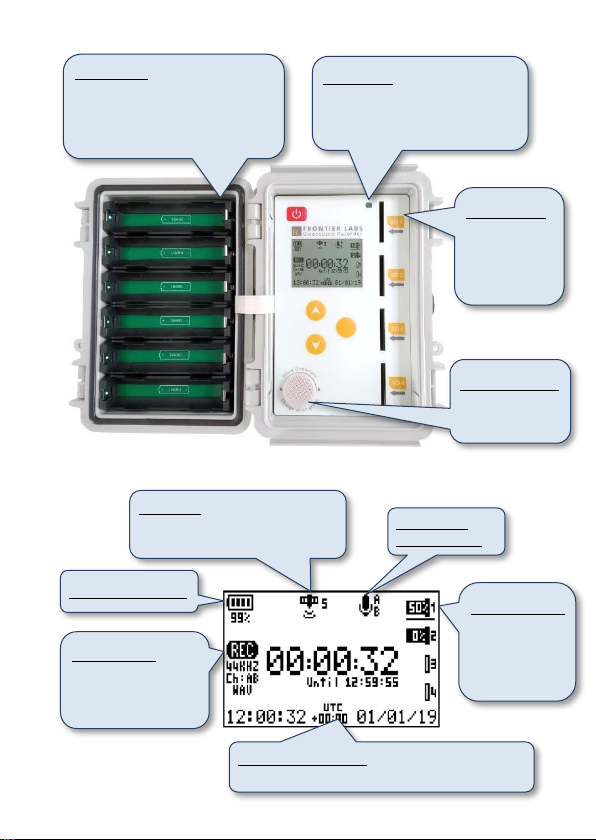
SD cards (1 to 4)
Shows % used
space.
Underline shows
the active card.
Microphone
detected (A/B)
GPS status
Shows number of visible satellites,
or a tick when completed.
Battery level (% full)
Recording info
sample rate, channels,
file format duration
and time remaining.
Current time and date
In HH:MM:SS [UTC timezone] DD/MM/YY format.
Battery slots
Insert up to six 18650 Lithium-Ion
rechargeable batteries. The more
batteries you use the longer it will
record for.
Desiccant bucket
Replace when it
charges to green.
Light sensor
Senses if the lid is open or closed.
If the screen does not turn on,
make sure it is light enough.
SD cards slots
To eject a card,
push it in then
it will spring
back out.

Before you deploy:
Format your SD cards before every deployment to keep
them running fast. (Do not just delete the files.)
We recommend using San Disk ultra, class 10 or higher.
Check your recording schedule on the BAR-LT or using the
Scheduler program on your PC.
By default, the BAR-LT comes pre-programmed with a schedule
that records continuously all day every day, broken into 1-hour
blocks.
If your schedule contains sunrise or sunset based recordings, set
the location in the Scheduler program and copy it onto the
recorder, it can use this as a backup location to calculate sun-
based times if it is unable to get a GPS position fix in the field.
To copy a PC schedule onto the recorder, save it as schedule.fls
on your SD card then insert it into the recorder. It will
automatically detect the new schedule file and ask if you would
like to copy it across.
Charge your batteries. Unfortunately, due to transport
regulations we are not allowed to ship your batteries fully
charged. Please make sure you charge your batteries
before each use.
Now is a good time to check everything is working as expected before
heading out into the field. Run through the following operating
procedure and check the time of the next scheduled recording is
correct. You can then turn the recorder OFF until you are ready to
deploy it or leave it ON and close/lock the lid if you want to have
untrained volunteers deploy the recorders at a later date without
having to do anything (it will go to sleep until the first recording then
re-acquire a GPS fix).

Operating procedure:
1. Insert the SD cards (up to 4 x 512GB) then insert the batteries
(up to 6 x 18650 rechargeable Li-ion).
The more batteries you use, the longer it can record for.
2. Turn the recorder on with the Power button.
As the recorder turns on, it shows the serial number and
firmware version on the screen.
3. Enter the time zone where the recorder is being deployed (note
daylight savings is not taken into account).
The home screen will then say “Waiting for GPS synchronisation”
until the clock is automatically updated by the GPS or manually
set by the user. It will then display the time of the next scheduled
recording or start recording if it is in the middle of a recording
period.
4. Connect the microphone(s) and check the microphone detect
status icon appears on the screen.
5. It’s good practice to wait until the GPS has acquired a fix in case
you need to move to a clearing to get a better signal.
It only records a GPS fix once after it has been switched on, then
disables the GPS to conserve power. If you move the recorder
and want to get a new fix, simply turn the recorder off and then
back on again.
If you turn the recorder on more than 1 day before the first
recording is scheduled it will automatically try to get a new fix
when it starts up for that first recording, so untrained volunteers
can deploy the recorders without having to open the lid or do
anything.
WARNING: Never eject SD cards while the recorder is
on as this can result in loss of data and corruption of
the file system. Always switch the recorder off before
swapping SD cards.

Sample rate
Total mono recording time per battery (hrs)
1
2
3
4
5
6
16 kHz
165
330
495
660
825
990
22.05 kHz
155
310
465
620
775
930
32 kHz
150
300
450
600
750
900
44.1 kHz
140
280
420
560
700
840
48 kHz
125
250
375
500
625
750
96 kHz
120
240
360
480
600
720
Sample rate
Total stereo recording time per battery (hrs)
1
2
3
4
5
6
16 kHz
140
280
420
560
700
840
22.05 kHz
130
260
390
520
650
780
32 kHz
125
250
375
500
625
750
44.1 kHz
110
220
330
440
550
660
48 kHz
105
210
315
420
525
630
96 kHz
90
180
270
360
450
540
Sample rate
Total mono recording time per SD card (hrs)
16 GB
32 GB
64 GB
128 GB
256 GB
512 GB
16 kHz
138
277
555
1111
2222
4444
22.05 kHz
100
201
403
806
1612
3224
32 kHz
69
138
277
555
1111
2222
44.1 kHz
50
100
201
403
806
1612
48 kHz
46
92
185
370
740
1481
96 kHz
23
46
92
185
370
740
Sample rate
Total stereo recording time per SD card (hrs)
16 GB
32 GB
64 GB
128 GB
256 GB
512 GB
16 kHz
69
138
277
555
1111
2222
22.05 kHz
50
100
201
403
806
1612
32 kHz
34
69
138
277
555
1111
44.1 kHz
25
50
100
201
403
806
48 kHz
23
46
92
185
370
740
96 kHz
11
23
46
92
185
370

www.frontierlabs.com.au
© 2021 Frontier Labs All Rights Reserved
Other manuals for BAR-LT
1
Table of contents
Other Frontier Labs Measuring Instrument manuals