Casella CEL-350 dBadge User manual

Casella CEL-35X dBadge Users Handbook – Page 1
August 2008
CEL-350 dBadge &
CEL-352 dBadge ‘Plus’
Including Intrinsically Safe (I.S.)
Versions
Users Manual
HB3323-04
CASELLA CEL
Regent House,
Wolseley Road,
Kempston,
Bedford,
MK42 7JY, U.K.
Phone: +44 (0) 1234 844 100
Fax: +44 (0) 1234 841 490
Web: www.casellacel.com
CASELLA USA
17 Old Nashua Road,
# 15, Amherst,
NH 03031,
U.S.A.
Toll Free: +1 (800) 366 2966
Fax: +1 (603) 672 8053
Web: www.casellaUSA.com
CASELLA ESPANA S.A.
Polígono Európolis
Calle C, nº4B
28230 Las Rozas - Madrid
Spain
Phone: + 34 91 640 75 19
Fax: + 34 91 636 01 96
Web: www.casella-es.com

Casella CEL-35X dBadge Users Handbook – Page 2
Caution
UNDER NO CIRCUMSTANCES should this equipment be cleaned
using a solvent based cleaner.
The CEL-35X dBadge contains no user serviceable parts, do not
open product case as this would invalidate the warranty.
When in use, always use the windshield provided.
Use only the recommended CEL-252 microphone.
Damage caused by a failure to observe these warnings will NOT
be covered by the normal warranty conditions.
When using the CEL-6351 pin mounting clips, care should be
taken when fitting them to an employee so that the skin is not
pierced accidentally.
Please refer to section 6.2 of this manual when changing dBadge
mounting clips as placing the incorrect screw in the wrong hole can
damage the dBadge.
Environmental Considerations
•Do not dispose of electronic equipment as municipal waste
•The WEE symbol shown above indicates that separate
collection systems should be used

Casella CEL-35X dBadge Users Handbook – Page 3
Instructions specific to hazardous area installations
(reference European ATEX Directive (94/9/EC, Annex II, 1.0.6.)
The following instructions apply to equipment covered by certificate
number Sira 07ATEX2032X for the CEL-35X/IS dBadge series:
The certificate number includes an ‘X’ suffix indicating that the
following special conditions of certification apply;
1. Parts of the enclosure are non-conducting and may generate
an ignition–capable level of electrostatic charge under
certain extreme conditions. The user should ensure that the
equipment is not installed or used in a location where it may
be subjected to external conditions (such as high-pressure
steam), which might cause a build-up of electrostatic charge
on non-conducting surfaces. Additionally, cleaning of the
equipment should be done only with a damp cloth.
2. The dBadge Noise Dosemeter shall not be used in areas
where a layer of coal dust may be deposited on the
enclosure.
3. The microphone should not be removed in a hazardous area.
4. The equipment may be used with flammable gases and
vapours with apparatus Groups IIA, IIB and IIC and with
temperature classes T1, T2, T3 and T4.
5. The equipment is only certified for use in ambient
temperatures in the range -20oC to +40oC and should not be
used outside this range.
6. Repair of this equipment shall only be carried out by the
manufacturer or in accordance with the applicable code of
practice.
7. If the equipment is likely to come into contact with aggressive
substances, then it is the responsibility of the user to take
suitable precautions that prevent it from being adversely
affected, thus ensuring that the type of protection is not
compromised. Aggressive substances e.g. solvents may
affect polymeric materials.
8. Do not charge the batteries in a hazardous area. Only
charge the CEL-35X or CEL-35X/IS using the recommended
charger CEL-6362.
9. The CEL-110/2 must only be used to calibrate the CEL-35X
or CEL-35X/IS in a non-hazardous atmosphere.

Casella CEL-35X dBadge Users Handbook – Page 4
CONTENTS
1 INTRODUCTION.....................................................................................................5
2 SUPPLIED EQUIPMENT.......................................................................................6
3 THE SYSTEM COMPONENTS.............................................................................7
3.1 The CEL-35X dBadge..........................................................................................7
3.2 Mounting Clips ....................................................................................................7
3.3 The CEL-6362 Charger........................................................................................8
3.4 The Windshield....................................................................................................9
4 CHARGING THE CEL-35X.................................................................................10
4.1 Charging.............................................................................................................10
4.2 Linking Chargers Together................................................................................12
5 GENERAL OPERATION......................................................................................13
5.1 Switching on the dBadge ...................................................................................13
5.2 Calibration..........................................................................................................15
5.3 Starting A Measurement Run.............................................................................17
5.4 Stopping A Measurement Run...........................................................................20
5.5 Reviewing Measurement Run Data...................................................................21
5.6 Configuration Menu...........................................................................................22
5.7 Display Mode.....................................................................................................23
5.8 Alarm Settings ...................................................................................................24
6 MOUNTING THE CEL-35X.................................................................................26
6.1 CEL-6351 Pin Mounting Clips..........................................................................26
6.2 CEL-6352 Crocodile Clip Mounting Kit...........................................................26
6.3 CEL-6353 Harness Mounting Kit......................................................................28
6.4 CEL-6354 Hard Hat Mounting Kit....................................................................28
7 TECHNICAL SPECIFICATION..........................................................................29
7.1 Specification ......................................................................................................29
7.2 Microphone Specification (CEL-252) ...............................................................30
8 SERVICING AND WARRANTY ARRANGEMENTS......................................31
9 TROUBLESHOOTING.........................................................................................32
10 APPENDIX............................................................................................................33
10.1 Glossary of Terms............................................................................................33
10.2 Measured Parameters.......................................................................................37
10.3 Using the CEL-352 for the Selection of Hearing Protection...........................38
10.4 ATEX Certificate.............................................................................................40
10.5 FM Certificate..................................................................................................42

Casella CEL-35X dBadge Users Handbook – Page 5
1 INTRODUCTION
The CEL-35X family consists of the CEL-350 dBadge and the
CEL-352 dBadge ‘Plus’. The CEL-35X dBadge is a unique solution
to problems associated with the measurement of personal noise
exposure. Using the latest digital technology ensures reliable and
repeatable measurements. The CEL-35X dBadge has no cable
like a traditional dosimeter, so is far easier to fit to an employee
and is less likely to interfere with the individuals work. Casella
CEL provides various mounting options for the dBadge.
The CEL-35X dBadge is very simple operate with just 2 keys, and
can be locked to prevent tampering. After a measurement has
been completed the noise badge can be downloaded via it’s infra-
red port to the dB35 PC software. This will allow comprehensive
analysis of an employee’s exposure.
This manual describes the operation of the CEL-35X dBadge and
the associated mounting options, as well as charging the dBadge.
Use of the CEL-35X/IS Intrinsically Safe (I.S.) dBadge is
described, including special requirements for use under ATEX
certification.
The CEL-352 dBadge ‘Plus’ measures additional values which
allow for the selection of hearing protection via the Single Number
Rating (SNR) or High, Medium, Low (HML) methods.

Casella CEL-35X dBadge Users Handbook – Page 6
2 SUPPLIED EQUIPMENT
Carefully remove all components of the dBadge from the shipping
container and check for possible damage or any missing items. If
any items are not present or damaged please contact Casella CEL
immediately. The following components should be included:
CEL-35X dBadge (includes microphone CEL-252,
windshield CEL-6356 and calibration certificate)
Or
CEL-35X/IS I.S. dBadge (includes microphone CEL-252,
windshield CEL-6356 and calibration certificate)
Where CEL-35X represents either a CEL-350 or CEL-352
CEL-6351 Pin Mounting Kit
CEL-6352 Crocodile Clip Mounting Kit (fitted to CEL-35X)
Instrument kits include the following parts:
HB-3323 dBadge Instruction Manual (on CEL-6357
software CD)
HB-3324 Field Guide (printed hard copy)
CEL-6362 3-way Charger Unit (including -PC18 Power
Supply Unit)
CEL-6355 Kit Case for up to 10 dBadge Units
CEL-110/2 Class 2C Acoustic Calibrator (including
calibration certificate)
193200B Infra Red Download Cable (includes screwdriver)
CEL-6357 dB35 Download Software on CD including HB-
3325 Software Manual and HB-3323 dBadge
Manual
-HK111 Screwdriver for changing mounting clips
If a kit with 10 dBadges was purchased, the following item will
be present:
CEL-6363 3-way charger extension unit (including
C6359/0.2 cable)

Casella CEL-35X dBadge Users Handbook – Page 7
Optional items at time of order:
D8147/Z 3 Point Harness
CEL-6351 Spare Pin Mounting Kit (5 Pack)
CEL-6352 Crocodile Clip Mounting Kit (5 Pack)
CEL-6353 Harness Mounting Kit (5 Pack)
CEL-6354 Hard Hat Mounting Kit
CEL-6356 Spare Windshield
CEL-90336 USB Adaptor
3 THE SYSTEM COMPONENTS
3.1 The CEL-35X dBadge
The CEL-35X dBadge and controls are shown below in Figure 1.
The two controls are the Left (L) and the Right (R) keys.
Figure 1
3.2 Mounting Clips
Upon delivery, the CEL-35X will be fitted with the CEL-6352
‘Crocodile’ mounting clips, as shown in Figure 2. Mounting clips
can be changed using the screwdriver provided. For information on
changing the mounting clips please see section 6.
LED
Window
Windshield
Left ‘L’ Key
(Power Key) Right ‘R’ Key
Display

Casella CEL-35X dBadge Users Handbook – Page 8
Figure 2
3.3 The CEL-6362 Charger
A CEL-6362 is a drop-in intelligent 3-way charger unit, required to
charge the internal Nickel Metal Hydride (NiMH) batteries on the
CEL-35X dBadge. The CEL-6362 consists of the charger base,
part number 193102B-01 and the -PC18 mains power supply unit
(PSU). The PSU will require fitting with an appropriate plug
connector (supplied) for the country of use.
Figure 3
Note that charger base 193102B-01 is for use with the CEL-35X
and the CEL-35X/IS. The previous version of the charger base
(193038B-01) can only be used with the CEL-35X and NOT the
CEL-35X/IS. Note that all versions of the dBadge should only be
Screws for
mounting
clips
Crocodile
Mounting
Clips

Casella CEL-35X dBadge Users Handbook – Page 9
charged in non-hazardous areas in the absence of any flammable
atmospheres.
3.4 The Windshield
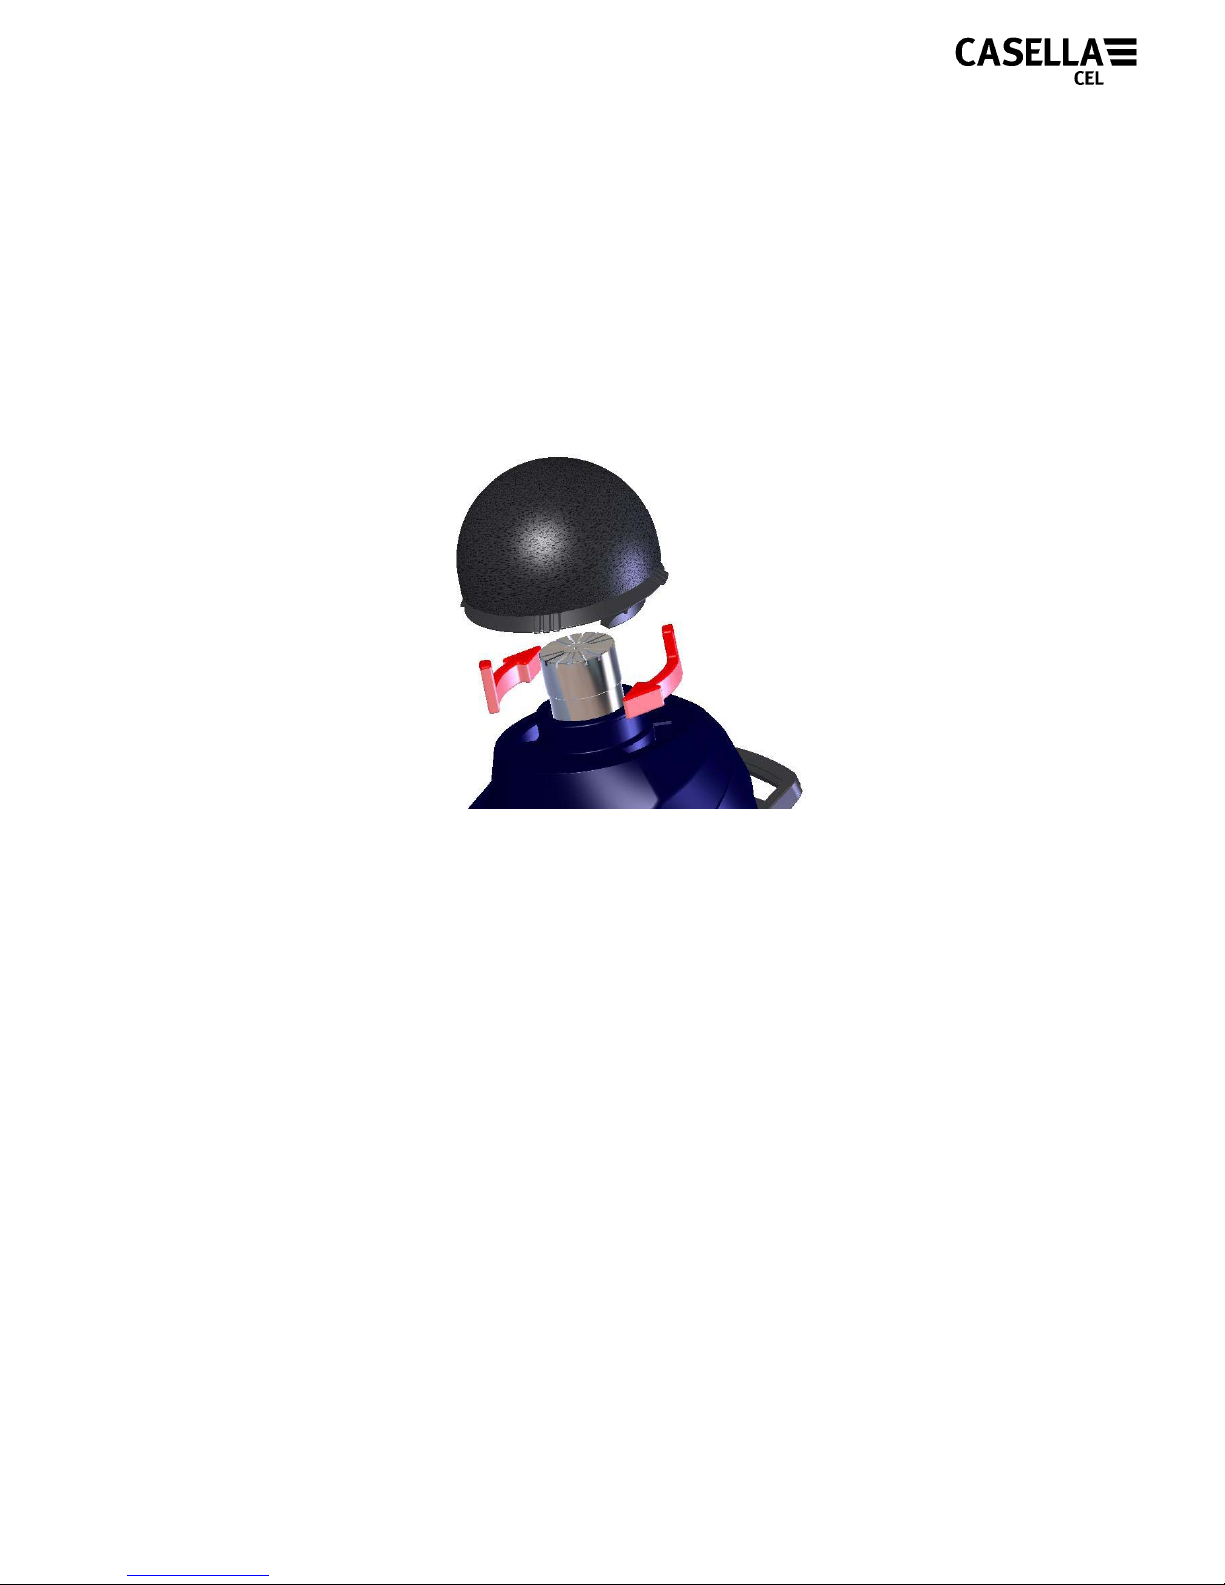
During use, it is essential the dBadge is fitted with the CEL-6356
windshield (supplied). To calibrate the dBadge it is necessary to
remove the windshield to gain access to the microphone. To
remove the windshield, twist the black plastic ring below the foam
anti-clockwise and lift the windshield to remove.
Figure 4
Once the CEL-35X dBadge has been calibrated (section 5.2) refit
the windshield by placing the windshield back into the body of the
dBadge and twisting clockwise, as shown previously in Figure 4.

Casella CEL-35X dBadge Users Handbook – Page 10
4 CHARGING THE CEL-35X
4.1 Charging
The CEL-35X dBadge uses internal NiMH batteries. Ensure the
CEL-35X is fully charged prior to use by placing in the charger as
shown in Figure 5. Note the CEL-35X will fit into charger units
regardless of which mounting clips are attached.
Figure 5
Ensure the power supply (-PC18) is connected and the supply is
switched on. The CEL-35X dBadge will automatically switch on
during charging and display how much charge is within the
dBadge, as shown in Figure 6. When the CEL-35X dBadge is
charging the red LED will flash and the charge symbol will
rotate on the top right of the display. The dBadge will display ‘Full’
once charging is complete and the LED on the front of the
instrument will turn blue. This should take approximately 1.5 hours
from a discharged state. A charging time of about 30 minutes will
be sufficient to perform greater than 8 hours of measurement.
Once fully charged, the CEL-35X holds enough charge to run for
approximately 32 hours.
Other manuals for CEL-350 dBadge
1
This manual suits for next models
2
Table of contents
Other Casella Measuring Instrument manuals

Casella
Casella CEL-960 User manual

Casella
Casella HB4087-01 User manual

Casella
Casella Evolution CM2010 User manual

Casella
Casella HB4056-01 dBadge2 User manual

Casella
Casella CEL-240 User manual

Casella
Casella HB4056-01 dBadge2 User manual

Casella
Casella dBadge2 HB4056-07 User manual

Casella
Casella HB3340-02 User manual

Casella
Casella HB3340-02 User manual

Casella
Casella 620 Series User manual