Sony MHC-VX90AV User manual

1
GB
Mini Hi-Fi
Component
System
©1999 by Sony Corporation
Operating Instructions
3-865-695-14(1)
f
MHC-VX90AV

2
GB
WARNING
To prevent fire or shock hazard, do not
expose the unit to rain or moisture.
To avoid electrical shock, do not open the cabinet.
Refer servicing to qualified personnel only.
Do not install the appliance in a confined space,
such as a bookcase or built-in cabinet.
This appliance is classified
as a CLASS 1 LASER
product. The CLASS 1
LASER PRODUCT
MARKING is located on
the rear exterior.
This stereo system is equipped with the Dolby B-
type noise reduction system*.
* Manufactured under license from Dolby
Laboratories Licensing Corporation.
DOLBY and the double-D symbol aare
trademarks of Dolby Laboratories Licensing
Corporation.
This system can play
the following discs
VIDEO CDs Audio CDs
Disc logo
Contents Audio + Video Audio
(moving pictures)
Disc size 12 cm/8 cm 12 cm/8 cm
Play time 74 min./20 min. 74 min./20 min.
Note on VIDEO CDs
This system conforms to VIDEO CDs without PBC
functions (Ver. 1.1) and VIDEO CDs with PBC
functions (Ver. 2.0) of VIDEO CD standards. You
can enjoy two kinds of playback according to the
disc type.
Disc type You can
VIDEO CDs without Enjoy video playback
PBC functions (moving pictures) as
(Ver. 1.1 discs) well as audio CDs.
VIDEO CDs with Play interactive
PBC functions software using menu
(Ver. 2.0 discs) screens displayed on
the TV screen (menu
playback), in addition
to the video playback
function of VIDEO
CDs without PBC
functions.
Moreover, you can
play high or standard
quality still picture.
* PBC = Play Back Control

3
GB
Table of Contents
Getting Started
Step 1: Hooking up the system............ 4
Step 2: Setting up your speakers ......... 8
Step 3: Setting the time ....................... 10
Step 4: Presetting radio stations ........ 11
Basic Operations
Playing a VIDEO CD ........................... 13
Playing a CD ......................................... 15
Recording a CD/VIDEO CD .............. 17
Listening to the radio........................... 18
Recording from the radio .................... 19
Playing a tape........................................ 20
Recording from a tape ......................... 22
Singing along: Karaoke ...................... 23
The VIDEO CD/CD Player
Playing a VIDEO CD with PBC
functions (Ver. 2.0) ........................ 25
Checking the remaining time ............. 26
Using the on-screen display ............... 27
Locating a specific part of a disc ........ 29
Resuming playback from the point
you stopped a VIDEO CD ............ 33
Setting the sharpness ........................... 34
Playing the CD tracks repeatedly ...... 35
Playing the CD tracks in
random order ................................. 36
Programming the CD tracks ............... 37
Playing CDs without interruption ..... 38
The Tape Deck
Recording on a tape manually ........... 39
Recording a CD by specifying
track order ...................................... 40
DJ Effects
Looping part of a CD ........................... 42
Flashing part of a CD ........................... 42
Sound Adjustment
Adjusting the sound ............................ 43
Selecting the audio emphasis ............. 44
Changing the spectrum analyzer
display ............................................. 45
Selecting surround effects ................... 46
Enjoying Dolby Pro Logic Surround
sound ............................................... 47
Adjusting the graphic equalizer......... 48
Making a personal audio
emphasis file................................... 49
Other Features
Mixing and recording sounds ............ 50
Falling asleep to music ........................ 51
Waking up to music ............................. 51
Timer-recording radio programs ....... 53
Optional components
Connecting audio components .......... 54
Connecting a VCR ................................ 55
Connecting a DVD player ................... 56
Connecting external antennas ............ 57
Additional Information
Precautions ............................................ 58
Troubleshooting ................................... 59
Specifications ........................................ 62
Glossary ................................................. 65
Index........................................ Back cover

4
GB
1Connect the front speakers.
Connect the speaker cords to the FRONT
SPEAKER jacks as below.
For the front speakers with jacks,
connect the speaker cords to the speaker
in the same way.
4
8
7
2 2
3
1 23
56
Getting Started
Step 1: Hooking up the system
Do the following procedure 1to 8to hook up your system using the supplied cords and
accessories.
Notes
• Keep the speaker cords away from the
antennas to prevent noise.
• The type of speakers supplied vary
according to the model you purchased
(see “Specifications” on page 62).
Front speaker (Left)Front speaker (Right)
Insert only the stripped portion.
Black/
Stripe (’)
Red/
Solid (‘)
Center
surround speaker
Rear surround speaker
(Left)
Rear surround speaker
(Right) To the video input
FM
antenna
AM loop
antenna
+
–
R
L
+

5
GB
R
L
++
–
R
L
++
–
FM75
AM
FM75
AM
COAXIAL
VIDEO OUT
Extend the FM lead
antenna horizontally.
AM loop antenna Extend the FM lead
antenna horizontally.
AM loop antenna
continued
2Connect the rear surround speakers.
Connect the speaker cords to the REAR
SURROUND SPEAKER jacks.
Notes
• Keep the speaker cords away from the
antennas to prevent noise.
• Do not place the rear surround
speakers on top of a TV. This may
cause distortion of the colors in the TV
screen.
• Be sure to connect both left and right
rear surround speakers. Otherwise,
the sound will not be heard.
3Connect the center surround
speaker.
Connect the speaker cords to the
CENTER SURROUND SPEAKER jacks.
Note
Keep the speaker cords away from the
antennas to prevent noise.
Insert only the stripped portion.
Black/
Stripe (’)
Red/
Solid (‘)
Insert only the stripped portion.
Black/
Stripe (’)
Red/
Solid (‘)
4Connect the FM/AM antennas.
Set up the AM loop antenna, then
connect it.
Jack type A
Jack type B
5Connect the video input jack of your
TV to the VIDEO OUT jack with the
supplied video connecting cable.
When using a TV
Turn on the TV and select the video input so you
can view the pictures from this system.
Tip
For even higher quality video images, you can use
an optional S VIDEO cord to connect the S VIDEO
input jack on your TV to the S VIDEO OUT jack.

6
GB
6Set SYSTEM SELECT (color system)
to the appropriate position (PAL or
NTSC), according to your TV.
If your TV automatically changes the
color system according to the input
signal:
The factory setting (AUTO) automatically
changes the color system of the video output
according to the color system of the current
VIDEO CD.
If the color system of your TV is NTSC:
Set SYSTEM SELECT to NTSC.
Pictures recorded in the PAL color system will be
stretched vertically and will be displayed with the
upper and lower parts of the picture cut off.
If the color system of your TV is PAL:
Set SYSTEM SELECT to PAL.
Pictures recorded in the NTSC color system will be
stretched horizontally and will be displayed with
the upper and lower parts of the screen masked in
black.
Note
Be sure to turn off the system before changing the
SYSTEM SELECT setting.
SYSTEM SELECT
AUTO PALNTSC
7For models with a voltage selector,
set VOLTAGE SELECTOR to
position of your local power line
voltage.
VOLTAGE SELECTOR
220V
120V
230
240V
-
8Connect the power cord to a wall
outlet.
The demonstration appears in the
display. When you press , the
system turns on and the demonstration
automatically ends.
If the supplied adapter on the plug does
not fit your wall outlet, detach it from
the plug (only for models equipped with
an adapter).
To connect optional components
See page 54.
To deactivate the demonstration
When you set the time (Step 3: Setting the
time), the demonstration is deactivated.
To activate/deactivate the demonstration
again, press DEMO (STANDBY) while the
system is off.
Step 1: Hooking up the system
(continued)

7
GB
TV
TV VOL +/
TV CH +/
TV/VIDEO
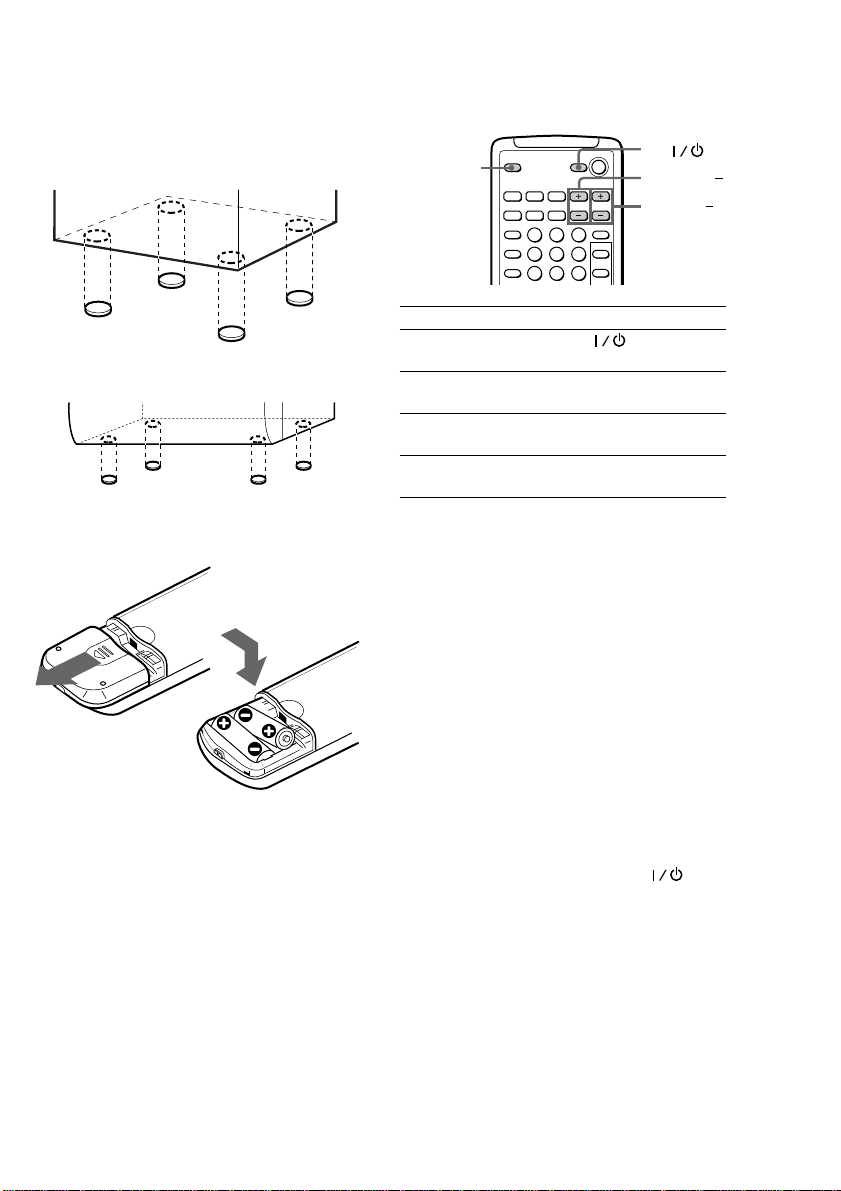
To attach the speaker pads
Attach the supplied speaker pads to the
bottom of the speakers to stabilize the
speakers and prevent them from slipping.
Front speaker
Center surround speaker
Inserting two size AA (R6)
batteries into the remote
To Press
Turn the TV on or TV .
off
Switch the TV's TV/VIDEO.
video input
Change the TV TV CH +/–.
channels
Adjusts the volume TV VOL +/–.
of the TV speaker(s)
Using the remote
You can use the shaded buttons shown below
to operate Sony TV.
Tip
With normal use, the batteries should last for about
six months. When the remote no longer operates
the system, replace both batteries with new ones.
Note
If you do not use the remote for a long period of
time, remove the batteries to avoid possible damage
from battery leakage.
When carrying this system
Do the following to protect the CD
mechanism.
Make sure that all CDs are removed from the
unit.
1Press FUNCTION repeatedly until “CD”
appears in the display.
2Hold down CD LOOP and press to
turn off the system.
3Disconnect the cord.

8
GB
2Place the center speaker so it is
placed about the same height as the
front speakers (A). Align the center
surround speaker with the front
speakers or place it slightly back
from the position of the front
speakers (B).
A
B
3Place the rear surround speakers
facing each other at about 60 to 90
cm (2 to 3 feet) above your listening
position.
Center surround speaker
Rear
surround
speaker
60 to 90 cm
(2 to 3 feet)
Front
speaker (L) Front
speaker (R)
Center
surround
speaker
Rear surround
speaker (L) Rear surround
speaker (R)
45°
Step 2: Setting up
your speakers
Connecting the supplied rear and center
surround speakers enables you to fully enjoy
Dolby Pro Logic Surround sound. Dolby Pro
Logic Surround is a decoding system
standardized in TV programs and movies.
Dolby Pro Logic Surround improves the
sound image by using four separate channels.
These channels manipulate the sound to be
heard and enhance the action as it happens
on the screen.
Positioning the speakers
Before you connect them, determine the best
location for your speakers.
1Place the front speakers at an angle
of 45 degrees from your listening
position.

9
GB
1Press PRO LOGIC (or PRO LOGIC
ON/OFF on the remote).
“PRO LOGIC ON” appears.
2Press T.TONE ON/OFF on the
remote.
The test tone is heard from the speakers
in the following order. Adjust the
volume of the test tone.
3From your listening position, press
CENTER LEVEL (+/–) and REAR
LEVEL (+/–) on the remote to
adjust the volume.
The volume levels from each speaker
must become the same.
4Press T.TONE ON/OFF when you
are done adjusting.
The test tone turns off.
Tip
If you turn VOLUME (or press VOL +/– on the
remote) all the speaker volumes change.
Note
The test tone feature works only for Dolby Pro Logic
Surround sound.
Adjusting the speaker
volume
To enjoy Dolby Pro Logic Surround sound,
turn the Dolby Pro Logic mode on, then
adjust the volume of each speaker using the
test tone that the system provides.
1
1
3
2, 4
(Power)
nLEFT (front) nCENTER nRIGHT (front)
REAR N

10
GB
DISPLAY
1Press CLOCK/TIMER SET.
The hour indication flashes.
2Turn the jog dial to set the hour.
3Press ENTER/NEXT.
The minute indication flashes.
4Turn the jog dial to set the minute.
5Press ENTER/NEXT.
The clock starts working.
Tip
If you’ve made a mistake, start over from step 1.
To change the time
The previous explanation shows you how to
set the time while the power is off. To change
the time while the power is on, do the
following:
1Press CLOCK/TIMER SET.
2Turn the jog dial to select SET CLOCK.
3Press ENTER/NEXT.
4Perform steps 2 through 5 above.
Note
The clock settings are cancelled when you
disconnect the power cord or if a power failure
occurs.
Step 3: Setting the
time
1
3,52,4
You must set the time before using the timer
functions.
Table of contents
Other Sony Stereo System manuals

Sony
Sony HCD-V919AV User manual

Sony
Sony SRS-X7 Reference guide

Sony
Sony MHC-ECL7D User manual

Sony
Sony MEX-N5200BT User manual

Sony
Sony HCD-MD1EX - System User manual

Sony
Sony CMTBX1 - CMT BX1 Micro System User manual

Sony
Sony MHC-RXD3/GRX20 User manual

Sony
Sony HCD-XGV6 User manual

Sony
Sony HCD-XGV6 User manual

Sony
Sony CMT-CPZ3 Installation instructions manual