Puretec Tripla Black User manual

User Guide
Puretec Tripla™ Black | Triple Action Tapware
Tripla™ Black
For correct operation & installation it is essential to observe these instructions.JUl2018
AS/NZS 3718:2005
Licence No. WM 74726
Australian Certication
Services

2
Installation & Operation Manual Copyright © Puretec Pty Ltd 2017
Puretec Customer Service
Thank you for purchasing a Puretec Tripla. Your tap is manufactured from only quality
materials and will last for years, if maintained and installed properly.
The system is designed for metropolitan supply water but can be used in other
situations. For other types of water supply please contact your local Puretec stockist or
call our Puretec Customer Service Helpline prior to installing the tap.
Customer Service Helpline 1300 140 140 (Australia) 0800 130 140 (New Zealand)
Operation
All surfaces should only be cleaned with liquid detergent or soap and water. Under no
circumstance should any abrasive or acid base cleaning agents be used.
What's inside
Puretec Customer Service ................................................................................................. 2
Operation...................................................................................................................................... 2
Servicing........................................................................................................................................ 3
Technical Information............................................................................................................ 3
Recommended Working Pressures................................................................................. 3
Installation Guide (BL1 & Bl2 models) ........................................................................ 4
Installation Guide (BL3 model) ........................................................................................ 5
Assembly (BL1 & Bl2 models).......................................................................................... 6
Assembly (BL3 model).......................................................................................................... 7
Water Connection Patterns................................................................................................. 8
Replacement of Ceramic Disc Cartridge(s)................................................................ 9
Tripla BL1 & BL2 Parts Description ........................................................................... 10
Tripla BL3 Parts Description .......................................................................................... 11
Notes .......................................................................................................................................... 12
Warranty .................................................................................................................................... 12
Warranty/Australia ............................................................................................................... 13
Warranty/New Zealand...................................................................................................... 13
What's Inside

3
Puretec Tripla™ Black Series | Triple Action Tapware
Servicing
Periodically clean the aerator for any lodged sediment that may restrict ow. A Puretec
whole house water lter is highly recommended to ensure longevity of all household
tapware.
Should it be necessary to have your mixer serviced while under warranty, please carry
out the following procedure:
1. Firstly call the plumber, preferably the one that has installed it, (most problems
are caused by the supply lines not being cleaned out properly, prior to connecting
the mixers).
2. Make sure that the plumber has installed your mixer according to the Instruction
Guide.
3. If the plumber is satised that he cannot rectify the problem then contact your
plumbing supply store or your local Puretec stockist.
Important: We do not recommend the dismantling of any internal parts of the mixer
purely to see what is inside as this will breach your warranty.
Technical Information
Puretec mixers can be used in conjunction with:
• Pressure storage hot water systems
• Any mains water pressure not exceeding 500 kPa
• Maximum hot water temperature of 60°C
• Instantaneous hot water systems
Recommended Working Pressures
• Minimum working pressure 50 kPa (7.5 PSI)
• Maximum working pressure 500 kPa
It should be noted that water mains pressure builds up during o peak periods, mainly
at night, sometimes doubling or trebling normal daytime pressures.
Note: Not suitable for unequal pressure. On high pressure areas where the pressure
exceeds the recommended working pressure as indicated above pressure limiting valves
must be installed or warranty is voided.
Introduction

4
Installation & Operation Manual Copyright © Puretec Pty Ltd 2017
Installation Guide (BL1 & BL2 models)
Note: It is important to ush out the supply pipes to the mixer before connecting
the exible hoses with the initial installation, so no foreign matter can enter into the
cartridges.
A Puretec Water Filter is highly recommended for product longevity.
Installation Guide
Base
Rubber Washer
Nut
Sink Faucet
Hole (Ø33mm)
COLD (blue )
HOT (red )
Water Fiter (green )

5
Puretec Tripla™ Black Series | Triple Action Tapware
Installation Guide (BL3 model)
Base
Rubber washer
Locking Nut
Sink Faucet
Hole (Ø33mm)
Metal washer
gasket
Retaining screw
Plastic xed nut
6
Installation & Operation Manual Copyright © Puretec Pty Ltd 2017
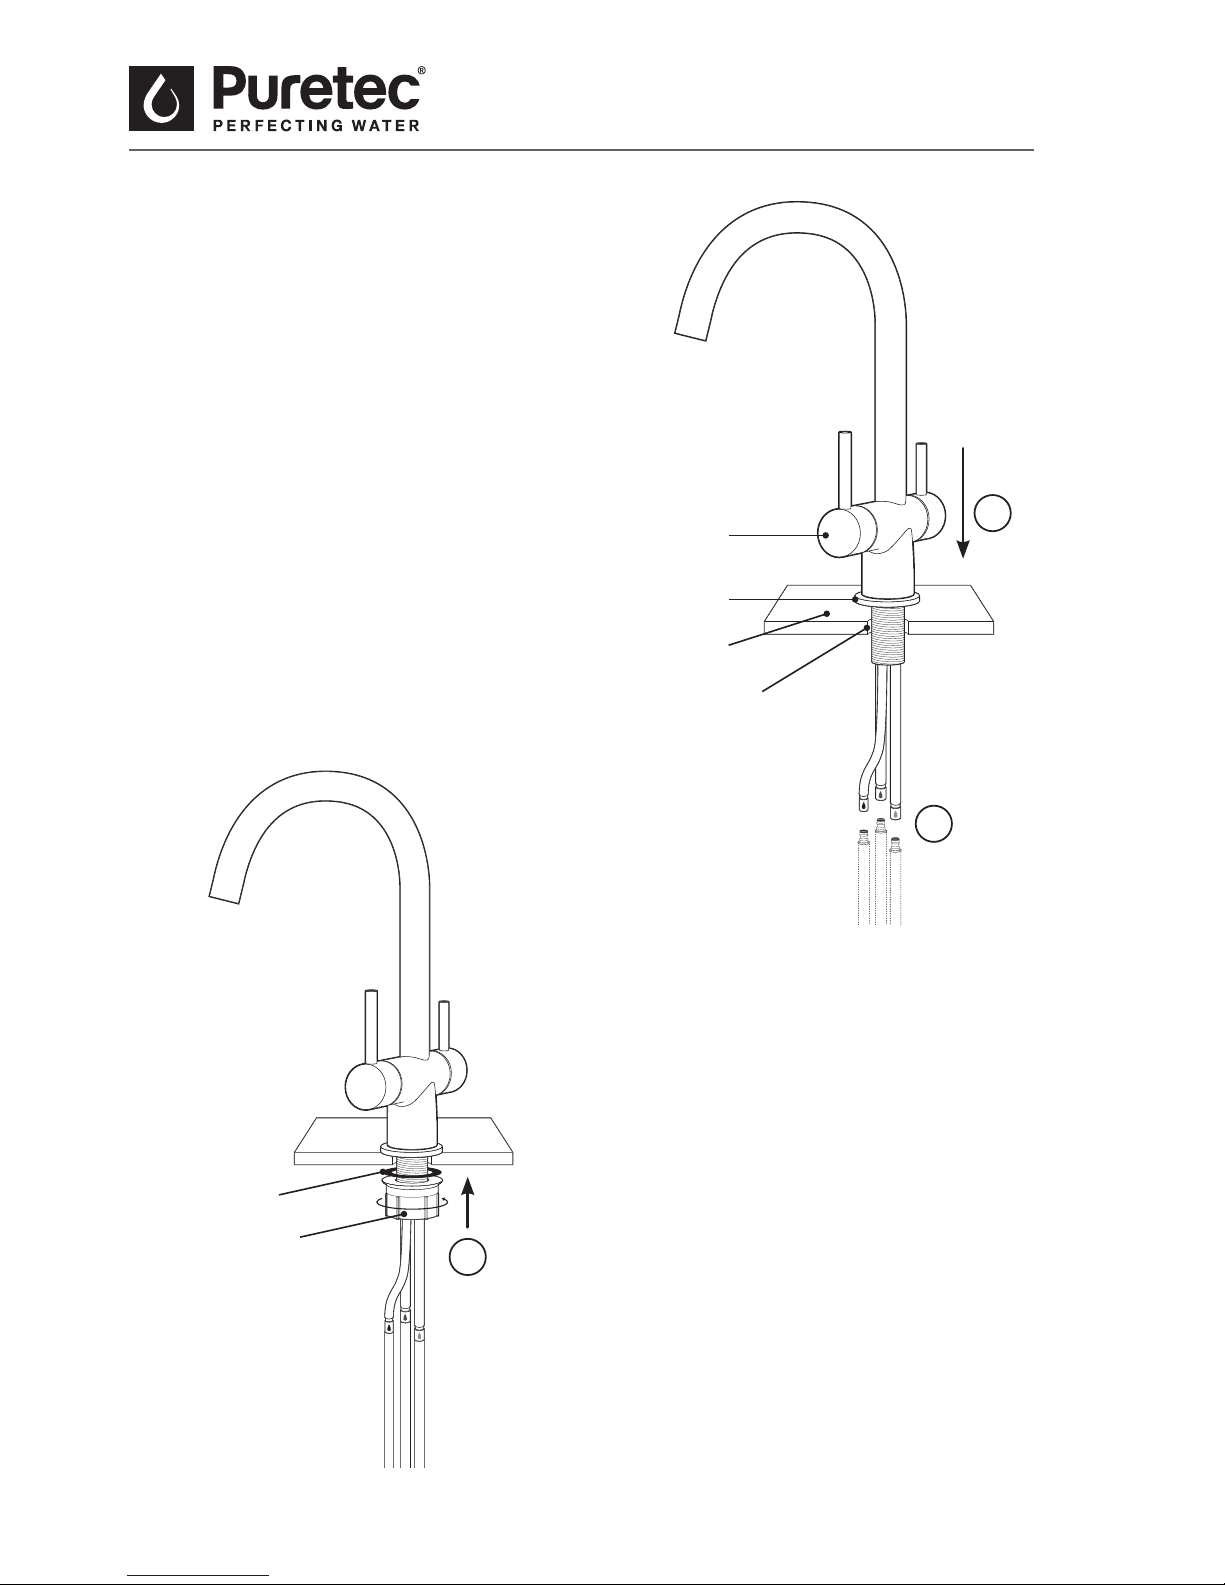
Step 3.
Place the rubber washer and screw the
nut below the sink. Position the tap on
your desired angle then tighten the nut.
Assembly
Assembly (BL1 & BL2 models)
1
2
3
Step 1.
Connect the hoses to the faucet and
tighten them.
Only use hand to screw the exible hose.
Do not over tight. Don't use any tools.
Step 2.
Feed the hoses through the basin or sink.
Required through hole size is Ø33mm.
Base should be on top of the sink
Tripla faucet
Base
Sink Faucet
Hole (Ø33mm)
basin or sink
Rubber Washer
Nut
7
Puretec Tripla™ Black Series | Triple Action Tapware
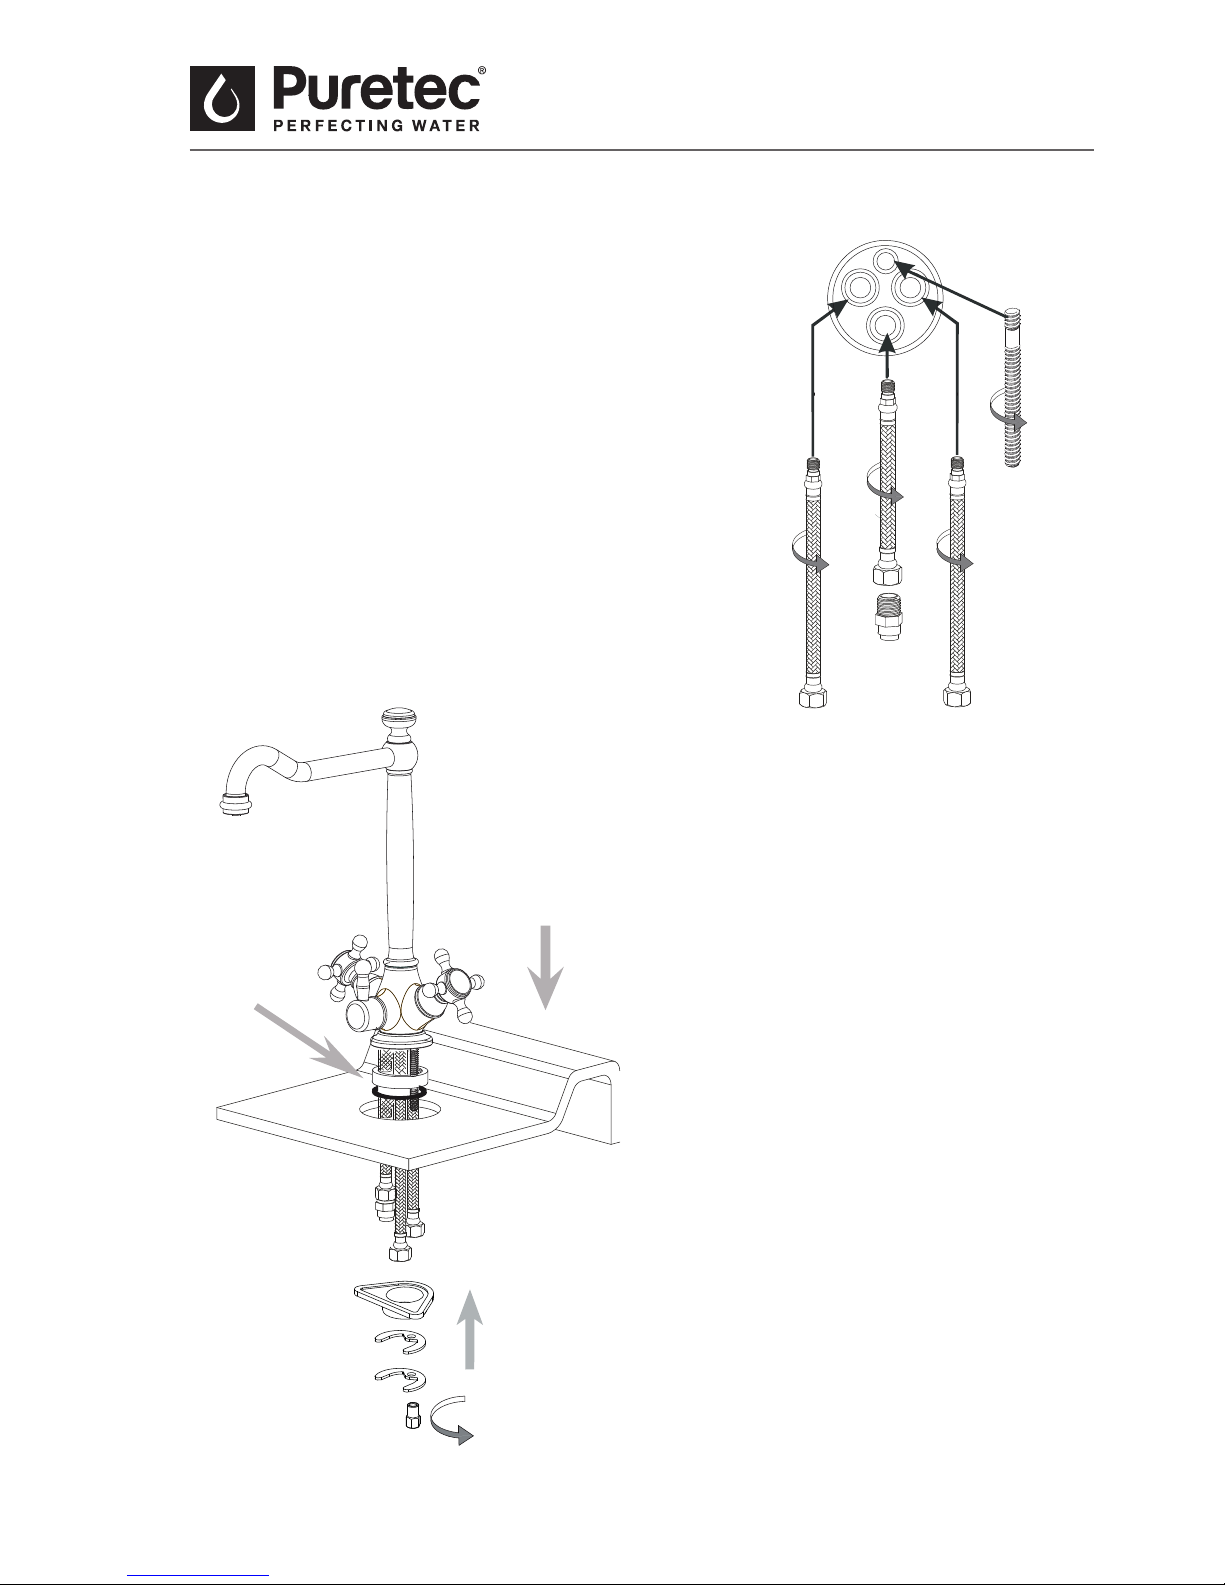
Assembly (BL3 model)
Step 1.
Connect the retaining screw and braided hoses to
the faucet and tighten them.
Only use hand to screw the exible hose. Do not
over tight. Don't use any tools.
See connection pattern on page 8.
Step 2.
Connect the straight adaptor to the ltered exible
hose
Step 3.
Feed the hoses through the basin or
sink. Required through hole size is
Ø33mm.
Base and washer should be on top of
the sink
Step 4.
Insert the plastic xed nut, rubber
washer, metal washer and screw the
nut by turning counterclockwise.
Step 5.
Position the tap on your desired angle
and tighten the nut by using a wrench.

8
Installation & Operation Manual Copyright © Puretec Pty Ltd 2017
For TRIPLA BL1 & BL2
Water Connection Patterns
For TRIPLA BL3
Connections
HOT Water
Connection
( red )
COLD Water
Connection
( blue )
Water Filter
Connection
( green )
Water Filter
Connection
COLD Water
Connection
HOT Water
Connection
Retaining screw

9
Puretec Tripla™ Black Series | Triple Action Tapware
Maintenance
Replacement of Ceramic Disc Cartridge(s)
1. Hot/Cold Outlet
• Remove screw in lever and li lever o, now you can unscrew dome cap and
loosen the cartridge lock nut.
• Li out old cartridge and clean inside making sure no old O-rings are still stuck
inside cartridge housing.
• Insert new cartridge making sure O-rings on bottom of new cartridge have not
fallen o and lugs in bottom of cartridge line up with holes in cartridge housing.
• Now you can tighten lock nut with a torque wrench to 14 newton meters, then
reinstall the dome cap and lever screw.
2. Filtered/Rain Ancillary Outlet
• Remove lever.
• Unscrew handle then remove cartridge by unscrewing it anti-clockwise, using 5/8”
socket. Install cartridge by completing removal instructions as above, in reverse
order.
• Ensure cartridge is rmly tightened not over tighten.
• Ensure all sealing rings/gaskets are lubricated using silicone lube.
10
Installation & Operation Manual Copyright © Puretec Pty Ltd 2017
Parts Description
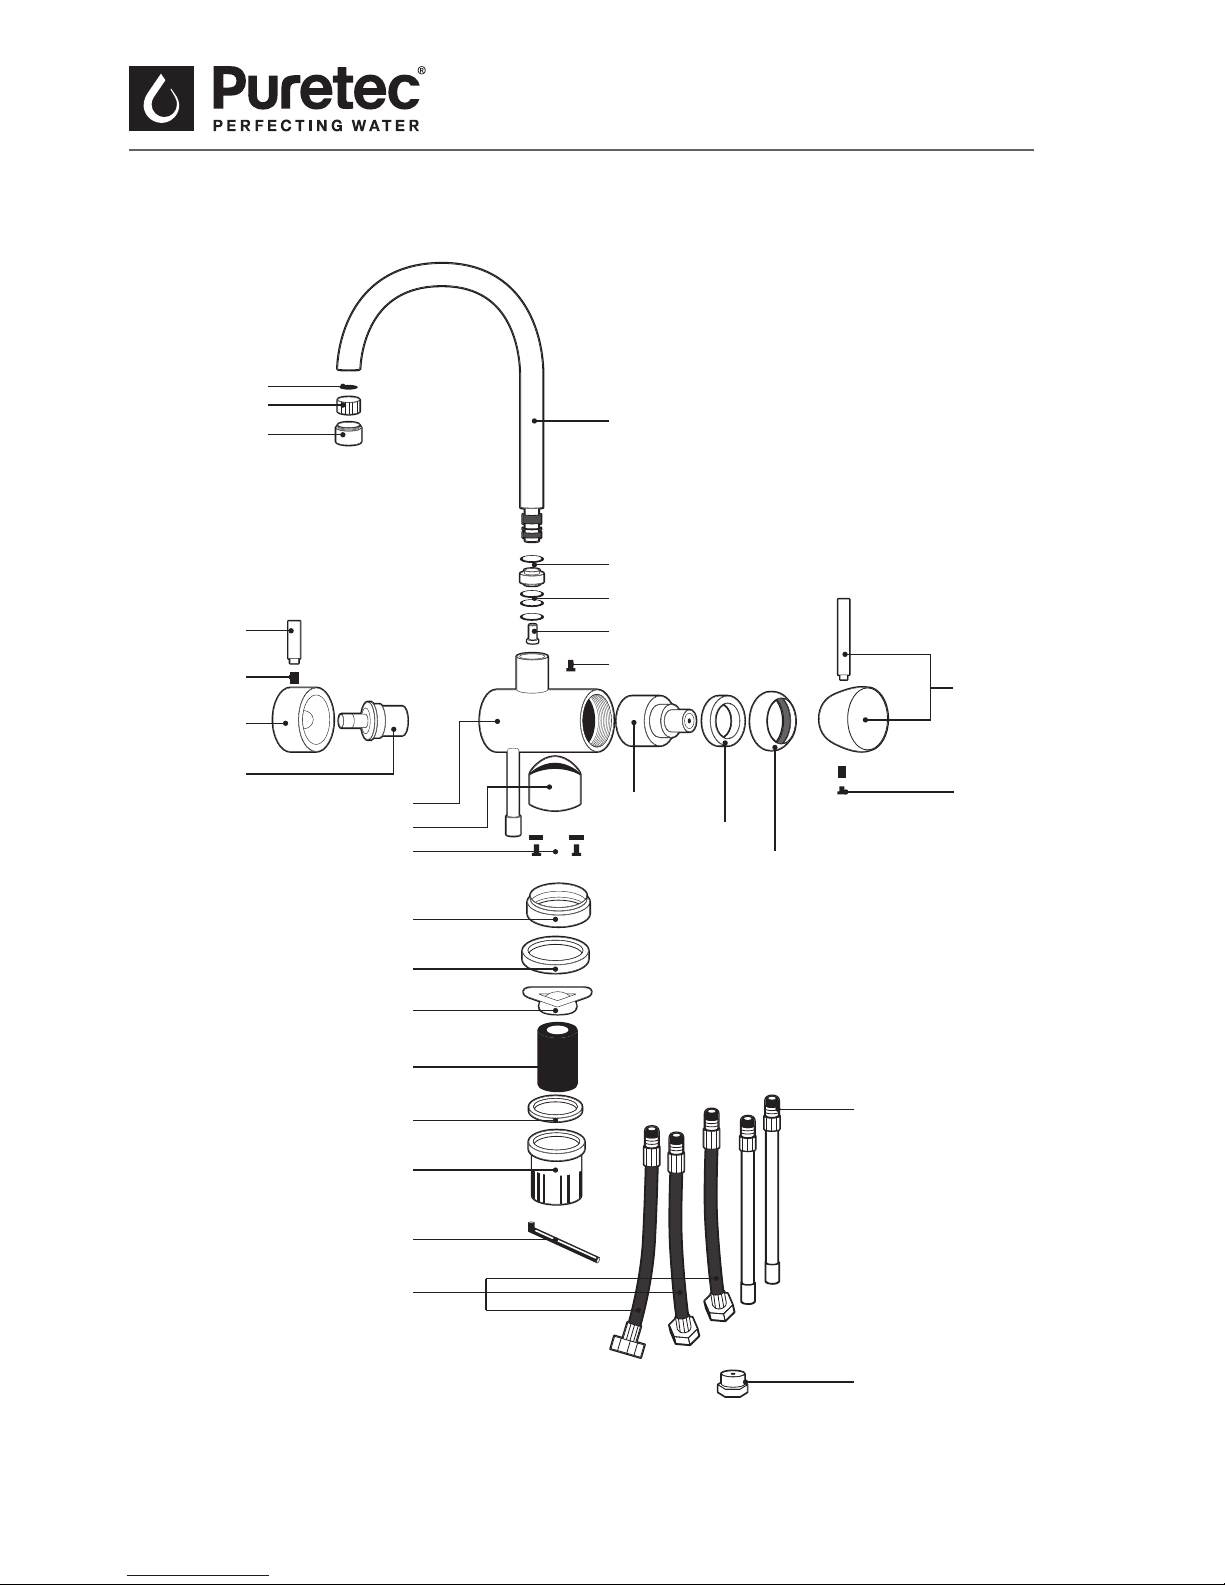
Tripla BL1 & BL2 Parts Description
11. handle
12. cartridge
9. handle
10. screw
1. aerator shell
20. screws
21. base
22. gasket
23. plastic xed nut
24. threaded tube
25. gasket
26. nut
27. wrench
28. exible hose
2. aerator
19. body base
3. gasket
13. body
4. spout
5. gasket
17. handle
6. O-ring
7. plug
8. screw
18. screw
29. lter adaptor
30. copper tube
14. cartridge
15. nut
16. cap
Table of contents
Other Puretec Plumbing Product manuals


Popular Plumbing Product manuals by other brands

Weka
Weka 506.2020.00E ASSEMBLY, USER AND MAINTENANCE INSTRUCTIONS

Kohler
Kohler K-6228 Installation and care guide

UBERHAUS DESIGN
UBERHAUS DESIGN 75175017 Operator's manual

American Standard
American Standard DetectLink 6072121 manual

Uponor
Uponor Contec TS Mounting instructions

Pfister
Pfister Selia 49-SL Quick installation guide


Kohler
Kohler Centerset K-15240 Homeowner's guide

Viega
Viega Prevista Dry 8522.33 Instructions for use

Sanela
Sanela Lema SLP 59RB Instructions for use

Elkay
Elkay EDF15AC Installation, care & use manual

Hans Grohe
Hans Grohe AXOR Citterio E 36702000 Instructions for use/assembly instructions

baliv
baliv WT-140 manual