König Electronic HAV-SDC20 User manual

HAV-SDC20
Portable
Micro System
1
Packaging contents
1x HAV-SDC20 Digital Music Box
1x USB cable
1x USB Driver CD for Windows
®
98SE
1x Manual
(Power adapter optional, article number P.SUP.USB400)
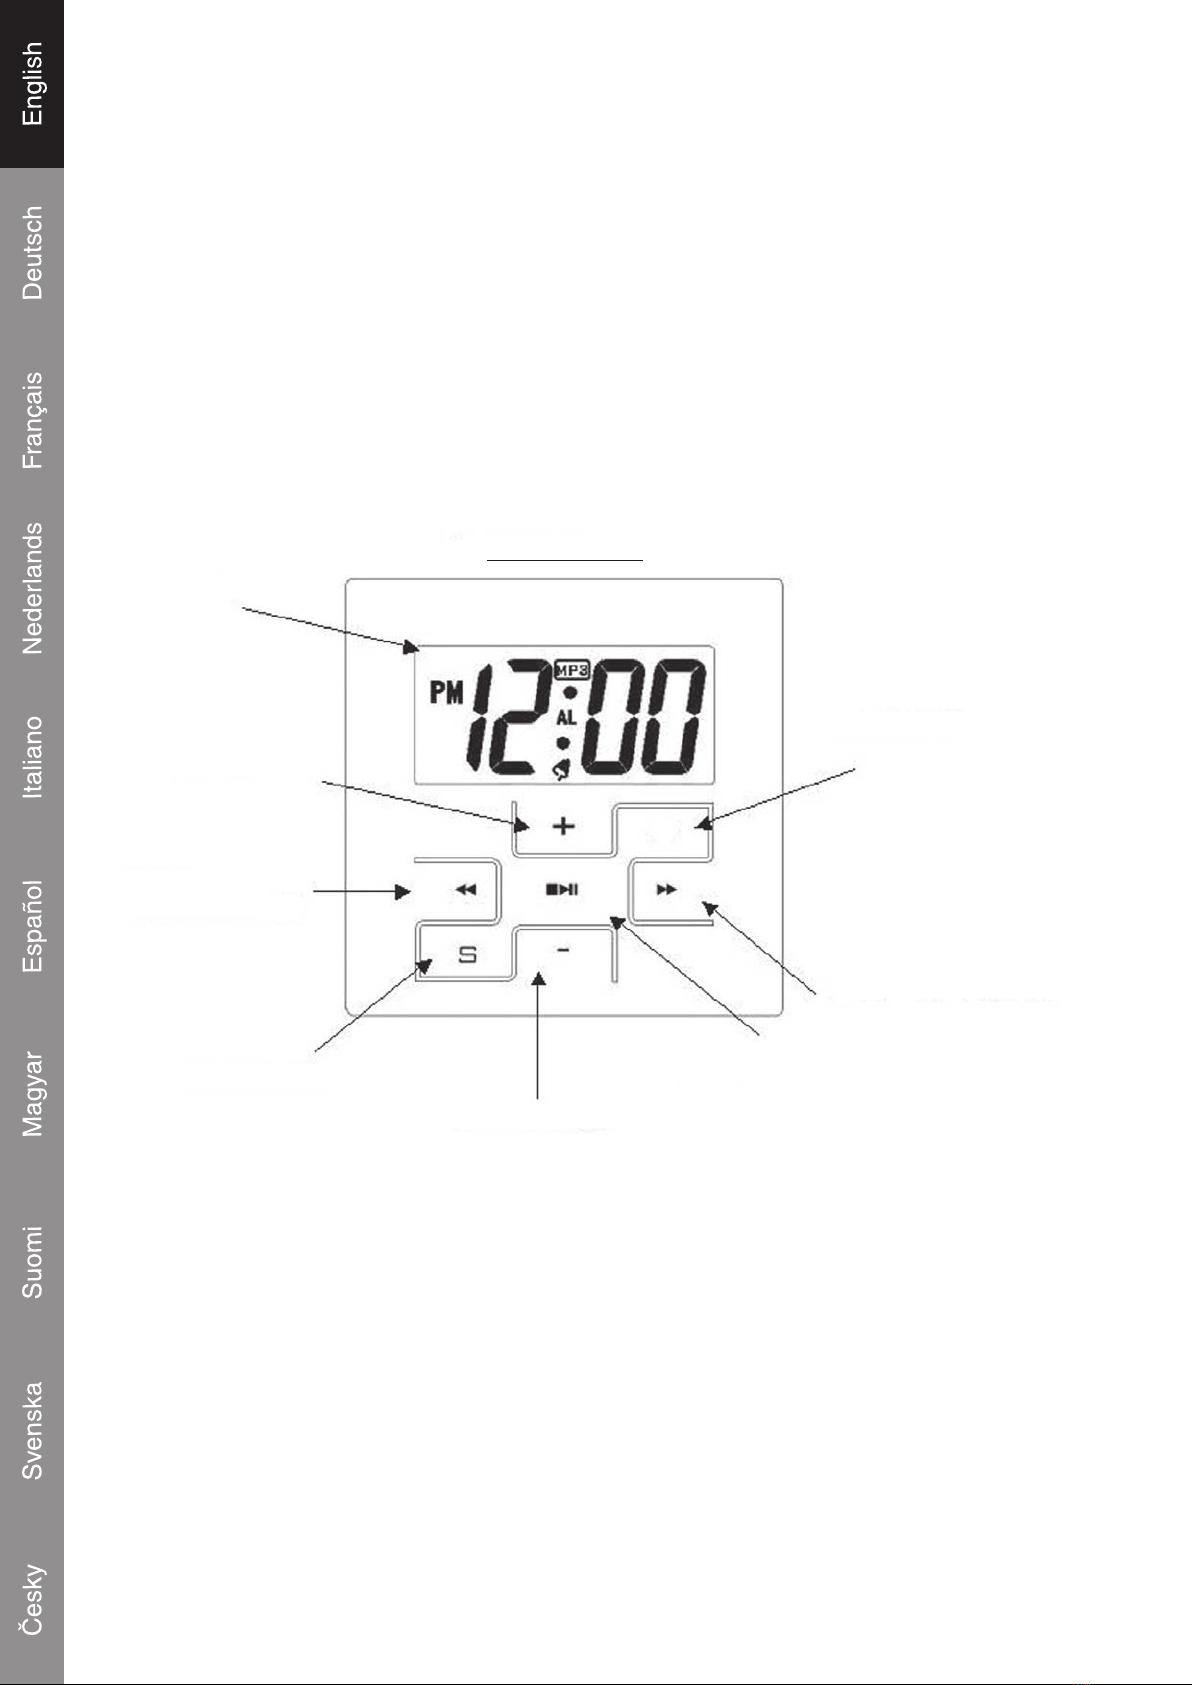
Location of controls
FRONT PANEL
LCD DISPLAY
VOLUME_UP
BACK/
FASTBACKWARD
SETTING KEY
VOLUME_DOWN
PLAY/PAUSE
NEXT/FASTFORWARD
ALARM KEY
MENU
2
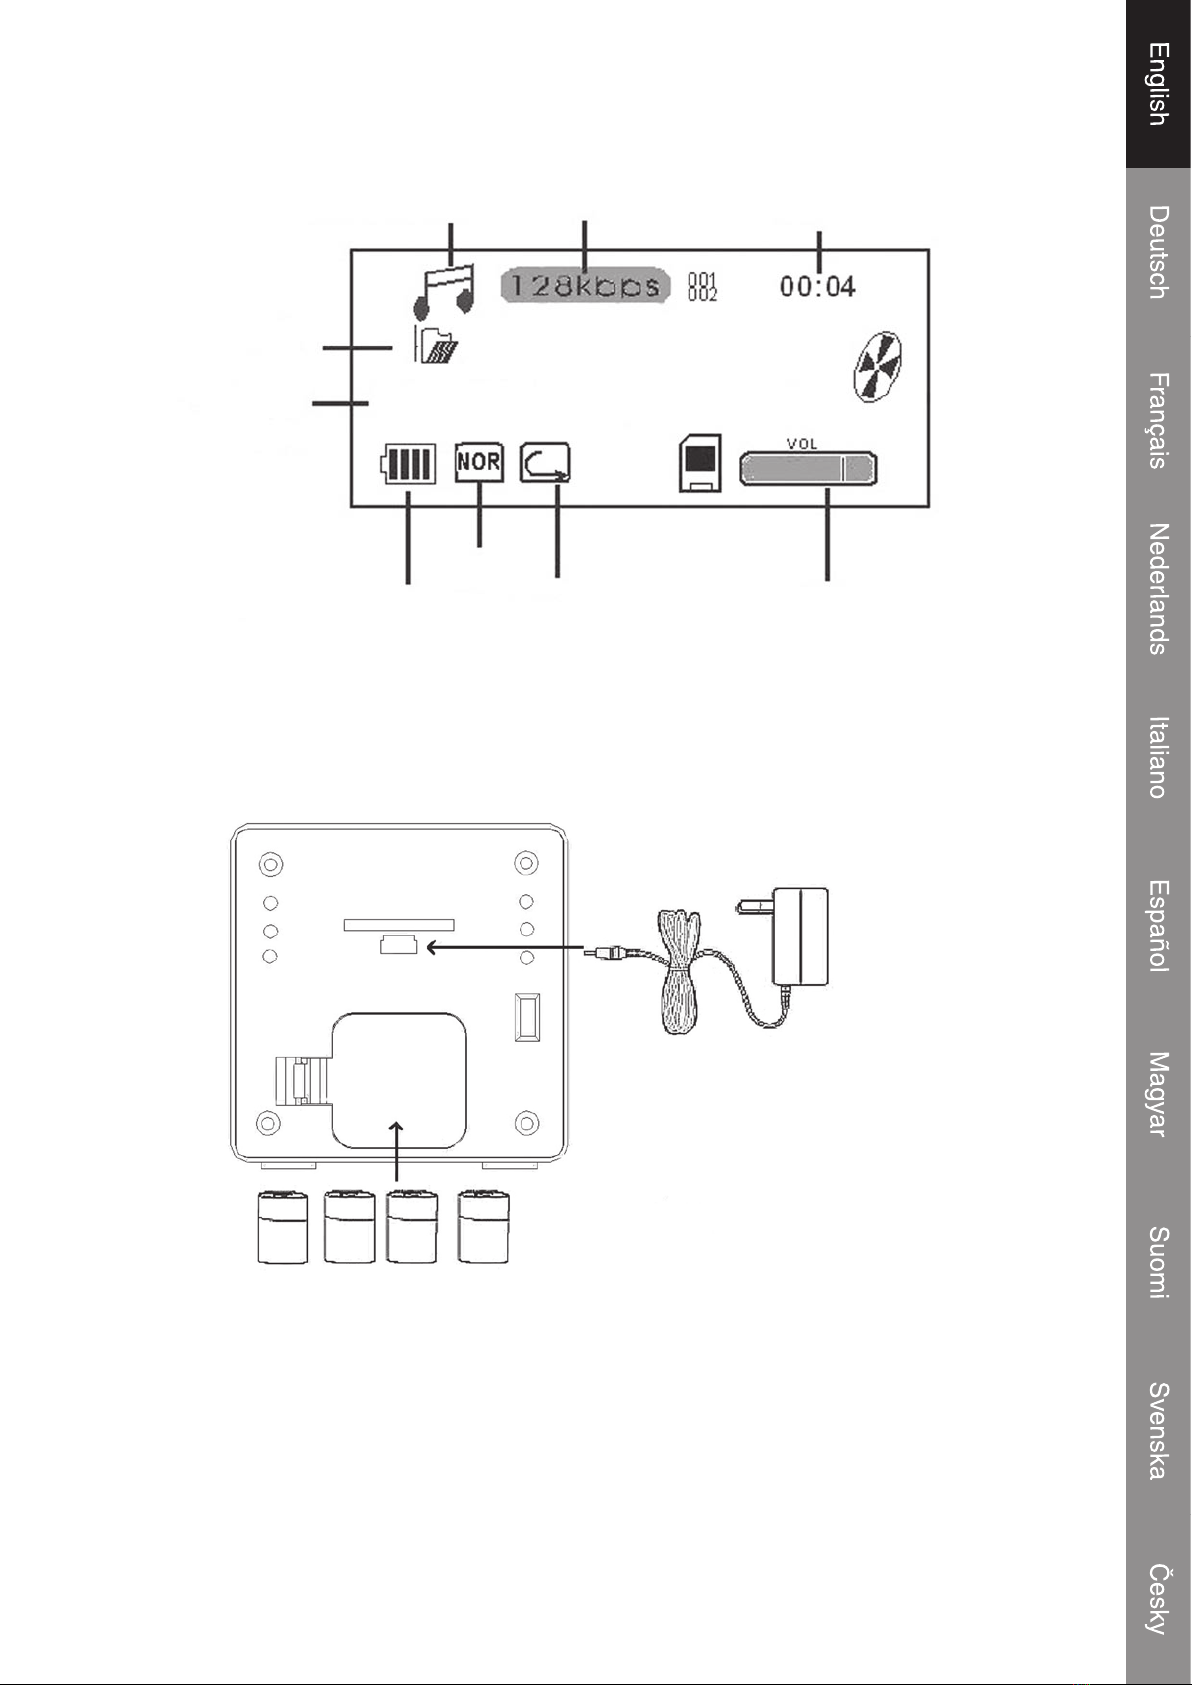
LCD display
Music mode Bit rate Song counter
VolumeRepeat mode
EQ
Battery Level
Lyrics/
ID3 Display
Root Root
When I rst saw you, I saw love
Battery operation
Open the battery compartment and insert 4x AA batteries (Alkaline batteries are recommended) as
shown in the diagram inside the battery compartment.
4 x AA Baterry
Power
Adapter
Power adapter operation
The connection for the power adapter is the same as the USB connection. Connect the mini plug to
the USB (5V) connection and the power plug to a 220~230V wall outlet.
3
Note: When the power adapter is connected the LCD backlight will turn on and remain lit until the AC
adapter is unplugged. When the system is running on batteries, the LCD backlight will light up briey
each time a button is pressed and then turn off. Once power connected, display will show a while
“USB RDY” and device will auto detect the power source or computer data.
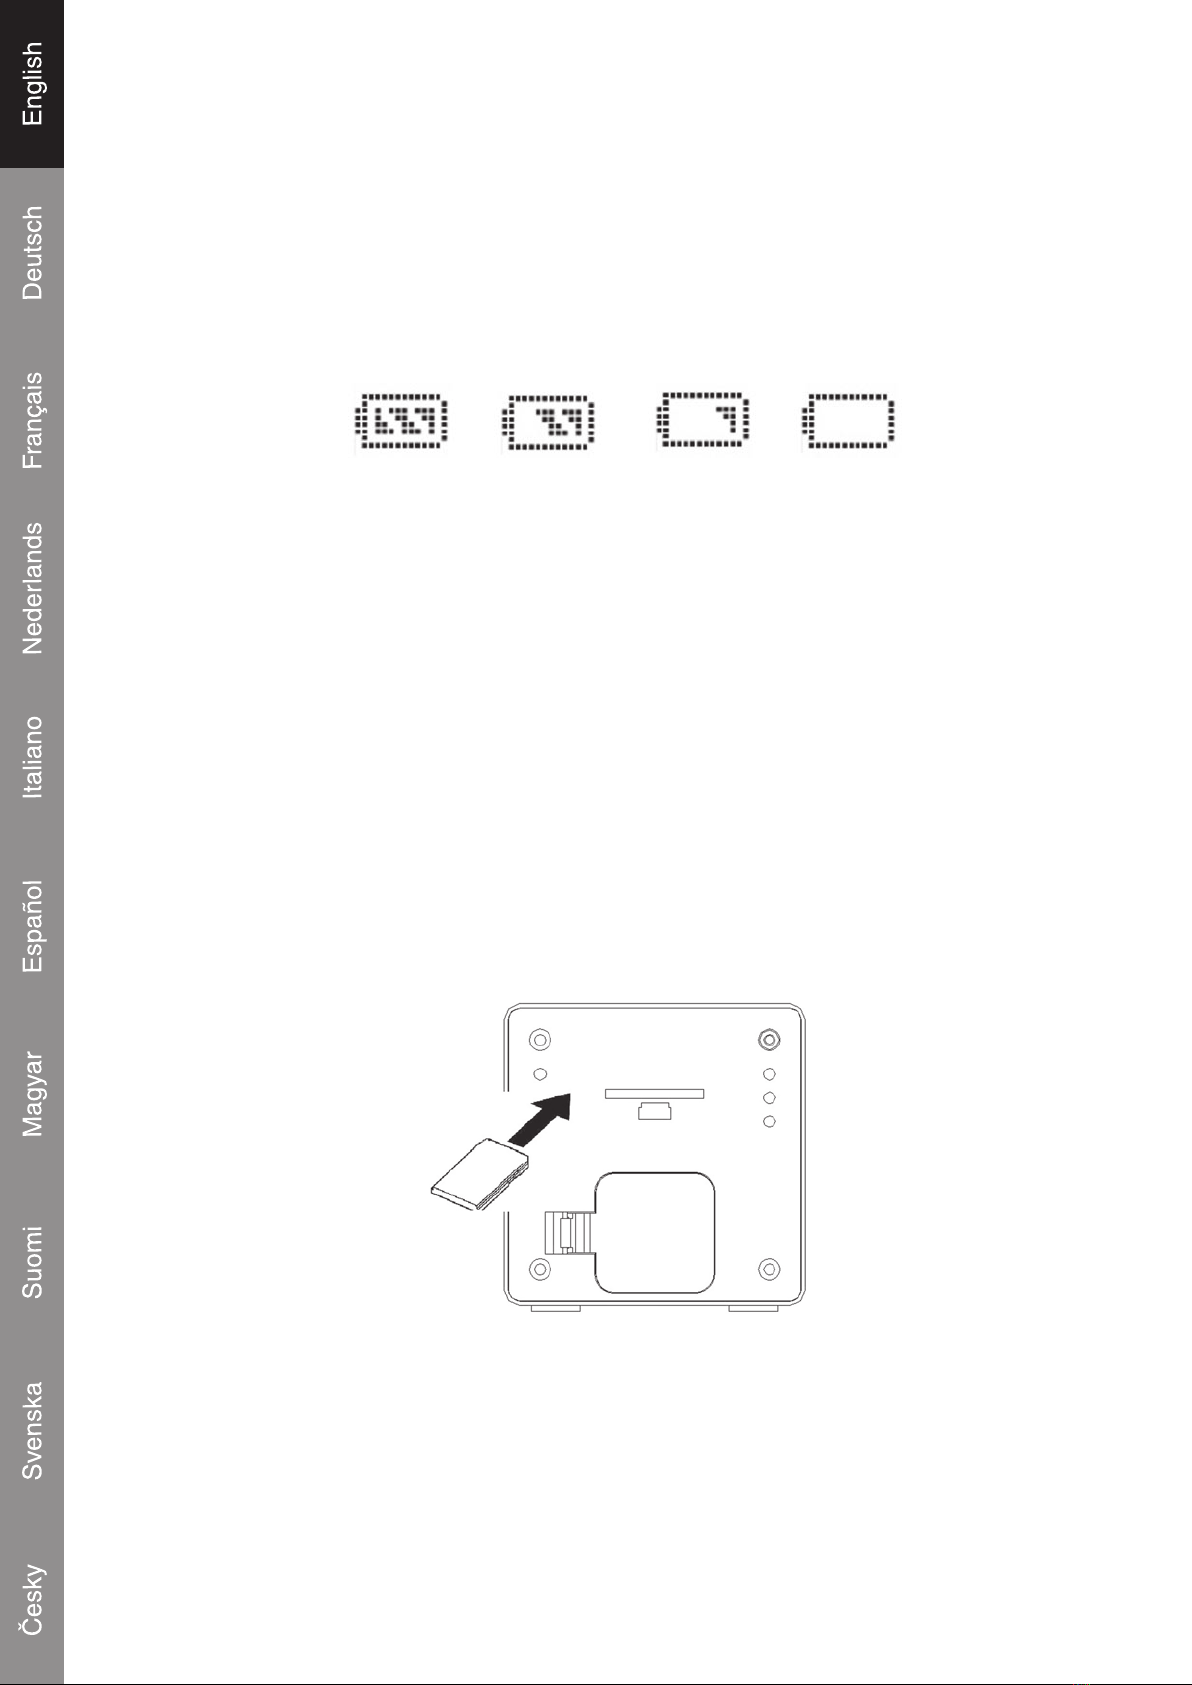
Low battery indication
There are four levels battery indication showed as following:
When the battery is almost empty, the red LED will blink to provide a nal warning.
Power from USB port
The system can get power from the PC USB port for play mode if the “mass storage” icon is removed
from PC.
SD/MMC card installation
The integrated SD/MMC card slot lets you upgrade the player’s memory capacity easily with additional
SD/MMC cards.
To install an SD/MMC card:
1. Insert the card on the rear of the system in the direction of the arrow.
2. Press the card in until a click is heard.
3. To remove the SD/MMC card, press the card in and it will jump out.
Important notice: Press the card in the slot exactly conforms below gure. Trying in another way
will damage the slot.

4
Connect to a computer
USB Driver Installation
It is not necessary to install the USB driver if your computer is running Microsoft Windows ME/2000/
XP or newer. Computers running these operating systems will recognize the system automatically
when the USB cable is connected.
Microsoft Windows 98 SE
For Windows 98 SE it’s necessary to install the USB driver.
1. Navigate to MY COMPUTER and double-click on the CD drive icon.
2. Double-click on the le “iSetup98” to start the USB driver installation program.
4. Follow the on-screen instructions to complete the installation and then restart the computer.
Connecting the USB cable to a computer
Connect the USB cable to the system and a computer.
Turn the system and press the “Play”
s
/II button to wake-up the system.
The LCD display of the system will show “USB RDY” and “RUNNING”, the red LED will turn on
also.
The computer will recognize the system as a Removable Disk.
If a SD/MMC card is installed in the system. The computer will recognize the card as a Removable
Disk.

5
Transferring les
The USB connection makes it easy to transfer music les (MP3/WMA) between the system
and a computer. Do not disconnect or interrupt the system.
Transferring les with Microsoft Windows
1. Locate the les or folders you would like to transfer from the computer.
2. Select the les or folders with the mouse and press CTRL-C (copy) on the keyboard.
3. Navigate to MY COMPUTER and double-click on the Removable Disk icon. The computer will
display all les and folders currently stored in the player.
4. Press CTRL-V (paste) on the keyboard to transfer the les you selected to the system.
Note: It’s also possible to use the mouse to drag-and-drop les between the system and the
computer.
Disconnecting from a computer and get the USB power from PC
Microsoft Windows
1. Double-click the green arrow icon in the taskbar of the computer screen (Safely Remove
Hardware).
2. Select “USB Mass Storage Device” from the list that appears and then click on “Stop”.
3. Select “USB Mass Storage Device” from the list that appears and then click on “OK”.
4. The system will direct get the power from the USB of PC.
5. Disconnect the USB cable from the system and the computer if all the jobs are nished.
Basic operations
Standby mode
The system will enter Standby mode automatically when it is connected to a power source. The LCD
will display the time.
Power On/Off
To turn the system on, press play/pause
s
/II while in Standby mode.
User will always enter to the Music mode rst and then press
s
/II key the music will play. For more
function, user can enter to the main menu by pressing the MENU key (when the player in pause or
stop status).
To turn the system off, press and hold play/pause.
6
Menu navigation
Press MENU to access the main menu (player in pause or stop status).
Following buttons are the general control denition.
Press I
s
s
/
s
s
I for left/right (fast forward / fast backward / next song/previous song)
Press +/- for volume up/down
Press play/pause
s
/II to conrm a selection.
Press MENU to cancel or return to the previous menu.
Press S to adjust clock in standby mode.
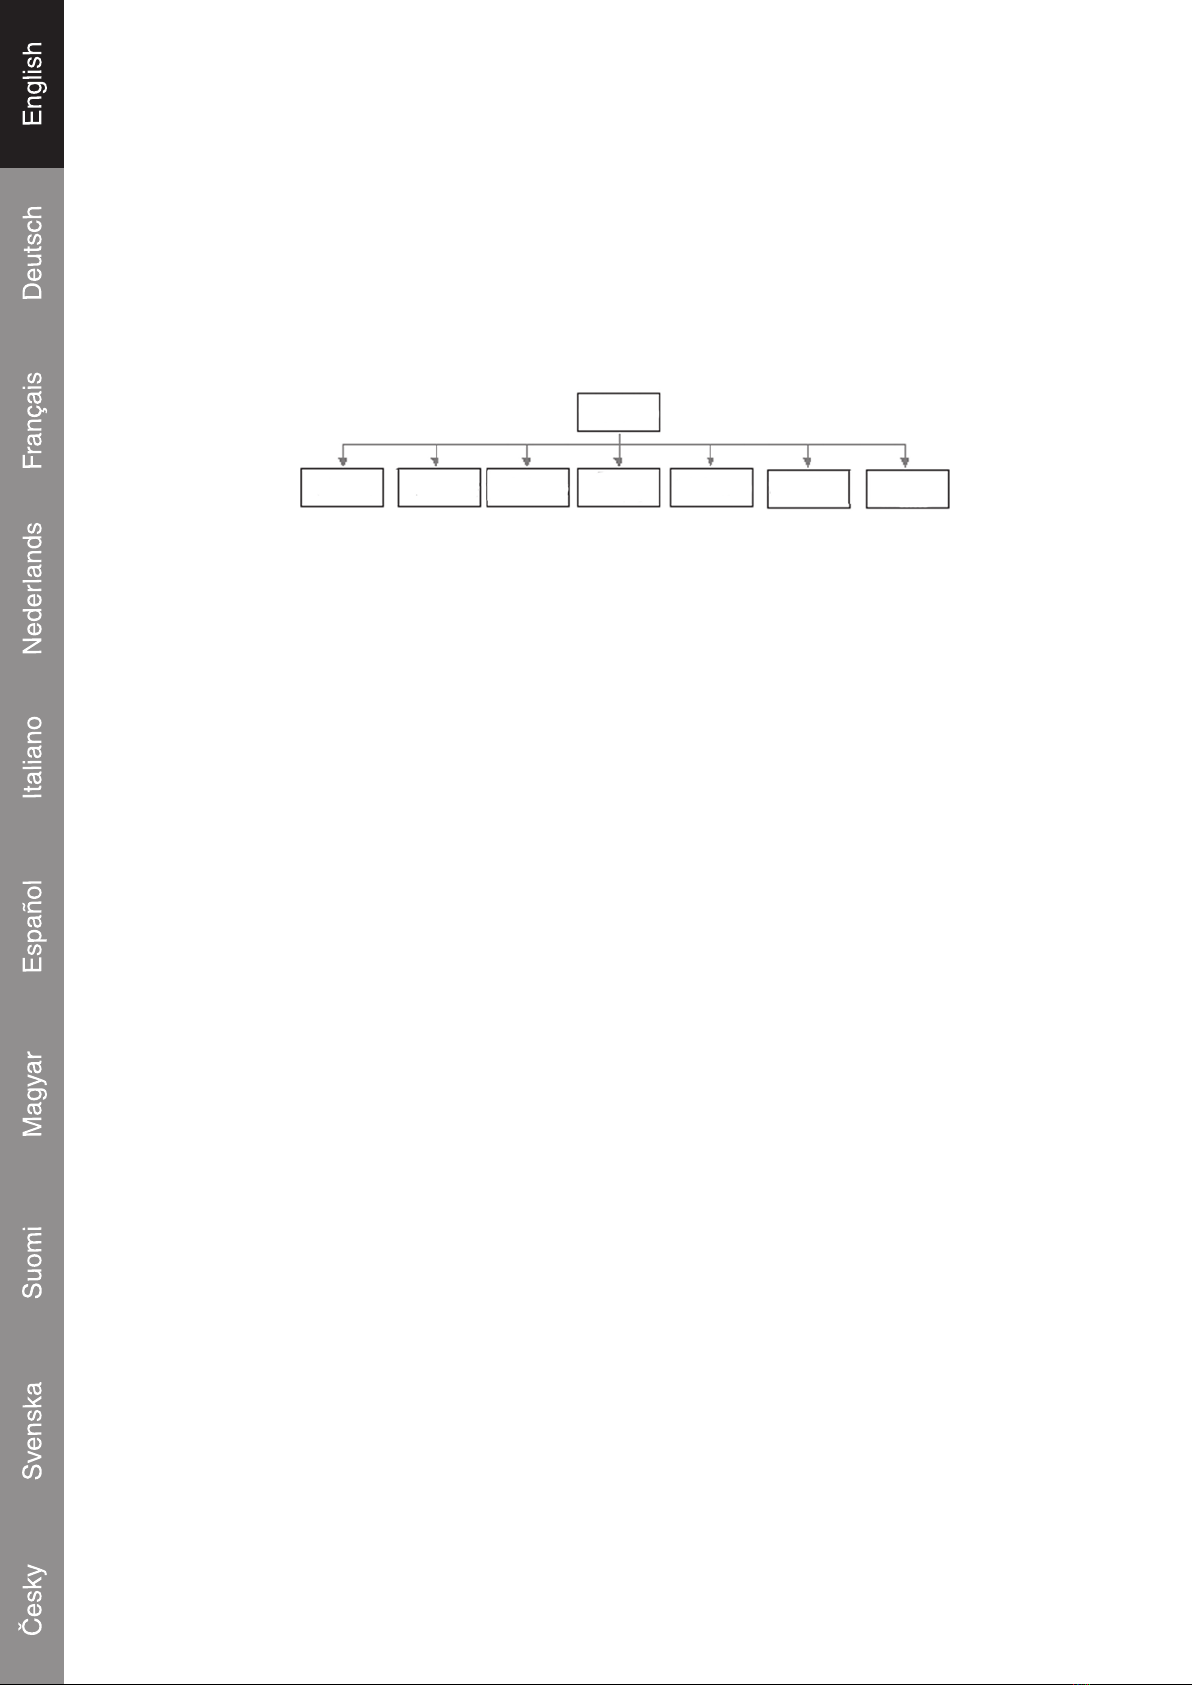
Main menu overview
Music player
Voice player
Voice Record
FM Radio
EQ Mode
Repeat
File Delete
Setting
Music player
Music
User can play all the MP3 or WMA les in this mode.
User under this mode and press menu key can access to EQ and Repeat mode.
Users can search their songs in the “Root” folder or other sub-folder (up to 3 levels) of the system.
How to search different folder, sub-folder or songs:
1) press the pause key
s
/II to stop the music
2) and then press and hold the “menu” key
3) search desired folder and song and press
s
/II key
Voice Player
Select this function to nd recorded audio les in the “Record” folder of the system. The system will
save all recorded les in this folder. User can playback all the voice les in this mode.
7
Voice Record
User can take a voice recording function in this mode. Once you enter to this mode the player will
start to record voice, by pressing
s
/II key momentarily user can stop the voice recording. User can
playback the voice les in the voice player mode.
FM Radio
There are 7 functions in the FM Radio.
FM Radio
Preset Frequency Auto Scan Save
Preset Clr Preset Sensitivity FM
Record
1) Preset
Under the radio mode you can press the I
s
s
/
s
s
I keys to turn up or down the radio frequency
(87.5—108MHz).
2) Frequency
User can use this function to tune up or down the radio frequency step by step (0.1 kHz) by pressing
I
s
s
/
s
s
I keys manually.
3) Auto Scan
User can use this function to auto scan all radio station frequency and
Store in 30 location channels.
Note: this will overwrite previously stored preset stations.
4) Save Preset
User can save the desired radio frequency by pressing the
s
/II key (play key) under the Save
Preset function.
5) Clr Preset
User can clear the current radio frequency by pressing the
s
/II key (play key) under the Clr Preset
function.
6) Sensitivity
User can through this function to ne tuning every station frequency from level 1 to level 3.
7) FM Record
Every tuned frequency or radio station can be recorded by the function “FM Record”. The recorded
les will be stored in a “ FM_REC” le. Those les all are in .mp3 format.
8
Escape the FM Radio Mode
By pressing the
s
/II key and the “stop” will show on LCD. And then press the “Menu” key to select
other function mode.
EQ Mode
Enter the EQ mode you can experience perfect Classic, Live Rock, Pop, DBB. Those effect by
choosing suitable corresponding mode. Normal mode could bring you original sound effect.
Repeat Mode
Repeat modes include Normal, Repeat one, Repeat folder, Repeat All and Repeat Random.
File Delete
User can delete some les in memory in order to get more memory space.
By pressing the “forward/back” I
s
s
/
s
s
I key user can choose any les those user want to
delete. In this dialog box, short press
s
/II key to conrm or if you will not delete the le press any
key to exit.
Setting
There are 9 settings in the setting mode.
Language
Lyric Display
LCD Contrast
Back Light
Bit-rate
Format Memory
Reset setting
Memory Info.
S/W Version
1) Language
In language setting user can select English, German, French, Italian and Spanish.
2) Lyric Display
The player can display the song or music those have lyric content.
Enable the Lyric function by pressing the
s
/II key to switch on the function. Only displayed if MP3
track contains Lyric information.
3) LCD Contrast
You can adjust the contrast level to low, middle and high in this function.
9
4) Back Light
User can choose to turn off the backlight or let the backlight on for 5,10,15,20, seconds and forever
on (this function only for the music mode only).
For the adaptor power the backlight will turn on forever.
5) Bit-Rate
There are six grades for voice recording velocity 32kbps, 64kbps, 96kbps, 112kbps,128kbps
and 192kbps. Those selections are only for the FM recording use.
6) Format Memory
User can re-empty the whole memory space by this format memory.
For the PC format we only accept the FAT-16.
7) Reset Setting
By choosing this item, your MP3 player will be reverted to the default setting in manufacturer and the
menu language will be back to English.
8) Memory Info.
User can nd the total memory size and the rest of the memory size.
9) S/W Version
The version information of rmware edition will show out in this function.
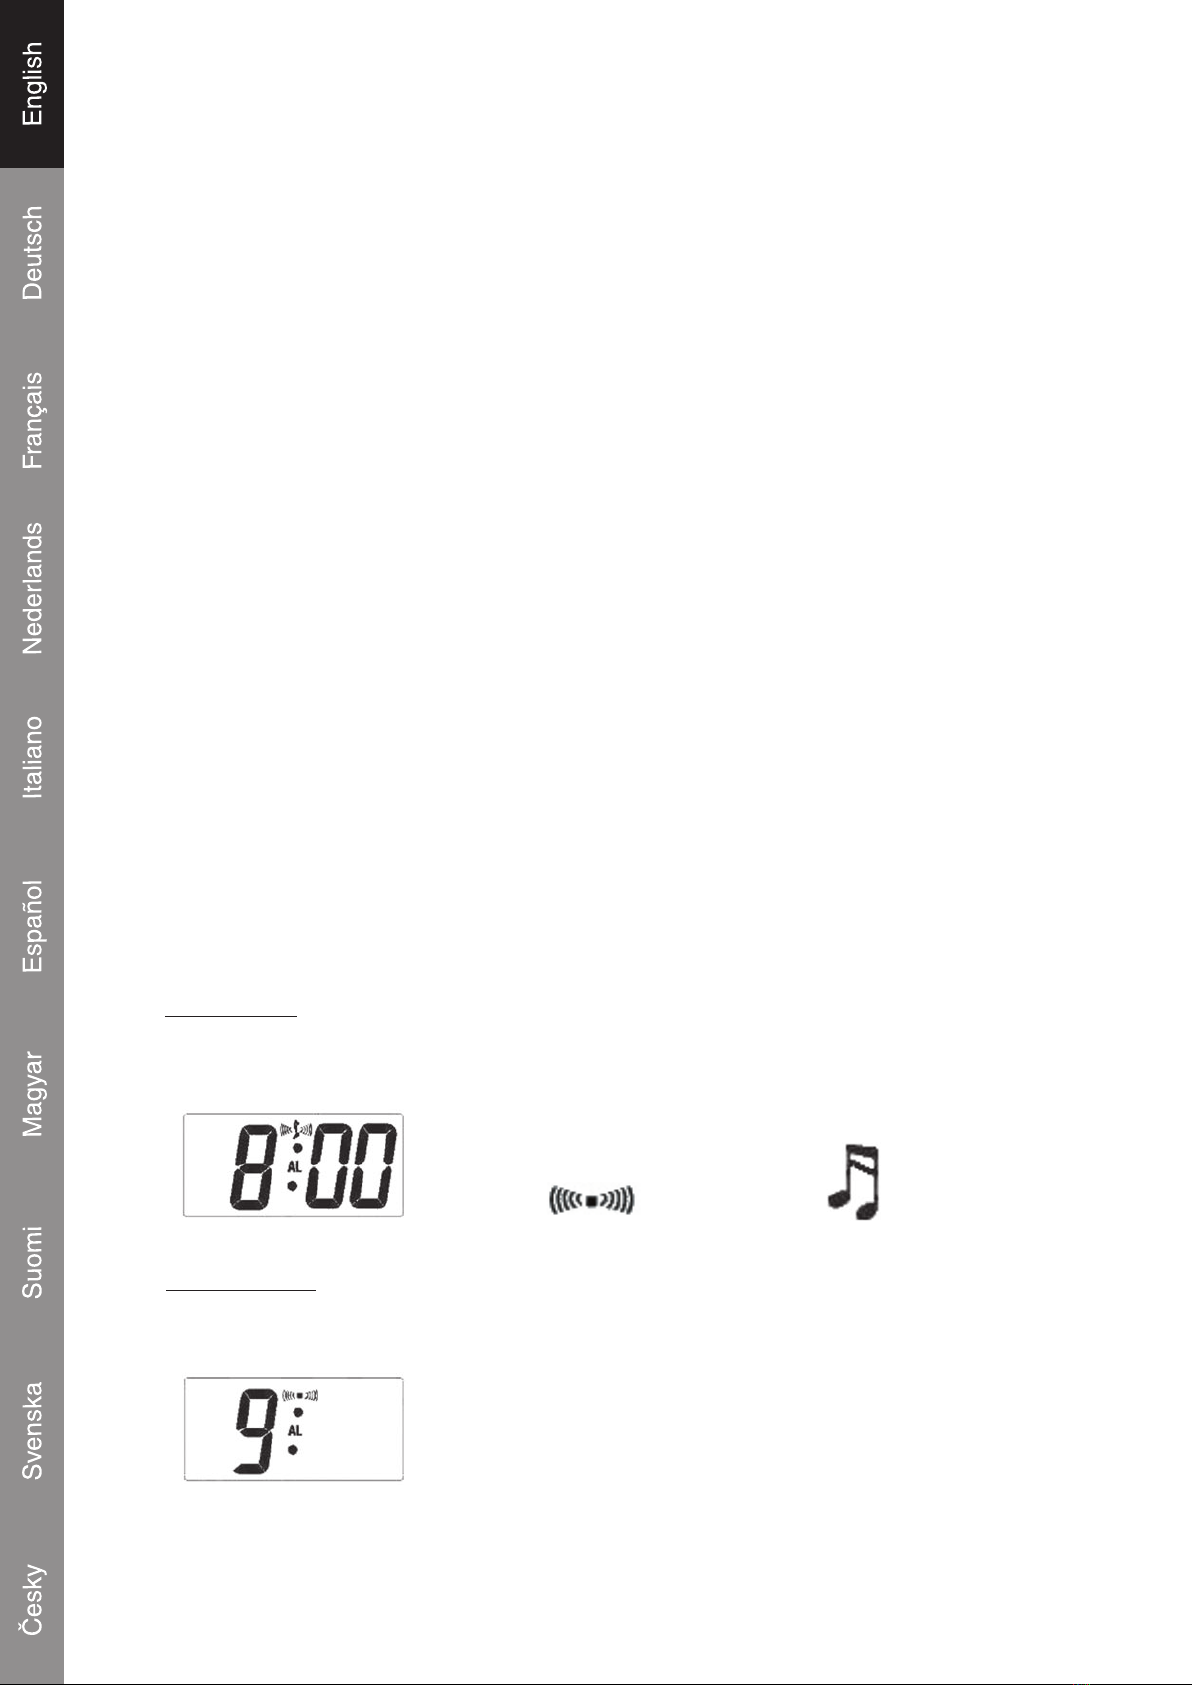
Clock and Alarm Setting
Alarm Section (4 Steps)
1. Enable Alarm
Press S key
-------
s
Press Menu key
(all digits will wink) (Select alarm sound)
buzzer alarm , mp3 music alarm
2. Set Alarm Hour
Press S key
-------
s
Press Menu key
(Hour digit will wink) (Set the hour value)
Table of contents
Languages:
Other König Electronic Stereo System manuals

König Electronic
König Electronic IPD-SPEAKER40 User manual

König Electronic
König Electronic HAV-MCS42 User manual

König Electronic
König Electronic HAV-MCS52 User manual

König Electronic
König Electronic HAV-MC100 User manual

König Electronic
König Electronic HAV-MCS30 User manual

König Electronic
König Electronic HAV-PMS10 User manual

König Electronic
König Electronic HAV-MCS50 User manual

König Electronic
König Electronic HAV-MCS42 User manual

König Electronic
König Electronic HAV-MCS30 User manual

König Electronic
König Electronic HAV-MCS35 User manual


