ADJUSTING THE SAFETY GUARD
You must always use the Electric Hoof Knife with the safety guard
attached, otherwise it can be potentially dangerous for you or the cow
you are trimming. The safety guard is preset at the factory, but you
may need to adjust it so that it will fully protect your fingers during operation.
Always make sure the Electric Hoof Knife
is unplugged before adjusting the safety
guard. To adjust the safety guard, first
loosen the set screw slightly using the hex
key that came in your set. You do not
need to take the screw out entirely for the
guard to move.
Turn the guard into the desired position, making sure it fully protects your
fingers from the chainsaw disc. With the disc in its new position, retighten
the set screw, but DO NOT OVER-TIGHTEN IT. Remember to always
make sure the guard cannot move freely before turning the tool on.
HOW TO HOLD THE ELECTRIC HOOF KNIFE
For the most control over
the Electric Hoof Knife,
lightly grip the tool neck just
below the gear head, with
the tool resting on your
fingertips. This will help the
Electric Hoof Knife feel
balanced in your hand.
Avoid blocking the air vents and try not to press the locking button while
trimming, as this can cause the disc to chatter.
The locking button is there to prevent the disc from free turning in the tool.
Though accidentally pressing the locking button during operation is not
dangerous, holding it down during operation can be. Therefore, we
recommend you hold the Electric Hoof Knife in a position that keeps your
fingers away from the locking button.
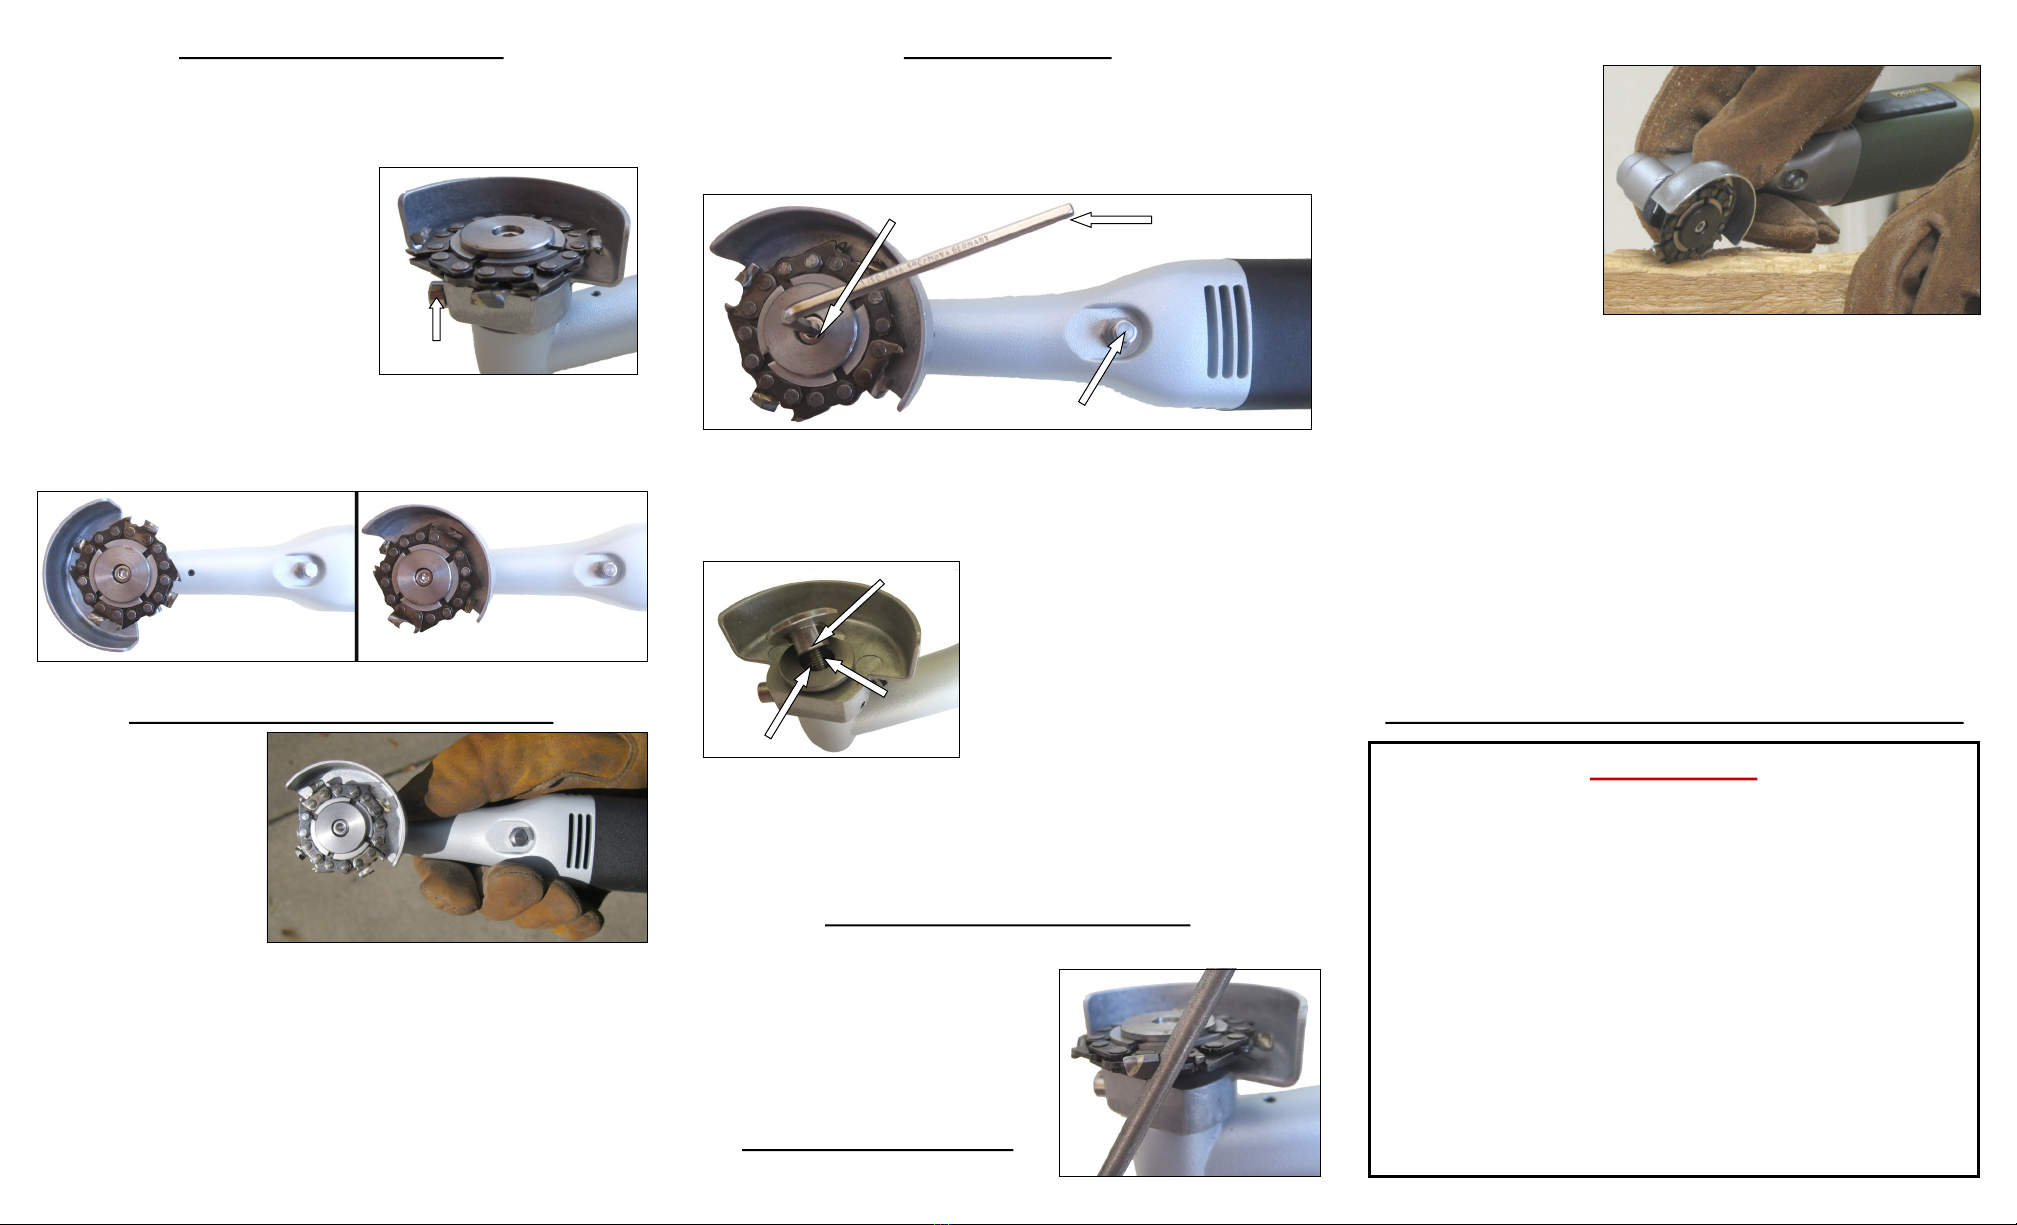
CHANGING THE DISC
Always make sure the Electric Hoof Knife is unplugged before changing the
disc. First, insert the hex key into the center screw in the middle of the tool’s
head. Press the locking button on the underside of the Electric Hoof Knife
and simultaneously turn the hex key counter clockwise. The locking button
will click down to let you know the screw is loosening properly.
Once the screw is out, remove the attachment washer and any disc already
in the Electric Hoof Knife. Put the screw and washer into the middle of the
new disc and align the screw with the hole in the middle of the tool’s head.
To lock the disk into place, press and hold
the locking button while turning the hex key
clockwise to tighten the screw but DO NOT
OVER-TIGHTEN IT. Make sure the disc
is secure and cannot fall out before turning
on the Electric Hoof Knife.
When installing the chainsaw disc, make
sure the tungsten carbide coated tips of the teeth are pointing in the same
direction as the arrow located on the top of the Electric Hoof Knife’s head.
The rakers should be on the left side of the teeth and the tungsten carbide
tips should be pointing counterclockwise. If assembled in reverse, the disc
will appear dull and will not cut properly.
SHARPENING THE CHAINSAW TEETH
Sharpening the chainsaw teeth is easy and works exactly like sharpening a
regular chainsaw. If you are unfamiliar with
how to sharpen a chainsaw, please read
over the included instructions titled
“Sharpening the Chainsaw Teeth.”
For the best results, we recommend that
you sharpen the teeth after every 3-5 trims.
PRACTICE ON WOOD FIRST
We recommend you use a piece of cedar or
redwood as their densities most closely resemble that of a hoof. To practice
with the tool, first position
yourself to the block of
wood like it’s a hoof. Never
turn the tool on when the
disc is in direct contact with
the wood.
Holding the tool correctly,
slightly angle the disc
perpendicular to the wood.
Gently pull the Electric Hoof Knife toward you, as if you were trimming a
hoof. Use a smooth pulling motion and don’t chop at the wood.
The disc is designed to flow easily across the hoof without any resistance so
you do not need to force the disc while trimming. Apply light pressure while
making a cut, as the disc will do the work for you. This feature helps to
decrease the wrist, hand, and arm pain usually experienced during trimming.
The Electric Hoof Knife will cut backwards, too. The motion is the same but
the back of the tool’s shaft will prevent you from laying the disc too flat.
You can control the depth of any cut by using a combination of disc angle,
speed you move the disc across the surface, and pressure you apply to the
disc. Keep practicing on the wood until you find the combination of angle,
speed, and pressure that works best for you.
ACCLIMATING YOU HORSE TO THE ELECTRIC HOOF KNIFE
SAFETY TIPS
1. Never operate the tool without the safety guard set at an angle
that will fully protect your fingers.
2. Always make sure the Electric Hoof Knife switch is off before
connecting it to a power source.
3. Make sure the hoof is secure before you begin trimming.
4. Always wear safety glasses, heavy duty gloves and footwear,
and long-legged pants while operating the tool.
5. Never start the tool if the disc is in direct contact with the hoof.
6. Do not force the disc or apply excessive pressure into the hoof.
7. Keep hands away from the cutting disc during operation. Do
not reach underneath or attempt to remove material while the
disc is rotating.
8. Unplug the Electric Hoof Knife when assembling, cleaning,
sharpening, or removing discs.
X
Set Screw
Center
Screw
Locking Buon
Hex Key
Aachment Washer
Center
Screw
Center
Hole


