Star SP298 SERIES User manual

SLIP PRINTER
SP298 SERIES
USER’S MANUAL
MODE D’EMPLOI
BEDIENUNGSANLEITUNG
MANUALE DI ISTRUZIONI

Federal Communications Commission
Radio Frequency Interference
Statement
This equipment has been tested and found to comply with the limits for a Class A digital
device, pursuant to Part 15 of the FCC Rules. These limits are designed to provide reasonable
protection against harmful interference when the equipment is operated in a commercial envi-
ronment. This equipment generates, uses and can radiate radio frequency energy and, if not
installed and used in accordance with the instruction manual, may cause harmful interference
to radio communications. Operation of this equipment in a residential area is likely to cause
harmful interference in which case the user will be required to corect the interference at his
own expense.
For compliance with the Federal Noise Interference Standard, this equipment requires a
shielded cable.
This statement will be applied only for the printers marketed in U.S.A.
Statement of
The Canadian Department of Communications
Radio Interference Regulations
This digital apparatus does not exceed the ClassA limits for radio noise emissions from digital
apparatus set out in the Radio Interference Regulations of the Canadian Department of Com-
munications.
Le présent appareil numérique n’émet pas de bruits radioélectiques dépassant les limites appli-
cables aux appareils numériques de la classe A prescrites dans le Règlement sur le brouillage
radioélectrique édicté par le ministère des Communications du Canada.
The above statement applies only to printers marketed in Canada.
CE
Manufacturer’s Declaration of Conformity
EC Council Directive 89/336/EEC of 3 May 1989
This product, has been designed and manufactured in accordance with the International Standards EN 50081-1/01.92 and
EN 50082-1/01.92, following the provisions of the Electro Magnetic Compatibility Directive of the European Communi-
ties as of May 1989.
EC Council Directive 73/23/EEC and 93/68/EEC of 22 July 1993
This product, has been designed and manufactured in accordance with the International Standards EN 60950, following
the provisions of the Low Voltage Directive of the European Communities as of July 1993.
The above statement applies only to printers marketed in EU.
Trademark acknowledgments
SP298, AutoSide Loading
: Star Micronics Co. Ltd.
ESC/POS, TM-295, TM-290
: Seiko Epson Corporation
Notice
• All rights reserved. Reproduction of any part of this manual in any form whatsoever, without STAR’s express per-
mission, is strictly forbidden.
• The contents of this manual are subject to change without notice.
• All efforts have been made to ensure the accuracy of the contents of this manual at the time of printing. However,
should any errors be found, STAR would greatly appreciate being informed of them.
• The above notwithstanding, STAR can assume no responsibility for any errors in this manual.
Copyright 1998 Star Micronics Co., Ltd.

TABLE OF CONTENTS
Chapter 1: Printer Setup ............................................................................. 1
Choosing a place for the printer ................................................. 1
Unpacking the printer ................................................................. 2
Removing the protective materials ............................................. 2
General guide ............................................................................. 3
Removing the printer cover ........................................................ 4
Installing the ribbon cassette ...................................................... 4
Removing the ribbon cassette ..................................................... 6
Connecting to a power outlet and turning power on and off ...... 6
Connecting to your host computer ............................................. 8
Connecting to a peripheral unit ................................................ 10
Inserting the paper into the printer ........................................... 11
AutoSide Loading
................................................................. 12
Chapter 2: Control Panel Operations ...................................................... 14
Indicator lights .......................................................................... 14
Buttons ...................................................................................... 15
Producing a test print ................................................................ 15
Adjusting the dot alignment ..................................................... 15
Hexadecimal dump ................................................................... 17
Errors ........................................................................................ 18
Chapter 3: Command Summary .............................................................. 20
Star Mode Commands .............................................................. 20
ESC/POS Mode Commands (TM-295 emulation).................... 26
ESC/POS Mode Commands (TM-290 emulation).................... 28
Appendix A: Specifications ......................................................................... 120
Appendix B: Making DIP Switch Settings................................................. 125
Appendix C: Memory Switch Settings....................................................... 130
Appendix D: Interface ................................................................................. 131
Appendix E: Peripheral Unit Driver Circuit............................................. 137
Please access the following URL
http://www.star-micronics.co.jp/service/sp_sup_e.htm
for the latest revision of the manual.
ENGLISH

1
ENGLISH
Chapter 1: Printer Setup
This chapter contains important information on setting up your printer. Be sure
to read this chapter carefully before using the printer for the first time. In this
chapter you will learn about:
❏
Choosing a place for the printer
❏
Unpacking and setting up the printer
❏
Installing the ribbon cassette
❏
Connecting to a host computer
❏
Inserting paper
Choosing a place for the printer
Before actually unpacking the printer, you should take a few minutes to think
about where you plan to use it. Remember the following points when doing this.
✓
Choose a firm, level surface where the printer will not be exposed to
vibration.
✓
The power outlet you plan to connect to for power should be nearby and
unobstructed.
✓
Make sure that the printer is close enough to your host computer for you to
connect the two.
✓
Make sure that the printer is not exposed to direct sunlight.
✓
Make sure that the printer is well away from heaters and other sources of
extreme heat.
✓
Make sure that the surrounding area is clean, dry, and free of dust.
✓
Make sure that the printer is connected to a reliable power outlet. It should
not be on the same electric circuit as copiers, refrigerators, or other
appliances that cause power spikes.
✓
Use a power outlet that matches the power rating noted on the label affixed
to the bottom of your printer.
✓
Make sure that the room where you are using the printer is not too humid.

2
ENGLISH
Unpacking the printer
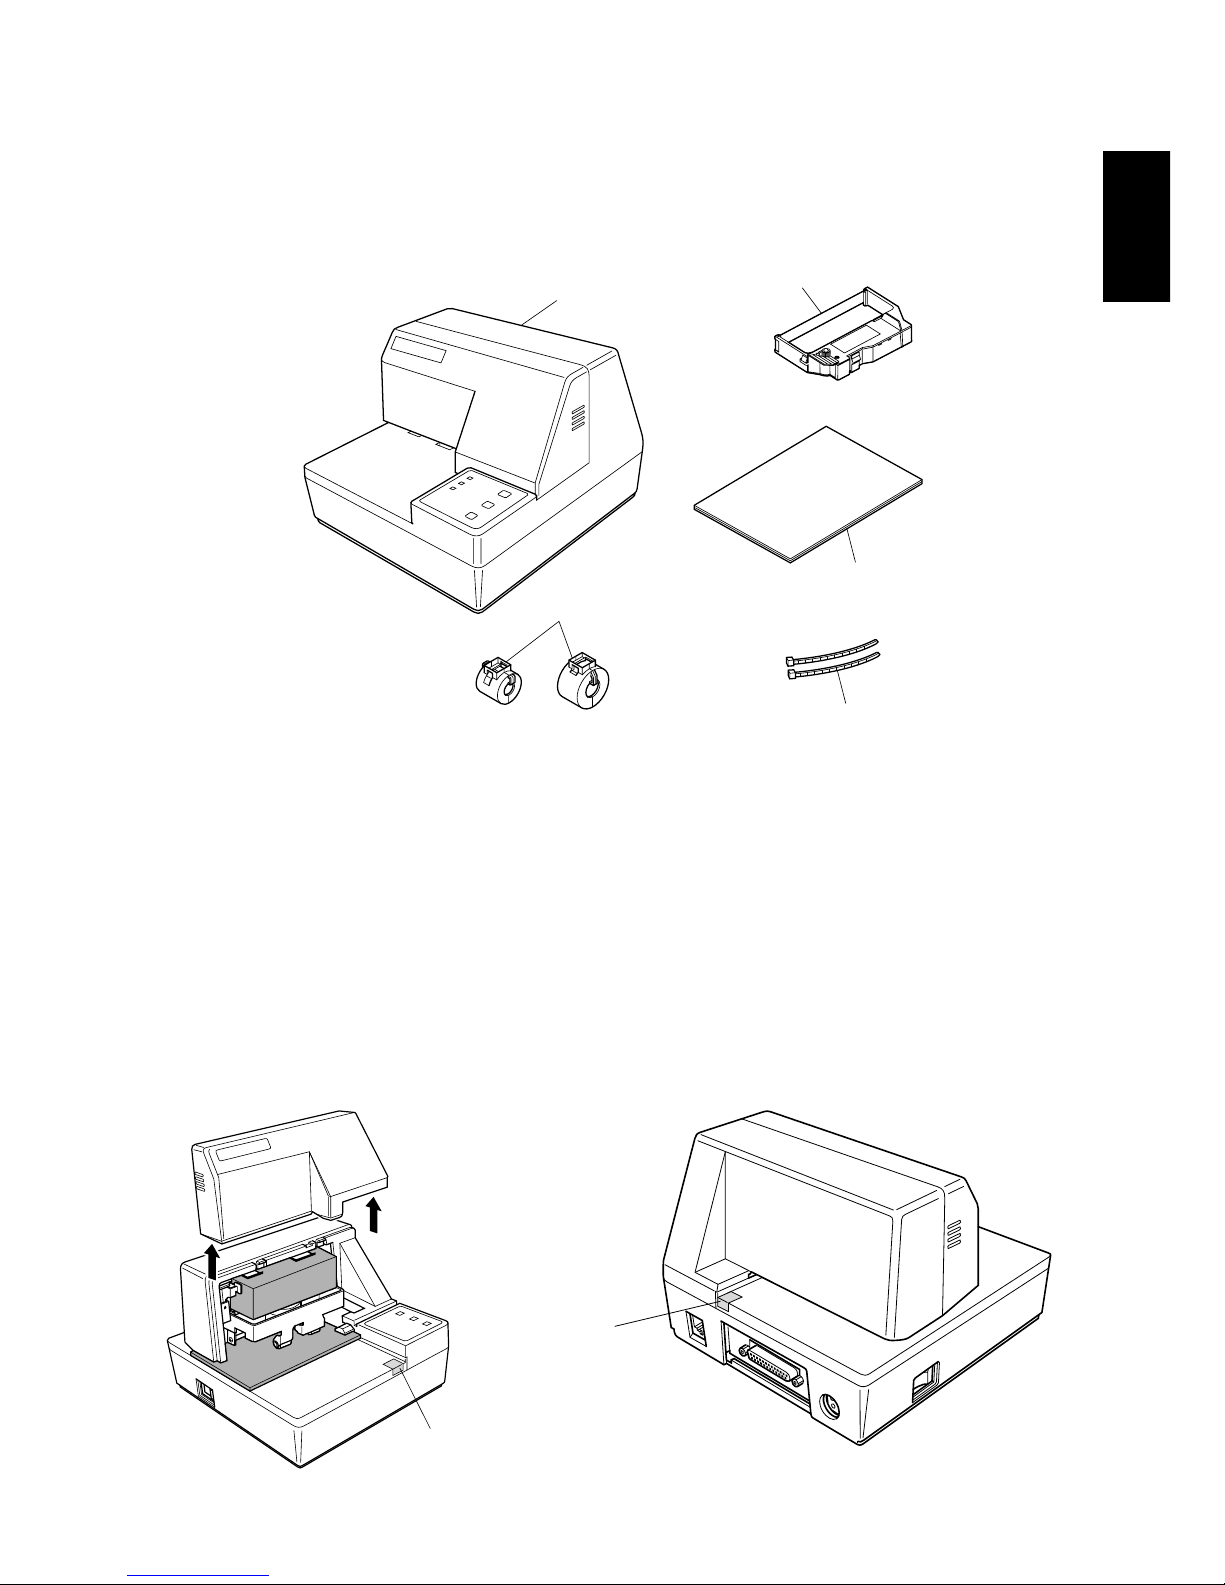
Check to make sure that the carton contains each of the items shown in the
following illustration.
If anything is missing, contact the dealer where you bought the printer and ask
them to supply the missing part. Note that it is a good idea to keep the original
box and all the packing materials just in case you need to pack the printer up
again and send it somewhere at a later date.
Removing the protective materials
Four protective materials are inserted into the printer to protect components
during shipping. Before using the printer, be sure to remove all protective
materials as shown in the illustration.
Printer Ribbon cassette
User’s Manual
Ferrite core
Fastener
tape
tape

3
ENGLISH
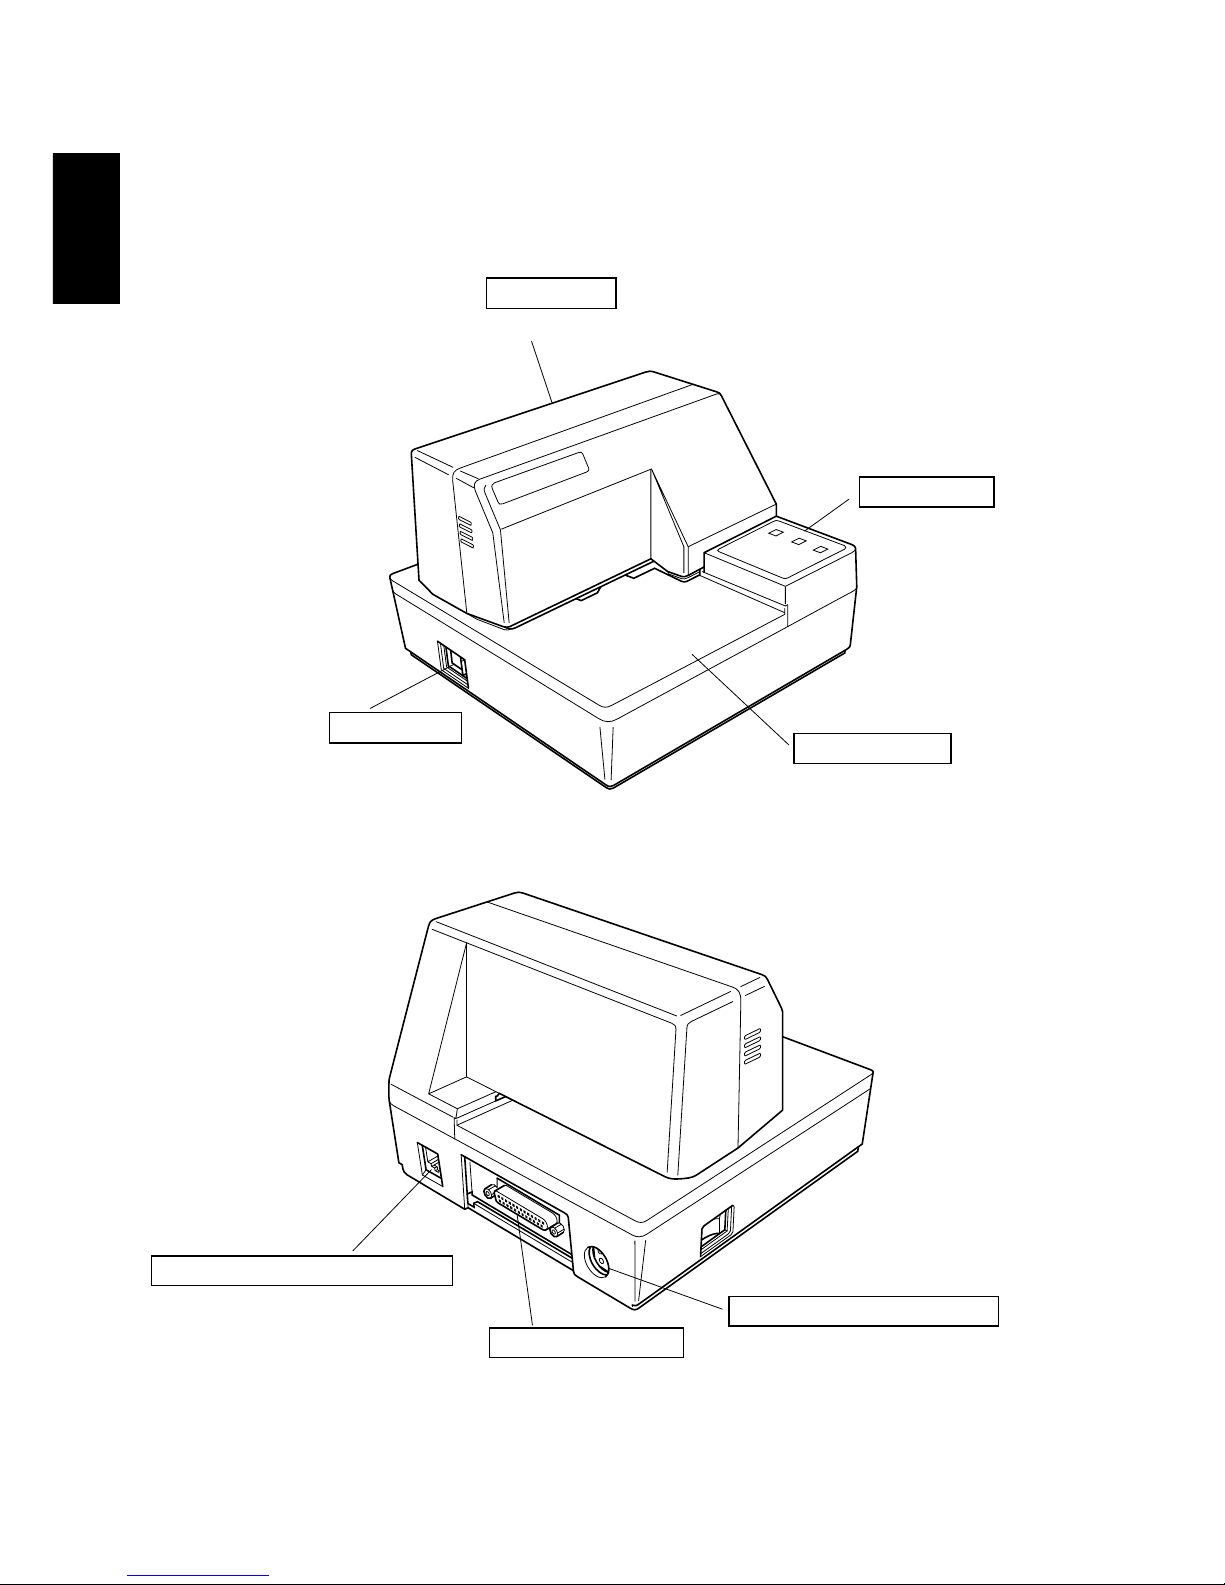
General guide
The following illustrations describe the major components, buttons, and
connectors of your printer.
Printer cover
Protects internal components.
Control panel
Threeindicatorsshow
theprinterstatus, and
two switches provide
control over printer
functions.
Power switch
Turns printer
power on and off.
Document table
Supports the paper fed
into the printer.
For connection
to a host computer.
For connection of the AC adapter.
Never unplug the AC adapter
while the printer is on.
Interface connector AC adapter cable connector
Peripheral unit connector cover
Covers a modular jack for
connection of a cash drawer or
other peripheral.
Do not connect a telephone line
to this connector.

4
ENGLISH
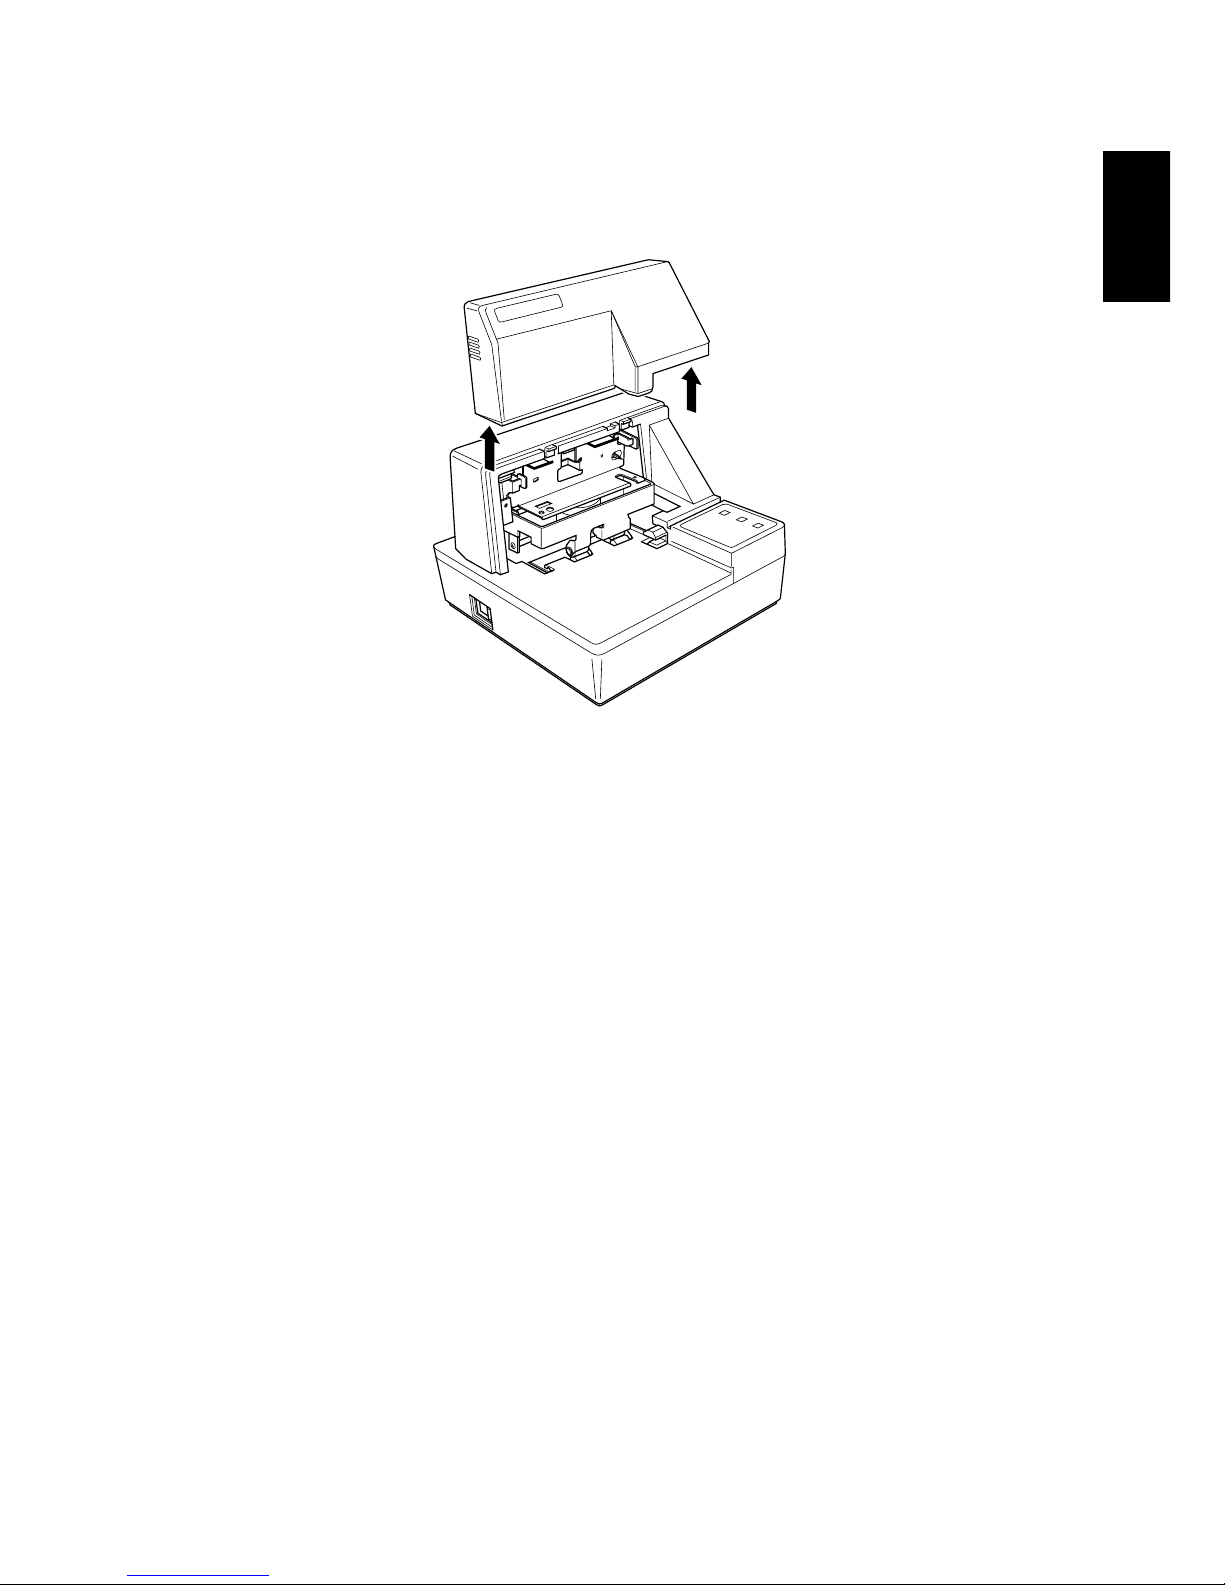
Removing the printer cover
❏
Push straight up on the ridged locations on the sides of the printer cover to
remove it from the printer.
❏
To replace the cover, slide it back down into position. Gently press down on
the cover until you hear it click securely into place.
Installing the ribbon cassette
❏
Make sure that the printer’s paper release is activated (the paper is not held
in place by the paper feed roller). If it cannot be determined whether or not
the paper release is activated, turn on the printer and check if the
RELEASE
indicator on the control panel is lit. If the indicator is not lit,
press the
RELEASE
button until the indicator lights up.
❏
Make sure that the printer is turned off and unplugged from its power
outlet.
❏
Remove the printer cover.

5
ENGLISH
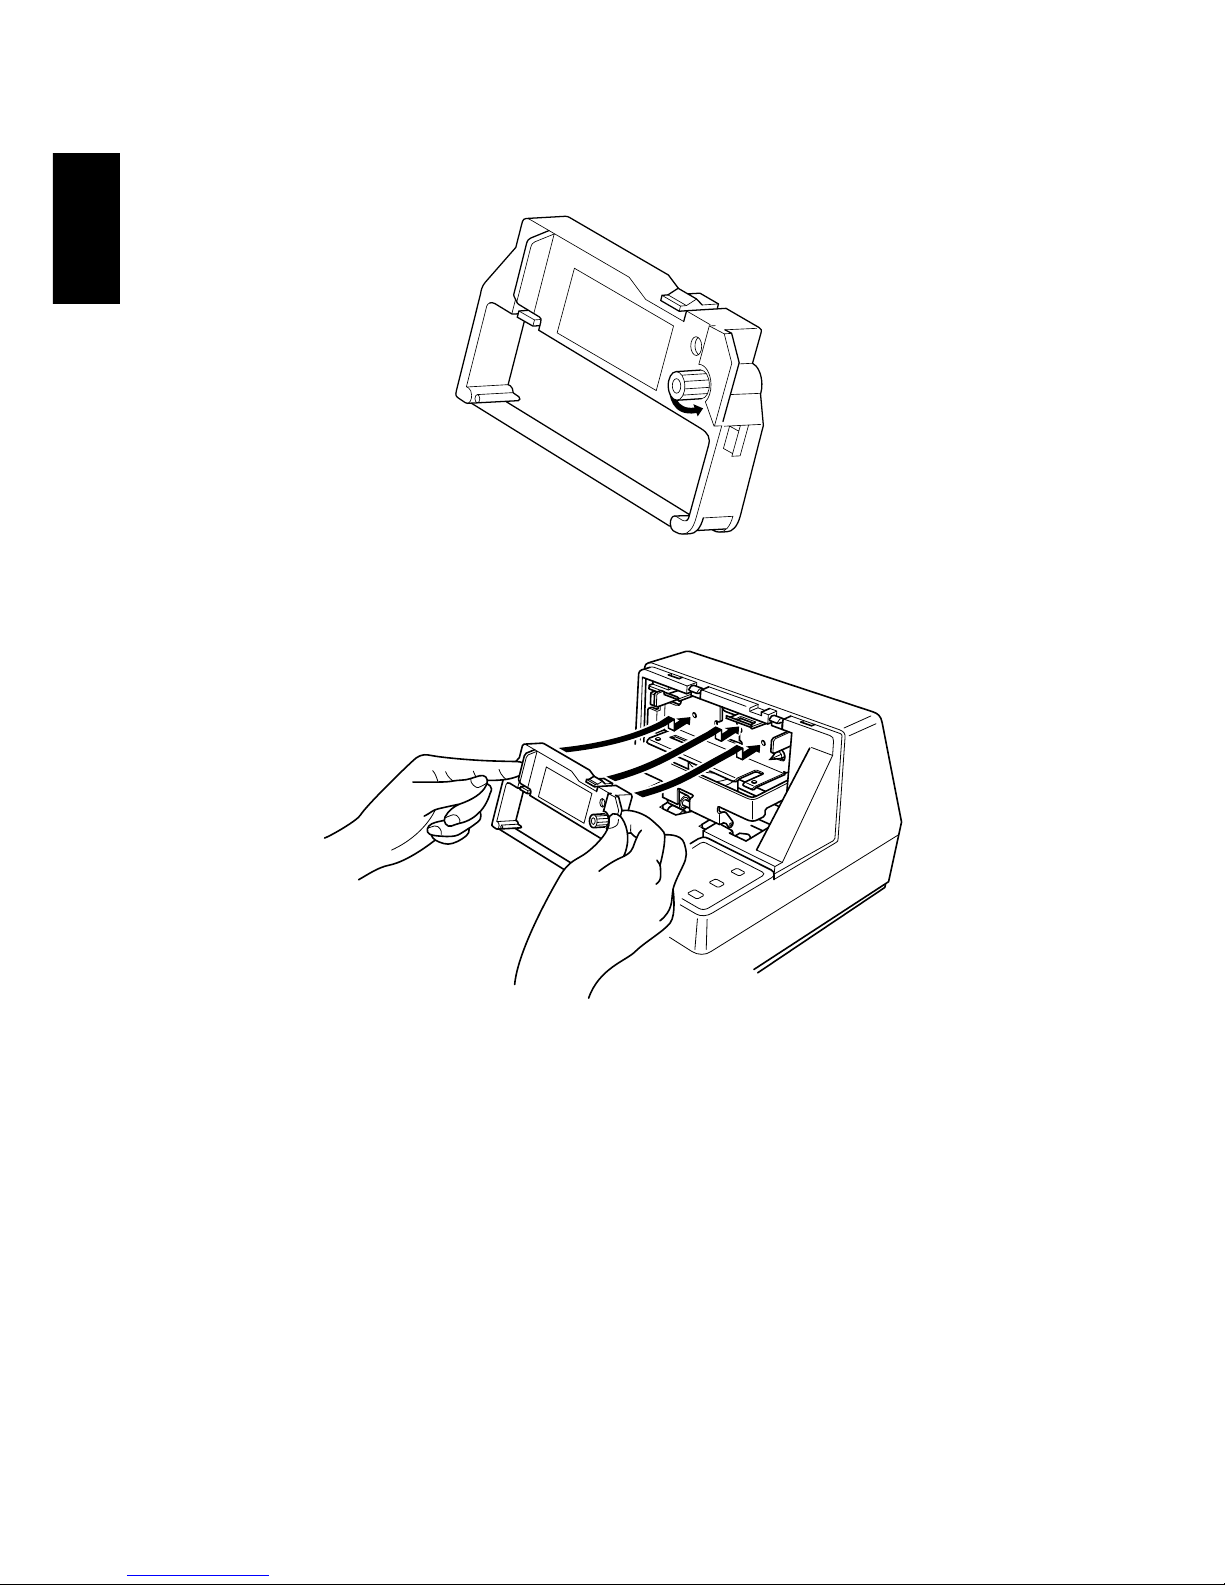
❏
Remove the ribbon cassette from its packaging, and turn its knob in the
direction indicated by the arrow to take up any slack in the ribbon.
❏
Holding the ribbon cassette so that the ribbon is facing down, install the
cassette into the slip printer as shown in the illustration.
❏
Press gently but firmly on the cassette until it snaps securely into place.
❏
Rotate the knob on the cassette again to take up any slack.
❏
Replace the printer cover.

6
ENGLISH
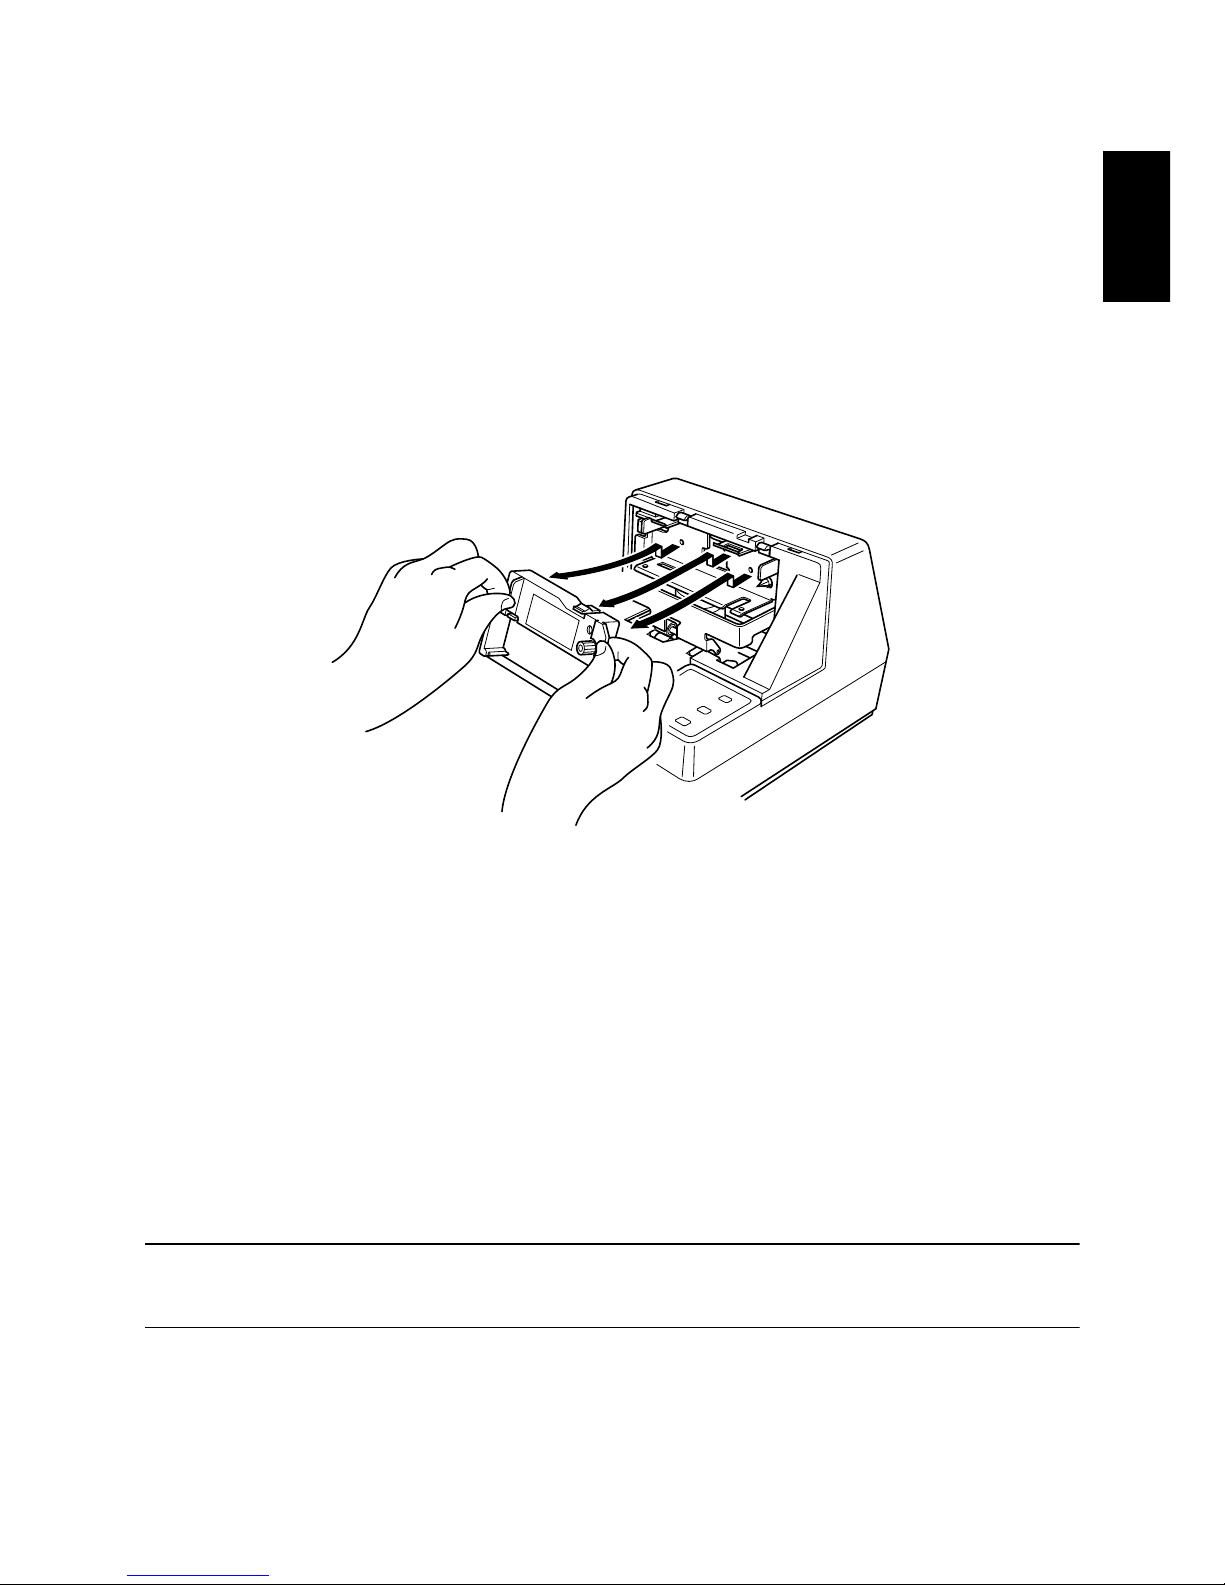
Removing the ribbon cassette
Use the following procedure to remove the ribbon cassette from the slip printer
when you want to replace it with a new one.
❏
Make sure that the printer is turned off and unplugged from its power
outlet.
❏
Remove the printer cover.
❏
Grasping the ribbon cassette as shown, gently pull it away from the printing
mechanism.
❏
Use the procedure under “Installing the ribbon cassette” on page 4 to install
a new cassette.
Connecting to a power outlet and turning power on and off
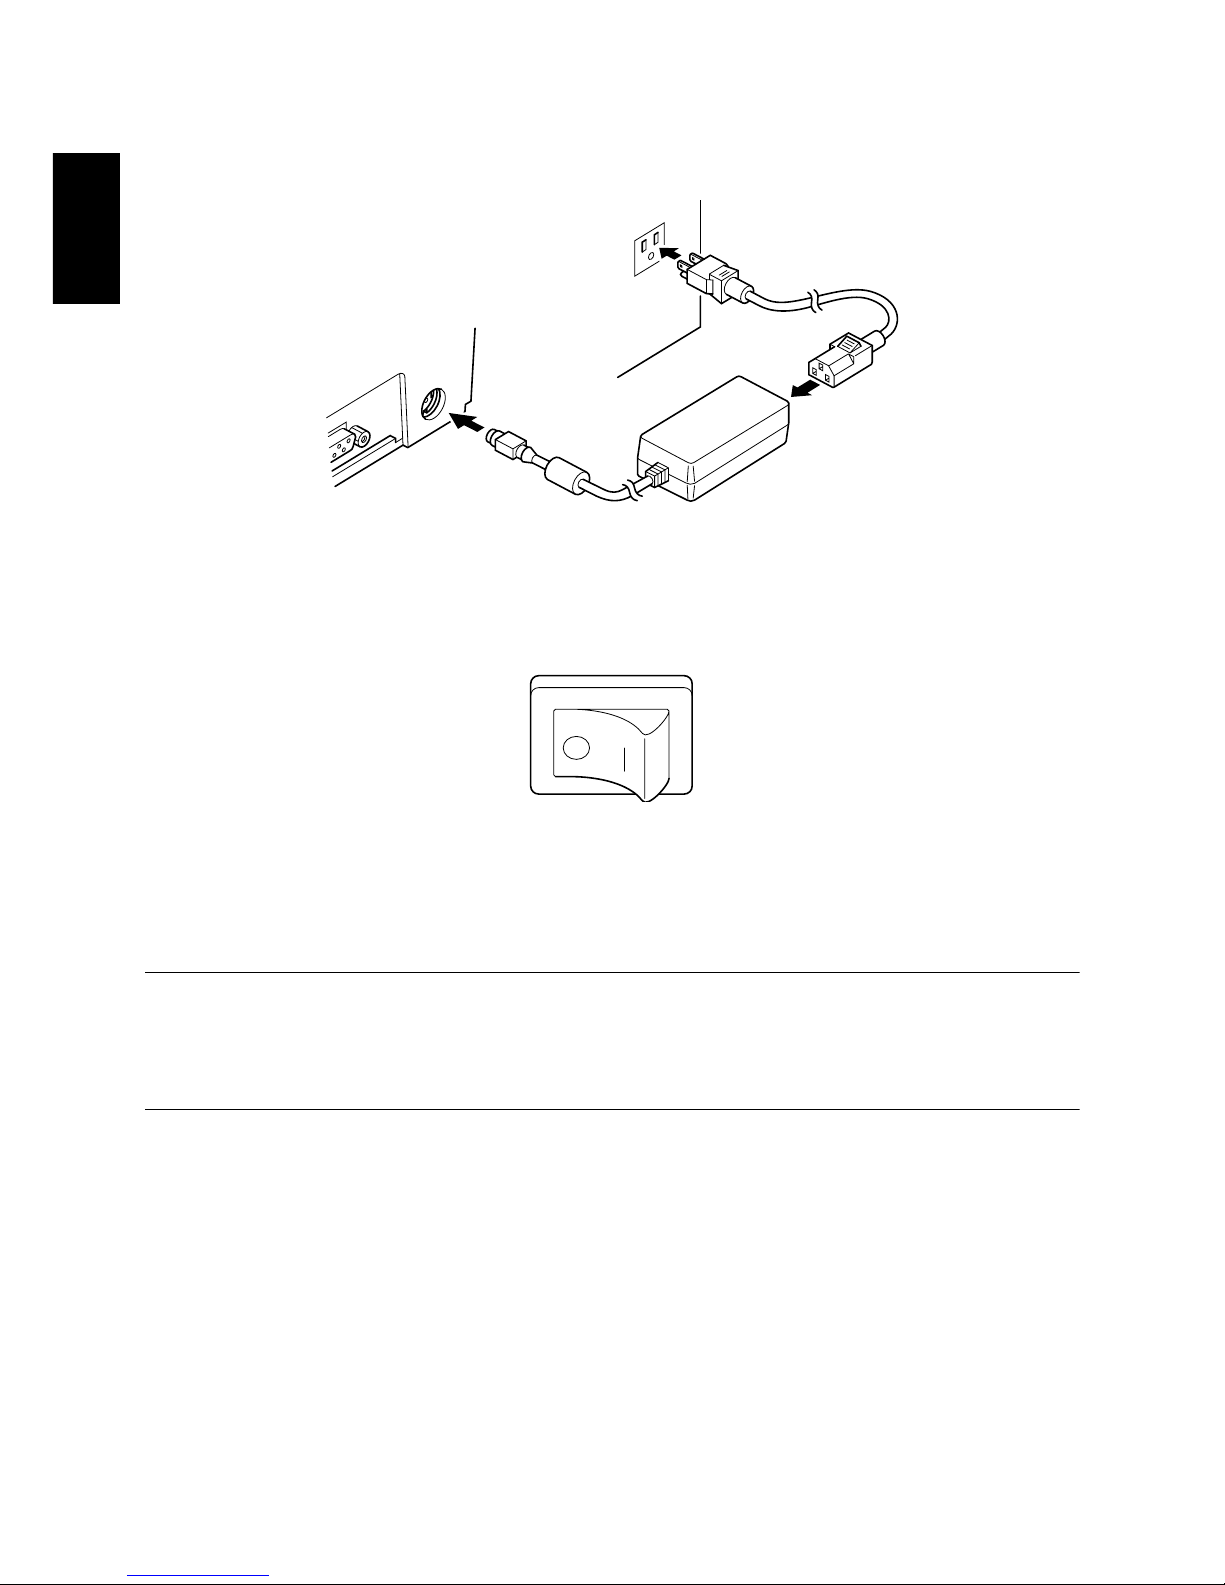
❏
Plug the AC adapter that comes with the printer into the printer’s AC
adapter cable connector.
❏
Connect a three-prong grounded power cord to the power cord connector of
the AC adapter.
Note:
The printer does not come with a power cord, so you must provide one yourself.

7
ENGLISH
❏
Plug the other end of the power cord to a standard household wall outlet.
❏
Use the power switch on the left side of the printer to turn power on and off.
Important!
We recommend that you unplug the printer from the power outlet whenever you
do not plan to use it for long periods. Because of this, you should locate the
printer so that the power outlet it is plugged into is nearby and easy to access.
At this point you may want to perform a test of the printer to make sure it is
working properly. See page 15 for details on how to test the printer.
Other manuals for SP298 SERIES
2
Table of contents
Languages:
Other Star Printer manuals

Star
Star Star NX-2430 User manual

Star
Star SM-S220I SERIES User manual

Star
Star SP712 Series User manual

Star
Star TSP700II User manual

Star
Star TUP500 Quick setup guide

Star
Star MP212FP-24-A Operating instructions

Star
Star StarPRNT mC-Print3 Series Quick start guide

Star
Star TSP700II User manual

Star
Star StarJet SJ-48 User manual

Star
Star SM-S400 Quick start guide