sentlotec LAVA User manual

LAVA
Version 02/22 item no. 1-053-072
EN
DE
FR
IT
NL
ASSEMBLY INSTRUCTIONS
English
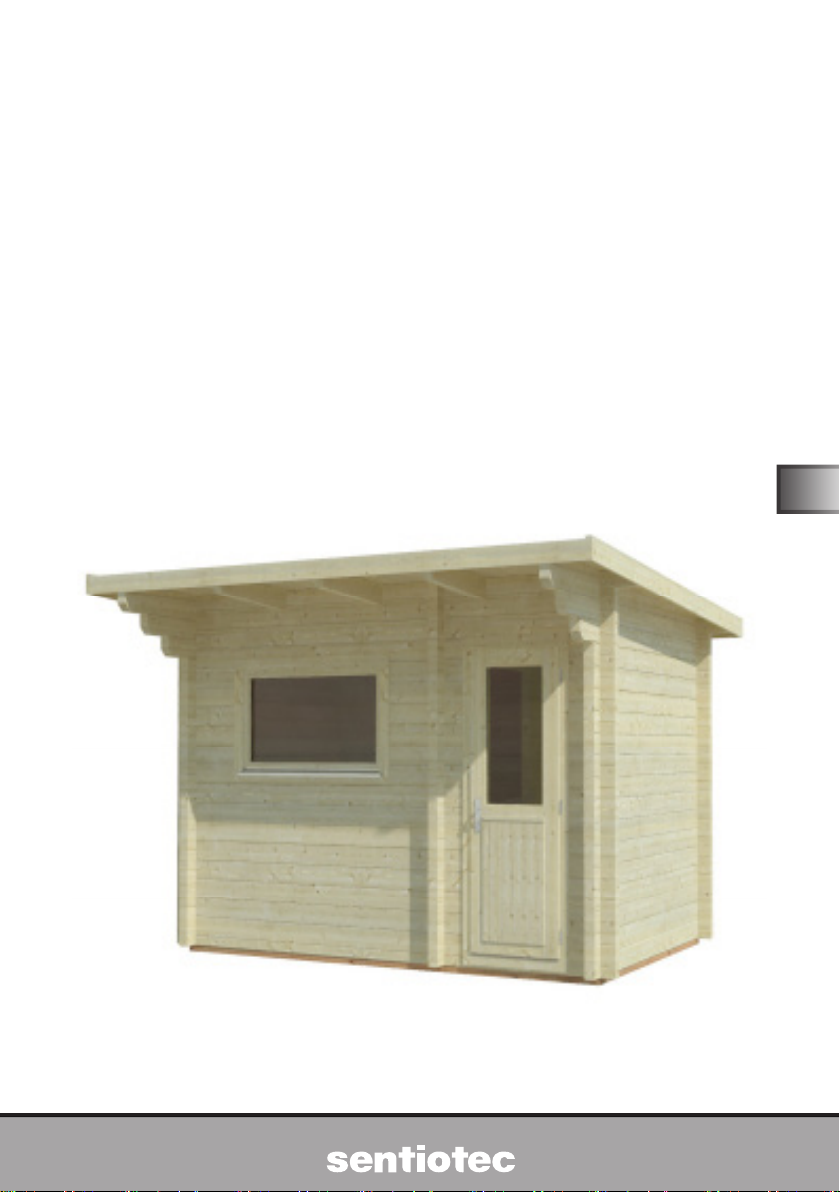
Garden sauna
LAVA
345 x 234 x 260 cm

Table of Contents
1. Preparing for installation 3
1.1. Important note 3
1.2. Maintenance and cleaning 4
1.3. Foundation 4
1.4. Anchoring the outdoor sauna 5
1.5. Disposal 5
1.6. Tools required 6
Assembly illustrations (after last language) 7

EN
Instructions for installation p. 3/6
1. Preparing for installation
Read these assembly instructions carefully and keep them within reach. so that
you can look up product information at any time.
1.1. Important note
●Check with your local planning authority (municipal oce, magistrate) with
respect to the building regulations and load standards.
●A solid concrete foundation is important for the durability as well as the safety of
your outdoor sauna. We recommend having the foundation laid by a specialist.
●The anchoring of the outdoor sauna is the responsibility of the customer.
No warranty in the event of damage.
●The outdoor sauna is delivered by lorry (also possible by semi-trailer truck).
Access to the unloading area must be ensured.
●Before you begin work, check the parts list to ensure that all the individual
parts have been delivered. If you discover any missing parts, notify your
dealer within 14 days of receiving the sauna cabin.
●Keep the delivery note, the invoice and the assembly instructions in a safe
place in case of any questions.
●You need an assistant for the installation.
● All screw ttings must be pre-drilled.
Attention!
The electrical connection may only be performed by a qualied
electrician or similarly qualied person.
● The roong felt included in the scope of delivery serves as an initial roong.
We also recommend covering the roof with bitumen shingles, sheet metal
or a suitable foil.
● Wood is a natural product that can swell, shrink or warp, despite good stor-
age. For this reason, some force may be necessary during the installation.
These assembly instructions can also be found in the downloads
section of our website: www.sentiotec.com/downloads.

Instructions for installation p. 4/6
●The wood of the outdoor sauna is untreated. To increase the life expectancy,
we recommend painting the outside with a suitable paint to protect the wood.
●The inside of the wooden parts used must not be treated with any paint.
Pitch pockets are not grounds for return, since they can always appear in
spruce wood and the depth at which they lie cannot be detected during
the sorting-out process.
If these are just under the surface, heat can cause them to soften and
“bleed”.
The leaking pitch can be removed with a rag soaked in acetone. If only
droplets of pitch occur, allow these to harden and then carefully scrape
them o with a knife.
1.3. Foundation
The following foundation elements have proven themselves in practice:
• Foundation slab (base plate)
• Strip foundation
For both types, a foundation that is absolutely at and load-bearing must be
ensured. Only then can the assembly of the outdoor sauna be ensured without
any diculties and with a precise t.
We recommend using tar tape between the base wood and the concrete to
prevent moisture from penetrating the wood.
1.2. Maintenance and cleaning
●The sauna should be cleaned inside with a damp cloth. Only use warm water
– no cleaning products.
●We recommend heating the cabin once a month if the sauna is not used for
a long time.
EN
Instructions for installation p. 5/6
1.4. Anchoring the outdoor sauna
The outdoor sauna must be rmly anchored on the base plate or the strip
foundation. Strong winds can exert a powerful force on the garden sauna.
To prevent damage to your, or third party, property proper anchoring is essential.
We point out that anchoring the garden sauna is the responsibility of the
customer and we do not accept any liability for accidental damage.
1.5. Disposal
●Dispose of packaging materials in accordance with the applicable
waste disposal regulations.

Instructions for installation p. 6/6
60 cm
80 cm
100 cm
This symbol indicates tips and useful information
Pre-drill
Cut to real measurement
Check the right angle:
Handle glass with care: Special care must be taken with the edges of
the glass – hardened glass can shatter into small pieces in the event of
impact. Insert protective cushioning (e.g: cardboard box) under the edge
of the glass.
1.6. Tools required
●Hammer with a wooden head and a mallet
●Cordless screwdriver with bits for cross-head screws and Torx
●Roller tape measure
● Drill bits with a diameter of 4 mm, 5 mm, 6 mm, 20 - 30 mm
(for sauna heater power cable)
●Spirit level
●17 mm open-ended wrench
●Utility knife
●Ladder
●Saw
MONTAGEANLEITUNG
Deutsch
LAVA
Version 02/22 Artikel-Nr. 1-053-072
DE
Gartensauna
LAVA
345 x 234 x 260 cm

Table of Contents
1. Montage Vorbereitung 3
1.1. Wichtige Hinweise 3
1.2. Wartung und Reinigung 4
1.3. Fundament 4
1.4. Verankerung der Außensauna 5
1.5. Entsorgung 5
1.6. Benötigtes Werkzeug 6
Montage Abbildungen (nach der letzten Sprache) 7

DE
Montageanleitung S. 3/6
1. Montage Vorbereitung
Lesen Sie diese Montageanleitung gut durch und bewahren Sie sie auf. So
können Sie jederzeit Produktinformationen nachlesen.
1.1. Wichtige Hinweise
●Erkundigen Sie sich bei Ihrer zuständige Baubehörde (Gemeindeamt, Ma-
gistrat) bezüglich den Bauvorschriften und Belastungsnormen.
●Ein solides Betonfundament ist wichtig für die Haltbarkeit sowie für die Si-
cherheit Ihrer Außensauna. Wir empfehlen Ihnen das Fundament von einem
Fachmann herstellen zu lassen.
●Die Verankerung der Außensauna liegt im Verantwortungsbereich des Kun-
den. Keine Gewährleistung bei auftretenden Schäden.
●Die Außensauna wird per LKW (eventuell auch per Sattelzug) angeliefert.
Dabei muss gewähr leistet sein, dass die Zufahrt zum Entladeort möglich ist.
● Kontrollieren Sie, bevor Sie mit der Arbeit beginnen, anhand der Stückliste,
ob alle Einzelteile auch tatsächlich mitgeliefert wurden. Sollten Einzelteile
ausnahmsweise fehlen, benachrichtigen Sie spätestens 14 Tage nach Erhalt
der Kabine Ihren Händler.
●Bewahren Sie den Lieferschein, die Rechnung und die Montageanleitung für
eventuelle Rückfragen gut auf.
●Für die Montage benötigen Sie einen Helfer.
●Alle Verschraubungen müssen vorgebohrt werden.
Achtung!
Der Elektroanschluss darf nur durch eine Elektrofachkraft oder
eine vergleichsweise qualizierte Person ausgeführt werden.
●Die im Lieferumfang enthaltene Dachpappe dient als Ersteindeckung. Wir
empfehlen zusätzlich das Dach mit Bitumenschindeln, Blech oder einer ge-
eigneten Folie einzudecken.
●Holz ist ein Naturprodukt, das trotz guter Lagerung aufquellen, schwinden
oder sich verziehen kann. Aus diesem Grund kann es vorkommen, dass bei
der Montage etwas Kraft aufgebracht werden muss.
Sie nden diese Montageanleitung auch im Downloadbereich unserer
Webseite auf www.sentiotec.com/downloads.
Montageanleitung S. 4/6
●Das Holz der Außensauna ist unbehandelt. Um die Lebensdauer zu erhöhen,
empfehlen wir, außen mit einer geeigneten Holzschutzfarbe zu streichen.
●Die Innen zu verwendenden Holzteile dürfen nicht mit Farbe behandelt werden.
Harzgallen sind kein Reklamationsgrund. Da in Fichtenholz immer wieder
Harzgallen vorkommen und man beim Aussortieren nicht erkennen kann
in welcher Tiefe diese sich benden.
Wenn diese knapp unter der Oberäche sind brechen sie bei Hitzeent-
wicklung auf und „bluten“ aus.
Das ausgelaufene Harz kann man mit einem Aceton gedrängtem Lappen
entfernen. Wenn lediglich Harztropfen entstehen, lassen Sie diese aus-
härten und schaben sie anschließend mit einem Messer vorsichtig ab.
1.3. Fundament
Diese folgenden Fundmente haben sich in der Paxis bewährt:
• Fundamentplatte (Bodenplatte)
• Streifenfundament
Dabei ist bei beiden Varianten ein absolut waagrechtes und tragfähiges Funda-
ment zu gewährleisten. Nur so kann eine einwandfreie Montage der Außensauna
mit einer exakten Passgenauigkeit gewährleistet werden.
Wir empfehlen,Teerband zwischen dem Sockelholz und dem Beton zu
verwenden, um zu verhindern, dass Feuchtigkeit in das Holz eindringt.
1.2. Wartung und Reinigung
●Die Sauna sollte innen mit einem feuchten Tuch gereinigt werden. Verwenden
Sie nur warmes Wasser - keine Reinigungsmittel.
●Wird die Sauna längere Zeit nicht benutzt, empfehlen wir, die Kabine einmal
im Monat aufzuheizen.
Other manuals for LAVA
1
Table of contents
Languages:
Other sentlotec Plumbing Product manuals

Popular Plumbing Product manuals by other brands

Weka
Weka 506.2020.00E ASSEMBLY, USER AND MAINTENANCE INSTRUCTIONS

Kohler
Kohler K-6228 Installation and care guide

UBERHAUS DESIGN
UBERHAUS DESIGN 75175017 Operator's manual

American Standard
American Standard DetectLink 6072121 manual

Uponor
Uponor Contec TS Mounting instructions

Pfister
Pfister Selia 49-SL Quick installation guide


Kohler
Kohler Centerset K-15240 Homeowner's guide

Viega
Viega Prevista Dry 8522.33 Instructions for use

Sanela
Sanela Lema SLP 59RB Instructions for use

Elkay
Elkay EDF15AC Installation, care & use manual

Hans Grohe
Hans Grohe AXOR Citterio E 36702000 Instructions for use/assembly instructions

baliv
baliv WT-140 manual