
Retevis RT649B User manual

RT649B
EN DE FR IT ES RU

1

2
CONTENTS
CONTROL BUTTONS·····························································
DISPLAY SCREEN GUIDE·······················································
GETTING STARTED·······························································
TALKING AND LISTENING······················································
MENU OPTIONS····································································
SPECIAL FEATURES······························································
CHANNEL AND FREQUENCIES···············································
SPECIFICATIONS···································································
WARNING·············································································
3
4
4
6
7
8
10
10
11

3
CONTROL BUTTONS
Screen
Push-to-Talk
Power On / O
Call Tone
Lamp On / O
Speaker
Accessary Port
Lamp
Micro-USB
Charging Port
Lock Menu
Monitor Scan
Microphone
1
1
2
2
3
3
4
4
5
5
6
6
7
7
8
8
9
9
10
10
11
11
4
Installing the Three AA NiMH Rechargeable Battery
1. Take the belt clip o.
2. With the back of the radio facing you, lift the battery cover latch up and remove the cover.
3. Insert the three AA NiMH battery with + and – polarity as shown inside.
4. Close the battery cover rmly.
Radio Battery Meter
The number of bars ( ) on the radio battery icon shown indicates the charge remaining in the battery. When the
radio battery meter shows one segments, the radio chirps periodically (Low Battery Alert). In battery low status, the
radio will sound the alert every 10 minutes or after releasing the PTT button.
Note: Remove the battery from radio for storage purposes.
GETTING STARTED
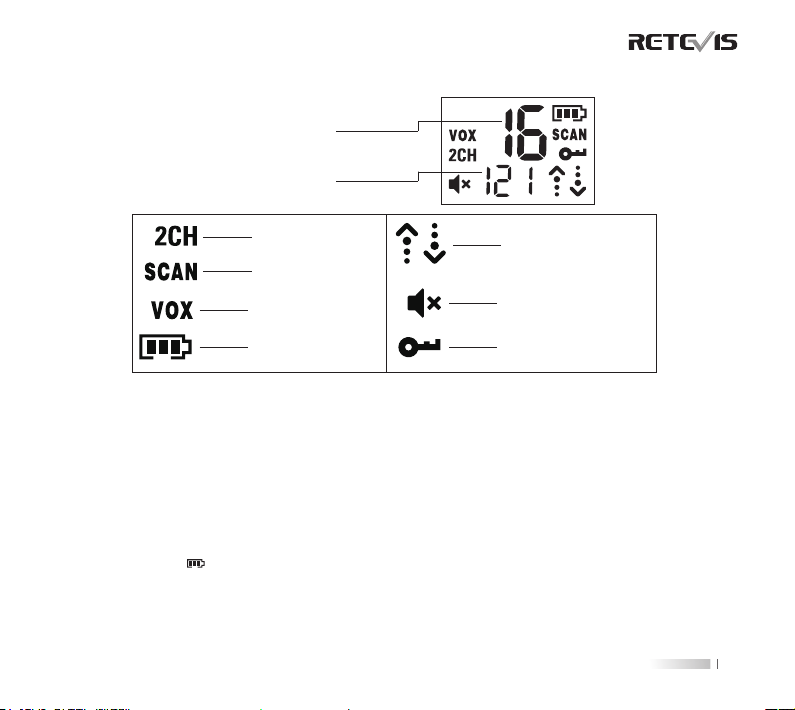
DISPLAY SCREEN GUIDE
Number s of Channe l
Call Tone
Number s for
Codes
VOX
Dual Watch
Volume Mute
Battery Meter
Status
(transmit/receive)
Lock
Scan

5
Removing the Three AA NiMH Rechargeable Battery
1. Turn the radio o.
2. With the back of the radio facing you, lift the battery cover latch up and remove the cover.
3. Close the battery cover rmly.
Note:
• Be careful when removing NiMH batteries. Do not use sharp or conductive tools to remove either of these batteries.
• Remove the batteries before storing your radio for extended periods of time. Batteries corrode over time and may
cause permanent damage to your radio.
• Do not mix old and new batteries and Do not mix alkaline, standard (carbon-zinc) or rechargeable (ni-cad, ni-mh,
etc.) batteries.
Battery Capacity Maintenance
1. Charge the NiMH batteries once every 3 months when not in use.
2. Before placing the radio in storage, remove the battery.
3. Store the NiMH batteries in temperature between -20 °C to 35 °C and in low humidity. Avoid damp
conditions and corrosive materials.
Using the Micro-USB Charger
The micro-USB charger is a handy port that allows you to conveniently charge your NiMH battery. Use
certied adaptor(5V, ≥1A). Do not attempt to charge alkaline batteries.
1. Make sure your radio is turned OFF.
2. Plug the micro-USB cable into the micro-USB charging port on your radio. Connect the other end of the
micro-USB charger to wall power outlet.
3. The battery meter on LCD will move to indicate the battery is charging.
Note:
It is recommended to power OFF your radio while charging.
When moving between hot and cold temperatures, do not charge the NiMH batteries until the battery
temperature acclimates (usually about 20 minutes).
For optimal battery life, remove the radio from the charger within 16 hours. Do not store the radio while
connected to the charger.
Turning your Radio On and O
1. Press and hold on the button to turn your radio ON/OFF. In the ON position, the radio chirps and briey
shows all feature icons available on the radio.

6
To communicate, all radios in your group must be set to the same channel and Interference Eliminator Code.
1. To talk, press and hold the PTT button. When transmitting, the icon is shown.
2. When you are nished talking, release the PTT button.
3. When receiving, the icon is shown.
For maximum clarity, hold the radio 2 to 3 centimeters away from your mouth and speak directly into the
microphone. Do not cover the microphone while talking.
Talk Range
Your radio is designed to maximize performance and improve transmission range. Do not use the radios closer
than ve feet apart.
Monitor Button
Press and hold button for 3 seconds to enter monitor mode and listen for weak signals on the current channel. You
can also listen to the volume level of the radio when you are not receiving. This allows you to adjust the volume, if
necessary. You can also press button to check for activity on the current channel before you talk.
Push-to-Talk Timeout Timer
To prevent accidental transmissions and save battery life, radio will stop transmitting if you press PTT button for
60 seconds continuously.
2. The display screen then shows the current channel, code and all features that are enabled. The radio is in
Two-Way mode.
Setting the Volume
Press and hold button for three seconds to listen to volume level.
1. First press either or to trigger volume change. You will see current volume level on screen.
2. Press to increase the volume. Press to decrease the volume.
3. When the volume reached level 0 the mute icon appears permanently on screen.
Do not hold the radio close to your ear. If the volume is set to an uncomfortable level, it could hurt your ear.
TALKING AND LISTENING

7
Selecting the Channel
The channel is the frequency of the radio uses to transmit.
1. Press the button until the channel number starts to ash.
2. Press or button to change the channel number.
3. Press the PTT button to exit menu or button to continue setup.
Selecting the Interference Eliminator Code
Sub-Codes help minimize interference by blocking transmission from unknown sources. Your radio has 121 Sub-
Codes.
To set the code for a channel:
1. Press the button until the code number starts to ash.
2. Press or button to select code number.
3. Press the PTT button to exit menu or button to continue setup.
Setting and Transmitting Call Tones
Your radio can transmit dierent call tones to other radios in your group when you pressed button. The radio
has 10 call tones.
To set a call tone:
1. Press button until call tone 'CA' appears. The current call tone setting ash.
2. Press or button to change and listen to the call tone.
3. Press the PTT button to exit menu or button to continue setup.
Voice Operated Transmission (VOX)
Transmission is initiated by speaking into the microphone of the radio instead of pushing the PTT button.
1. To activate VOX, press button until 'VOX' appears on the display. The current setting (0, 1-3) will ash.
2. Press or button to select the sensitivity level.
3. Press the PTT button to exit menu.
MENU OPTIONS
L3=High Sensitivity for quiet environments
L2=Medium Sensitivity for most environments
L1=Low Sensitivity for noisy environments
L0=Turn O VOX function

8
Dual Channel Monitor
Enable you to scan current channel and another channel alternately.
To set another channel and start Dual Watch.
1. Press button until '2CH' appears on the display. The current setting (OF, 1-16) will ash.
2. Press or to select channels.
3. Press the PTT button to exit menu or button to continue setup.
4. Press the PTT button or wait until the time out menu to activate Dual Watch. The screen will alternate
between Home Channel and Dual Watch Channel.To end Dual Watch mode, re-enter Dual Watch menu to
select the OFF setting.
Note: If you set the same channel and code as current channel, Dual Watch does not work.
Keypad Tones
Your radio emits a beep each time one of the buttons is pressed (except the PTT and button).
Press and hold the button while turning the radio ON to switch the keypad tone ON/OFF.
Roger Tone
You can set your radio to transmit a unique tone when you nish transmitting.
Press and hold the button while turning the radio ON to turn the Roger Beep ON. Repeat the step to turn
Roger Beep OFF.
Keypad Lock
To avoid accidentally changing your radio settings:
1. To lock the radio, press and hold button until the key lock indicator icon on display appear.
2. To unlock the radio, press and hold button until key lock indicator icon on display disappear.
Scanning Channels
Use scan to search all channels for transmissions from unknown parties, to nd someone in your group who has
accidentally changed channels or to quickly nd unused channels for your own use.
To Start Scanning:
1. Briey press the button, the icon will appear in the display and the radio will begin to scroll through
the channel and code combinations.
2. When the radio detects channel activity matching the channel and code combination, it stops scrolling and you can
SPECIAL FEATURES

9
hear the transmission.
3. To respond and talk to the person transmitting, press the PTT button within 5 seconds after the end of the
transmission.
4. The radio will resume scrolling through the channels ve seconds after the end of any received activity.
5. To stop scanning, briey press the button.
Scanning Notes:
1. If you press the PTT button while the radio is scrolling through inactive channels, the transmission will be on
the” home channel”. Scanning will resume 5 seconds after the end of your transmission. You may press the
button to stop scanning at any time.
2. If the radio stops on an undesired transmission, you may immediately resume the scan by briey pressing
or button.
3. If the radio repeatedly stops on an undesired transmission, you may temporarily remove that channel from the
scan list by pressing and holding or for 3 seconds. You may remove more than one channel in this
way.
4. To restore the removed channel(s) to the scan list, turn the radio o and then turn back on, or exit and re-enter
the scanning mode by pressing button.
5. You cannot remove the home channel from the scan list.
LED Lamp
Your radio has a built-in-LED Lamp.
Briey press the button once to ON the lamp, press again to OFF the lamp.
Automatic Power Save
For better battery life, your radio is designed to switch to Power Save mode when it has been no transmissions
after 5 seconds. The radio can receive transmissions in this mode.
Table of contents
Languages:
Other Retevis Two-way Radio manuals

Retevis
Retevis RT6 User manual

Retevis
Retevis RT36 User manual

Retevis
Retevis RT30 User manual

Retevis
Retevis RT-35 User manual

Retevis
Retevis RT30M User manual

Retevis
Retevis RT616 User manual

Retevis
Retevis RB28 User manual

Retevis
Retevis RT49P User manual

Retevis
Retevis RT47V User manual

Retevis
Retevis RT665 User manual

Retevis
Retevis RB26 User manual

Retevis
Retevis RT66 User manual

Retevis
Retevis RM40 User manual

Retevis
Retevis H-777 User manual

Retevis
Retevis RA636 User manual

Retevis
Retevis RT33 User manual

Retevis
Retevis RT30 User manual

Retevis
Retevis CTCSS105 User manual

Retevis
Retevis RT32 User manual

Retevis
Retevis RT53 User manual


