
EUROPRO 415QV User manual

Instruction Manual
Manual de Instrucciones
Model/ Modelo/ Modèle
EURO-PRO Operating LLC, 4400 Bois Franc, St. Laurent, Quebec H4S 1A7 Tel. 1(800) 361-4639
94 Main Mill Street, Door 16, Plattsburgh,New York 12901 Tel. 1(800) 361-4639

When using an electrical appliance, basic safety precautions
should always be followed, including the following:
Read all instructions before using this sewing machine.
1. An appliance should never be left unattended when plugged in.
2. Always unplug this appliance from the electric outlet
immediately after using and before cleaning.
3. Always unplug before relamping. Replace bulb with same type
rated 1 watts (11 -12 V area) or 15 watts (22 -24 V area).
1. Do not allow to be used as a toy. Close attention is necessary
when this appliance is used by or near children.
2. Use this appliance only for its intended use as described in
this manual. Use only attachments recommended by the
manufacturer as contained in this manual.
3. Never operate this appliance if it has a damaged cord or plug,
if it is not working properly, if it has been dropped or damaged,
or dropped into water. Return the appliance to the nearest
authorized dealer or service center for examination, repair,
electrical or mechanical adjustment.
4. Never operate the appliance with any air openings block. Keep
ventilation openings of the sewing machine and foot controller
free from accumulation of lint, dust, and loose cloth.
5. Keep fingers away from all moving parts. Special care is
required around the sewing machine needle.
6. Always use the proper needle plate. The wrong plate can
cause the needle to break.
7. Do not use bent needles.
8. Do not pull or push fabric while stitching. It may deflect the
needle causing it to break.
9. Switch the sewing machine off ("O") when making any
adjustments in the needle area, such as threading needle,
changing needle, threading bobbin, or changing presser foot,
and the like.
1 .Always unplug sewing machine from the electrical outlet when
removing covers, lubricating, or when making any other user
servicing adjustments mentioned in the instruction manual.
11.Never drop or insert any object into any opening.
12.Do not use outdoors.
13.Do not operate where aerosol spray products are being used
or where oxygen is being administered.
14.To disconnect, turn all controls to the off ("O") position, then
remove plug from outlet.
15.Do not unplug by pulling on cord. To unplug, grasp the plug,
not the cord.
This sewing machine is intended for household use only.
DANGER
SAVE THESE INSTRUCTIONS
- To reduce the risk o electric shock:
WARNING - To reduce the risk o burns, ire, electric
shock, or injury to persons:
IMPORTANT SAFETY INSTRUCTIONS

"Cuando usar una máquina de coser eléctrica, la precaucion
basica hay que slempre se seguido, incluiendo el sequito."
"Leer todas instrucción antes de usar esa máquina de coser."
"Esta máquina de coser esta diseñada por el uso casero."
"Reducir el riesgo del choque eléctrico"
1."Una máquina de coser debe nunca esta desligada cuando esta
enchufada. Siempre no enchufar esta máquina de coser desde
la salida eléctrica èn seguida déspues de usar y antes de
limpiar."
2."Usar esta máquina de coser solamenta por el uso prometido
como se describe en ese manual. Usar solamente los
accessories recomendados por el fabricante que se contiene
en ese manual.
3."Nunca operar esta máquina de coser si la cuerda o el enchufe
esta dañado, si la máquina de coser no trabaja oportunamente,
si ella ha sido caida o dañada, o caido en aguá. Traer la
máquina de coser a el comerciante autorizado o el centro de
servicio dónde es cerca de Vd, para examen, remiedo y ajuste
eléctrico o mecanico."
4."Nunca dirigir la máquina de coser con la abertura del aire
obstruido. Quedar la abertura del aire fuera de hilas, pelo y
ropa."
5."Nunca caer o insertar alguno objeto en alguna obertura."
6."No usar al aire libre."
7."No operar a dónde el productos pulverulentos están usados o
oxigeno se administra."
8."Para desconectar, carrar todos dominados a la posición "O",
entonces quitar el enchufe desde la salida."
9."No desenchufar por sacar sobre la cuerda. Agarrar el enchufe
pero no agarrar la cuerda."
A. La máquina de coser.
a. Reemplazar la bombilla con el tipo mísmo con 1 vatio (11 -
12 V área) o 15 vatio (22 -24 V área).
b. "Tener dedos alejado desde tatas piezas motriz. Cuidado
especial esta necesltado alrededor la aguja de la máquina de
coser."
c. "Siempre usar el plato de la aguja propla. El plato falso puede
casusar la aguja romper."
d. "No usar la aguja forcida."
e. "No sacar o impeler la tela cuando coer. Ello puede desviar la
aguja romper."
f. "Desconectar la máquina de coser a "O" cuando hace alguno
ajuste en la area de la aguja, tal como enhebrar la aguja,
cambiar la aguja, enhebrar el carrete, o cambiar prensatelas."
g. "Siempre desenchufar la máquina de coser desde la salida
cuando quitar la cubierta, lubricar o cuando ajustar."
"PELIGRO" "CONSERVAR LOS
INSTRUCCIONES DE LA
ADVERTENCIA"
INSTRUCCION DE SEGURIDAD IMPORTANTE

Congratulations
As the owner of a new sewing machine,
you will enjoy precision quality stitching on all
types of fabrics, from multiple layers of denim to
delicate silks.
Your sewing machine offers the
ultimate in simplicity and ease of operation. For
your safety and to fully enjoy the many
advantages and ease of operation of your sewing
machine, we recommend that you read all the
important safeguards and use and care
instructions in this instruction book.
May we suggest that before you start to use your
sewing machine, you discover the many features
and advantages by going through this instruction
book, step by step, while seated at your sewing
machine.
Euro-pro
Euro-pro
Le felicitamos muy cordialmente por su nueva
máquina de coser.
Vd. acaba de comprar un producto de calidad
que ha sido fabricado con el máximo cuidado. Su
máquina de coser es fácil de usar pero
naturalmente hay que seguir las reglas. Y estas
las hemos especificado en este manual de
instrucciones. Si Vd. les presta atención
entonces realizará sus trabajos perfectamente
desde el comienzo.
Por supuesto que Vd. tendrá algunas preguntas
que en este manual no hemos podido agotar del
todo. En este caso el representante de nosotro
estará siempre a su disposición, para cualquier
pregunta que Vd. pueda tener.
Le deseamos buen divertimiento con su hobby.
De rienda suelta a su máquina de coser y a su
fantasía.
Estimado Cliente

List o contents Indice
Details of the machine...........................................................................2/3
Fitting the snap-in sewing table................................................................5
Connecting machine to power source ......................................................6
Changing the bulb ....................................................................................8
Attaching the presser foot holder .............................................................9
Winding the bobbin.................................................................................11
Inserting the bobbin................................................................................12
Threading the upper thread....................................................................14
Thread tension .......................................................................................15
Bringing up the lower thread ..................................................................16
Reverse sewing/ Removing the work/ Cutting the thread.......................17
Matching needle/ fabric/ thread ..............................................................18
Straight stitching.....................................................................................2
Zigzag stitching ......................................................................................21
Buttonholes ............................................................................................22
Blind hem and lingerie stitch...................................................................23
Sewing on buttons..................................................................................24
Zippers and piping..................................................................................25
3-step zig-zag.........................................................................................26
Quilting ...................................................................................................28
Twin needle ............................................................................................29
Applique .................................................................................................3
Maintenance...........................................................................................31
Trouble shooting guide...........................................................................33
Accessories ..............................................................................................4
Inserting and changing needle ...............................................................13
Free motion darning ...............................................................................27
Detalles de la máquina..........................................................................2/3
Accesorios................................................................................................4
Ajusta la snap-in mesa plana corrediza....................................................5
Conecta la máquina al fuente eléctrico ....................................................7
Cambio de la bombilla..............................................................................8
Montaje del porta-pie..............................................................................1
Devanado de la canilla ...........................................................................11
Colocación de la canilla..........................................................................12
Colocación y cambio de agujas..............................................................13
Enhebrado del hilo superior ...................................................................14
Tensión del hilo ......................................................................................15
Subir el hilo inferior.................................................................................16
Coser hacia atrás/ Como sacar la labor / Cortar el hilo..........................17
Guía de selección de aguja / tejido / hilo................................................19
Punto recto .............................................................................................2
Punto en zig-zag ....................................................................................21
Coser ojales ...........................................................................................22
Costura Invislble y Punto de lenceria .....................................................23
Coser botones ........................................................................................24
Cremalleras y ribetes..............................................................................25
Zig-zag cosido ........................................................................................26
Zurcido de brazo libre.............................................................................27
Para acolchar .........................................................................................28
Aguja doble ............................................................................................29
Aplicación ...............................................................................................3
Manutención de la máquina ...................................................................32
Eliminación de averías ...........................................................................34

1. ension dial
2.
3. Presser foot
4. Needle plate
5.
6. Thread take-up lever
7. Upper thread guide
8.
9.
1 . Hand wheel
11.P
12.
Thread t
Reverse sewing lever
Sewing table
Bobbin winder
Bobbin stopper
attern indicator window
Pattern selector dial
Details o the machine/ Detalles de la máquina
1. T
2. Control
3. Pie
4. Place de la aguja
6. Palanca tensora del hilo
7. Guia de la devanadera
8. Devanadera
9. Tapon de bobina
1 .Volante
11.
12.
5.
Bot
Bot
ensión del hilo
de retroceso
Mesa plana corrediza y caja de accesorios
ón indicator ventada
ón selector de puntos
2
6
1
2
3
4
5
789
11
10
12

Details o the machine/ Detalles de la máquina
13.Spool pin
14.Presser foot lever
15.Presser foot holder
16.Power cord receptacle
17.Foot controller
13.
14.Palanca alza-prensatelas
Portabobinas
15.Barra prensatelas
16.Enchufe de conexion al la red
17.Pedal de control
3
17
13
14
15
16

4
Accessories/ Accesorios
Standard accessories (1)
a.All purpose foot
b.Zipper foot
Button sewing foot
E.
F.Buttonhole foot
g.Brush/ seam ripper
h.
i. Pack of needles (3x)
j. Screwdriver
k. Bobbin (6x)
l. Darning plate
m
n.Spool pin
o.
p.Darning/ embroidery foot
q.Seam guide
c. Satin stitch foot
d.
Blind hem foot
Oil bottle
.Twin needle
Quilting foot
Quilting package (2)
Accesorios standard (1)
a.pie universal
b.Pie para cremallera
c. Pie para bordar
d.Pie para ojales
E.Pie para puntada ciega
F.Pie para coser botones
g.Pincel/ corta-ojales
h.Aceitera
i. Agujas(3x)
j. Destornillador grande
k. Canillas(6x)
l. Zurcida plancha
m.Aguja mellizo
n.
o.Pie para acolchar
p.Pie para zurcido
q.Rregla de borde
Portabobinas
Paquete colchadura (2)
1
6 25 8
6 99 8
g
6 13 9
h
6 14148
i
d
6 5 8
e
6 6 8
a
6 56 8
b
6 55 8
c
6 3 8
k
6 84 9
j
61 1 9
l
6117 9
m
6 2 8
2
o
6 24 8 6 16 8
p q
6 8 1
n

Keep the snap-in sewing table horizontal, and push it in the direction of
the arrow. (1)
The inside of the snap-in sewing table can be utilized as an accessory
box.
To open, lift up at the point of the arrow. (2)
Fitting the snap-in sewing table/ Ajusta la snap-in mesa plana corrediza
Mantenga horizontal la mesa de coser convertible y empújela en la
dirección de la flecha. (1)
El interior de la mesa puede utilizarse como almacenamiento para
accesorios.
Para abrirla, elévela siguiendo la dirección de la flecha. (2)
5
1
2
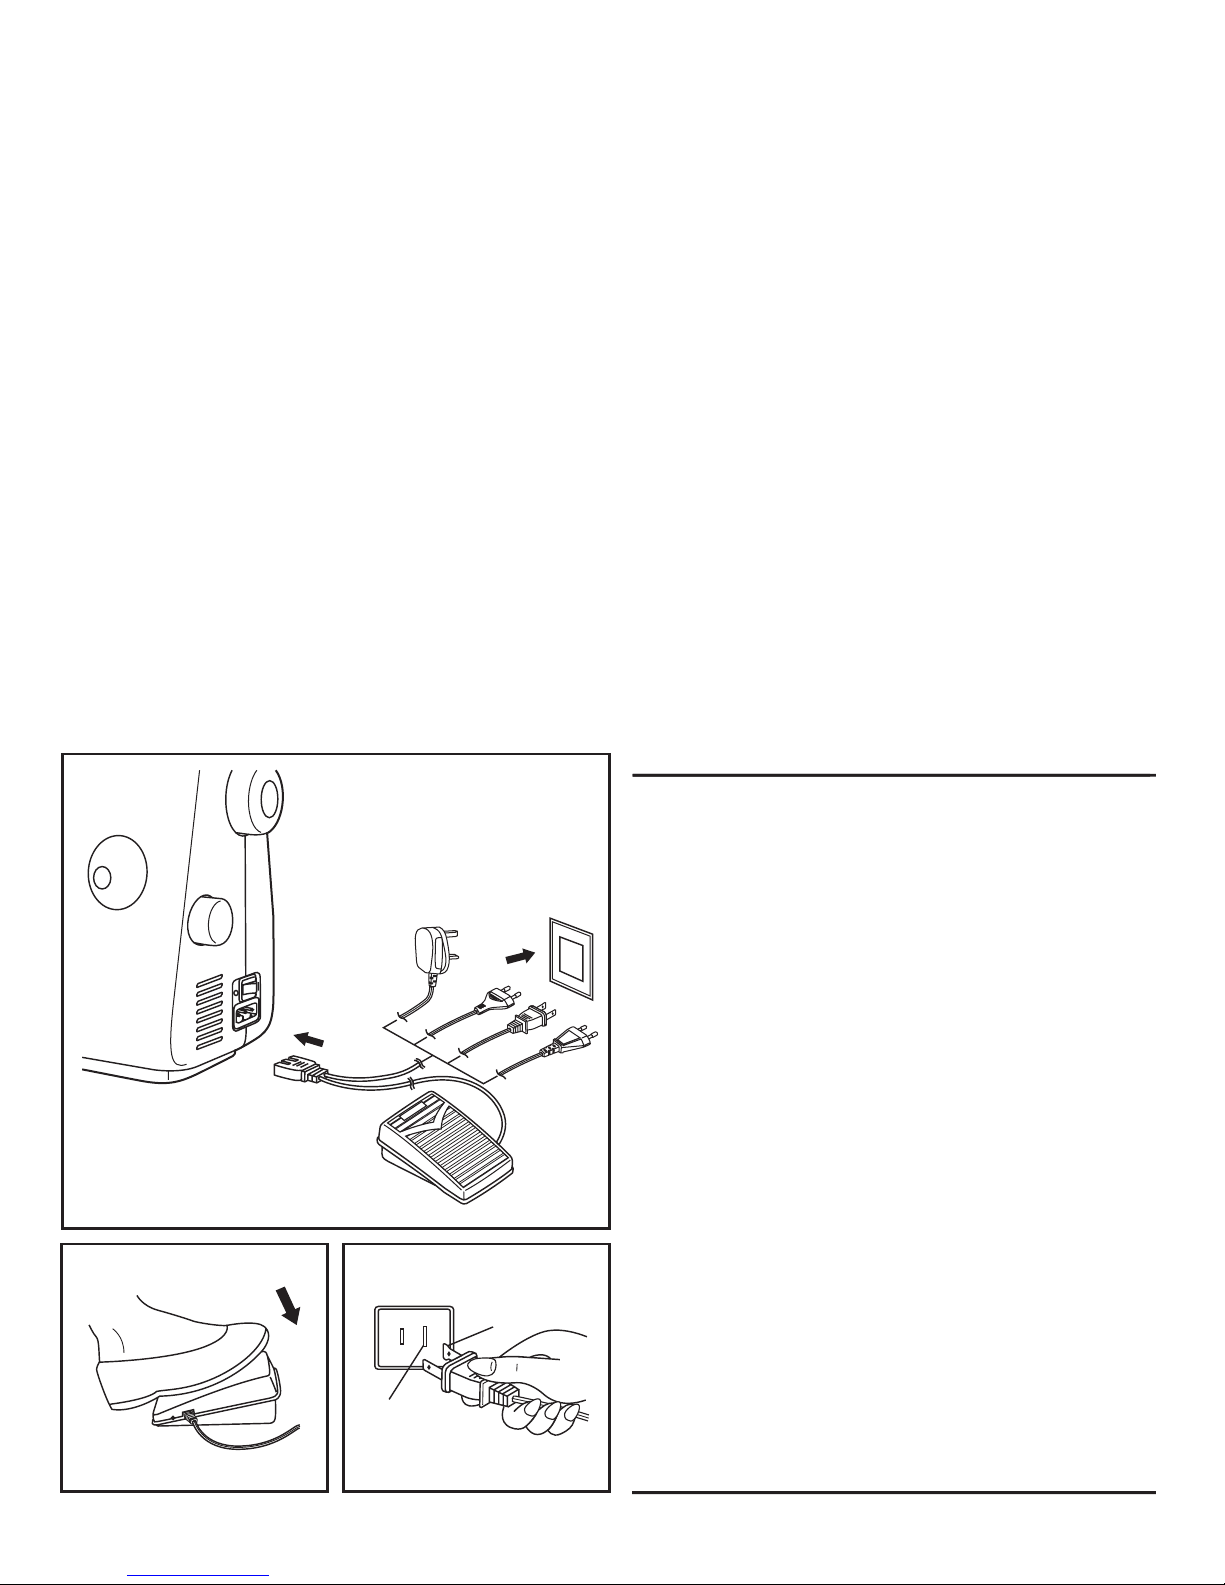
Always make sure that the machine is unplugged from power source and
the main switch is on "O" when the machine is not in use and before
inserting or removing parts.
- This machine is equipped with a polarized plug which must be used
with an appropriate electrical outlet.
- Connect the machine to a power source as illustrated (1).
- The power switch is located above the terminal box. Your machine will
not operate unless this switch is on " I ". (1)
- Sewing light turns on automatically when the main switch is on " I ".
- To start the machine, press on the foot control (2). The speed of the
machine is regulated by the amount of pressure exerted on the foot
control.
Consult a qualified electrician if in doubt as to connect machine to power
source. Unplug power cord when machine is not in use.
The appliance must be used with the foot controller 4C-316B (11 -12 V
area)/ 4C-316C (22 -24 V area) manufactured by MATSUSHITA
ELECTRIC (TAIWAN) CO., LTD.
a. Polarized attachment plug
b. Conductor intended to be grounded
Caution:
Attention:
IMPORTANT NOTICE
For appliance with a polarized plug (one blade is wider than the other).
To reduce the risk of electric shock, this plug is intended to fit in a
polarized outlet only one way. If it does not fit fully in the outlet, reverse
the plug. If it still does not fit, contact a qualified electrician to install the
proper outlet. Do not modify the plug in any way. (3)
1
a
b
6
A
Connecting machine to power source
B
23
Other manuals for 415QV
1
Table of contents
Other EUROPRO Sewing Machine manuals

EUROPRO
EUROPRO 380 User manual

EUROPRO
EUROPRO 7131 User manual

EUROPRO
EUROPRO 416 User manual

EUROPRO
EUROPRO Dressmaker.PLUS 970C User manual

EUROPRO
EUROPRO 9110 User manual

EUROPRO
EUROPRO 7500 User manual

EUROPRO
EUROPRO 8630M User manual

EUROPRO
EUROPRO 8135H User manual

EUROPRO
EUROPRO 7535 User manual

EUROPRO
EUROPRO 385X User manual

EUROPRO
EUROPRO 534DX User manual

EUROPRO
EUROPRO 8260 User manual

EUROPRO
EUROPRO Shark 803XC User manual

EUROPRO
EUROPRO 6130 User manual

EUROPRO
EUROPRO 7130 User manual

EUROPRO
EUROPRO Select 762XH User manual

EUROPRO
EUROPRO 416 User manual

EUROPRO
EUROPRO Shark 7133 User manual

EUROPRO
EUROPRO 6131A User manual

EUROPRO
EUROPRO 464XC User manual



