
BluMill BL-168DL User manual

MANUAL
GEBRUIKSAANWIJZING
MODE D’EMPLOI
ANLEITUNG
MANUALE DI ISTRUZIONI
MANUAL DE USO
BRUKSANVISNING
Model no.: BL-168DL
AIR COOLER

2 3
WARNING
• Do not place the air inlet too close to a wall, curtains etc. because it will
prevent or hamper the ow of air.
• If using for the rst time, please check whether your voltage corresponds
with the voltage details on the air cooler’s nameplate.
• Before use, please check to make sure that the power cord and plug are not
broken. Do not twist or turn the plug because that may cause connection
problems.
• If the power cord is damaged, it must be replaced by the manufacturer, its
service agent, or a similarly qualied person.
• Do not cover the outlet and keep the air fan away from the socket. Choose
a socket which supplies more than 10A current and do not use the same
socket for any other device.
• Keep hands and body parts away while the air cooler is working. Keep a
particular eye on children.
• This appliance can be used by children aged from 8 years and above and
persons with reduced physical, sensory or mental capabilities or lack of
experience and knowledge if they have been given supervision or instruction
concerning use of the appliance in a safe way and understand the hazards
involved. Children shall not play with the appliance. Cleaning and user
maintenance shall not be made by children without supervision.
• Turn off the power before pulling out the plug. Do not pull the power cord
and do not pull the power plug since that may cause a short circuit, re, or
electric shock.
• To avoid the risk of an electric shock, do not handle the power plug if you
have wet hands.
• Keep the plug away from the socket when not in use.
• The air cooler must be kept at and not angled during use.
• Do not use the air cooler outdoors, or near a bath, shower, or pool.
• The water level in the water tank must always be below ‘Max’ and above
‘Min’ when the air cooler is operating in cooling (humidifying) mode.
• Be careful when moving the air cooler after the water tank has been lled.
• Do not place anything on top of the air cooler.
• Do not cover the air cooler outlet and inlet.
EN EN
Thank you for purchasing our air cooler. We kindly request
that you read this instruction manual carefully and keep it in
a safe place for future reference.
4 5
EN EN
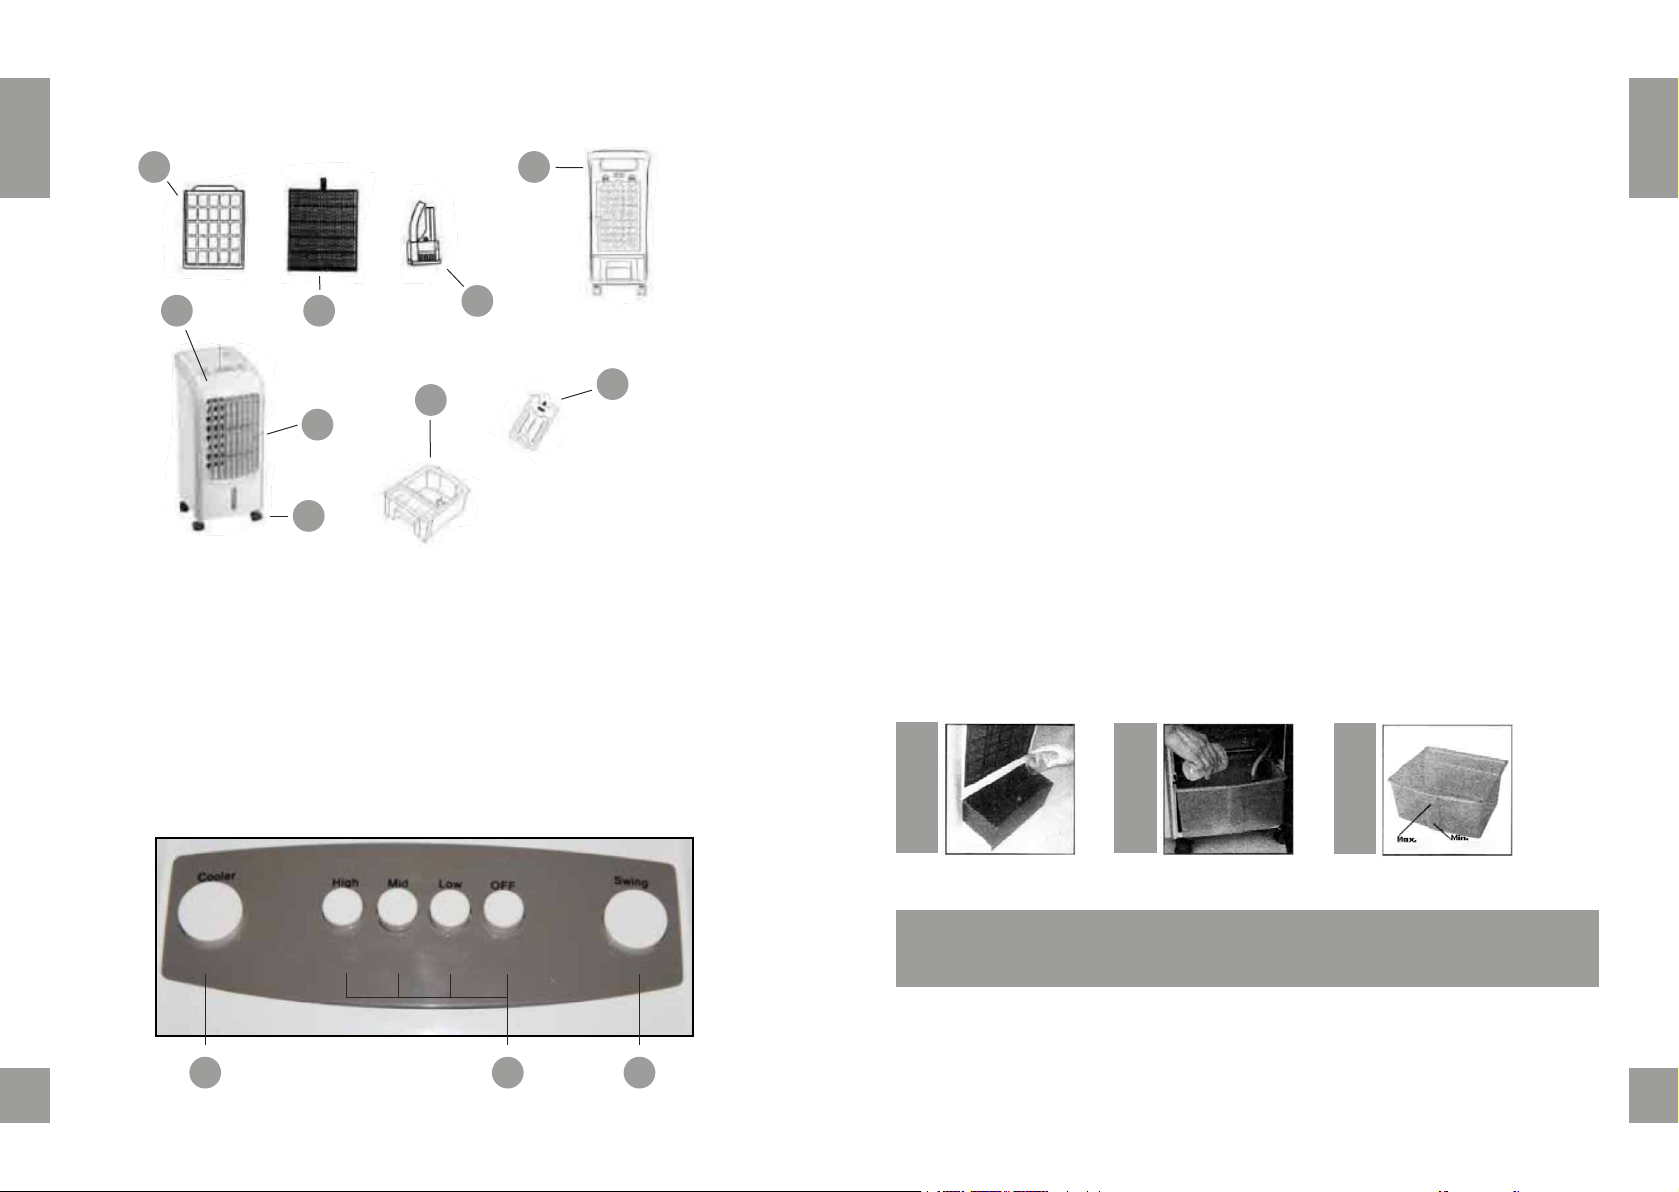
CONTROL PANEL
AIR COOLER
ADDING WATER TO THE WATER TANK
The water tank is located low down at the rear of the air cooler. Pull it out 1/3 and pour
fresh water into it [1].
• Please check the water level on the display when pouring in the water [3].
• The water level in the water tank must stay below ‘Max’ during pouring.
• The water level must also stay above ‘Min’ when the air cooler is cooling and
humidifying [3].
• Place the frozen ice packs (or ice cubes) in the water tank whenever you want
cooler air [2].
1. On-off switch / High, Mid and Low
• The air cooler will make a buzzing sound when you plug in the power cord.
• If you press the Low button, the air cooler will operate at low speed.
• If you press the Mid button, the air cooler will operate at medium speed.
• If you press the High button, the air cooler will operate at high speed.
2. Cooler
• After you have added the ice packs, press the Cooler button and the air will be
cooled.
3. Swing
• Press the Swing button and the blades will swing to the left and right.
1
5
6
7
89
4
3
2
1
3 2
The water level in the water tank must stay below ‘Max’ after the ice packs (or
ice cubes) have been placed in the water tank.
1. Air lter
2. Cooling pad
3. Water pump
4. Back
5. Control panel
6. Outlet
7. Casters
8. Water tank
9. Ice pack
1
2
3

6 7
EN EN
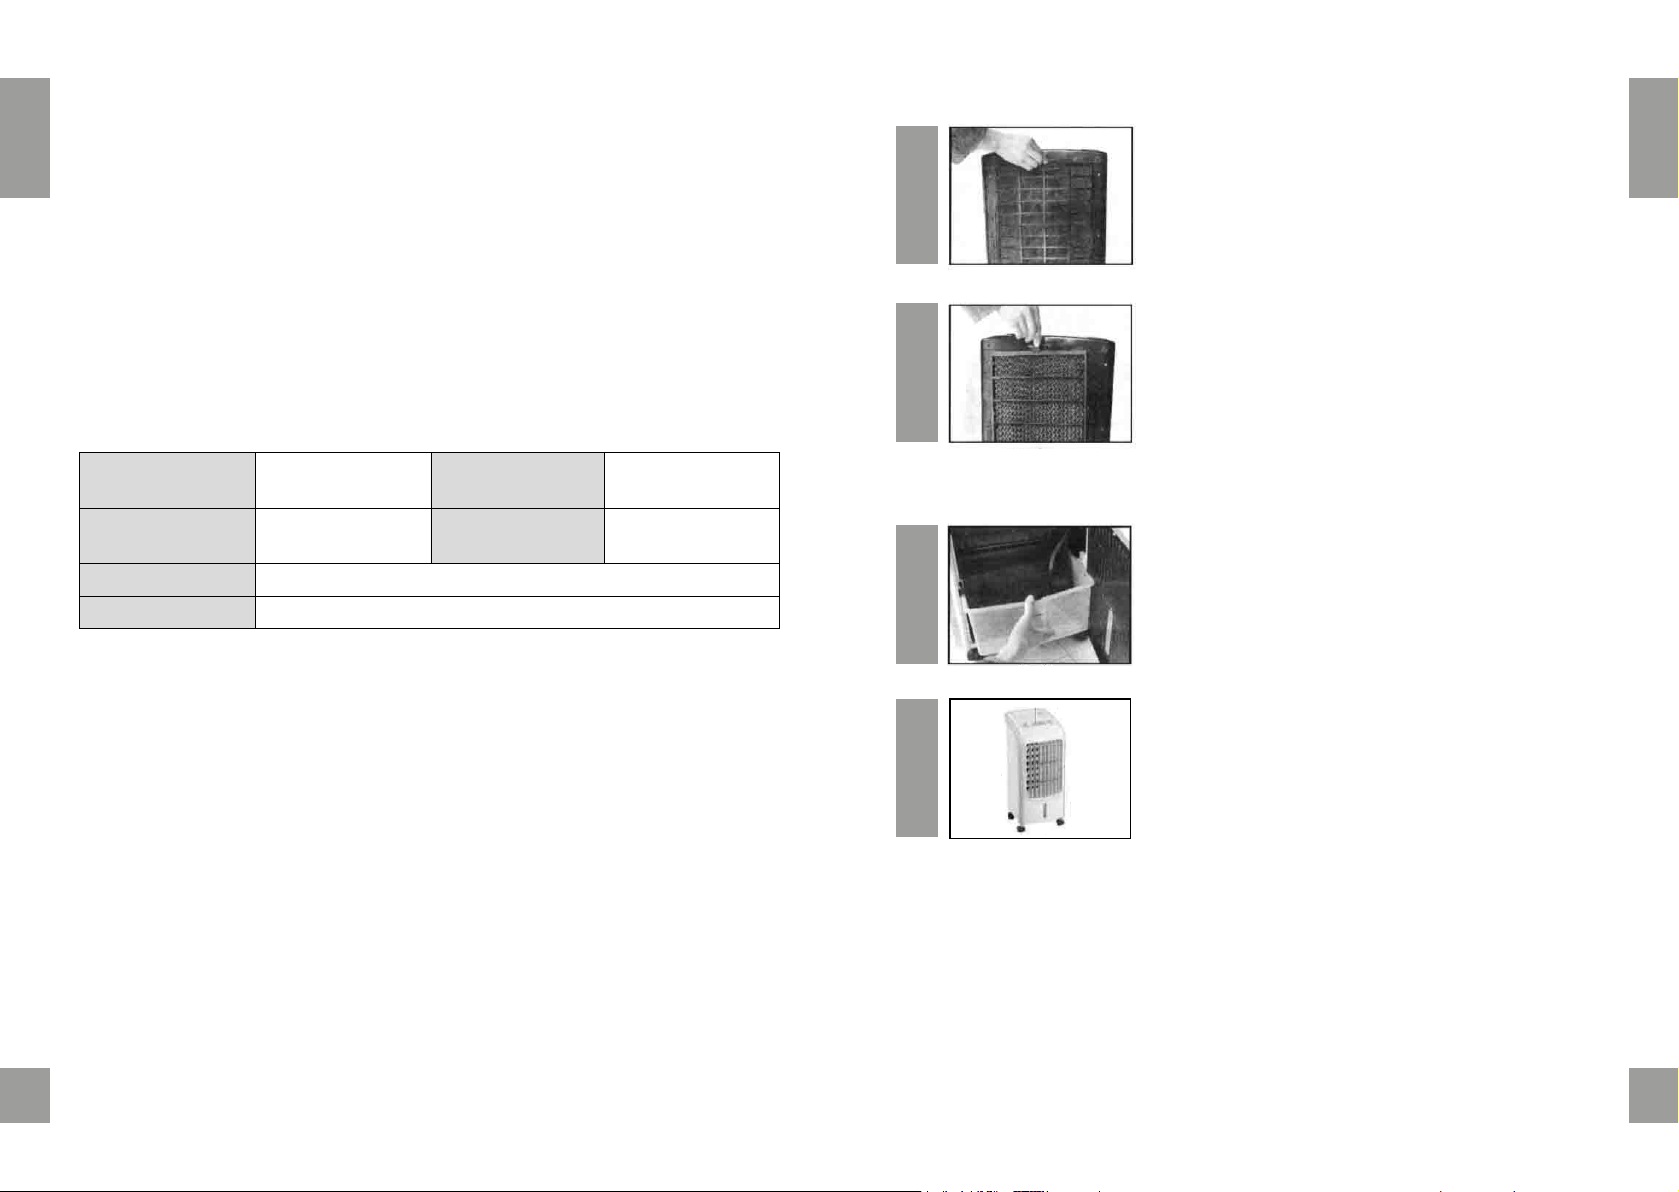
CLEANING
Step 1Step 2Step 3Step 4
Cleaning the housing:
Wipe off the housing using a neutral detergent and
a soft cloth.
IMPORTANT: When cleaning the air cooler, pull out
the plug and switch off the power supply. None of the
control panel parts must be immersed in water during
cleaning.
Cleaning the water tank:
Pull out the plug and remove the water tank. Wipe off
most of the scale from the water tank using a cloth and
some detergent. Clean the water tank with fresh water
and return it to the air cooler.
Cleaning the cooling pad:
Pull out the plug and remove the air lter and the cooling
pad from the air cooler. Clean the cooling pad with fresh
water, a detergent and a soft brush. Then put it back into
the air cooler.
IMPORTANT: In order to avoid leaks, the cooling pad
must be installed smoothly.
Cleaning the air lter:
Pull out the plug and remove the holder from the air lter
by hand. Remove the air lter and clean it using a neutral
detergent, a soft brush and fresh water. Then put the air
lter back into the air cooler.
TECHNICAL DATA
Dimensions 30 x 60 x 27,5cm Engine power 80W
Water tank 3.5 liters Voltage 220-240V / 50Hz
Air ow 270 m3/h
CE-certied
USING THE ICE PACKS
The ice packs can be used to cool and slowly absorb heat from the water and therefore
lower the temperature of the water in the water tank and the temperature of the
surrounding air. When the frozen ice packs are added to the air cooler, it will blow
cooler air.
• Put the ice packs in the freezer and remove them when frozen.
• Pull out the water tank and place the frozen ice packs in the water tank.
• Each air cooler comes with two ice packs so that you will be able to use it
continuously.

8 9
WAARSCHUWING
• Plaats het apparaat niet met de luchtinlaat naar onder andere wanden en
gordijnen toe, omdat dit de luchtstroom blokkeert en de werking beïnvloedt.
• Gebruikt u het apparaat voor het eerst, ga dan na of de netspanning
overeenkomt met het typeplaatje op de luchtkoeler.
• Controleer voor elk gebruik of het snoer en de stekker niet defect zijn.
Zorg dat het snoer niet in de knoop raakt of knikt; daarmee voorkomt u
kabelbreuk.
• Wanneer het snoer beschadigd is, moet het worden vervangen door de
fabrikant of een erkend onderhoudsbedrijf.
• Dek de luchtuitlaat niet af en zorg dat de ventilator niet in de richting van het
stopcontact blaast. Gebruik een stopcontact van meer dan 10A en sluit op
dat stopcontact tegelijkertijd geen andere apparaten aan.
• Steek geen handen of voorwerpen in de luchtkoeler terwijl hij ingeschakeld
is; let hierop vooral bij kinderen.
• Dit apparaat mag worden gebruikt door kinderen van 8 jaar en ouder en door
personen met lichamelijke, zintuiglijke of geestelijke beperkingen of met
gebrek aan ervaring en kennis, op voorwaarde dat zij worden geïnstrueerd
over het veilige gebruik van het apparaat en op de hoogte zijn van de risico’s
ervan. Laat kinderen niet spelen met dit apparaat. Laat kinderen het apparaat
niet schoonmaken of onderhouden zonder toezicht.
• Schakel het apparaat uit voordat u de stekker uit het stopcontact haalt. Trek
de stekker niet aan het snoer uit het stopcontact; zo voorkomt u kortsluiting,
brand of een elektrische schok.
• Haal de stekker niet met natte handen uit het stopcontact om het risico op
een elektrische schok tegen te gaan.
• Haal de stekker uit het stopcontact als u het apparaat niet gebruikt.
Hartelijk dank voor uw aankoop van deze luchtkoeler.
Lees deze gebruiksaanwijzing zorgvuldig door en bewaar
hem goed, zodat u hem in de toekomst nog eens kunt
raadplegen.
• Plaats de luchtkoeler als hij ingeschakeld is niet op een hellend vlak of op
een instabiele ondergrond.
• Gebruik de luchtkoeler niet in de open lucht en niet in de buurt van bad,
douche of zwembad.
• Het waterpeil in het reservoir mag niet hoger zijn dan de aanduiding ‘Max.’.
Bovendien mag het waterpeil als het apparaat koelt (bevochtigt) niet lager
zijn dan de aanduiding ‘Min.’
• Leun of stoot niet tegen de luchtkoeler als het waterreservoir gevuld is en u
het apparaat verplaatst.
• Zet geen voorwerpen op de luchtkoeler.
• Dek de luchtinlaat en -uitlaat van de luchtkoeler niet af.
NL NL

10 11
NL NL
BEDIENINGSPANEEL
AIR COOLER
ZO VULT U HET WATERRESERVOIR
Trek het waterreservoir aan de achterzijde uit de luchtkoeler, zodat het voor 1/3 uitsteekt,
en vul het met schoon water [1].
• Let tijdens het vullen van het reservoir op de aanduiding voor het waterpeil. [3].
• Het waterpeil in het reservoir moet lager blijven dan de aanduiding ‘Max.’
• Wanneer het apparaat koelt en bevochtigt, moet het waterpeil in het reservoir hoger
zijn dan de aanduiding ‘Min.’ [3].
• Wilt u koudere lucht, dan legt u het bevroren koelelement (of ijsblokjes) in het
waterreservoir [2].
1. Aan-uitschakelaar / snelheidsregelaar
• Nadat u de stekker in het stopcontact hebt gestoken, maakt het apparaat een
zoemend geluid.
• Door op ‘LOW’ te drukken, functioneert de luchtkoeler op lage snelheid.
• Door op ‘MID’ te drukken, functioneert de luchtkoeler op halve snelheid.
• Door op ‘HIGH’ te drukken, functioneert de luchtkoeler op hoge snelheid.
2. Koelen
• Door de knop ‘COOLER’ in te drukken, wordt de lucht gekoeld als u het koelelement
in het reservoir hebt geplaatst.
3. Zwenken
• Door de knop ‘Swing’ in te drukken, beweegt de ventilator naar links en naar rechts.
1
5
6
7
89
4
3
2
1
3 2
Het waterpeil in het reservoir mag niet hoger zijn dan de aanduiding ‘Max.’ nadat
u het koelelement (of ijsblokjes) in het reservoir hebt gelegd.
1. Luchtlter
2. Honingraatlter
3. Waterpomp
4. Achterkant
5. Bedieningspaneel
6. Luchtuitlaat
7. Zwenkwieltjes
8. Waterreservoir
9. Koelelement
1
2
3

12 13
SPECIFICATIES
REINIGEN
Stap 1Stap 2Stap 3Stap 4
Reinigen van de behuizing:
Veeg de behuizing schoon met een mild
schoonmaakmiddel en een zachte doek.
BELANGRIJK: Schakel het apparaat uit en haal
de stekker uit het stopcontact voordat u het
schoonmaakt. Het bedieningspaneel mag nooit in
aanraking komen met water.
Reinigen van het waterreservoir:
Haal de stekker uit het stopcontact en verwijder
het lter. Trek het honingraatlter uit de luchtkoeler.
Reinig het honingraatlter met schoon water, een
schoonmaakmiddel en een zachte borstel. Plaats het
vervolgens weer in de luchtkoeler.
Reinigen van het honingraatlter:
Haal de stekker uit het stopcontact en verwijder
het lter. Trek het honingraatlter uit de luchtkoeler.
Reinig het honingraatlter met schoon water, een
schoonmaakmiddel en een zachte borstel. Plaats het
vervolgens weer in de luchtkoeler.
BELANGRIJK: Om lekkage te voorkomen, moet het
honingraatlter op de juiste manier worden bevestigd.
Reinigen van het luchtlter:
Haal de stekker uit het stopcontact, trek de houder van
het luchtlter uit het apparaat en haal het luchtlter
eruit. Reinig het lter vervolgens met een mild
schoonmaakmiddel en een zachte borstel. Spoel het
lter af met schoon water, laat het drogen en plaats het
vervolgens weer in de luchtkoeler.
NL NL
ZO GEBRUIKT U HET KOELELEMENT
Het koelelement zorgt ervoor dat de temperatuur van het water lager wordt dan de
omgevingstemperatuur. Als u het bevroren koelelement in het waterreservoir legt, wordt
de uitgeblazen lucht kouder.
• Leg het koelelement in de vriezer. Zodra het bevroren is, haalt u het uit de vriezer.
• Trek het waterreservoir uit het apparaat en leg het bevroren koelelement in het
reservoir.
• De luchtkoeler wordt geleverd met twee koelelementen, zodat u het apparaat
permanent kunt gebruiken.
Afmetingen 30 x 60 x 27,5cm Vermogen 80W
Watertank 3,5 liter Voltage 220-240V / 50Hz
Luchtstroom 270 m3/h
CE-gecerticeerd

14 15
AVERTISSEMENT
• Ne placez pas l’arrivée d’air de l’appareil contre un mur, une paroi ou
un rideau. Ces derniers peuvent bloquer l’entrée d’air et impacter le
fonctionnement de l’appareil.
• Si vous utilisez l’appareil pour la première fois, vériez d’abord si la tension
électrique correspond à celle indiquée sur la plaque de l’appareil (type).
• Avant chaque utilisation, vériez que le l électrique et sa che ne sont pas
endommagés. Pour éviter tout endommagement du l, celui-ci ne doit pas
être plié ou noué lorsque l’appareil fonctionne.
• Si le l électrique de l’appareil est endommagé, faites-le remplacer par le
fabricant ou un technicien agréé.
• Ne couvrez jamais la sortie d’air et vériez que le ventilateur ne soue pas
en direction de la prise. Utilisez une prise de plus de 10A et ne branchez pas
d’autres appareils en même temps sur cette prise.
• N’insérez jamais vos mains ou des objets dans l’appareil en fonctionnement.
Soyez vigilant avec les enfants.
• Il peut être utilisé par des enfants âgés de 8 ans et plus et par des personnes
ayant des capacités physiques, sensorielles ou mentales réduites ou
manquant d’expérience et de connaissances, moyennant qu’elles aient reçu
des instructions concernant l’utilisation sûre de l’appareil et comprennent les
risques encourus. Ne laissez pas les enfants jouer avec l’appareil. Ne conez
pas aux enfants le nettoyage ou l’entretien de l’appareil sans surveillance.
• Éteignez toujours l’appareil avant de le débrancher. Pour débrancher
l’appareil ne tirez pas sur le l mais saisissez la che. Vous éviterez ainsi tout
risque de court-circuit, d’incendie ou de choc électrique.
• Pour éviter tout risque de choc électrique, ne débranchez jamais l’appareil
lorsque vous avez les mains mouillées.
• Débranchez toujours l’appareil lorsque vous ne l’utilisez pas.
Nous vous remercions d’avoir acheté ce rafraîchisseur d’air.
Lisez attentivement ce manuel d’utilisation et conservez-le
pour pouvoir le consulter ultérieurement.
• Ne placez pas l’appareil en marche sur un sol en pente ou une surface
instable.
• N’utilisez pas l’appareil en plein air ni près d’une baignoire, d’une douche ou
d’une piscine.
• Ne remplissez pas le réservoir d’eau de l’appareil au-dessus de la limite
indiquée (Max). Lorsque l’appareil est en mode refroidissement le niveau du
réservoir d’eau ne doit pas se trouver en-dessous du minimum indiqué (Min).
• Lorsque vous déplacez l’appareil alors que son réservoir d’eau est rempli, ne
vous appuyez pas sur l’appareil et évitez les chocs.
• Ne posez aucun objet sur l’appareil.
• Ne couvrez jamais l’arrivée d’air ni la sortie d’air de l’appareil.
FR FR

16 17
FR FR
TABLEAU DE CONTRÔLE
AIR COOLER
REMPLIR LE RÉSERVOIR D’EAU
Tirez le réservoir à l’arrière de l’appareil sur 1/3 de sa longueur et remplissez-le avec de
l’eau propre [1].
• Vériez les limites de remplissage indiquées sur le réservoir [3].
• Ne remplissez pas le réservoir de l’appareil au-dessus de la limite indiquée (Max).
• En mode refroidissement / humidication, le niveau d’eau ne doit pas se trouver en-
dessous du minimum indiqué (Min) [3].
• Pour générer de l’air frais, placez l’élément réfrigérant ou des glaçons dans le
réservoir de l’appareil [2].
1. Bouton ON/OFF / régulateur de vitesse
• Une fois l’appareil branché, celui-ci émet un son vibrant.
• Appuyez sur «Low» pour faire fonctionner l’appareil à vitesse minimum.
• Appuyez sur «Mid» pour faire fonctionner l’appareil à vitesse intermédiaire.
• Appuyez sur «High» pour faire fonctionner l’appareil à vitesse maximum.
2. Bouton Cooler
• Pour rafraîchir l’air, placez l’élément réfrigérant dans le réservoir et appuyez sur
«Cooler».
3. Bouton Swing
• Appuyez sur «Swing» pour faire pivoter le ventilateur de gauche à droite.
1
5
6
7
89
4
3
2
1
3 2
Après avoir placé l’élément réfrigérant ou des glaçons dans le réservoir, ne le
remplissez pas au-dessus de la limite indiquée (Max).
1. Filtre à air
2. Filtre alvéolé
3. Pompe à eau
4. Face arrière
5. Tableau de contrôle
6. Sortie d’air
7. Roulettes pivotantes
8. Réservoir d’eau
9. Élément réfrigérant
1
2
3
18 19
NETTOYAGE
Étape 1Étape 2Étape 3Étape 4
Nettoyer l’extérieur de l’appareil:
Nettoyez la surface avec un chiffon doux et un produit
nettoyant non agressif.
IMPORTANT: Éteignez toujours l’appareil et
débranchez-le avant de le nettoyer. Le tableau de
contrôle ne doit jamais entrer en contact avec du
liquide.
Nettoyer le réservoir d’eau:
Débranchez l’appareil et retirez le réservoir d’eau.
Essuyez le réservoir avec un chiffon et un peu de liquide
nettoyant puis rincez à l’eau claire. Replacez le ltre
dans l’appareil.
Nettoyer le ltre alvéolé:
Débranchez l’appareil. Retirez le ltre alvéolé de
l’appareil. Nettoyez le ltre à l’eau avec une brosse
douce et un produit nettoyant non agressif. Replacez le
ltre dans l’appareil.
IMPORTANT: Replacez le ltre alvéolé correctement
an d’éviter tout risque de fuite.
Nettoyer le ltre à air:
Débranchez l’appareil, tirez le porte-ltre de l’appareil
pour en extraire le ltre à air. Nettoyez le ltre avec une
brosse douce et un produit nettoyant non agressif.
Rincez le ltre à l’eau claire et laissez-le sécher avant de
le replacer dans l’appareil.
FR FR
DONNÉES TECHNIQUES
UTILISER L’ÉLÉMENT RÉFRIGÉRANT
L’élément réfrigérant permet de refroidir l’eau du réservoir à une température inférieure à
celle de la pièce. Lorsque l’élément réfrigérant est placé dans le réservoir, l’appareil soue
un air plus froid.
• Placez l’élément réfrigérant dans votre congélateur. Lorsque l’élément réfrigérant est
congelé, sortez-le du congélateur.
• Placez l’élément congelé dans le réservoir de l’appareil.
• L’appareil est livré avec deux éléments réfrigérants pour alterner leur utilisation et
proter en permanence d’un air froid.
Dimensions 30 x 60 x 27,5cm Puissance du
moteur
80W
Water tank 3.5 liters Tension 220-240V / 50Hz
Flux d’air 270 m3/h
CE-certied
Table of contents
Languages:
Other BluMill Air Conditioner manuals


Popular Air Conditioner manuals by other brands






Fujitsu
Fujitsu Inverter ASBA30JFC operating manual

Toshiba
Toshiba RAS-M10SMUV-E installation manual

Daikin
Daikin FXLQ20MAVE Operation manual

Hitachi
Hitachi RAS-E24CAK instruction manual

CIAT
CIAT Magister 2 Series Installation, Operation, Commissioning, Maintenance

Bestron
Bestron AAC6000 instruction manual





