Biostar H110MGV3 User manual

BIOS Update ������������������������������������������������������������������������������������� 2
UEFI BIOS Setup �������������������������������������������������������������������������������� 6
1� Main Menu ����������������������������������������������������������������������������������� 7
2� Advanced Menu���������������������������������������������������������������������������� 8
3� Chipset Menu�������������������������������������������������������������������������������17
4� Boot Menu�����������������������������������������������������������������������������������21
5� Security Menu������������������������������������������������������������������������������24
6� O�N�E Menu����������������������������������������������������������������������������������27
7� Exit Menu�������������������������������������������������������������������������������������34
BIOS User Guide
H110MHV3 / H110MGV3 / H110MLV3

2 | BIOS Update
BIOS Update
The BIOS can be updated using either of the following ulies:
• BIOSTAR BIOS Flasher: Using this ulity, the BIOS can be updated from a le on a hard disk, a
USB drive (a ash drive or a USB hard drive), or a CD-ROM.
• BIOSTAR BIOS Update Ulity: It enables automated updang while in the Windows
environment. Using this ulity, the BIOS can be updated from a le on a hard disk, a USB
drive (a ash drive or a USB hard drive), or a CD-ROM, or from the le locaon on the Web.
BIOSTAR BIOS Flasher
Note
» This ulity only allows storage device with FAT32/16 format and single paron.
» Shung down or reseng the system while updang the BIOS will lead to system boot failure.
Updang BIOS with BIOSTAR BIOS Flasher
1. Go to the website to download the latest BIOS le for the motherboard.
2. Then, copy and save the BIOS le into a USB ash (pen) drive.
3. Insert the USB pen drive that contains the BIOS le to the USB port.
4. Power on or reset the computer and then press <F12> during the POST process.
5. Aer entering the POST screen, the BIOS-
FLASHER ulity pops out. Choose <fs0> to search
for the BIOS le.
6. Select the proper BIOS le, and a message asking
if you are sure to ash the BIOS le. Click “Yes” to
start updang BIOS.

BIOS Update | 3
H110MHV3 / H110MGV3 / H110MLV3
7. A dialog pops out aer BIOS ash is completed,
asking you to restart the system. Press the <Y> key
to restart system.
8. While the system boots up and the full screen logo shows up, press <DEL> key to enter BIOS
setup.
Aer entering the BIOS setup, please go to the <Save & Exit>, using the <Restore Defaults>
funcon to load Opmized Defaults, and select <Save Changes and Reset> to restart the
computer. Then the BIOS Update is completed.
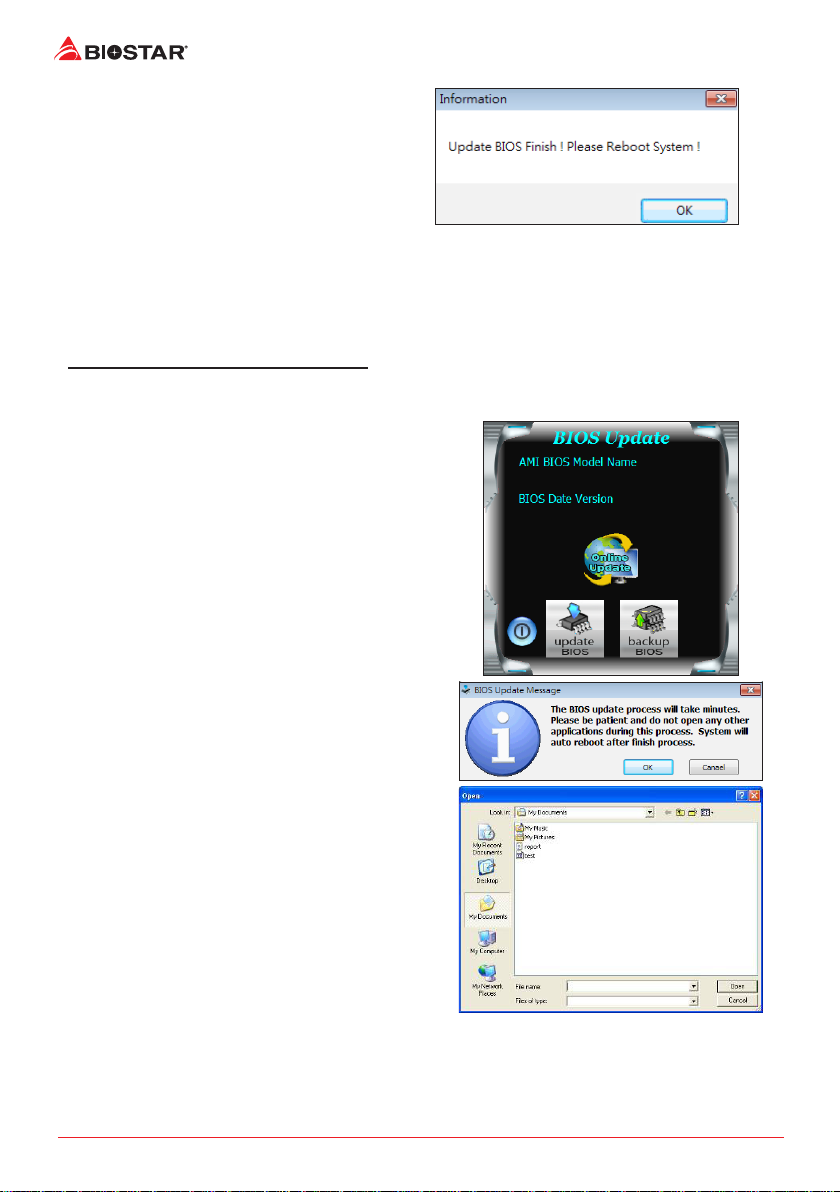
BIOS Update Ulity (through the Internet)
1. Installing BIOS Update Ulity from the DVD Driver.
2. Please make sure the system is connected to the internet before using this funcon.
3. Launch BIOS Update Ulity and click the
“Online Update” buon on the main screen.
4. An open dialog will show up to request your
agreement to start the BIOS update. Click “Yes”
to start the online update procedure.
5. If there is a new BIOS version, the ulity will
ask you to download it. Click “Yes” to proceed.
6. Aer the download is completed, you will be
asked to program (update) the BIOS or not. Click
“Yes” to proceed.
4 | BIOS Update
7. Aer the updang process is nished, you
will be asked you to reboot the system. Click
“OK” to reboot.
8. While the system boots up and the full screen logo shows up, press <DEL> key to enter BIOS
setup.
Aer entering the BIOS setup, please go to the <Save & Exit>, using the <Restore Defaults>
funcon to load Opmized Defaults, and select <Save Changes> and <Reset> to restart the
computer. Then, the BIOS Update is completed.
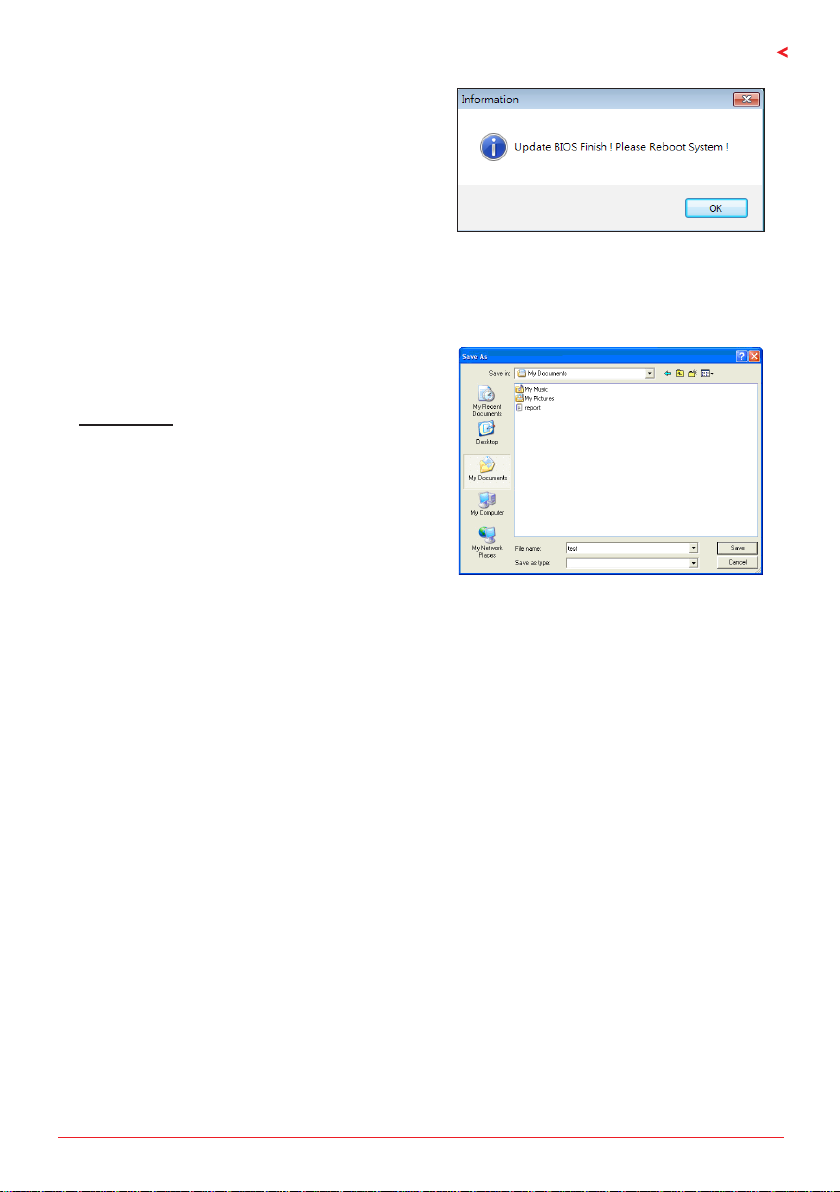
BIOS Update Ulity (through a BIOS le)
1. Installing BIOS Update Ulity from the DVD Driver.
2. Download the proper BIOS from hp://www.biostar.com.tw/
3. Launch BIOS Update Ulity and click the “Update
BIOS” buon on the main screen.
4. A warning message will show up to request your
agreement to start the BIOS update. Click “OK” to
start the update procedure.
5. Choose the locaon for your BIOS le in the
system. Please select the proper BIOS le, and
then click on “Open”. It will take several minutes,
please be paent.
UEFI BIOS Setup | 5
H110MHV3 / H110MGV3 / H110MLV3
6. Aer the BIOS Update process is nished, click
on “OK” to reboot the system.
7. While the system boots up and the full screen logo shows up, press <DEL> key to enter BIOS
setup.
Aer entering the BIOS setup, please go to the <Save & Exit>, using the <Restore Defaults>
funcon to load Opmized Defaults, and select <Save Changes and Reset> to restart the
computer. Then, the BIOS Update is completed.
Backup BIOS
Click the Backup BIOS buon on the main screen
for the backup of BIOS, and select a proper
locaon for your backup BIOS le in the system,
and click “Save”.

6 | UEFI BIOS Setup
UEFI BIOS Setup
Introducon
The purpose of this manual is to describe the sengs in the AMI UEFI BIOS Setup program on this
motherboard. The Setup program allows users to modify the basic system conguraon and save
these sengs to NVRAM.
UEFI BIOS determines what a computer can do without accessing programs from a disk. This
system controls most of the input and output devices such as keyboard, mouse, serial ports and
disk drives. BIOS acvates at the rst stage of the boong process, loading and execung the
operang system. Some addional features, such as virus and password protecon or chipset
ne-tuning opons are also included in UEFI BIOS.
The rest of this manual will to guide you through the opons and sengs in UEFI BIOS Setup.
Plug and Play Support
This AMI UEFI BIOS supports the Plug and Play Version 1.0A specicaon.
EPA Green PC Support
This AMI UEFI BIOS supports Version 1.03 of the EPA Green PC specicaon.
ACPI Support
AMI ACPI UEFI BIOS support Version 1.0/2.0 of Advanced Conguraon and Power interface
specicaon (ACPI). It provides ASL code for power management and device conguraon
capabilies as dened in the ACPI specicaon, developed by Microso, Intel and Toshiba.
PCI Bus Support
This AMI UEFI BIOS also supports Version 2.3 of the Intel PCI (Peripheral Component Interconnect)
local bus specicaon.
Using Setup
When starng up the computer, press <Del> during the Power-On Self-Test (POST) to enter the
UEFI BIOS setup ulity.
In the UEFI BIOS setup ulity, you will see General Help descripon at the top right corner, and
this is providing a brief descripon of the selected item. Navigaon Keys for that parcular menu
are at the boom right corner, and you can use these keys to select item and change the sengs.
Note
The default UEFI BIOS sengs apply for most condions to ensure opmum performance of the
»
motherboard. If the system becomes unstable aer changing any sengs, please load the default
sengs to ensure system’s compability and stability. Use Load Setup Default under the Exit Menu.
For beer system performance, the UEFI BIOS rmware is being connuously updated. The UEFI BIOS
»
informaon described in this manual is for your reference only. The actual UEFI BIOS informaon and
sengs on board may be slightly dierent from this manual.
The content of this manual is subject to be changed without noce. We will not be responsible for any
»
mistakes found in this user’s manual and any system damage that may be caused by wrong-sengs.
1. Main Menu | 7
H110MHV3 / H110MGV3 / H110MLV3
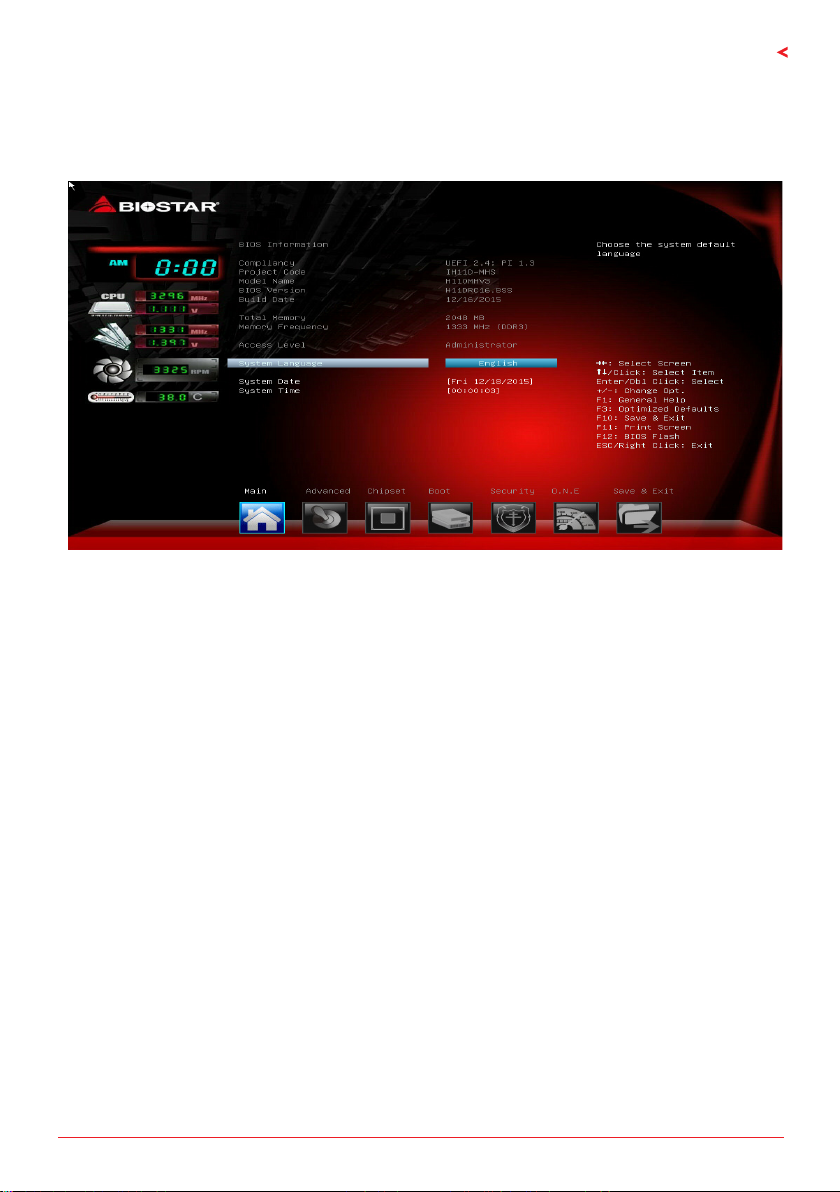
1� Main Menu
Once you enter AMI UEFI BIOS Setup Ulity, the Main Menu will appear on the screen providing
an overview of the basic system informaon.
BIOS Informaon
It shows system informaon including UEFI BIOS version, Project Code, Model Name, Build Date
and etc.
Total Memory
Shows system memory size, VGA shard memory will be excluded.
System Language
Choose the system default language.
System Date
Set the system date. Note that the ‘Day’ automacally changes when you set the date.
System Time
Set the system internal clock.
8 | 2. Advanced Menu
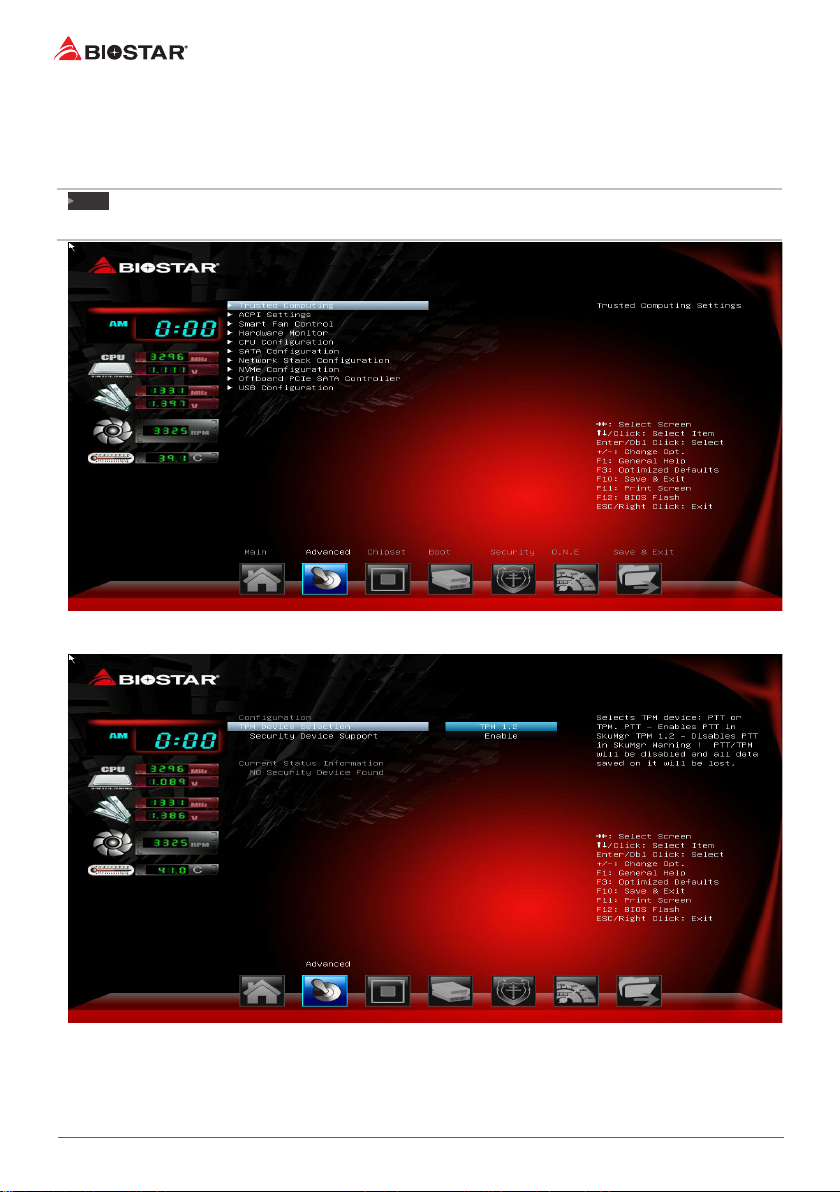
2� Advanced Menu
The Advanced Menu allows you to congure the sengs of CPU, Super I/O, Power Management,
and other system devices.
Note
Beware of that seng inappropriate values in items of this menu may cause system to malfuncon.
»
Trusted Compung
TPM Device Selecon
This item selects TPM device: PTT or TPM. PTT - Enables PTT in SkuMgr warning! PTT/TPM will be
disabled and all data saved on it will be lost.
Opons: TPM1.2 (Default) / PTT
2. Advanced Menu | 9
H110MHV3 / H110MGV3 / H110MLV3
Security Devices Support
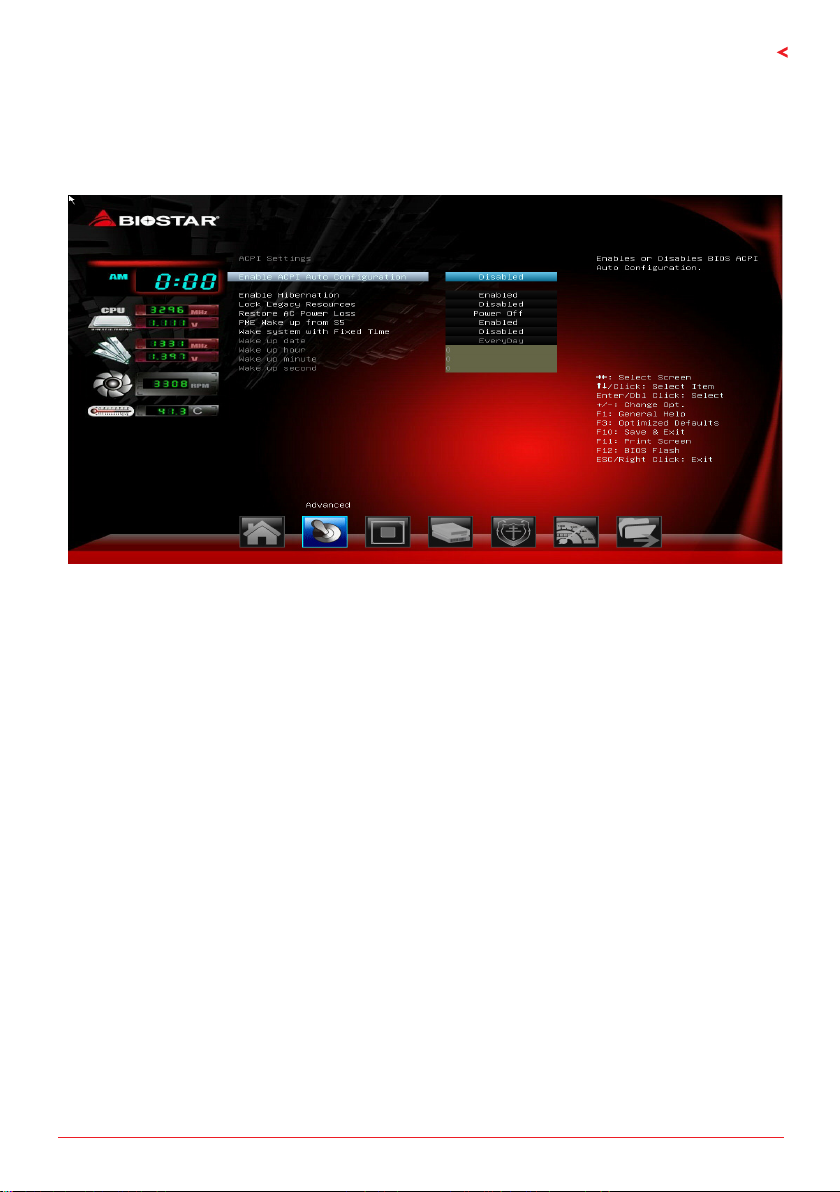
This item enables or disables BIOS ACPI auto conguraon funcon.
Opons: Enabled (Default) / Disabled
ACPI Sengs
Enable ACPI Auto Conguraon
This item enables or disables BIOS ACPI auto conguraon funcon.
Opons: Disabled (Default) / Enabled
Enable Hibernaon
This item enables or disables system ability to hibernate (0S/S4 sleep state). This opon may be
not eecve with some OS.
Opons: Enabled (Default) / Disabled
Lock Legacy Resources
The item enables or disables Lock of Legacy Resources.
Opons: Disabled (Default) / Enabled
Restore AC Power Loss
Specify what state to go to when power is re-applied aer a power failure.
Opons: Power O (Default) / Power On / Last State
PME Wake up from S5
The item enables the system to wake from S5 using PME event.
Opons: Disabled (Default) / Enabled
Wake system with Fixed Time
This item enables or disables the system to wake on by alarm event. When this item is enabled,
the system will wake on the hr::min::sec specied.
Opons: Disabled (Default) / Enabled
Wake up date
You can choose which date the system will boot up.
10 | 2. Advanced Menu
Wake up hour / Wake up minute / Wake up second
You can choose the system boot up me, input hour, minute and second to specify.
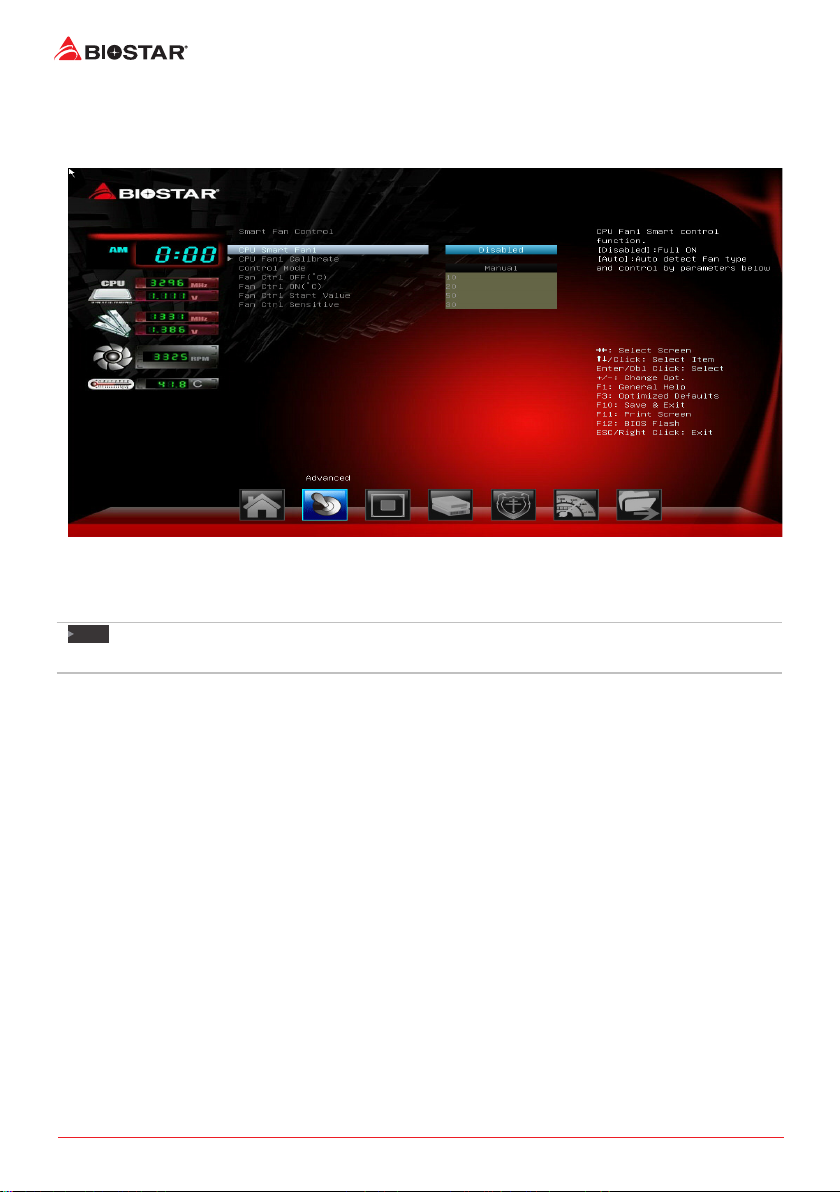
SMART FAN Control
CPU Smart Fan1
This item allows you to control the CPU Smart Fan funcon.
Opons: Disabled (Default) / Auto
Note
The following items appear only when you set the Smart Fan funcon to [Auto].
»
CPU Fan Calibrate
Press [ENTER] to calibrate CPU Fan speed.
Control Mode
This item provides several operaon modes of the fan.
Opons: Quiet / Aggressive / Manual
Fan Ctrl OFF(°C)
When CPU temperature is lower than this value, the CPU fan will keep lowest RPM.
Opons: 10 (°C) (default)
Fan Ctrl On(°C)
When CPU temperature is higher than this value, the CPU fan controller will turn on.
Opons: 20 (°C) (Default)
Fan Ctrl Start Value
This item sets CPU FAN Start Speed Value.
Opons: 50 (Default)
Fan Ctrl Sensive
The bigger the numeral is, the higher the FAN speed is.
Opons: 30 (Default)
This manual suits for next models
2
Table of contents
Other Biostar Motherboard manuals

Biostar
Biostar G41D-M7 Manual

Biostar
Biostar M7VIW User guide

Biostar
Biostar Hi-Fi Z97WE User guide

Biostar
Biostar M7VKB User manual

Biostar
Biostar M7NCD Pro User manual

Biostar
Biostar H61MH User guide

Biostar
Biostar A58MD User guide

Biostar
Biostar H61MLC2 User manual

Biostar
Biostar 945P-A7B User guide

Biostar
Biostar N4SIE-A7 User manual

Biostar
Biostar B460GTA User manual

Biostar
Biostar M7 VKD User manual

Biostar
Biostar H61MHP User guide

Biostar
Biostar 945GC-M7G User guide

Biostar
Biostar A780G-M2-SE User guide

Biostar
Biostar P4 TGV User manual

Biostar
Biostar M6VCT User manual

Biostar
Biostar M6TBA User manual

Biostar
Biostar TA790GX A3+ Manual

Biostar
Biostar AM1MHP User manual


