
Art-Tech Diamond 1000 User manual

Radio control glider

Contents
SPARE PARTS LIST
SAFETY PRECAUTIONS
STATEMENT
SPECIFICA
TIONS
PRE-FLIGHT INSPECTION AND ADJUSTMENT
CHARGING METHOD AND CAUTIONS
2.4GHz RADIO SYSTEM
ASSEMBLY
02
02~03
01
03~05
11
06~07
08~10
10~11
12~13
TROUBLESHOOTING
Art-Tech reserve the right to alter the specifications at any point.
Please contact your nearest retailer for the latest specifications.
All information correct at time of print E&OE.

SPECIFICATIONS
Diamond 1000 glider features:
1. 1000mm wingspan, quick and easy assembly, excellent gliding performance.
2. Brushed motor and ESC.
3. Tough ABS cowling, foldable propeller.
4. Crash resistant EPO fuselage.
5. Anti-interference 2.4GHz radio system.
Thank you for choosing the Diamond glider, which is suitable for novice and expert pilots.
The RTF version includes: 2.4GHz transmitter, ESC, motor, batteries, servos, receiver and charger.
The PNP version includes: ESC, motor and servos.
You will need to add a suitable transmitter, receiver and battery pack.
Diamond 1100 Pro glider features:
1. 1100mm wingspan, quick and easy asssembly, excellent gliding performance.
2. Powerful brushless motor and ESC.
3. Tough ABS cowling, foldable propeller.
4. Crash resistant EPO fuselage.
5. Anti-interferance 2.4GHz radio system.
★
W
ingspan:1000mm
★Length:777.5 mm
★Weight:410 g
★
Servo: 8g*2
★Battery:7.4V,800mAh Li-Po
★ESC: 10A Brushed ESC
★Motor: R380M-4046-57RB Brushed Motor
★Wing Area: 12.6 dm
★
Wing load: 32.4 g/ dm 2
2
★
W
ingspan:1100 mm
★Length:777.5 mm
★Weight:470 g
★
Servo: 8g*4
★Battery:11.1V,1300mAh Li-Po
★ESC: 20A Brushless ESC
★Motor: BM C2408-1750KV Brushless Motor
★Wing Area: 14 dm
★
Wing load: 33.4 g/ dm 2
2
Diamond 1100 Glider Parameter
Diamond 1000 Glider Parameter

STATEMENT
SAFETY PRECAUTIONS
WWW.ART-TECH.COM
1. The Diamond 1000 and 1100 are not toys, and are only suitable for responsible pilots.
Please keep in mind that you are responsible for the safe operation of this model and any
damage or harm that may be caused due to improper usage.
2. Please setup this model correctly according to instructions and make sure that
all body parts are kept away from any rotating parts to avoid personal injury or
damage to your model.
3. The user bears full responsibility for proper operation and use of this model.
Art-Tech or any of its distributors can not be held responsible for any liablity or loss
due to improper operation.
4. You must read and fully understand this manual before attempting to fly your model.
1. Do not y in unsuitable weather conditions such as:
thunderstorms, rain or excessive winds.
2. Do not y near an airport, railway line, road,
telephone lines or power lines.
3. Do not y where there are crowds of people.
Only y at specially designated ying sites.
4. Make sure your model and radio system are
functioning correctly before attempting to y.

-14 +14
CHARGING METHOD AND CAUTIONS
1. Insert the charger's plug to the power outlet, the red and green lights flash, then the green
light remains on, the red goes out, which shows the charger works, you can now charge the
battery.
2. Insert the battery’s balance plug into the correct charging port as shown, the red light
comes on which shows battery is charging.
3. Charge the battery for about one and a half hours, when red light goes out, the battery is
charged.
Using Your Charger
Specifications:
Input voltage: DC 110V~240V
Output voltage: DC 7.4V & 11.1V
(for 2 or 3 cell Li-Po battery)
Charging current: 0.6A~0.7A
Integrated Balance Charger for Lithium Battery SPA026R
5. Only use genuine Art-Tech replacement
parts to repair your model.
6. Do not attempt to catch the Diamond 1000 or
Diamond Pro 1100 while ying.
7. Beginners should have an experienced pilot to
help them learning to y. Not recommended for
children under the age of 14.

WWW.ART-TECH.COM
SAFETY INSTRUCTIONS FOR YOUR LI-PO CHARGER
1. The battery should be charged at no more than 1C using a specified charger.
2. The battery should not be discharged at over 15C to avoid damaging the battery.
3. When the Li-Po battery is stored for more than 3 months, it needs to be recharged to
maintain its voltage, and ensure its life time.
4. Keep the charger away from water or liquid.
5. Do not insert anything into the cooling vents in the charger.
6. Battery charging should take place on a non-flammable surface.
7. Do not charge 2 and 3 cell Li-Pos at the same time.
8. The charger is for Li-Po batteries only.
9. The charger should be kept out of the reach of children.
10. Do not leave the battery and charger unattended during charging.
11. If anything abnormal occurs, stop charging immediately.
(Battery getting hot, battery swelling)
12. Do not disassemble the charger.
13. Do not attempt to charge a warm battery.

SAFETY INSTRUCTIONS FOR YOUR LI-PO BATTERY
1. Do not disassemble or reconstruct the battery.
2. Do not short-circuit the battery.
3. Do not use or leave the battery near a fire, stove or heated place (more than 80℃).
4. Do not immerse the battery in water.
5. Do not leave the battery in direct sunlight.
6. Do not damage, throw or strike the battery
7. Always thoroughly inspect a battery that has been involved in a crash.
8. Do not use a battery with damage or deformation.
9. Do not charge a warm battery. Allow it to cool completely before attempting to charge.
10. Do not reverse polarity or over discharge the battery.
11. Do not directly connect the battery to the mains power socket or 12v supply.
12. Do not use the battery for unspecified equipment.
13. Do not touch a leaking battery directly, please wash your skin or clothes with water if
they come into contact with liquid leaking from the battery.
14. Do not mix the battery with other battery types during usage.
15. Do not continue charging the battery over the prescribed time.
16. Do not put the battery into the microwave oven or high-pressure container.
17. Do not use the battery nearby the place which generates static electricity (over 64V).
18. Do not charge the battery when the temperature is under 0℃or over 45℃.
19. If you find the battery leaking, smelling or abnormal, stop using it and return it to the
seller.
20. The battery must be charged on a non-flammable surface.
21. Keep the battery away from the children.
22. Use the specified charger and observe charging requirements (under 1A).
23. The battery should always be monitored during charging

WWW.ART-TECH.COM
1. Connect right hand (starboard)
aileron servo to aileron Y-lead.
Fit right hand (starboard) wing into
fuselage.
2. Slot the wing spar through the
fuselage into the right hand wing.
Connect the left hand (port) aileron
servo and fit wing.
3. Push the wing roots into the
fuselage, taking care not to trap
any servo connectors / cables.
Diamond 1100 Pro (4ch) Glider Assembly
7. Undo the release clip at the front
of the cockpit and lift to open the
battery bay. Fit the wing lock bolt to
secure the wing.
8. Insert battery into fuselage 9. Lower the throttle stick and trim
fully, turn on the the transmitter.
Connect the battery to the ESC.
10. Make sure the battery is securely
fitted and all servos are operating
correctly. Replace the canopy.
4. Secure the wings to the fuselage
using the nylon PM4x40 screw.
5. Secure the horizontal stabilizer
(elevator) to the vertical fin (rudder)
with the steel PM2x10 screw.
6. Connect elevator pushrod to
the servo arm, then connect the
clevis to the control horn.
A
SSEMBLY

8. Make sure the battery is securely
fitted and all servos are operating
correctly. Replace the canopy.
A
SSEMBLY
WWW.ART-TECH.COM
7
Diamond 1000 (3ch) Glider Assembly
3. Insert horizontal stabilizer (elevator)
into vertical fin (rudder) and secure
with steel PM2x10.
1. Slot the wing into the fuselage. 2. Secure the wing with nylon
PM4x40 wing bolt.
5. Undo the release clip at the front
of the cockpit and lift to open the
battery bay. Fit the wing lock bolt
to secure the wing.
6. Fit battery into the fuselage.
7. Lower the throttle stick and trim
fully, turn on the the transmitter.
Connect the battery to the ESC.
4. Connect elevator pushrod to
the servo arm, then connect clevis
to control horn.
WWW.ART-TECH.COM
8
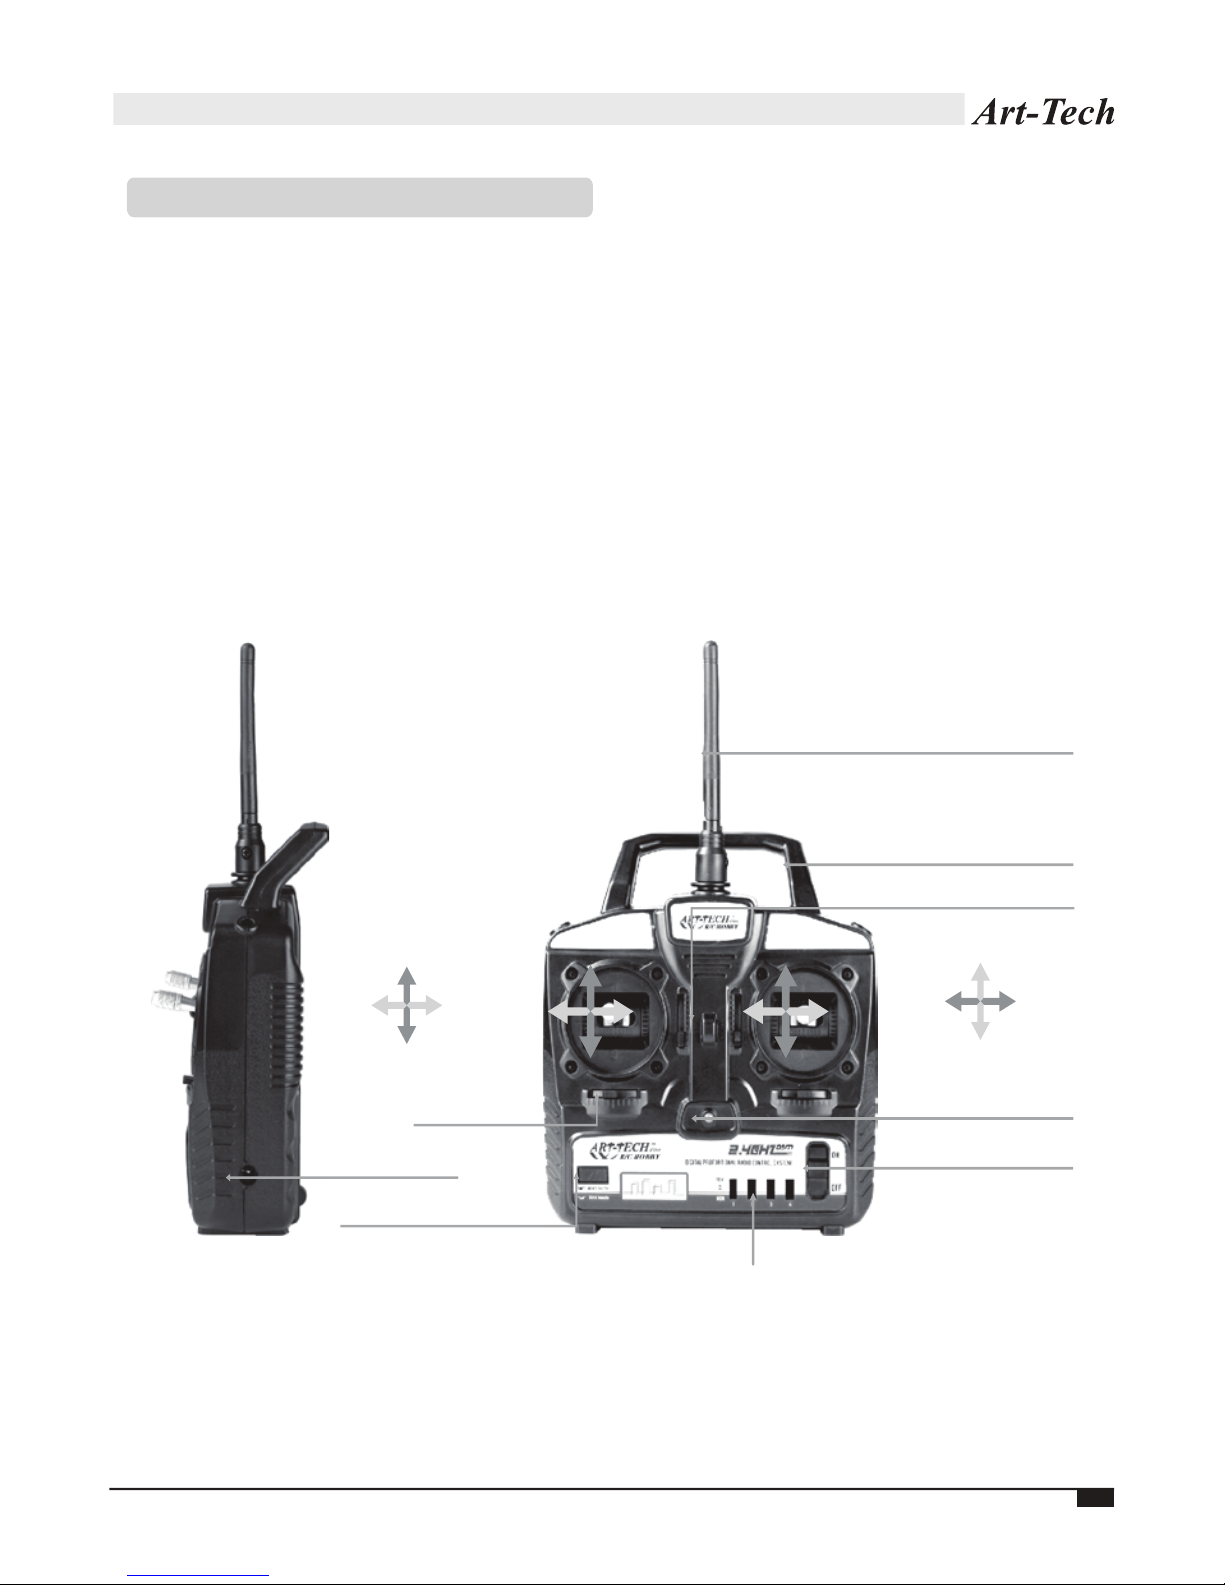
2.4GHz TRANSMITTER AND RECEIVER
Mode ll
Trim
Hook
Servo reversers
Power switch
Power indicator
Antenna
Carrying bar
Rudder
left
Rudder
right
Throttle Max
Throttle Min
Elevator down
E
levator up
Aileron
left
A
ileron
right
Binding Button
Charger port
This 2.4GHz radio system has a control distance of 200 meters ground to ground and 400
meters ground to air
FUNCTIONS FOR CONTROL SET
This radio is a 4 channel, 2.4GHz system and uses Direct Sequence Spread Spectrum (DSSS),
with strong anti-interference technology it is stable and reliable.
This system is compatible with 4 channel aeroplanes and helicopters and features a simulator
training connection port.
A low transmitter battery voltage warning system is also in place.
Please note: In 3 channel models, the rudder control is on the right hand stick in place
of the aileron control.
This manual suits for next models
2
Table of contents
Other Art-Tech Toy manuals

Art-Tech
Art-Tech fire fox User manual

Art-Tech
Art-Tech F-14 "TOMCAT" JET User manual

Art-Tech
Art-Tech 784251 User manual

Art-Tech
Art-Tech ASK-21 User manual

Art-Tech
Art-Tech P-51D Gunfighter User manual

Art-Tech
Art-Tech Sbach 342 User manual

Art-Tech
Art-Tech Flywolf User manual

Art-Tech
Art-Tech CESSNA-182 User manual

Art-Tech
Art-Tech F6F Hellcat User manual

Art-Tech
Art-Tech R/C Hobby User manual






