WICKED GIZMOS JB555 User manual

www.wickedgizmos.co.uk
www.wickedgizmos.co.uk
MODEL JB555
INSTRUCTIONS
BLUETOOTH JUKEBOX

2
www.wickedgizmos.co.uk
TECHNICAL DATA
Descripon: Bluetooth Jukebox
Model: JB555
Product Rang: DC 12V 2.0A
Adaptor:
Input: 100-240V ~50/60Hz 0.6A
Output: 12V 2.0A
Radio FM Bandwidth: 87.5-108 MHz
DOCUMENTATION
We declare that this product conforms to the following product legislaon in accordance with the
following direcve(s):
2014/30/EU Electromagnec Compability Direcve.
2014/35/EU Low Voltage Direcve.
2011/65/EU Restricon of Hazardous Substances Direcve.
2014/53/EU Radio Equipment Direcve.
RK Wholesale LTD Quality Assurance, United Kingdom
WARRANTY
This product is guaranteed for 12 months from the date of original purchase. If any defect arises due to
faulty materials of workmanship, the faulty products must be returned to the place of purchase. Refund or
replacement is at the discreon of the retailer.
The following condions apply:
• The product must be returned to the retailer with proof of purchase.
• The product must be installed and used in accordance with the instrucons contained in this
instrucon guide.
• It must be used only for domesc purposes.
• It does not cover wear and tear, damage, misuse or consumable parts.
• This guarantee is only Valid in the UK and Eire Only.

3
www.wickedgizmos.co.uk
WARNING:
Do not aempt to open any part of the power adaptor or plug.
WIRING SAFETY FOR UK USE ONLY
(Power adapters only)
Never open the power adapter, you risk geng an electric shock.
Only use the power adapter that is supplied with your product.
You must always connect the power adapter to the product before connecng to the mains power supply.
The power adapter must be used indoors only, and must not be subjected to damp condions.
The power adapter does not have any user serviceable parts.
If in doubt, consult a qualied electrician who will be pleased to do this for you.
If you need to remove the plug – disconnect it from the mains – and then cut it o of the mains lead and
immediately dispose of it in a safe manner. Never aempt to reuse the plug or insert it into a socket outlet
as there is a danger of an electric shock.

4
www.wickedgizmos.co.uk
• Check that the voltage of the
main circuit corresponds with
the rang of the appliance
before operang.
• Please ensure that the
appliance is used on a stable,
level, and heat resistant
surface.
• DO NOT immerse cords, plugs
or any part of the appliance in
water or any other liquid.
• DO NOT leave the appliance
unaended while it is
operang.
• Close supervision is necessary
when any appliance is used by
or near children or pets.
• This appliance can be used
by children aged from 8 years
and above and persons with
reduced physical, sensory or
mental capabilies or lack of
experience and knowledge
if they have been given
supervision or instrucon
concerning use of the appliance
in a safe way and understand
the hazards involved.
• Children shall not play with the
appliance.
• Cleaning and user maintenance
shall not be made by children
without supervision.
• Switch o at the wall socket
then remove the plug from
the socket when not in use or
before cleaning.
• If the supply cord or appliance
is damaged, stop using the
appliance immediately and seek
advice from the manufacturer
or its service agent or a
similarly qualied person.
• DO NOT let the cord hang over
the edge of a table or counter
or let it come into contact with
any hot surfaces.
• The use of accessory
aachments is not
recommended by the appliance
manufacturer apart from those
supplied with this product. DO
NOT use extension cords with
the appliance.
• DO NOT pull the plug out by the
cord as this may damage the
plug and/or the cable.
• DO NOT use this product
for anything other than its
intended use.
• This appliance is for household
use only.
• DO NOT carry the appliance by
the power cord.
• DO NOT use the appliance
outdoors.
PRODUCT SAFETY
When using any electrical appliance, basic safety precauons should
always be followed including the following:

5
www.wickedgizmos.co.uk
• DO NOT use in direct sunlight.
• DO NOT use in wet or damp
condions.
• DO NOT place the product on or
near sources of electromagnec
polluon, vibraon or where
the venlaon is poor as this
may cause damage to the
product or could interfere with
other products.
• DO NOT place containers lled
with water or any other liquid
on the top of the product as
this may damage the product.
• When handling electrical items
ensure that your hands are dry.
• Never disconnect the plug by
pulling the power cable as this
may damage the plug and/or
socket.
• If water has entered the body
of the product please switch
o at the wall socket and then
consult a qualied electrician
for an inspecon and /or repair.
• Should the product malfuncon
due to electrostac discharge,
switch o at the wall socket
and allow 30 minutes for the
charge to dissipate before
reconnecng the power supply.
• Ensure that there are no
metallic objects placed in the
internal space of the product as
this may damage the product
and cause a risk of electric
shock to the user.
• In the unlikely event the
appliance develops a fault, stop
using it immediately and seek
advice by emailing us at:
support@wickedgizmos.co.uk
HIGH VOLTAGE CLASS 1 LASER

6
www.wickedgizmos.co.uk
WHAT’S IN THE BOX
Instrucon Manual
Jukebox
3.5mm Aux Cable
Power Adapter
Remote
1. LCD Display
2. Disc Tray
3. Control Panel
4. LED Lights
5. Speakers
6. Aux in jacks/DC in jack/
Power ON/OFF switch (not shown)
Control Panel
1. CD Tray
2. LED Display
3. Power/Mode
4. Stop
5. Skip Backward
6. Volume -
7. Play/Pause
8. Skip Forward
9. Volume +
10. LED On/O
11. Open/Close
Rear Panel
1. DC Input Socket
2. AUX-IN 2 RCA (L)
3. AUX-IN 2 RCA (R)
4. FM antenna
5. AUX-IN 1
6
3
4
5
2
1
11
10

7
www.wickedgizmos.co.uk
BEFORE YOUR FIRST USE:
1. Remove the product from the box.
2. Remove any packaging from the product.
3. Please retain all packaging unl you have
checked and counted all the parts and the
contents against the parts list.
4. Your appliance is now ready for normal use.
Dispose of the packaging in a responsible manner.
Power/Mode: Long press to turn the jukebox
on and o.
Short press to switch between
CD, BT, FM, AUX-IN and RCA
mode.
LED On/O -
Open/Close: Long press to turn the LED lights
on and o.
Short press to open and close
the CD tray.
Play/Pause: Press once to play, press again
to pause playback.
Stop: Stops playback.
Skip forward: Press once to skip to the next
track.
Skip backward: Press once to skip to the
previous track.
Volume +: Press to increase the volume.
Volume -: Press to decrease the volume.
USING YOUR APPLIANCE
1. Connect the included mains power adaptor
into the DC input socket on the back of the
jukebox and then plug the adaptor into the
main power supply.
2. To turn the jukebox on, press and hold the
Power/Mode buon on the control panel
or press the Standby buon on the remote
control.
3. Short press the Power/Mode buon on the
control panel or use the Mode buon on the
remote control to move between the CD,
Bluetooth, FM, or Radio modes.
4. Adjust the volume using the Volume + and
Volume- buons on the remote control or by
pressing the Volume + and Volume - buons
on the control panel.
5. Switch the LED lights on or o by pressing
and holding the LED ON/OFF – Open/Close
buon on the control panel, or by pressing
the LED ON/OFF buon on the remote
control.
6. Set the jukebox to standby by pressing and
holding the Standby buon on the remote
control.

8
www.wickedgizmos.co.uk
CD PLAYER
1. Short press the Power/Mode buon on the
control panel or the Mode buon on the
remote control to select the CD funcon.
The LED screen will display ‘cd’.
2. Short press Open/Close on the control panel
or press the Open/Close buon on the
remote control to eject the CD tray. Press
the Eject buon again to close the tray once
you have placed your CD inside.
3. Press the Play/Pause buon on the remote
or control panel to begin CD playback.
4. Adjust the volume using the Volume + and
Volume- buons on the remote control.
5. Use the Skip Forward and Skip Backward
buons to skip tracks.
Repeat:
Press the repeat buon during playback to select
a repeat funcon.
Press repeat once to repeat 1 track. Press the
repeat buon twice to repeat all tracks.
Press the repeat buon three mes to turn o
repeat.
CD Programming:
Up to 20 tracks can be programmed in any order.
Before aempng to program, press the Stop
buon.
1. Make sure the CD funcon has been
selected and CD playback has been stopped
using the Stop buon.
2. Press the program buon.
3. Select the track you wish to program using
the skip buons.
4. Once the required track has been selected,
press the program buon to store the track
or song into memory.
5. Repeat steps 3 & 4 to store addional songs
or tracks into memory.
6. When all the desired songs or tracks have
been programmed, press the Play/Pause
buon to play the songs/tracks in the new
assigned order.
7. Press the Stop buon to stop programmed
playback.
8. Remove all programmed memory by
pressing the stop buon repeatedly.
Bluetooth:
1. Press the Power/Mode on the control panel
or press the mode buon on the remote
repeatedly unl the ‘bt’ shows on the LED
screen. The LED will ash unl a device has
been paired with the speaker.
2. Enable Bluetooth on your device to pair it
with your jukebox by selecng ‘I60017GW’
from the listed devices on your smart
phone/tablet. If a password is required,
press ‘0000’.
3. You can now play or skip songs using your
Bluetooth device, remote control or jukebox
control panel.
Radio:
1. Press the Power/Mode buon on the control
panel or press the mode buon on the
remote repeatedly unl you have selected
FM mode.
2. Ensure the FM antenna has been fully
extended.
3. Press the Skip Forward and Skip Backward
buons to select the desired FM radio
staon.

9
www.wickedgizmos.co.uk
4. Press and hold the Skip Forward or Skip
Backward buons to scan the radio staon.
The jukebox will stop scanning once it picks
up a radio staon.
5. Long press the Play/Pause buon to scan the
radio staon and save.
6. You can also press the Prog buon to save a
radio staon aer scanning.
7. Press the Stop buon to play a previously
saved radio staon.
AUX-IN 1:
Requires a 3.5mm Aux cable (included)
1. Connect one end of a 3.5mm cable to the
AUX-IN 1 jack, and connect the other end to
an MP3 player or other audio device.
2. Press the Power/Mode buon on the control
panel or the press the mode buon on the
remote control repeatedly to select AUX-IN
mode.
3. You can now play or skip songs using the
controls on your audio device.
AUX-IN 2 RCA Connecon:
Requires an RCA cable (not included)
1. Connect one end of a RCA cable (not
included) to the AUX-IN 2 jack, and connect
the other end to an external Audio/Video
device such as a TV, DVD player etc.
2. Press the Power/Mode buon on the
control panel or the press the mode buon
on the remote control repeatedly to select
RCA mode.
3. You can now play or skip songs using the
controls on your audio device.
LED Lights:
1. To turn the LED lights on, press and hold the
LED ON/OFF buon on the remote. To turn
the lights o, press and hold the LED On/O
buon.
2. Long press the LED On/O – Open/Close
buon on the control panel to turn the LED
lights on and o.
10
www.wickedgizmos.co.uk
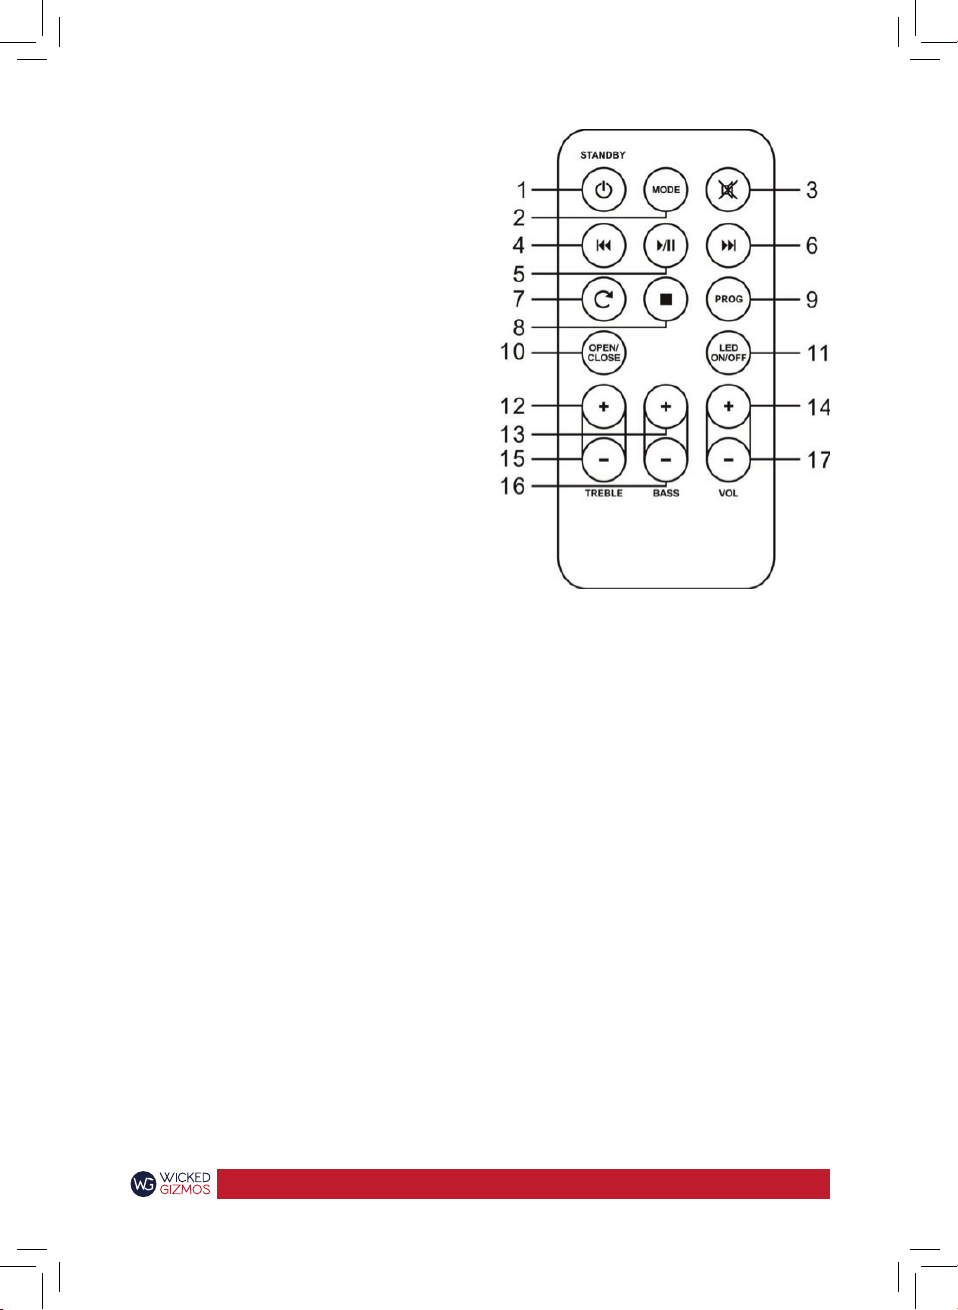
Using the Remote Control:
Before rst use, remove the clear plasc tab from
the rear of the remote control and discard.
To open the baery compartment, slide the tab
to the right and pull the tray out. Insert or replace
the exhausted baery with a 3 V CR2025 baery,
observing the polarity markings and then close
the tray.
Remote Control:
Aim the remote control directly at the remote
control sensor (IR) on the front panel. Do not put
any objects between the remote control and the
system while operang the unit.
1. Standby
2. Mode
3. Mute
4. Skip Forward
5. Play/Pause
6. Skip Backward
7. Repeat
8. Stop
9. Prog
10. Open/Close
11. LED On/OFF
12. Treble + and -
13. Bass + and -
14. Volume + and -
Mode: Press the source buon to move
between CD, Radio, Bluetooth,
Aux.1 and Aux.2 modes.
Mute: To mute all sound from the
jukebox, press the ‘Mute’ buon
on the remote control. Press it
again to resume the sound.
LED ON/OFF: Press ‘LED ON/OFF’ on the remote
to turn the lights on. Press the
same buon again to turn them
o.
Treble: Adjust the treble output by using
the treble + and – buons on the
remote control unl the desired
eect is achieved.
Bass: Use the bass + and – buons on
the remote control to adjust the
bass output unl the desired
eect is achieved.
Table of contents


