Viper 4708V User manual

OWNER’S GUIDE MODEL
The company behind Viper®Auto Security
Systems is Directed.
Since its inception, Directed has had one
purpose, to provide consumers with the fin-
est vehicle security and accessories avail-
able. The recipient of nearly 100 patents and
Innovations Awards in the field of advanced
electronic technology.
Quality Directed products are sold and ser-
viced throughout North America and around
the world.
Call (800) 876-0800 for more information
about our products and services.
Directed is committed to delivering
world class quality products and
services that excite and delight our
customers.
®
No oNe Dares
Come Close ®
4708V
©2012 Directed. All rights reserved. G4708VML 2012-12
Vista, CA 92081
www.viper.com

1
© 2012 Directed. All rights reserved.
Contents
Getting Started.................................................................................................... 2
Charging the Remote Control ................................................................ 2
Responder LC3 2-Way......................................................................................... 3
Advanced Remote Control Commands ................................................... 4
Fault Condition Alerts........................................................................... 4
Status Screen Icons.............................................................................................. 4
Basic Commands................................................................................................. 6
Lock ................................................................................................... 6
Unlock................................................................................................ 6
Remote Start........................................................................................ 6
AUX/Trunk.......................................................................................... 7
Responder LC3 Configuration............................................................................... 7
Navigating Menus and Options ............................................................ 7
Access Menu Items .............................................................................. 7
Remote Features (Main Menu) ............................................................... 8
Setup Remote menu.............................................................................. 8
Demo Mode...................................................................................... 11
Power Off......................................................................................... 12
Exit .................................................................................................. 12
Additional Remotes ........................................................................................... 12
Remote Start Features........................................................................................13
Disabling Remote Start ....................................................................... 13
Remote and System Operations.......................................................................... 13
Out of Range .................................................................................... 13
No Remote Output............................................................................. 13
1-Way Companion Remote Control .................................................................... 14
Using the 1-Way Companion Remote................................................... 15
Accessing Commands ........................................................................ 15
Button Auto Lock................................................................................ 15
Programming .................................................................................... 15
Battery Information (Responder LC3)................................................................... 17
Low Battery....................................................................................... 17
Low Battery Alerts.............................................................................. 18
Battery Life........................................................................................ 18
Battery Information (1-Way) ................................................................ 19
Battery Disposal ................................................................................ 19
Government Regulations .................................................................................... 20
Warning! Safety First......................................................................................... 22
Limited Lifetime Consumer Warranty................................................................... 23

2© 2012 Directed. All rights reserved.
Getting Started
Your Responder LC3 remote is powered by an internal rechargeable
battery that can only be serviced by an authorized Directed dealer.
Due to transit and storage time prior to your purchase, the battery
charge may have depleted. To ensure proper operation, check the
battery level and connect the battery charger if not fully charged. See
Battery Information and Status Screen Icons sections for more informa-
tion about the battery.
Charging the Remote Control
1. Plug the AC adapter into a 110V AC outlet. Insert the mini-USB
connector into the mini-USB port located on the side of the
remote control (see diagram under Responder LC3 2-way). The
text field will display CHARGE to indicate the remote control is
charging (The remote remains operational while charging and
can command the system).
2. Once fully charged the text field will display FULL .
3. The remote control is then ready for use. Disconnect the mini-
USB end from the remote control first and then the AC adapter
from the AC outlet.
Note If the battery is excessively depleted when the charger is
connected, functionality may be delayed while it charges to
the minimum voltage required to operate the display, after
which normal charging resumes.
3
© 2012 Directed. All rights reserved.
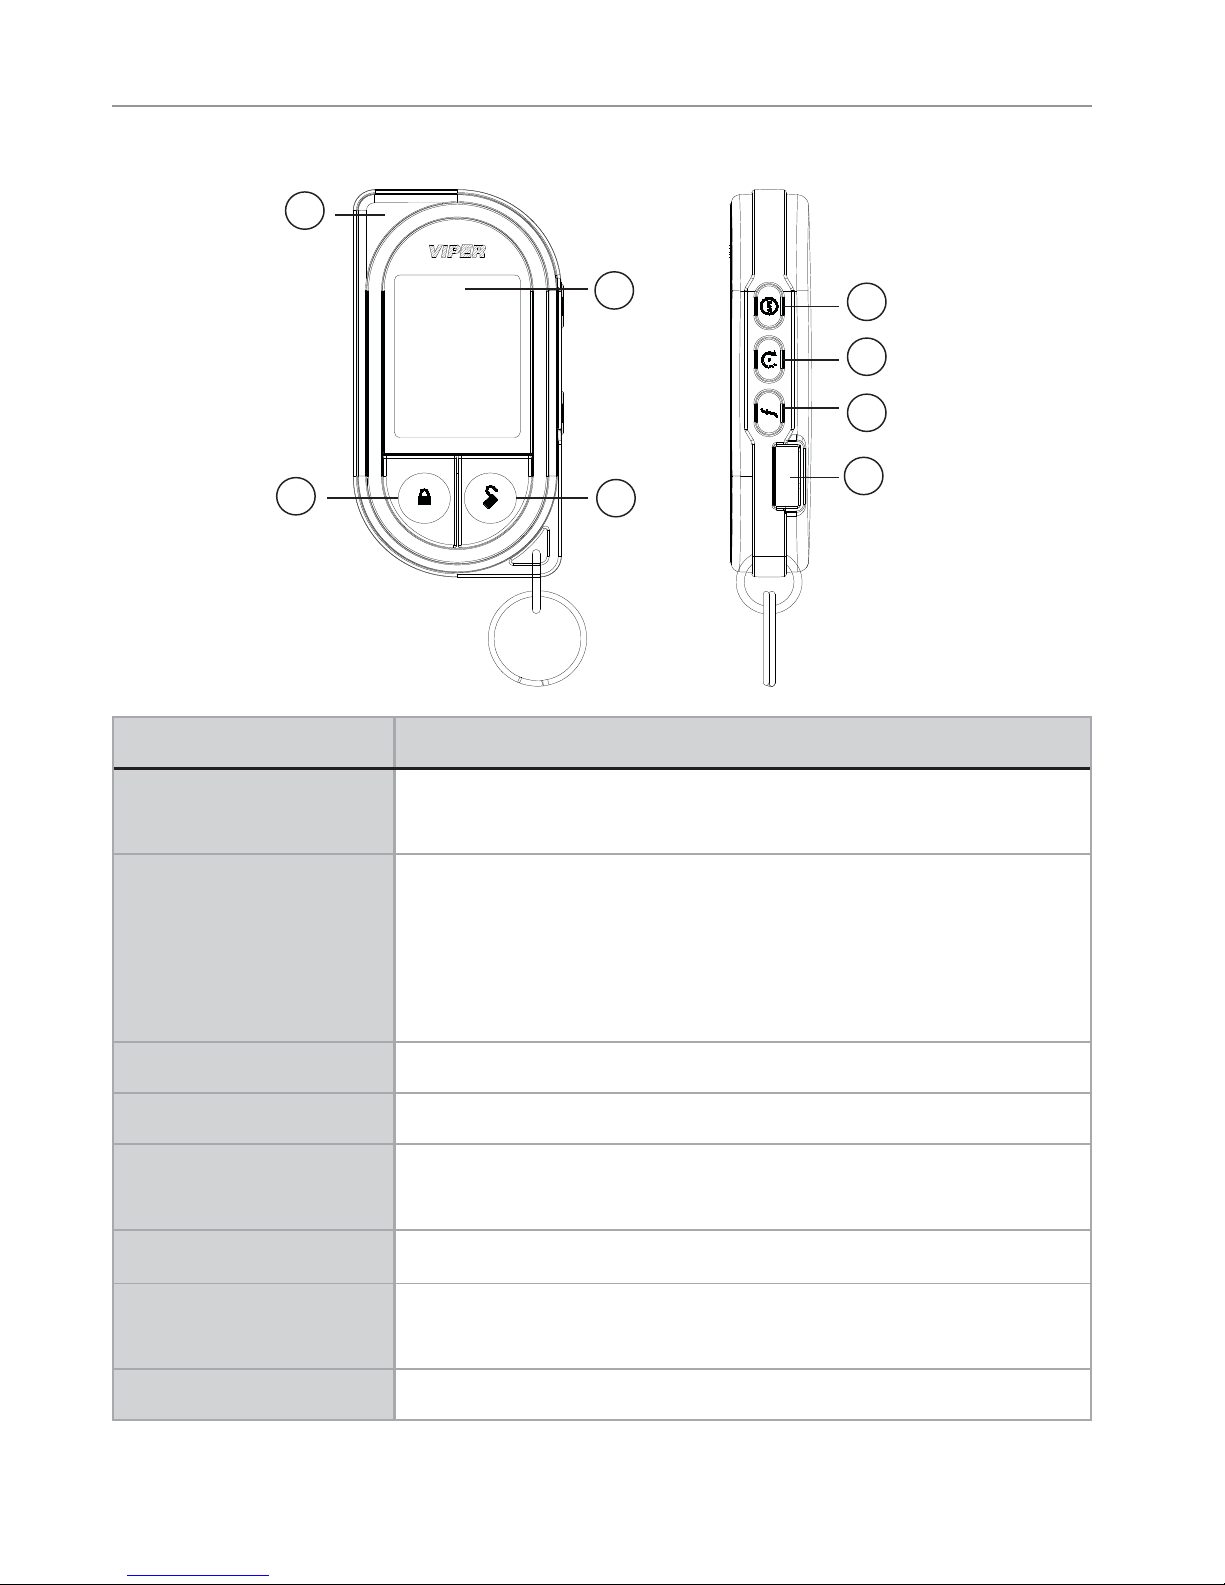
Responder LC3 2-Way
5
1
2
6
7
8
34
Feature Description
1 Internal Antenna: Used for transmitting and receiving infor-
mation
2 Status screen - the upper portion of the display contains status
icons for the System, Remote Start and Remote Control.
Text field - the lower portion of display - shows the Clock,
or Runtime, as well as Command confirmations, Page mes-
sages and programming menus
3 Press for one second to lock.
4 Press for one second to unlock.
5 Press and hold for 5 seconds to activate optional trunk
release or other optional accessory.
6 Press for one second to activate remote start.
7 Allows access to programming and modifies operation of
the other buttons.
8 The battery charger plugs into this port.

4© 2012 Directed. All rights reserved.
Advanced Remote Control Commands
Refer to the Quick Reference Guide for more information
on advanced remote start commands that are specific to
each vehicle.
Fault Condition Alerts
If, when performing a command, a condition exists that does not
allow activation of a Remote Start feature*, the NOT AVAILABLE or
REMOTE START ERROR text and a fault tone will play.
* Remote Start feature not available when the Remote Start status
is incorrect upon receiving the command. Refer to the notes in-
cluded in the command descriptions that address these faults or
go to Remote Start Error under the Remote Start Features section
for more details.
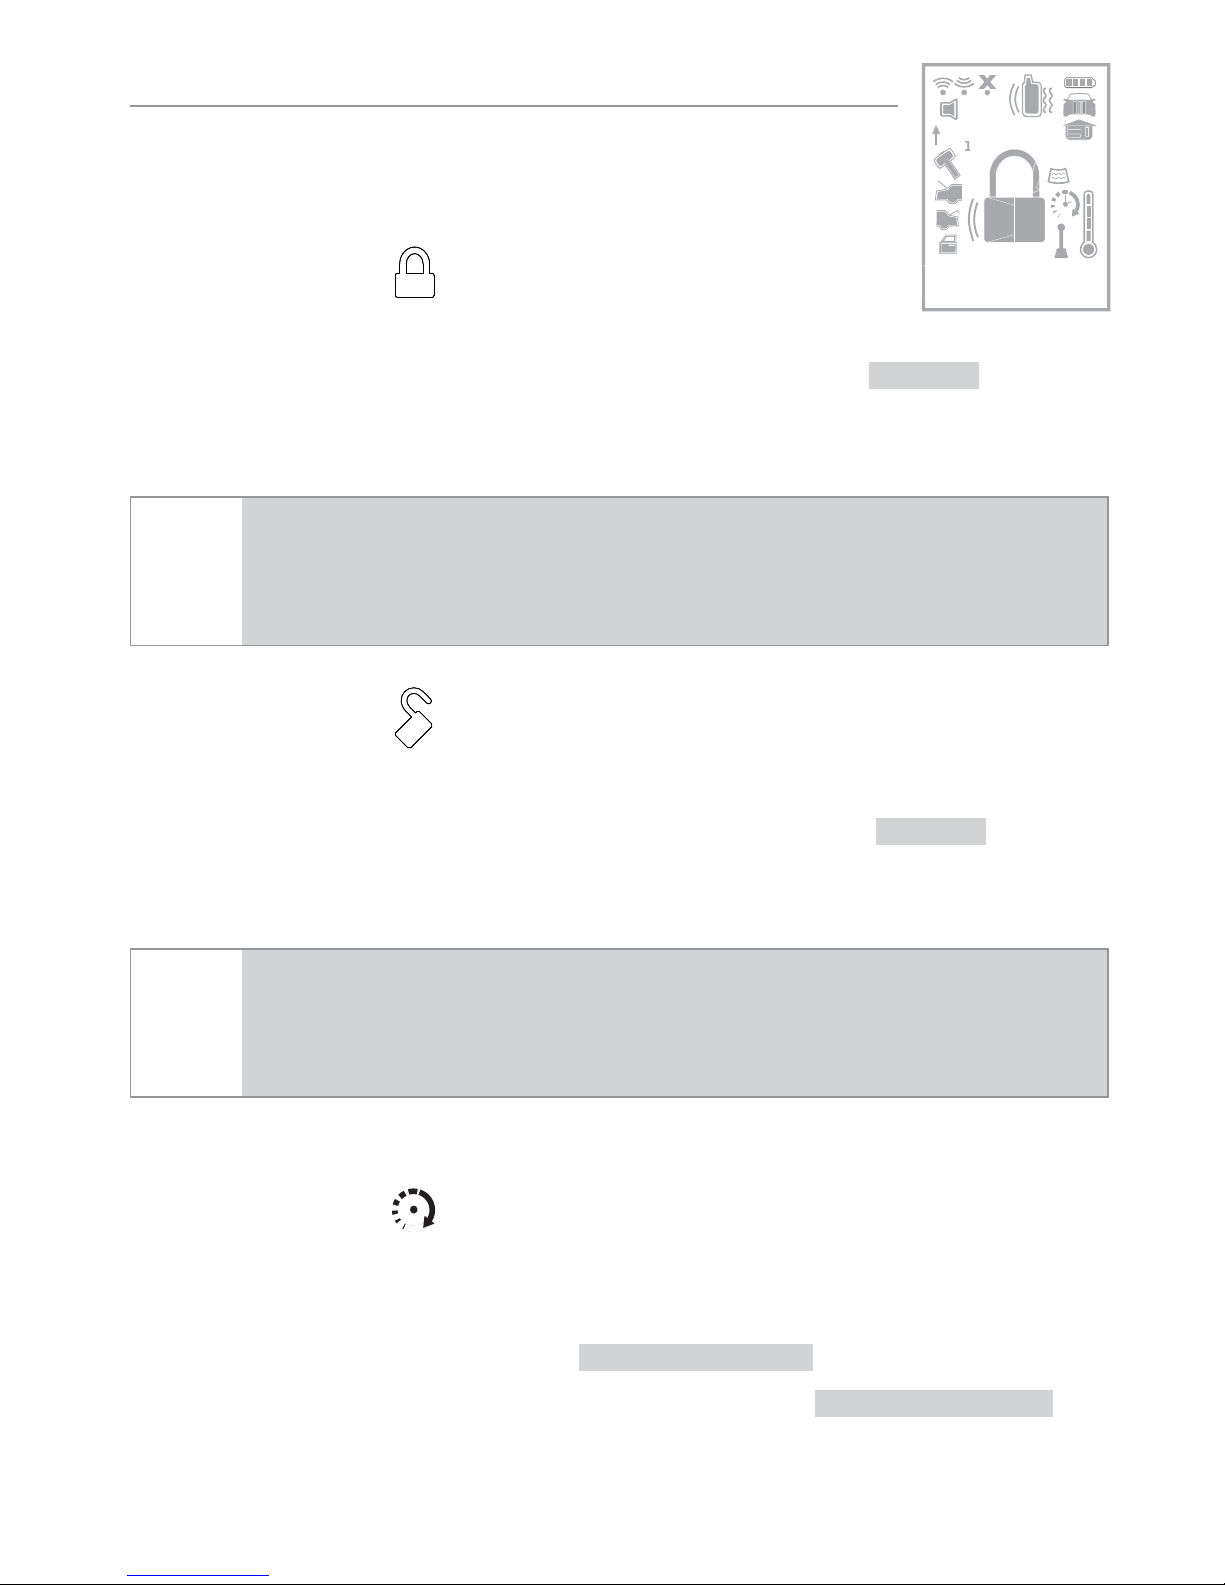
Status Screen Icons
1
ALL
Text Field
Status Screen
Icons
The table below describes all the status screen icons.

5
© 2012 Directed. All rights reserved.
Icon Description
System Status
Locked: The system is Locked.
Unlocked: The system is Unlocked.
Remote Start
Remote start is active, the engine is running.
On during Aux/Trunk channel activation.
On during Fault Report to indicate the Hood is open.
Remote Control Status
Bars indicate battery level is Full, ¾,½,¼ or Empty.
On while the remote control is transmitting a command.
On while the remote control is receiving a message.
On with Out of Range fault tone to indicate the remote failed to
receive a command confirmation.
Pager on: The remote will wake up to listen for messages.
Pager off: The remote will not wake up to listen for messages.
The remote will Vibrate when messages are received.
The remote will emit Beeps and Tones when messages are
received.
Text field Displays the Clock, Runtime, message text and feature menus.
6© 2012 Directed. All rights reserved.
Basic Commands
Lock
Press and release
The doors lock and parking lights flash once. The ARMED text and
beeps play to confirm and the System Status Icons update.
Note If the remote is set to Remote Keyless Entry (RKE), it will dis-
play LOCK/UNLOCK; otherwise, it will display ARMED/
DISARMED.
Unlock
Press and release
The doors unlock and parking lights flash twice. The DISARM text and
beeps play to confirm and the system status icons update.
Note If the remote is set to Remote Keyless Entry (RKE), it will dis-
play LOCK/UNLOCK; otherwise, it will display ARMED/
DISARMED.
Remote Start
Press and release
Activates (or if On, deactivates) the remote starter. The engine and
parking lights turn On and the REMOTE START ON text and tones play,
or the engine and parking lights turn Off and the REMOTE START OFF text
and tones play to confirm, the Remote Start status icons update.
1
ALL
6:30

7
© 2012 Directed. All rights reserved.
The icon will display in the status screen and the text field will
display the Runtime or Clock as programmed. If Remote Start fails to
activate, REMOTE START ERROR text and a fault tone play.
The runtime on the remote starter is predetermined based on vehicle
application. The remote starter will shut down when the preset runtime
times out or when any shutdown zone becomes active.
Note Refer to the Quick Reference Guide for more information.
AUX/Trunk
Press and hold AUX
The Trunk opens (if connected) when this button is pressed for 5 sec-
onds. The TRUNK text and tones play to confirm.
Advanced Commands
Note Refer to the Quick Reference Guide for more information
on advanced commands that are specific to each vehicle.
Runtime Reset
Press the button 1 time and then .
Re-starts the remote start rntime counter if remote start is active.

8© 2012 Directed. All rights reserved.
Responder LC3 Configuration
Operations of the Responder LC3 and how it communicates messages
are set in the configuration Main Menu. The following instructions will
direct you through the available programming options.
Navigating Menus and Options
Navigating menus and features, changing options, and exiting are
performed using the remote control buttons. The following instructions
discuss how to access and configure the settings.
Access Menu Items
1. Press and hold the button for 8 seconds, the remote will beep
once, MAIN MENU is displayed.
2. Release the button to display the Main Menu item list,
SETUP REMOTE is displayed.
3. The Main Menu has been accessed and configuring can begin.
Use the following process to view the Main Menu features, op-
tions and settings in the text field. The following actions are com-
monly used throughout the configuration operation.
s Press the AUX or buttons to change the feature or option
that is displayed in the text field.
s Press the button to choose the feature in the text field and
view its options. Press it when the desired feature or option
is in the text field to set it as the new setting.
4. To exit configuration: use the or buttons.

9
© 2012 Directed. All rights reserved.
Remote Features (Main Menu)
The following Main Menu list of features is available for configuration
of the remote control.
Setup Remote menu
Keypad Lock
Options: OFF ,AUTO
When OFF , the buttons do not lock and always perform a com-
mand when pressed. When set to AUTO , the remote buttons
lock after a 20 second lapse between buttons presses to prevent
unintentional operations. If a button is pressed when locked a
fault tone plays as an alert followed by unlock instructions in the
text field. To unlock the buttons, press the button followed by
the button. The unlock tones play and READY is displayed
in the text field, a command can now be performed.
Page Mode
Options: POWER SAVE ,OFF ,ON
Paging is how the Responder LC3 remote monitors your system’s
messages. POWER SAVE extends battery life by turning Paging
Off after 72 hours if the remote control is not used during this
period. Just press any button to resume system monitoring. When
set to ON it wakes up every few seconds to listen for pages
from the system. When set to OFF it does not wake up to receive
remote start or alarm trigger pages.
Page Alert
Options: TONE VIBE ,TONE ,VIBE ,SCREEN ONLY
Other manuals for 4708V
1
Table of contents
Languages:
Other Viper Car Alarm manuals

Viper
Viper 550 ESP User manual

Viper
Viper 5606V User manual

Viper
Viper 550HF User manual

Viper
Viper 5806V User manual

Viper
Viper 3102V User manual

Viper
Viper 5606V User manual

Viper
Viper SmartStart 3000 Series User manual

Viper
Viper 591XV User manual

Viper
Viper SmartKey VSK100 User manual

Viper
Viper 4103XV User manual


Popular Car Alarm manuals by other brands

Clifford
Clifford 3606X owner's guide

Ultra Start
Ultra Start 2500M SERIES install guide

Ultra Start
Ultra Start 650 Series owner's manual

Audiovox
Audiovox Prestige Platinum+ APS-511C owner's manual

Sparkrite
Sparkrite SRA8 Guide

Federal Signal Corporation
Federal Signal Corporation Pathfinder Siren Series Installation and maintenance manual


