Telycam TLC-50TC User manual

TLC-50TC
IP&Serial Joystick Remote Control Keyboard
User Manual
V1.0
J.BC.0205.0158


〓〓〓〓〓〓〓〓 Catalog 〓〓〓〓〓〓〓〓
1
1. Security Guidance........................................................................................................................2
1.1 Cautions........................................................................................................................................2
1.2 Notice......................................... ........ ..........................................................................................2
2. Check Before Using....................................................................................................................3
2.1 Packing List.................................................................................................................................3
2.2 The Wiring...................................... ........ ...................................................................................3
2.3 Bottom Dialing Switch...........................................................................................................3
3. Keyboard Description...............................................................................................................4
3.1 Functional Features..................................................................................................................4
3.2 Technical Specifications.........................................................................................................5
3.3 Product Size.................................................................................................................................5
3.4 Interface Description...............................................................................................................6
3.5 Display Screen Content..................... ........ ........ ..................................................................6
3.6 Button Function.........................................................................................................................7
4. Menu Setting...................................................................................................................................11
4.1 Operating Instructions..........................................................................................................11
4.2 Menu options............................................................................................................................11
5. Wiring diagram............................................................................................................................12
5.1 Connection in network mode.............................................................................................12
5.2 Connection in RS232 mode................................................................................................13
5.3 Connection in RS422 mode................................................................................................14
5.4 Connection in RS485 mode................................................................................................14
5.5 Cascade in RS232, RS422, RS485 mode.....................................................................15
6. WEB Configuration..................................................................................................................17
6.1 Login WEB................................................................................................................................17
6.2 Device Control.........................................................................................................................17
6.3 Network Paramete..................................................................................................................18
6.4 Firmware Upgrade.................................................................................................................18
6.5 Reset Options...........................................................................................................................18
6.6 Account.......................................................................................................................................19
7. Frequently Asked Questions.............................................................................................20

〓〓〓〓〓 1. Security Guidance 〓〓〓〓〓
2
1.1 Cautions:
●Before using the product, please read this safety instruction carefully, operate
strictly in accordance with the instruction manual, and keep this manual properly for
future reference.
●The standard power supply voltage is DC 12V and the rated current is 1A. It is
recommended to use with the power adapter that comes with the product.
●Please place the power cable and control cable in a place where they will not be
trampled on, and protect the cable, especially the connection part must be firm.
●Please use this product within the allowable temperature and humidity range.
Operating temperature: -10℃~ 50℃, humidity ≤ 80%.
●Do not spill liquids, especially corrosive liquids, on this product to prevent
danger.
●Please don't put heavy pressure, violent vibration and immersion during
transportation, storage and installation to avoid damaging the product.
●Please do not disassemble this product without permission, there are no parts
inside the machine that can be repaired by the user, please leave the work to qualified
maintenance personnel.
●Power supply polarity:
1.2 Notice:
█Please refer to the actual product, the user manual is for reference only.
█Please contact our Customer Service Department for the latest procedures and
additional documentation.
█In case of doubt or dispute in the user manual, the final interpretation of the
company shall prevail.

〓〓〓〓〓 2. Check Before Using 〓〓〓〓〓
3
2.1 Packing List
When opening the package, please check and confirm all the accessories that should
be provided.
Control keyboard·········································································· 1PCS
Power Adapter············································································· 1PCS
Power Cord·················································································1PCS
RS232 Cord················································································ 1PCS
User Manual··············································································· 1PCS
Certificate of Conformity································································ 1PCS
Warranty Card············································································· 1PCS
2.2 The Wiring
2.3 Bottom Dialing Switch
Bottom dial control
Mode
SW-1
SW-2
Description
1
*
OFF
ARM Upgrade
Mode
2
*
ON
Normal Working
Mode
SW-1 is reserved, no function defined

〓〓〓〓〓 3. Keyboard Description 〓〓〓〓〓
4
3.1 Functional Features:
★Support network interface, RS232 interface, RS422 interface and RS485
interface for control.
★Supports VISCA Serial, Pelco-P, Pelco-D, VISCA over IP, VISCA TCP, VISCA
UDP, ONVIF, and NDI protocols for control. (NDI protocol is optional.)
★With seven camera shortcut control buttons, to improve the speed of multiple
cameras control switching, convenient and fast.
★Support setting different protocols to control multiple cameras with different
protocols.
★Support one keyboard to control multiple cameras, also support multiple
keyboards to control a camera through the network interface.
★Adapts four-dimensional joystick to enable the control of the video camera PTZ
movement smoothly and flexibly.
★Support to set different levels of operation permission via OSD menu.
★Support button keys backlight, enable users to choose automatic backlight in
low light or dark environment.
★Support set, call and clear presets.
★Support daisy chain function. (Max 7 cameras are available)
★Support camera OSD menu setting.
★Supports standard POE (Power Over Ethe.
★Support 10M, 100M, 1000M adaptive network RJ45 connection.
★Support both Chinese and English menu interface.

〓〓〓〓〓 3. Keyboard Description 〓〓〓〓〓
5
3.2 Technical Specifications:
3.3 Product Size:
Parameters
Indicators
Control Interface
RJ45,RS232,RS422,RS485
RJ45
Ethernet port,POE(IEEE802.3af)
RS232
DB9 male connector
RS422
3.81 spacing terminal,T+,T-,R+,R-
RS485
3.81 spacing terminal,T+,T-
Support Protocols
VISCA Serial, Pelco-P, Pelco-D, VISCA over IP,
VISCA TCP, VISCA UDP, ONVIF, NDI(optional)
Upgrade Interface
Type-C
Display Screen
3.12" OLED screen, blue light, 256×64 pixels
Display Screen
Working power
12V⎓1A
Working Temperature
-10℃~50℃
Working Humidity
20%~80%
Storage Temperature
-20℃~60℃
Storage Humidity
0~90%
Size
320.5mm×156.5mm×118mm
Weight
1.05kg
〓〓〓〓〓 3. Keyboard Description 〓〓〓〓〓
6
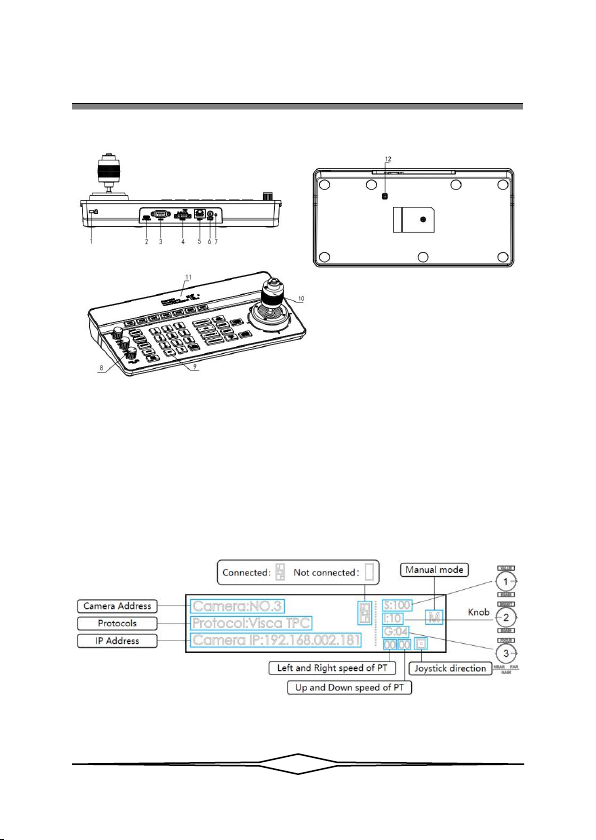
3.4 Interface Description:
1. Lock hole
5. Network interface
9. Button
2. Upgrade interface
6. Power interface
10. Joystick
3. RS232 interface
7. Indicator light
11. Display screen
4. RS485 interface
8. Adjusting knob
12. Dipswitch
3.5 Display Screen Content:

〓〓〓〓〓 3. Keyboard Description 〓〓〓〓〓
7
3.6 Button Function
3.6.1 Shortcut Selection Area
【CAM1】~【CAM7】Select the corresponding camera.
3.6.2 Adjustment Knob Area, 3A Setting Area
【AE MODE】There is the word “AUTO” next to the button AE MODE. When
the "AUTO" light is on, automatic exposure mode is triggered; when the "AUTO"
light is OFF, the other modes manual exposure, shutter priority, iris priority, bright
priority can be selected, and at this time, the three knobs on the left side of the
keyboard can adjust the shutter, iris, gain, bright and other parameters.

〓〓〓〓〓 3. Keyboard Description 〓〓〓〓〓
8
【WE MODE】There is the word "AUTO" next to the button WE MODE. when
the "AUTO" light is on, it is AUTO and ATW mode; when the "AUTO" light is off,
the manual, indoor and outdoor, Sodium lamps, fluorescent lamps mode can be
selected, then the camera red gain and blue gain can be adjusted through the first two
knobs on the left side of the keyboard.
Table of contents


