
SpaceraiL LEVEL 1 - CLASSIC User manual

Spacerail ©2021
LEVEL 1 CLASSIC
PRODUCT AND CONSUMER WARNING
CHOCKING HAZARD: This product contains small parts and is not intended for children under 3.
• This product is intended for users over the age of 8.
• To avoid choking, keep small parts away from children.
• Use caution, this product contains parts with sharp edges.
• Only insert the steel marbles into the elevator to avoid damage to the product.

Spacerail ©2021
PARTS INCLUDED
Keep parts together to avoid misplacing them.
ARM COMPONENTS
Arm
5 PCS
Arm Sheath
5 PCS
Arm Holder A
5 PCS
Arm Holder B
5 PCS
Arm Wrench
5 PCS
LOOPS, TURNS, AND SPLIT COMPONENTS
Corner A
3 PCS
Corner B
3 PCS
Rail Splitter
1 PCS
Corner Stand
6 PCS
Loop
1 PCS
Loop Stand
1 PCS
Rail Clip
29 PCS
BASE COMPONENTS
Base Base Holder A Base Holder B
3 PCS 2 PCS 2 PCS
RAIL COMPONENTS
Rail Joining
2 PCS
Steel Marble
2 PCS
Rail
5000 mm
REQUIRED TOOLS & ITEMS NOT INCLUDED
Wire Cutters or Utility Scissors
Pen or Marker
1 battery - size AA
Ruler (in centimeters)
ELEVATOR COMPONENTS
Gear Box
1 PC
Shaft (300mm)
9 PCS
Elevator Helix
12 PCS
Elevator Ring
3 PCS
Elevator Cover
1 PC
Elevator Stand
3 PCS
Gear Box Stand
1 PC

Spacerail ©2021
1PREPARE THE COASTER COMPONENTS
AARMS
Prepare the Loop: Find 2 Rail Clips
and attach them to both sides of
the Loop. Find the Loop Stand and
attach it to the bottom of the Loop.
Prepare the Turns: Find 2 Rail Clips
and attach them to both sides of
the Turn. Repeat this process with
all 6 Turns.
BLOOP & TURNS NOTE:
Corner A and Corner B are
distinguished by the letters on the
bottoms, as shown below.
CRAIL SPLITTER Prepare the Rail Splitter: Find the Rail
Splitter and 3 Rail Clips. Press the Rail Clips
on each of the Rail Splitter openings. Set
aside for coaster construction.
Step 1: Attach 1 Arm Holder A and
1 Arm Holder B with 1 Arm Sheath.
Insert 1 Arm into Arm Holder A.
Step 2: Align Arm in Arm Holder
with the Arm Wrench. Attach as
shown in step 3.
Step 3: Turn the Arm and Arm
Wrench counter-clockwise to lock
the arm in place.

Spacerail ©2021
Step 3: Once the
Corkscrew is built, attach
3 support shafts to the
Gear Box.
DELEVATOR
Step 2: Find the Elevator Helix
pieces and connect each
piece along the shaft.
NOTE:
There should not be any
space between the Gear
Box and the Helix. If the
Helix is not installed
correctly the Elevator will
not run.
Step 1: Find the Gear Box and
attach the shaft.
Step 6: Place the Elevator Cap onto
the top of the elevator assembly.
Step 7: Attach the 3 Elevator Guards
to each of the Elevator Rings.
Step 5: Place the 3 Elevator
Rings onto the Shafts.
NOTE:
The Steel Marble will fall
out of the elevator if it
enters too fast.
Step 4: Connect 1 Rail
Clip to each Elevator
Ring. Make sure
brackets on elevator
ring are right side up.

Spacerail ©2021
EBASE ASSEMBLY
2
1
2
Step 1: Locate all 3 Base blocks and
interlock together as shown below.
Step 2: Locate the Base Holder A and
Base Holder B and attach them to the
base blocks for a secure hold.
2CONSTRUCT THE COASTER
ABUILD THE COASTER SHAFTS
NOTE:
Illustration of Shafts are 1:2.3 or (approximately 43%) of scale.
A B C D E
63 mm
264 mm
204 mm
261 mm
194 mm
47 mm
159 mm
238 mm
129 mm
101 mm
240 mm
199 mm

Spacerail ©2021
LOOP
A
BC
DE
ELEVATOR
BINSTALL THE COASTER SHAFTS, LOOP AND ELEVATOR
Step 2: Attach Gear Box Stand to Gear Box.
BACK
FRONT
LOOP
LOOP STAND
Step 1: Attach Loop Stand to the bottom of the Loop.
PUSH
ONOFF
LOOP PART
SHAFT A
SHAFT B
SHAFT C
SHAFT D
SHAFT E
Step 3: Attach the Loop, Gear Box and all the Shafts to the Base.

Spacerail ©2021
CCUT THE RAIL TO SIZE
26mm
73mm
79mm
162mm
174mm
275mm
313mm
416mm
420mm
487mm
Step 1: Measure each section and mark the cutting point with a pen.
Step 2: Cut each section according to your measurement making sure to cut
at a 90 angle.
Tip: Cut longer rails slightly larger to be on the safe side. Longer rails can
always be cut a bit shorter. This will help you to avoid having to recut and not
having enough rail.
NOTE:
Illustration of rail lengths is 1:2.84 or
(approximately 35%) of scale.

Spacerail ©2021
Rail Joining for Custom Designs: To adjust your
designs with the rails, use the Rail Joinings to increase
the length of your rail sections.
Connecting Rails to Arms: To install the Rails, press
them into the Arm as shown. You should hear a click
sound when the Rail is locked in place.
Angling the Arms: Install the Arms at the angle of the
incline the Rails will travel along.
Railroad Stability: On the longer segments of Rail, attach
Rail Ties as needed to maintain stability along the track.
Smoothing the Elevator Exit: When installing the elevator
exit rails, pull the rails close to the Elevator Helix to ensure
the steel marble enters to the roller coaster easily.
Smooth Rails for Eicient Travel: Make sure the Rails
connect smoothly and are free of bumps or kinks.
Corner Stability: To provide extra stability on the
Corners, place Corner Stands directly below the Corners.
Rail and Corner Connections: Cut the rail at a 45°
angle where it meets a Corner. This will help smooth out
the transition as the steel marble ies around the track.
3CONSTRUCT THE ROLLER COASTER
ASSEMBLY TIPS & TRICKS
Spacerail ©2021
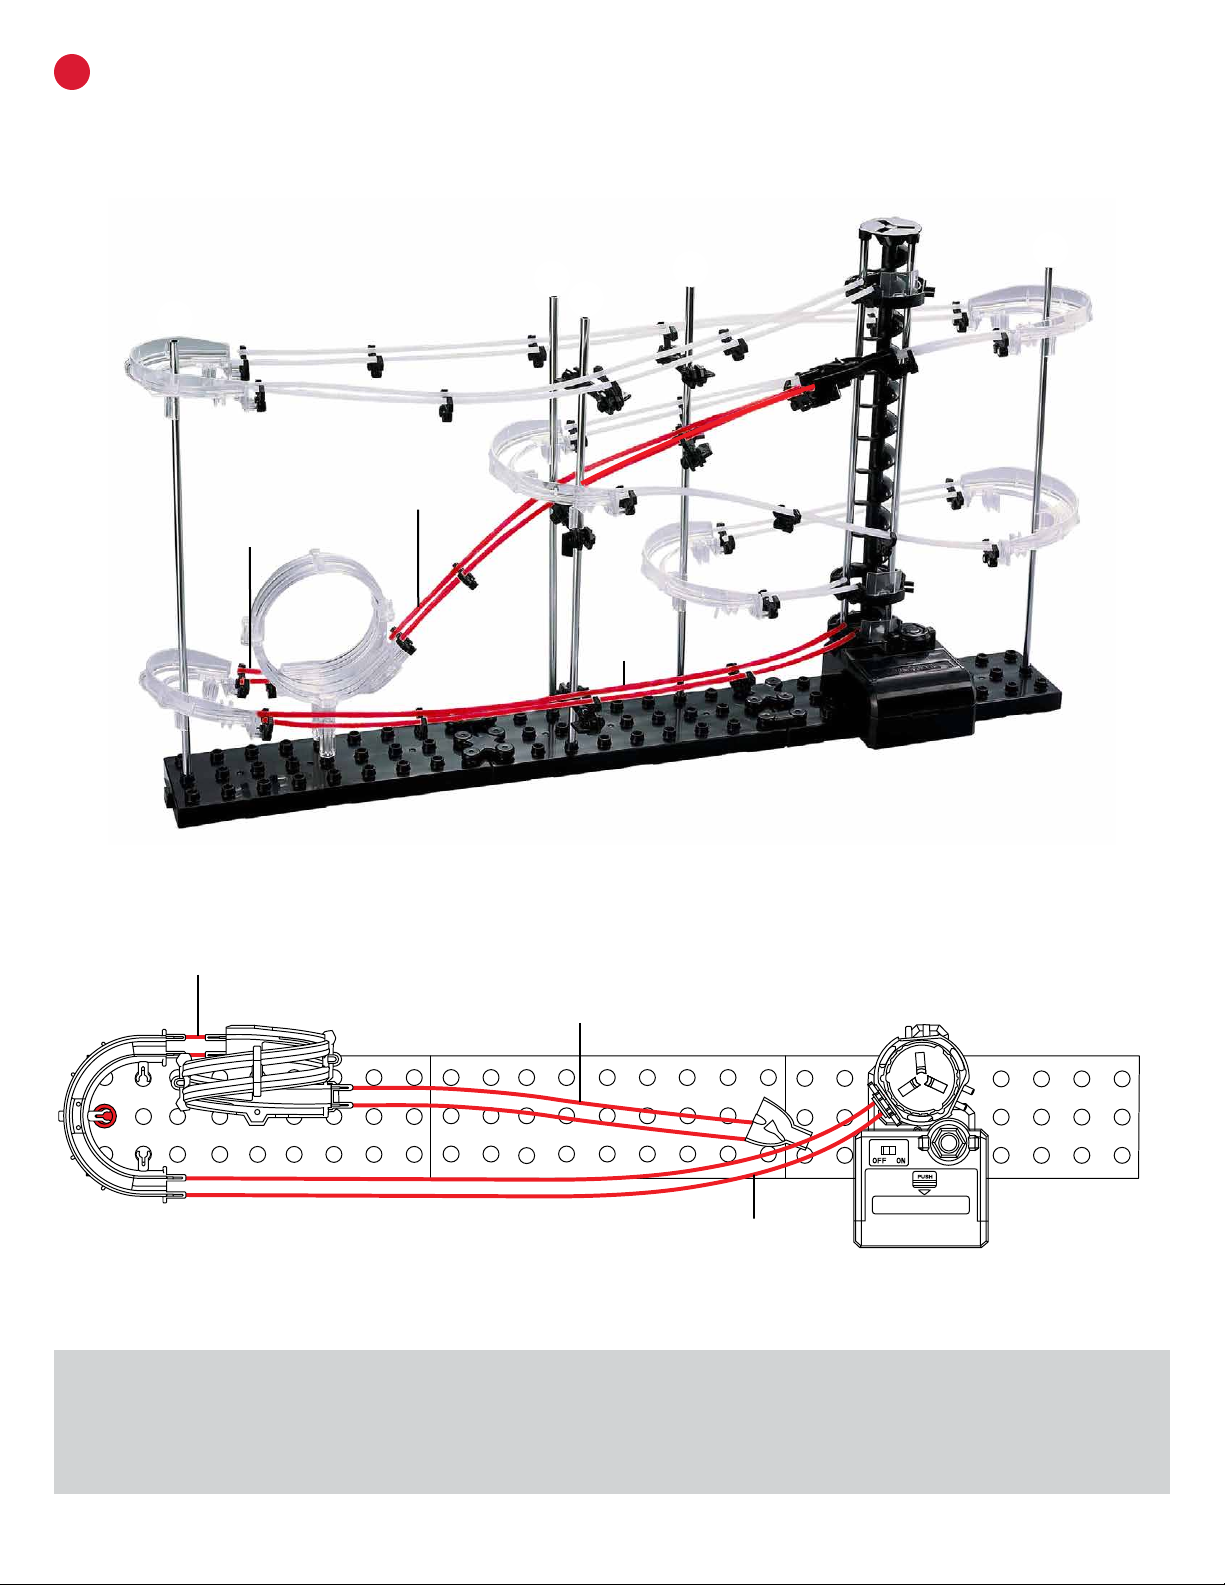
ACONNECT THE RAILS STEPS 13
Use the following illustrations and pictures as references for attaching the rails to the structure.
Step 1: Connect both A Rail sections between the Loop and the back bottom corner of Shaft A.
Step 2: Connect both G Rail Sections between the entrance of the loop and the front section of the Split.
Step 3: Connect both I Rail sections between the bottom entrance of the elevator and the bottom front corner of Shaft A.
A
BC
DE
STEP 1
(A Rail)
STEP 2
(G Rail)
STEP 3
(I Rail)
STEP 1
A Rail) STEP 2
(G Rail)
STEP 3
(I Rail)
A

Spacerail ©2021
BCONNECT THE RAILS STEPS 46
Use the following illustrations and pictures as references for attaching the rails to the structure.
Step 4: Connect both J Rail sections between the back top corner of shaft A and the back top corner of Shaft E.
Step 5: Connect Both H Rail sections between the exit of the Elevator and the front top corner of Shaft A.
Step 6: Connect both B Rail sections between the front top corner of Shaft E and the single side of the Split.
STEP 4
J Rail
STEP 5
H Rail STEP 6
B Rail
A
BC
DE
STEP 4
(J Rail)
STEP 5
(H Rail)
STEP 6
(B Rail)
EA
Other manuals for LEVEL 1 - CLASSIC
1
Table of contents
Other SpaceraiL Toy manuals






