RTS 10D1 User manual

ASSEMBLY INSTRUCTIONS
RTS 10D1 TICKET OFFICE
CONGRATULATIONS
Congratulations in choosing a unique product to enhance your slot car track
diorama. This can truly be described as a product born from a love for slot cars.
Buying this product have made you a member of a very special family, yes you are
not dealing with a faceless business, but rather a family of slot car fanatics.
We have put hours of skill and more importantly love into this product and it is
wonderful to share our love for slot cars with you. May you enjoy the build and have
years of joy having it as part of your trackside diorama.
This is a fictitious building, but not unlike the ticket offices that you will find at most
race tracks. We believe that this will enhance your trackside diorama and help to
transform it into a realistic scaled reality for you to enjoy.
WARRANTY
This product is covered by a comprehensive money-back warranty to ensure your
absolute satisfaction with your purchase.
WHO ARE WE?
This product is brought to you by racetrackscenics.com. If you have not done so
already, please visit our website today. You are also most welcome to visit the
Facebook pages “Race Track Scenics Slot Car Scenery” and “Johan Malan” to
keep up to date with the latest developments and the launching of exciting new
products that may be in the pipeline.
You can contact Kevin Sharpe on
Text in the USA 586 549 2879
WhatsApp 1-586-549-2879
for any assistance that you might require. Your feedback and a photo or two of your
trackside addition will really be appreciated. We love to share in your joy!

WHAT IS IN THE KIT?
In this kit you will find all the laser cut pieced needed to assemble this product. The
pieces are still intact in the sheets as they were cut to ensure that all the parts are
there. Some of the loose bits inside pieces may have been removed, but they are not
part of the finished product. In the section “FAMILIARIZE YOURSELF” below, you
will find diagram(s) that identify and explain each piece (component) that you are
about to assemble. In the section “PREPARING THE CUT PIECES” below, you will
learn how to proceed to prepare the pieces for assembly.
WHAT YOU WILL NEED
We have specifically designed this product so that it is easy to assemble with only a
few basic tools. You will need the following:
a screwdriver
a sharp hobby knife
some glue
a few toothpicks
a few earbuds can be handy
a paintbrush or sponge roller and paint or a rattle can or two with spray paint.
There are really two schools of thought as to the right glue to use. Some people
prefer a rapid setting glue like most gel super glues, while others prefer a slower
setting glue like ordinary cold wood glue. Sometimes more than one part must be
assembled almost simultaneously and then a forgiving glue makes life a bit easier.
Other times you may want a quick fit and then the rapid setting glue is the obvious
choice. Our advice is to see what works best for you, there are no right or wrong,
both types will produce a sturdy structure.
You will only need a small amount of glue and remember to look for the surfaces that
will be in contact in the end and do not only apply glue to the lugs and sleeves. The
latter restrict movement in one plane, but the glue fix it in the perpendicular plane.
Using a toothpick is a handy way to apply glue and an earbud can be used to dab
away any excess of glue (especially if you use wood glue).
If parts must be at a right angle, you can use any object to assist you in obtaining a
square finished product in the end.

FAMILIARIZE YOURSELF
Have a look at two photos of the finished unpainted product.

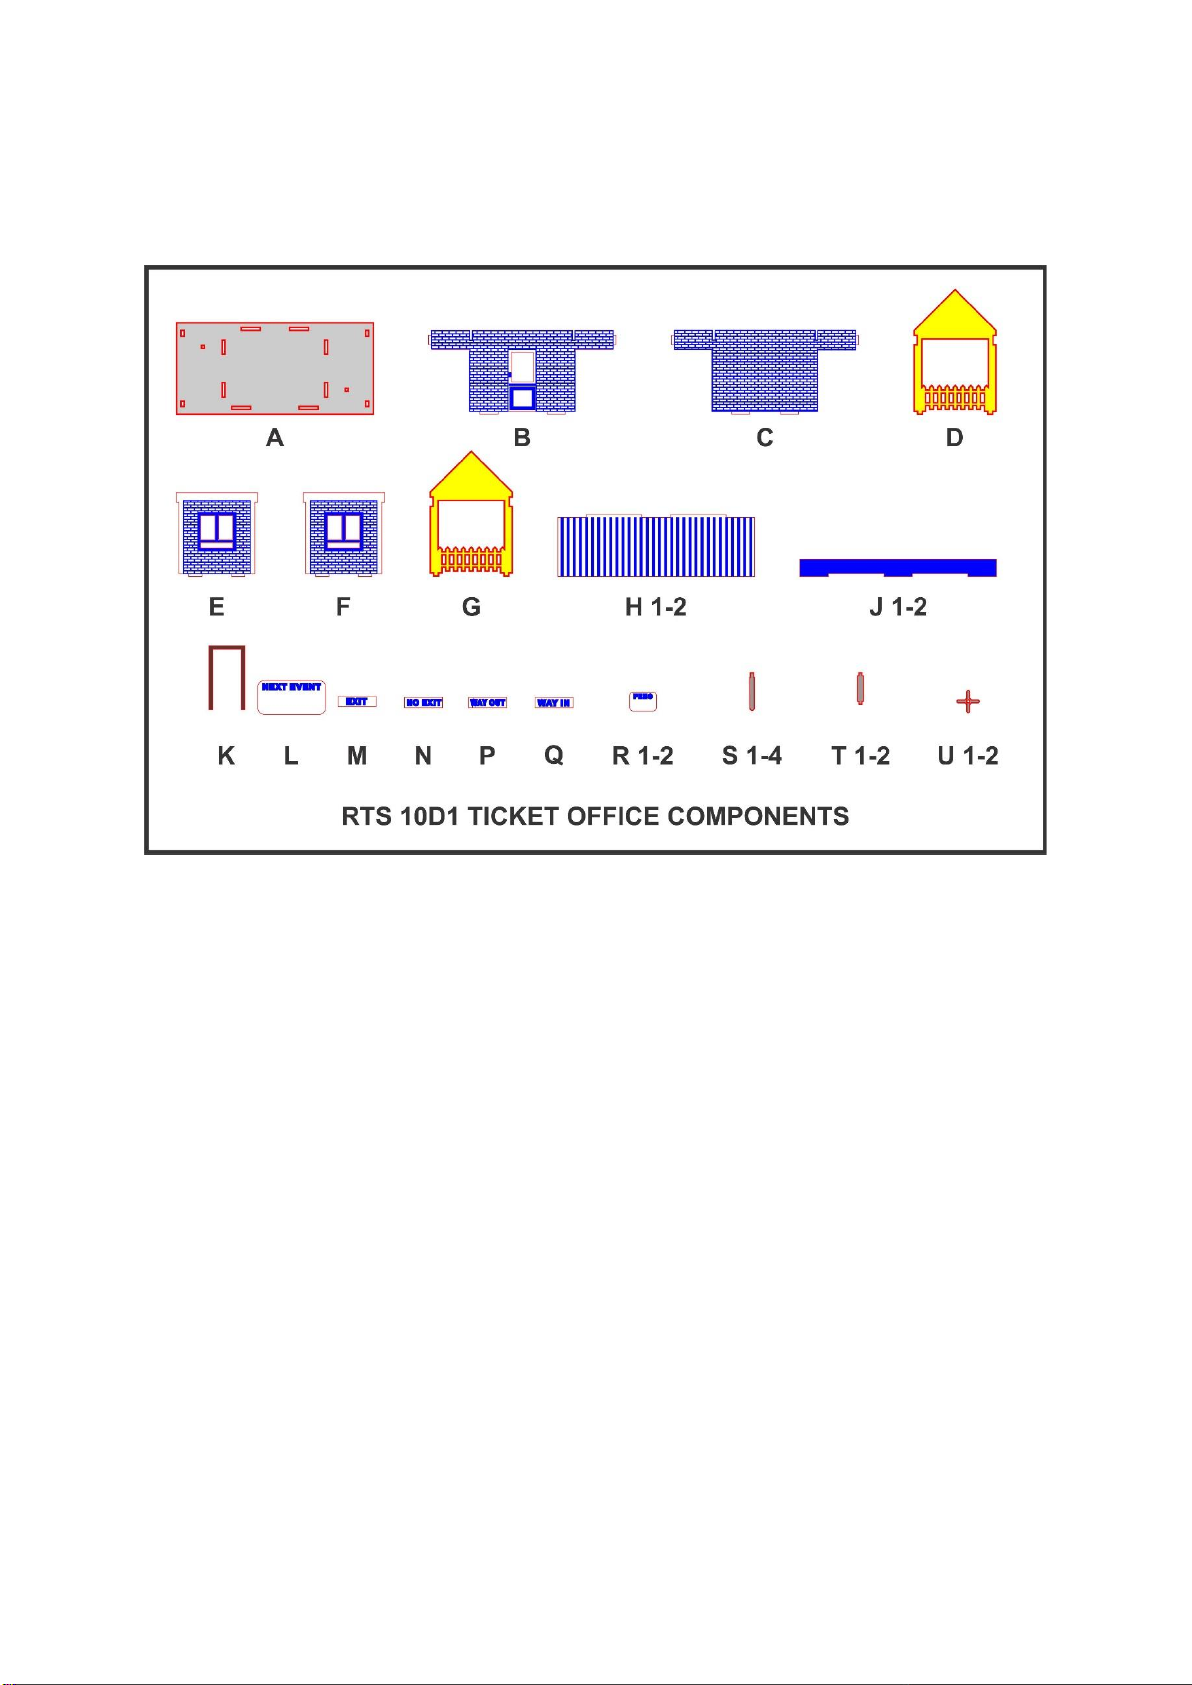
Now have a look at the next diagram where all the laser cut parts are shown and
numbered from Ato U. Next, we will identify which is which and where they fit in.
The main structure consists of six walls, the front wall (B), the rear wall (C), two side
walls (E) and (F) and then two gable walls (D) and (G), All the walls fit into the floor
(A). There are two roof panels (H 1-2) and also two roof ridge caps (J 1-2) (not
shown in the photos).
There is a doorframe (K) for the front door and a number of notice boards (L), (M),
(N), (P), (Q) and (R 1-2). Pedestrian access is regulated with the assistance of four
booms (S 1-4) and two turnstiles, made up of (T 1-2) and (U 1-2).
PREPARING THE CUT PIECES
Firstly, remove all the laser cut parts from the sheets. The sheets can be discarded.
Clean the edges of the parts if there are any tiny bits where the parts were fixed to
the sheets. This can be done with your knife or even your thumb nail.
We recommend that you start by sanding your finished product with a very light
sandpaper to ensure a smooth finish for the end product.

WORD OF ADVICE
We would strongly advise you to do a quick dry assembly before you start gluing the
laser cut parts together. Lay out all the parts on your work surface and make sure
that the parts are not upside down or mirrored. In most instances it will make no
difference, but in others it may be crucial to ensure a perfect product in the end.
Our laser cut parts are specifically cut to very fine tolerances to ensure a snug fit and
therefore it is wise to check all fits before gluing parts together. You may need to trim
a lug here and there to make assembly easier.
PAINTING YOUR PRODUCT
We would strongly advise you to finish the product with paint or wood stain to make
them as appealing as possible. The parts should be primed (2 coats) and painted
before final assembly. Spray paint can also be used to get a very smooth finish (the
finished product in the photo above has been spray painted). Oil or water-based
paint can be used and specialised paints like chalk paint can be used to give unique
finishes.
Generally, it is highly advisable to paint/spray before gluing. You may not be able to
get to the inside of the structure after it is glued together. Covering all the parts that
must not be painted or sprayed with the same colour can be a tedious process. Pre-
painting will avoid this process.
Please ensure that no paint clog a slot where a lug must fit in later. The tolerances
are often so tight that too thick a layer of paint may cause problems. It is our
experiences that a small foam roller instead of a brush, will produce a better finish
and far less clogging of sleeves.
Applying a base or undercoat normally makes life easier afterwards. Two coats of
primer are advisable because the MDF absorbs a lot of paint. Using a single colour
for the undercoat of all parts works quite well from personal experience. You can
choose the paint of your preference, whether it is oil or water based. Cleaning
brushes and rollers are just so much easier if you use a water base paint. A chalk
paste can give a unique finish to walls and give a weathered look if so desired. If you
prefer to protect the paint work of your structure you can always apply a clear spray
coat.
LET’S GET STARTED WITH THE ASSEMBLY
We can start by gluing the nubs of the of six walls, the front wall (B), the rear wall
(C), two side walls (E) and (F) and then two gable walls (D) and (G) into the slots in
the floor(A). Have a look at the photos above to ensure that the walls have the right
orientation to each other. You will notice that four of the walls have a brick pattern
engraving that must face outwards.

All that is needed for a proper sturdy assembly is some glue where any two parts
touch each other. The lugs that fit into the slots stop any movement, but the glue
holds all the parts together. The walls must therefore have glue at the bottom and
the sides where the parts touch each other (only a little bit of glue is required). Gently
press down on the walls to ensure a snug fit. Ensure that all the walls are plumb and
square before the glue fully sets.
The two roofing sections (H 1-2) fit into each other and needs to be glued where they
make contact with one another. The engraving must face upwards. The roof pitch is
45° and therefore the two roof panels will be square to each other. On top of
the roof are two roof ridge caps (J 1-2) that also fits into each other and needs to be
glued together. The roof ridge cap can now be glued to the roof itself. The
assembled roof can now be placed in position. This needs not be glued down to the
walls and will then facilitate access to the inside of the building at a later stage (fitting
lights or adding furniture, etc.).
The two turnstiles are assembled by gluing parts (T 1-2) and (U 1-2) together and
then the end of the poles can be glued into the slots in the floor (A). There are also
four booms (S 1-4) than can be glued into the slots in the side walls. Look the photos

again to assist with the positioning. Lastly the doorframe (K) for the front door and
the notice boards (L), (M), (N), (P), (Q) and (R 1-2) can be glued onto the structure.
Again, the photos will give the required guidance. As to which goes where.
FINISHING & BRANDING
We leave the finishing to your imagination and your taste. Do whatever you think will
transform this into a structure that will compliment your race track diorama.
CONCLUSION
We sincerely hoped you have enjoyed this assembly and finishing. Please remember
to give us some feedback and either send or post some pictures of this product on
your track.
Table of contents
Other RTS Toy manuals

RTS
RTS 5M10 REIMS-GUEUX MARSHAL HUT User manual

RTS
RTS 7C6 User manual

RTS
RTS 2T13 BRANDS HATCH LEADER BOARD User manual

RTS
RTS 10D3 REIMS-GUEUX BLOC HABITAT User manual

RTS
RTS 3P6B User manual

RTS
RTS 1S1A MILANO HAIRPIN PAVILION User manual

RTS
RTS 10D12C User manual

RTS
RTS 7C7 User manual

RTS
RTS 2T17 REIMS-GUEUX COMMENTATORS LOOKOUT User manual

RTS
RTS 10D9 User manual

RTS
RTS 1S10 ESSO STAND User manual

RTS
RTS 2T12 LIQUI MOLY CAMERA NEST User manual

RTS
RTS 8A61 User manual

RTS
RTS 1S18 VINTAGE SPECTATOR OUTLOOK User manual

RTS
RTS 3P2 User manual

RTS
RTS 8A36 User manual

RTS
RTS 10D5 User manual

RTS
RTS 4B5A LAGUNA SECA STRAIGHT ON STAIRCASE... User manual

RTS
RTS 4B4 LAGUNA SECA 4 User manual

RTS
RTS 17C5 User manual