
Rowenta RWAC1900C User manual

CLIMATISEUR
IDRAAGBARE AIRCONDITIONER
PT
ES
NL
FR
EN

WARNINGS
2
EN
PLEASE READ THE FOLLOWING INSTRUCTIONS
CAREFULLY BEFORE USING THE APPLIANCE AND
KEEP FOR FUTURE REFERENCE.
• This appliance is intended for domestic household use only
and should not be used for any other purpose or in any
other application, such as for non-domestic use or in a
commercial environment.
• This appliance can be usedby children aged from 8 years
and above and persons with reduced physical, sensory or
mental capabilities or lack of experience and knowledge if
they have been given supervision or instructionconcerning
use of the appliance in asafe way and understand the
hazards involved. Children shall not play with the
appliance. Cleaning and user maintenance shall not be
made by children without supervision.
• If the supply cord is damaged, it must be replaced by the
in order to avoid a hazard.
• For the details concerning the method of cleaning, please
see section “Cleaning and Maintenance” on pages 13&14.
• The battery must be removed from the appliance before it is
scrapped.
• The battery is to be disposedof safely.
• Batteries are to be inserted with the correct polarity.
• Exhausted batteries are to be removedfrom the product.
• Attention should be drawn to the environmental aspects of
battery disposal. Don’t throw used batteries in dustbin.
Please contact your retailer in order toprotectthe
environment.
• The batteries (batteries installed) shall not be exposed to

3
EN
• Refrigerant leakage contributes to climate change.
Refrigerant with lower global warming potential (GWP)
would contribute less to global warming than a refrigerant
with higher GWP, if leaked to the atmosphere.
• This product contains a refrigerant uid with a GWP equal
to 3. This means that if 1 kg of this refrigerant uid would be
leaked to the atmosphere, the impact on global warming
would be 3 times higher than 1 kg of CO2, over a period of
100 years. Never try to interfere with the refrigerant circuit
yourself or disassemble the product yourself and always ask
a professional.
• For disposal of the appliance:
To prevent possible harm to the environment or human
health from uncontrolled waste disposal, recycle the
appliance responsibly to promote the sustainable reuse of
material resources, the refrigerants and the ammable
insulation blowing gases. The disposal should only be done
through public collection points; contact the waste
treatment center nearest your home for more details on the
correct procedures for disposal.
• For installation, servicing:
The appliance should be placed on a horizontal oor and
keep the ventilation freely.
Don’t try to replace or repair any components by yourself,
ask the service agency for help if necessary.
• For handling:
Always handle the appliance to avoid any damage.
• This product contains non-uorinated greenhouse gas
(hermetically sealed) which is dangerous for the
environment and contributes to global warming if
released to the atmosphere.
• Refrigerant type: R290 Global warming potential (GWP): 3
4
IMPORTANT SAFETY INSTRUCTIONS EN
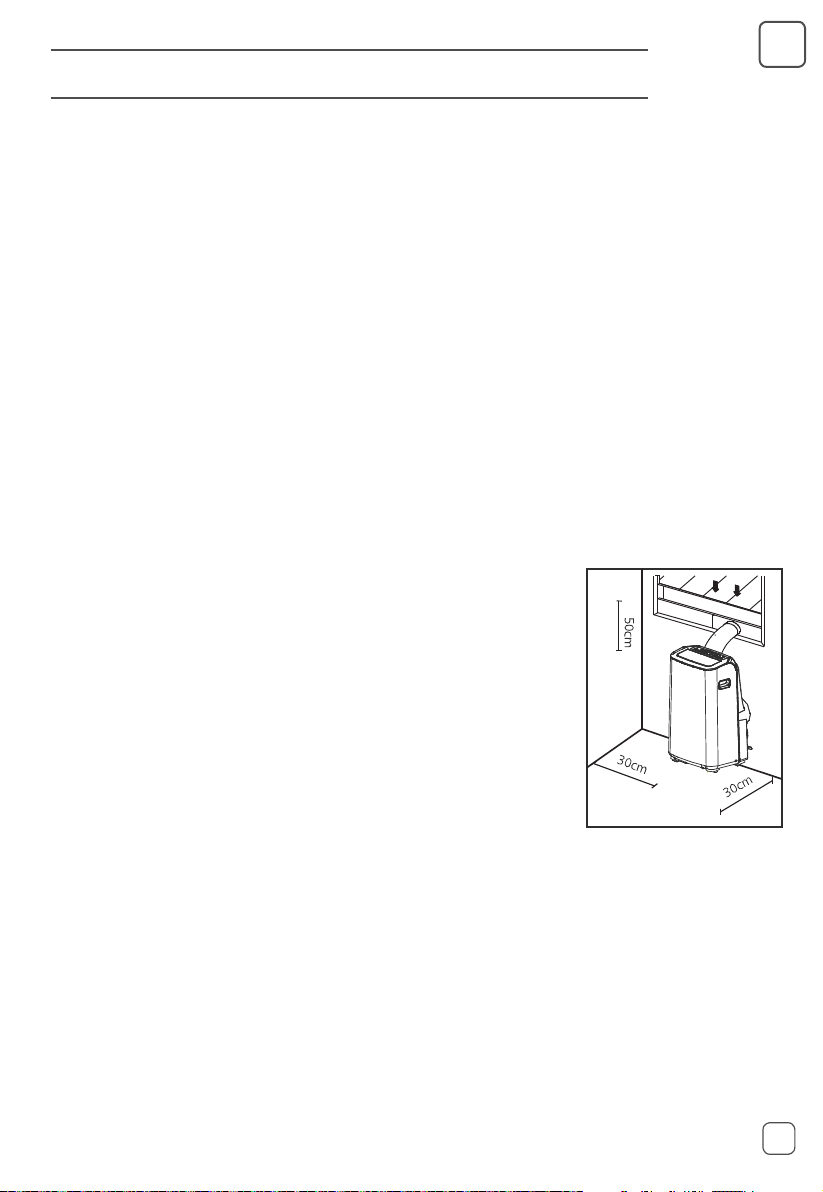
• Only use the appliance in the upright position on a at level
surface and at least 30 cm from the wall or any objects.
• Read all instructions.
• To protect against re, electric shock and personal injury, do
not immerse cord, plugs, or the unit in water or other liquid.
• Turn o and disconnect the appliance from the mains
socket when it is not in use and before cleaning.
• Transport and store the appliance in an upright position only.
• Always place the appliance on a stable, level surface.
• Do not cover or insert any objects into the air inlet and/or
outlet.
• Do not use the appliance in a wet room, such as a bathroom
or laundry room to avoid the risk of electrical shocks.
• Do not place articles on the appliance.
• Do not use the appliance with wet or
damp hands.
• Do not use the appliance in the presence
of ammable substances or vapours such
as alcohol, insecticides, petrol, etc.
• Do not use the plug to start and stop the
appliance. ALWAYS use the control panel
to start and stop the appliance.
• The lter must be used with the appliance
at all times.
• Be sure to drain water with the drain tube
connected to the middle drainage point
when the appliance is operated in heating
mode.

5
EN
• The batteries should only be replaced by adults. Do not allow
children to use the remote control unless the battery cover is
attached.
• Replace the battery only with the same type. The batteries
used in the remote control are two AAA 1.5V batteries which
are accessible and can be replaced.
Battery handling and usage
Remote control batteries (included):

4
3
1
2
5
12
11
10
9
87
6
1. Control panel
2. Louver
3. Caster
4. Carrying handle (on both sides)
5. Upper air inlet grille
6. Air outlet grille
7. Power cord outlet
8. Power cord wraps
9. Bottom drainage point
10. Power plug sockets
(use only when storing the appliance)
11. Lower air inlet grille
12. Upper drainage point
Unit Adaptor *Screw and anchor
(only for wall installation)
*Security Bracket
and Screw
*Window Slider
Adaptor
*Wall Exhaust
Adaptor A
(only for wall
installation)
*Window Slider A
*Window Slider B
Drain Hose
Wall Exhaust Adaptor B(with cap)
(only for wall installation)
Power Cord Buckle
Remote Control
and Battery
*Foam Seal A (Adhesive)
*Foam Seal C (Non-adhesive)
*Foam Seal B (Adhesive)
Exhaust Hose
*Bolt
NOTE: Items with * are optional. Slight variations in design may occur.
EN
6

CONTROL PANEL
Buttons:
+/-
Swing Setting timer Setting mode Adjusting
temperature or
time
Setting fan
speed
Sleep mode ON/OFF
Indicator lights:
Timer on Timer o
Dehumidification mode AUTO Fan mode
Cooling mode
Temperature in Celsius
High fan speed Medium fan speed
Temperature in Fahrenheit
Small fan speed
Sleep mode Power ON
REMOTE CONTROL
Buttons:
Adjusting
temperature
Setting mode Power ON Setting fan speed
Swing
Setting timer ON
Sleep mode
Swinging display blacklight on/o
Short cut
Setting timer OFF
Battery installation: Remove the cover on the back of the remote control and insert two batteries with“+”and “-”marks
correctly aligned.
Caution: Remove the batteries if the remote control is not in use for long periods of time.
The functions work the same as the control panel of the appliance.
7
EN

8
INSTALLATION
This appliance is a portable air conditioner, which can be moved from room to room.
EN
Windows Installation Kit
1. Install the unit adaptor and window slider adaptor on both sides of the exhaust hose.
2. Connect the exhaust hose assembly to the back of the appliance. Slide in the hose until it is locked in place.
3. Adjust the window sliders as per width or height of your window and insert the supplied bolt to fix at the desired position.
There is a hole where the exhaust hose will be inserted. Make sure this hole is not blocked.
4. Cut the foam seals A and B to the proper lengths and attach them to the window frame.
INSTALLATION
Exhaust hose
Unit adaptor
Hook
Unit adaptor
Hole
Window slider A Window slider B
Bolt
Lower groove Make sure the unit adaptor is
inserted into the lower groove
of the air outlet.
Hook groove
Window slider adaptor
Exhaust hose assembly
Foam seal B
(shorter)
Foam seal A Foam seal A
OR
Foam seal B
(shorter)
Note: The window kit is only designed to be installed with sliding windows.
The window kit is not designed or to be used with casement style windows.

9
EN
5. Connect the window slider assembly to the window.
6. Cut the non-adhesive foam seal C to match the width (or height) of the window. Insert the seal between the glass and
the window frame to prevent air and insects from getting into the room.
7. If desired, install the security bracket with 2 screws supplied.
8. Insert the window slider adaptor into the hole of the window slider.
OR
OR
OR
OR
Window slider A Window slider B

EN
Wall Installation Kit
1. Install the unit adaptor and wall exhaust adaptor A on both sides of the exhaust hose.
Exhaust hose
Unit adaptor
2. Connect the exhaust hose assembly to the back of the appliance.
3. Cut a 125mm hole into the wall for the wall exhaust adaptor B.
4. Secure the wall exhaust adaptor B to the wall using the supplied anchors and screws.
5. Connect the exhaust hose assembly to the wall exhaust adaptor B.
Wall exhaust adaptor A
Exhaust hose assembly
Expansion anchor position
Wall exhaust adaptor B
Adaptor cap
NOTE: Do not bend the exhaust hose.
NOTE: Cover the hole in the
wall using the adaptor cap
when not in use.
10
Table of contents
Languages:
Other Rowenta Air Conditioner manuals


Popular Air Conditioner manuals by other brands






Fujitsu
Fujitsu Inverter ASBA30JFC operating manual

Toshiba
Toshiba RAS-M10SMUV-E installation manual

Daikin
Daikin FXLQ20MAVE Operation manual

Hitachi
Hitachi RAS-E24CAK instruction manual

CIAT
CIAT Magister 2 Series Installation, Operation, Commissioning, Maintenance

Bestron
Bestron AAC6000 instruction manual





