Ravpower Power 7 Wi-Fi SD/USB Storage kit User manual

Power 7 Technology Corporation – Wi-Fi SD/USB Users Manuals v1.0
1
PRODUCT OVERVIEW
The portable Wi-Fi SD/USB (code name: Combi) device allows you to convert any SD memory cards and
USB external storage devices into a Wi-Fi accessible media.
Simply insert your SD memory card into the SD slot or connect your USB external storage into the built-in
USB port. Switch the unit on and you can now wirelessly access your videos, music, photos, data and
stream it to your iPad®, iPhone®, tablets, smartphones, and notebooks. There is no need to worry about
running out of space on your mobile devices
For maximum portability, the Wi-Fi SD/USB device has a built-in rechargeable battery. Simply plug it into
any available USB port on your computer to charge. As simple as 1-2-3, you are ready to enjoy your
device and no waiting needed. With the SD or External USB connected, the portable Wi-Fi SD/USB can
be accessed while the battery is charging.
Product Features
Supports SDXC, SDHC and SD memory cards. SD adapter is needed for MicroSD and MiniSD.
Supports USB 1.1, 2.0 and 3.0 External Storage devices
Stream media over WiFi enabled devices up to 5 users simultaneously
Access and stream your music, videos, photos and data from the SD memory cards or from USB
external storage using the free custom mobile app supporting iOS and Android operating systems
Built-in micro USB port for charging and data sync function
Up to 7 Hours of continuous battery life*
Search function to locate and access your file much faster
Internet access capability via wireless, supporting 802.11 b/g/n speeds
Supports LAN data-shares and cross-platforms including Windows, Mac, Linux, iOS and Android.
Support multiple NSA, including samba/webdav

Power 7 Technology Corporation – Wi-Fi SD/USB Users Manuals v1.0
2
Support multiple platform client tools, including Windows/Mac/Linux/iPad/iPhone/Android
*Battery life subject to normal usage conditions and configurations.
A. To function as SD memory card reader. Simply connect the device into the computer’s available
USB port. The device will automatically mount on your desktop or inside the “My Computer”.
The Wi-Fi SD/USB works as SD memory card reader and charges the internal battery.
B. To function as a Bridge. Press power switch button on, it works solely as a Wi-Fi SD/USB external
HDD/Flash.
C. Wireless mode, Wirelessly connect the device to your existing wireless router to have internet
access as illustrated below.

Power 7 Technology Corporation – Wi-Fi SD/USB Users Manuals v1.0
3
1. Hardware and Accessories
The Power 7 Wi-Fi SD/USB Storage kit includes the following:
2 Product Parameters
2.1 Product Dimensions
Dimension:118mm (L) X 79mm (W) X 14mm (H)
2.2. Product Specification
CPU:

Power 7 Technology Corporation – Wi-Fi SD/USB Users Manuals v1.0
4
Model: Ralink RT5350
Frequency: MIPS24KEc 360MHZ
Wi-Fi:
Standard: 802.11 b/g/n,
Frequency: 2.4 GHZ
Speed: 72Mbps at 20MHz
150Mbps at 40MHz
USB Interface:Micro USB 2.0 for data transfer and charging
Battery:
Capacity:3000mAh
Charging current: supports 500mA, 800mA and 1.5A
Power consumption:
A) SD Card Read/Write*:2W
B) Stand-by (HDD Sleep Mode): 1.5W
Emission (EMI) Safety and Other Certifications: FCC (Class B) and CE
*Varies on SD card type.
2.3. Operating Temperature
The normal operating temperature of the device is between 5°C to 35°C. Non-operating temperature is
between 0° to 60°C.
The operating humidity (non-condensing) is between 5% to 90% and non-operating humidity is 5% ~ 90%
(non-condensing).
3. Minimum Hardware Requirements
Internet Connection
PC Operating System Requirements
oWindows: XP/Vista/Windows 7
oMac: OS X 10.5.0 and later
oOthers: Fedora 12 (Linux) and late
PC Web Browser
oWindows: Supports Internet Explorer 7.0 and higher version
oMac: Supports Safari 3.0 and higher version
oOthers: Firefox 3.5 and higher version
Router or Switch

Power 7 Technology Corporation – Wi-Fi SD/USB Users Manuals v1.0
5
4. Product View
5. Interface
5.1USB Interface:Micro USB 2.0 Interface can connect to the computer to transmit data and charge
the device.
5.2 USB host interface: connect USB memory for WIFI accessing, or connect smartphone for
charging.
5.3 SD slot: insert SD card for WIFI accessing.
5.4 Power BUTTON: Turns the device on/off.
5.5 Reset Button: set the device to Default Factory configuration.
5.6 LED Panel
Battery Level LED:

Power 7 Technology Corporation – Wi-Fi SD/USB Users Manuals v1.0
6
1. Green Steady Light: The battery power is >30%.
2. Red Steady Light: The battery power is <30% and >10%.
3. Red Fast Flash: The battery power is depleting and will soon shut down.
4. Green Slow Flash (every 2 seconds): The battery is charging.
5. Green Slow Flash (every 1.5 seconds): The device is shutting down.
6. LED off: The device is powered off.
WiFi LED
1. Blue LED shows the system initiation state. It starts flashing in the process of initiation, and it
stops flashing when the system initiation completes.
2. Blue Steady Light: WiFi is ready.
3. The LED light is off for the following situations:
A. Device is on, but the WiFi signal is unsteady.
B. Device is off.
C. Device is in Mobile HDD Mode and the WiFi is off.
Internet LED
A. Green Steady Light: WiFi signal is good. .
B. No Light: Not connected to the Internet.
R/W LED
1. On WiFi disk mode
A. Blue Steady Light: Memory connection is successful.
B. Blue Flashing Light: Memory is reading or writing.
2. Card reader mode
A. Blue Steady Light: Connected to USB2.0
B. Blue Flashing Light: Connected to USB2.0 and is reading or writing.
6. Storage Installation
6.1 SD Memory Card
Note: Do not touch the exposed connectors on your SD memory card. Prior to installing the SD memory
card, make use the Wi-Fi SD/USB device is switched off and no USB external storage is connected.
Installing the SD memory card is very simple. Locate the SD memory card slot. Simply insert the
memory card as seen on the image below. Gently push the memory card all the way in until it locks into
its place.

Power 7 Technology Corporation – Wi-Fi SD/USB Users Manuals v1.0
7
Press the power button to switch on the device. Wait for few seconds to complete the initialization
process and your SD memory card is ready to use.
6.2 USB External Storage
Note: Prior to installing your external USB Storage, make use the Wi-Fi SD/USB device is switched off
and no SD memory card installed.
Locate the USB port on the device. Simply insert the USB connector into the USB port of the device as
seen the image below.
Press the power button to switch on the device. Wait for few seconds to complete the initialization
process and your USB external storage is ready to use.
7. PC Client Software Installation

Power 7 Technology Corporation – Wi-Fi SD/USB Users Manuals v1.0
8
Our included Client Utility software is the only software that you will need to install on your computer. This
software utility allows you to easily search and look for your Wi-Fi SD/USB that is connected from your
home network.
1. To install the software, simply double-click on the “NAS Client Login Utility v2.2 Setup” executable
file and follow the on-screen instructions.
2. Once the installation is complete, double-click on the “NAS Client Login Utility V2.2” icon on
your desktop to launch the software utility.
8. Using Personal Computer
8.1. Connecting Wirelessly to PC
Switch-on the Wi-Fi SD/USB by pressing the power button at the front panel. Wait for few minutes until
the Wireless LED has remained lit. Enable the Wi-Fi feature on your PC and open the Wireless Network
Connection. Select the WiFiDisk wireless connection (default wireless SSID: WiFiDisk and with no
password). Once you have successfully connected to your Wi-Fi SD/USB, you may now run the “NAS
Client Log In Utility V2.2” to search for your device and complete the configuration process.
8.2. PC Client Login Utility
Double-click the “Client Log In Utility V 2.2” icon on your desktop. The software utility will search all the
connected devices in your network as seen on the screenshot below.

Power 7 Technology Corporation – Wi-Fi SD/USB Users Manuals v1.0
9
If you do not find the WiFiDisk on the list of devices connected in your network, click on the “Refresh”
button to refresh the device list.
Select the WiFiDisk on the list, then click on the “Log In” button to enter the web interface as seen on the
image below.
Type the default User Name as admin and leave the User Password as blank. Click on the “Log In”
button to access the Web Management Interface.
If you choose to click on the “My Storage” button, enter the admin login name and password to gain access
to the Wi-Fi SD/USB. Once successfully logged-in, it automatically mount the storage area of the Wi-Fi
SD/USB onto your desktop
8.3. Wi-Fi SD/USB Configuration using PC
Once your Wi-Fi enabled-PC is successfully connect to the Wi-Fi SD/USB, using the “NAS Client Login
Utility V2.2” will allow you to access our built-in Web Management Interface and configure your device.

Power 7 Technology Corporation – Wi-Fi SD/USB Users Manuals v1.0
10
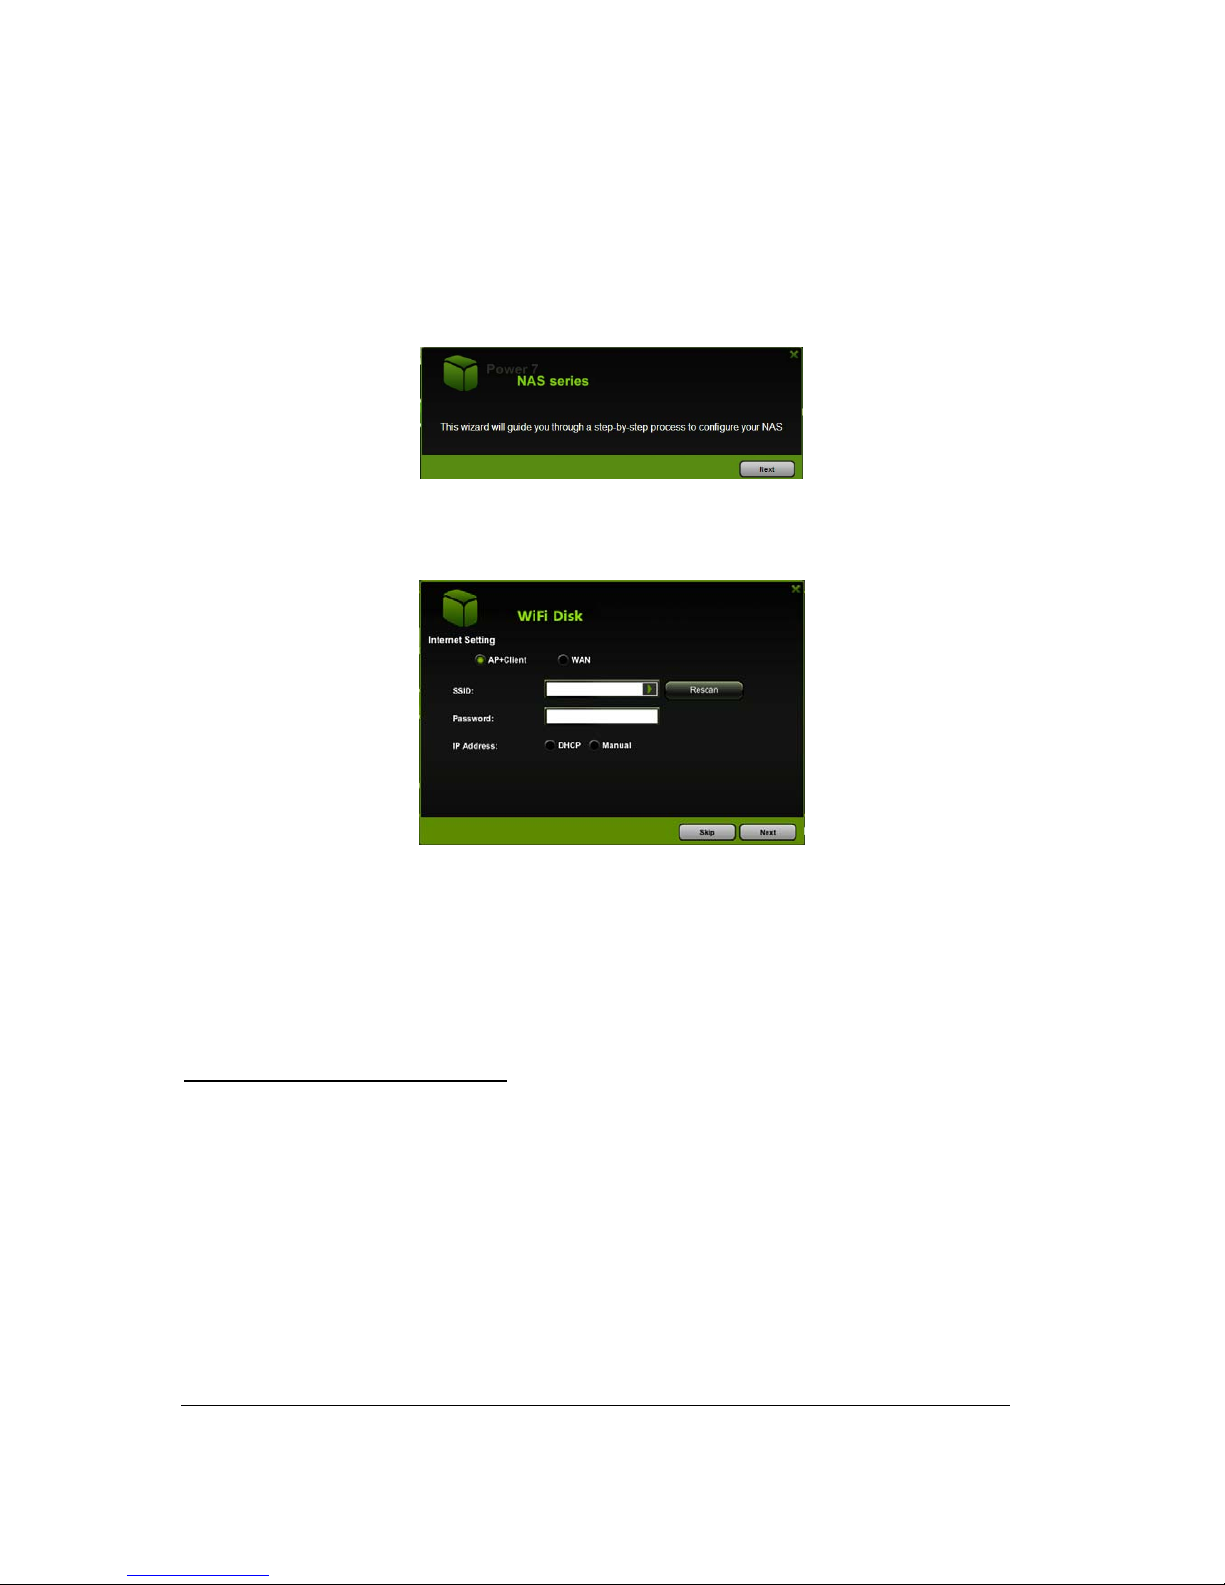
1. During the initial setup, our Wizard will automatically run and will guide you through the
step-by-step process on configuring the Wi-Fi SD/USB as seen on the screenshot below. You
may cancel this process by clicking on the “X” at the top right corner of the window. If you
cancel the Wizard, it will keep the factory default settings of your Wi-Fi SD/USB.
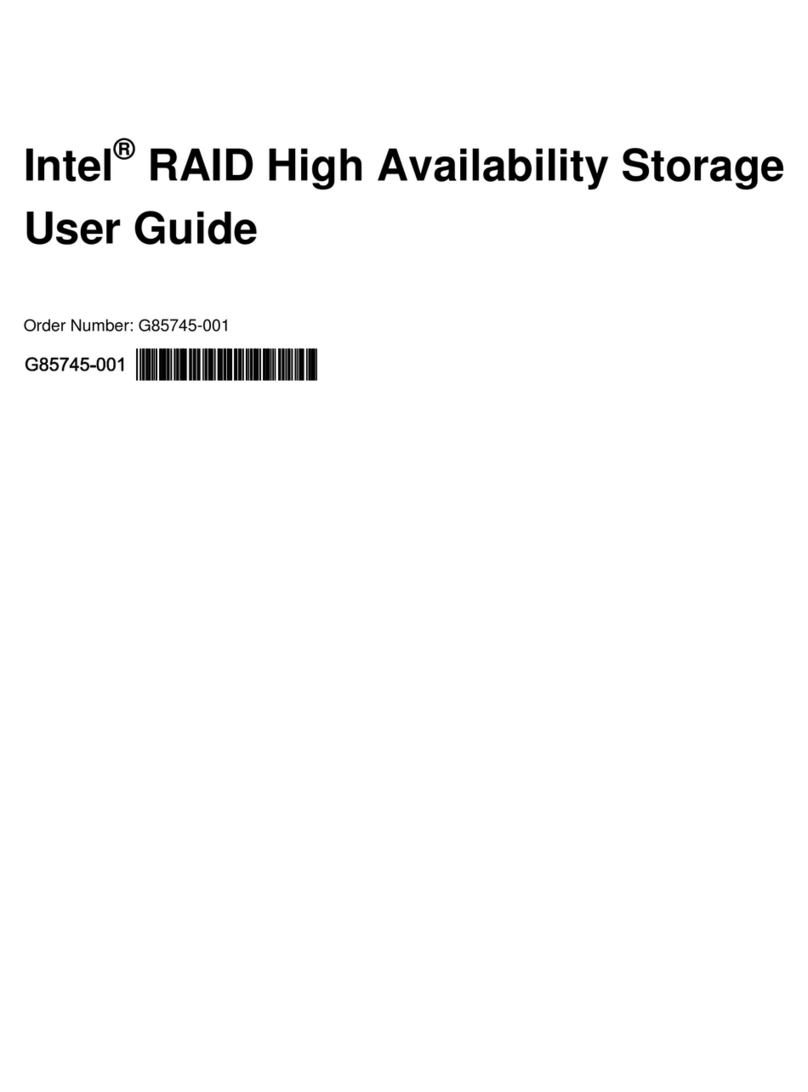
2. Click on the “Next” button. By default, the Access Point (AP)+Client is selected.
There are two available Internet Access options –
A. Access Point (AP) + Client. Connecting the Wi-Fi SD/USB to another wireless device to
have the internet access.
B. WAN. Directly connecting the Wi-Fi SD/USB to the available port on the back the router.
Selecting the AP+Client Option
- SSID. Type-in the SSID name or click on the “Rescan” button to automatically search for the
available wireless network connections.
- Password. Type-in the correct password to join the wireless network connection selected.
- IPAddress. Select either DHCP or Manually assign an IP address
oBy selecting DHCP, the host will provide an automatic IP address to connect to the
internet
oBy selecting Manual, you have to manually assign an IP address to connect to the
internet
Table of contents
Other Ravpower Storage manuals