Precor Cycles Integrated LCD Screen Option none User manual

Cardio Theater Integrated Bracket Assembly Instructions
Treadmill Integrated LCD Screen Option


Cardio Theater Integrated Bracket Assembly Instructions
page 3
Table of Contents
Table of Contents
Before You Begin ............................................................................................. 4
Obtaining Service ........................................................................................................................ 4
Unpacking the Equipment ........................................................................................................... 4
Important Safety Instructions ...................................................................................................... 4
Preparations..................................................................................................... 5
Required Tools ............................................................................................................................. 5
Installation Requirements ............................................................................................................ 5
Assembly Tips ............................................................................................................................ 5
Install the Bracket Assembly .......................................................................... 6
Attach the LCD Screen ................................................................................... 10
Reinstall the Bracket Cover ............................................................................ 12
Connect the Controller and the Cables ......................................................... 13
1
2
3
4
5
6

Cardio Theater Integrated Bracket Assembly Instructions
page 4
IMPORTANT SAFETY INSTRUCTIONS
1
Before You Begin
Thank you for adding the Precor Cardio Theater
Integrated LCD Screen Option to your treadmill.This
option will add a new dimension to your workout.
For proper installation, please read this guide
thoroughly and follow the assembly instructions.
Obtaining Service
For information about product operation or service,
see the Precor web site at www.precor.com. Should
you need more information regarding customer
support numbers or a list of Precor authorized
service centers, visit the Precor website at
www.precor.com/contact.
Unpacking the Equipment
The Cardio Theater Integrated Bracket for the LCD
Screen is shipped in one box with the following
items:
•Bracket assembly
•Power extension cable
•Four Phillips-head screws
•Rubber adapter mounts
If any items are missing, contact the dealer
from whom you purchased the unit or call Precor
Customer Support .
Important: To complete the assembly of the Cardio
Theater Integrated Bracket, you need the Cardio
Theater Integrated LCD Screen option, which is
shipped in a separate box. Included with the screen
are two cables — coaxial/power cable and controller
cable — which you will need during the assembly
process.
Important Safety Instructions
When using exercise equipment, basic
precautions should always be taken,
including the following:
• Read all instructions before using
the unit. These instructions are
written to ensure your safety and to
protect the equipment.
• Use the equipment only for its
intended purpose. Do not use
accessory attachments that are not
recommended by the manufacturer,
as such attachments might cause
injuries.
• Always check the unit before each
use. Make sure that all fasteners and
cables are secure and in good
working condition.
Important: The important safety instruc-
tions written here reflect a portion of what
is found in the Precor treadmill owner’s
manuals. Please review and follow the
safety instructions found there.
Before You Begin

Cardio Theater Integrated Bracket Assembly Instructions
page 5
Preparations
2
Important: To attach the Cardio Theater Integrated
Bracket, ask another adult for help. Do not attempt
the assembly by yourself.
Remember to read and follow the instructions in this
guide. If you do not assemble the Cardio Theater
Integrated Bracket according to these guidelines,
you could void the Precor Limited Warranty.
RequiredTools
Obtain these tools before assembly:
•Standard hex key set
•Phillips-head screwdriver
•Standard torque wrench
Installation Requirements
Review these installation requirements before
assembly:
•The Cardio Theater Integrated Bracket is built
to VESA MIS-D, 100/75 standard interface
specifications.
•Provide ample space around the treadmill where
you plan to install the Cardio Theater Integrated
Bracket. Open space around the unit allows for
easier access and installation.
•Open the box and assemble components in
the sequence presented in this guide.
•Leave room for adjustments.Tighten
fasteners (bolts, nuts, and screws) so the
unit is stable, but leave room for adjustments.
Do not fully tighten fasteners until instructed
in the assembly steps to do so.
AssemblyTips
•Read all the notes on each page before
completing that step.
•While you may be able to assemble the
Cardio Theater Integrated Bracket using the
illustrations only, important safety notes and
other tips are included in the text.
The assembly of the Cardio Theater Integrated
Bracket takes about ½ hour to complete.
Preparations

Cardio Theater Integrated Bracket Assembly Instructions
page 6
Install the Bracket Assembly
3
Important: Assemble the fasteners throughout
these instructions as detailed in each step. When
in doubt, use the illustrations for help. Do not fully
tighten fasteners until instructed to do so.
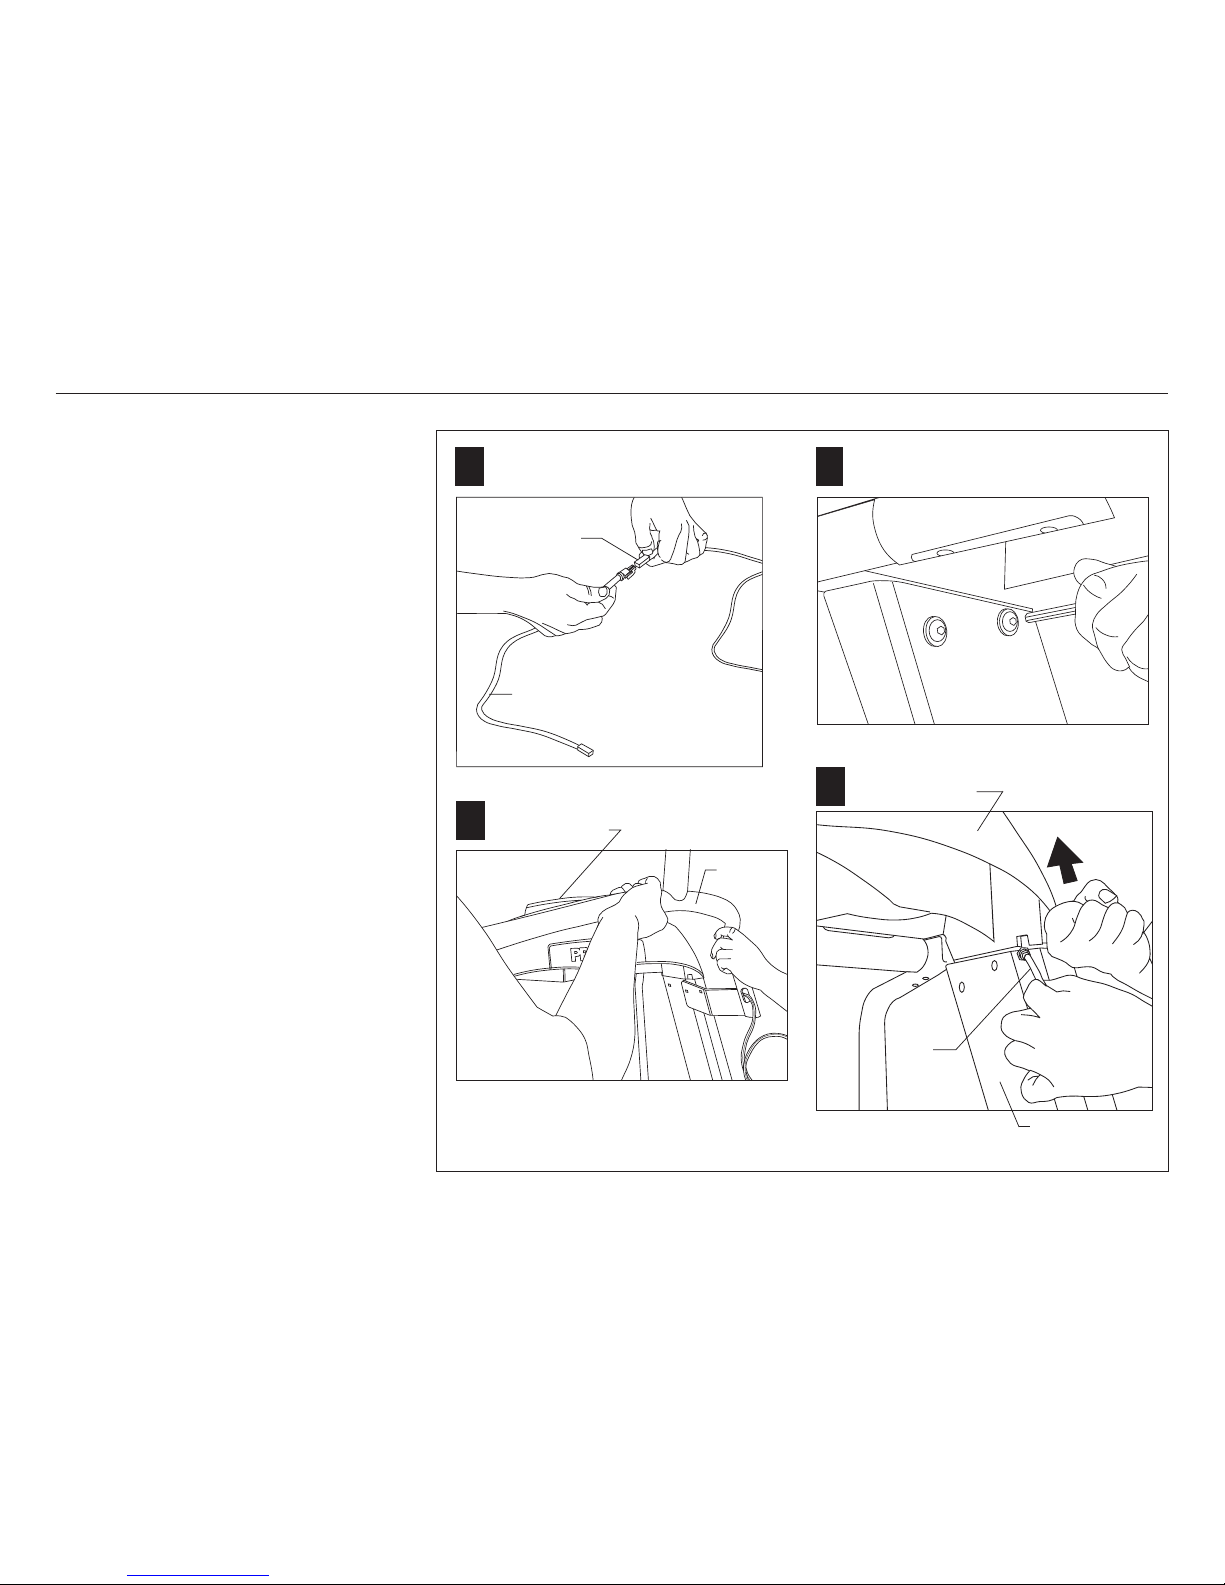
1. Remove the bracket cover.
Loosen the bolts on the pivot tube using a
⁷⁄₃₂-inch hex key. Pull the bracket cover away
from the assembly. Set it aside.
2. Feed the cables through the center tube of the
bracket assembly.
Locate the coaxial/power cable and controller
cable provided with the LCD Screen. Feed the
end of the coaxial/power cable with its two
connectors and the controller cable through the
top hole in the center tube of the bracket
assembly. Leave about 3 feet of the cables
hanging out of the hole at the top of the bracket.
Note: The 3 feet (1 meter) of cables hanging out
of the upper hole consist of the controller cable
and the end of the coaxial/power cable with
coaxial and power connectors.These cables will
be attached to the back of the LCD Screen.
Install the Bracket
Assembly
Bracket
cover
Bracket
assembly Bracket
cover
1
Bracket
assembly
2
Coaxial/power
cable
Controller cable
Bracket assembly
Center
tube
Pivot
tube

Cardio Theater Integrated Bracket Assembly Instructions
page 7
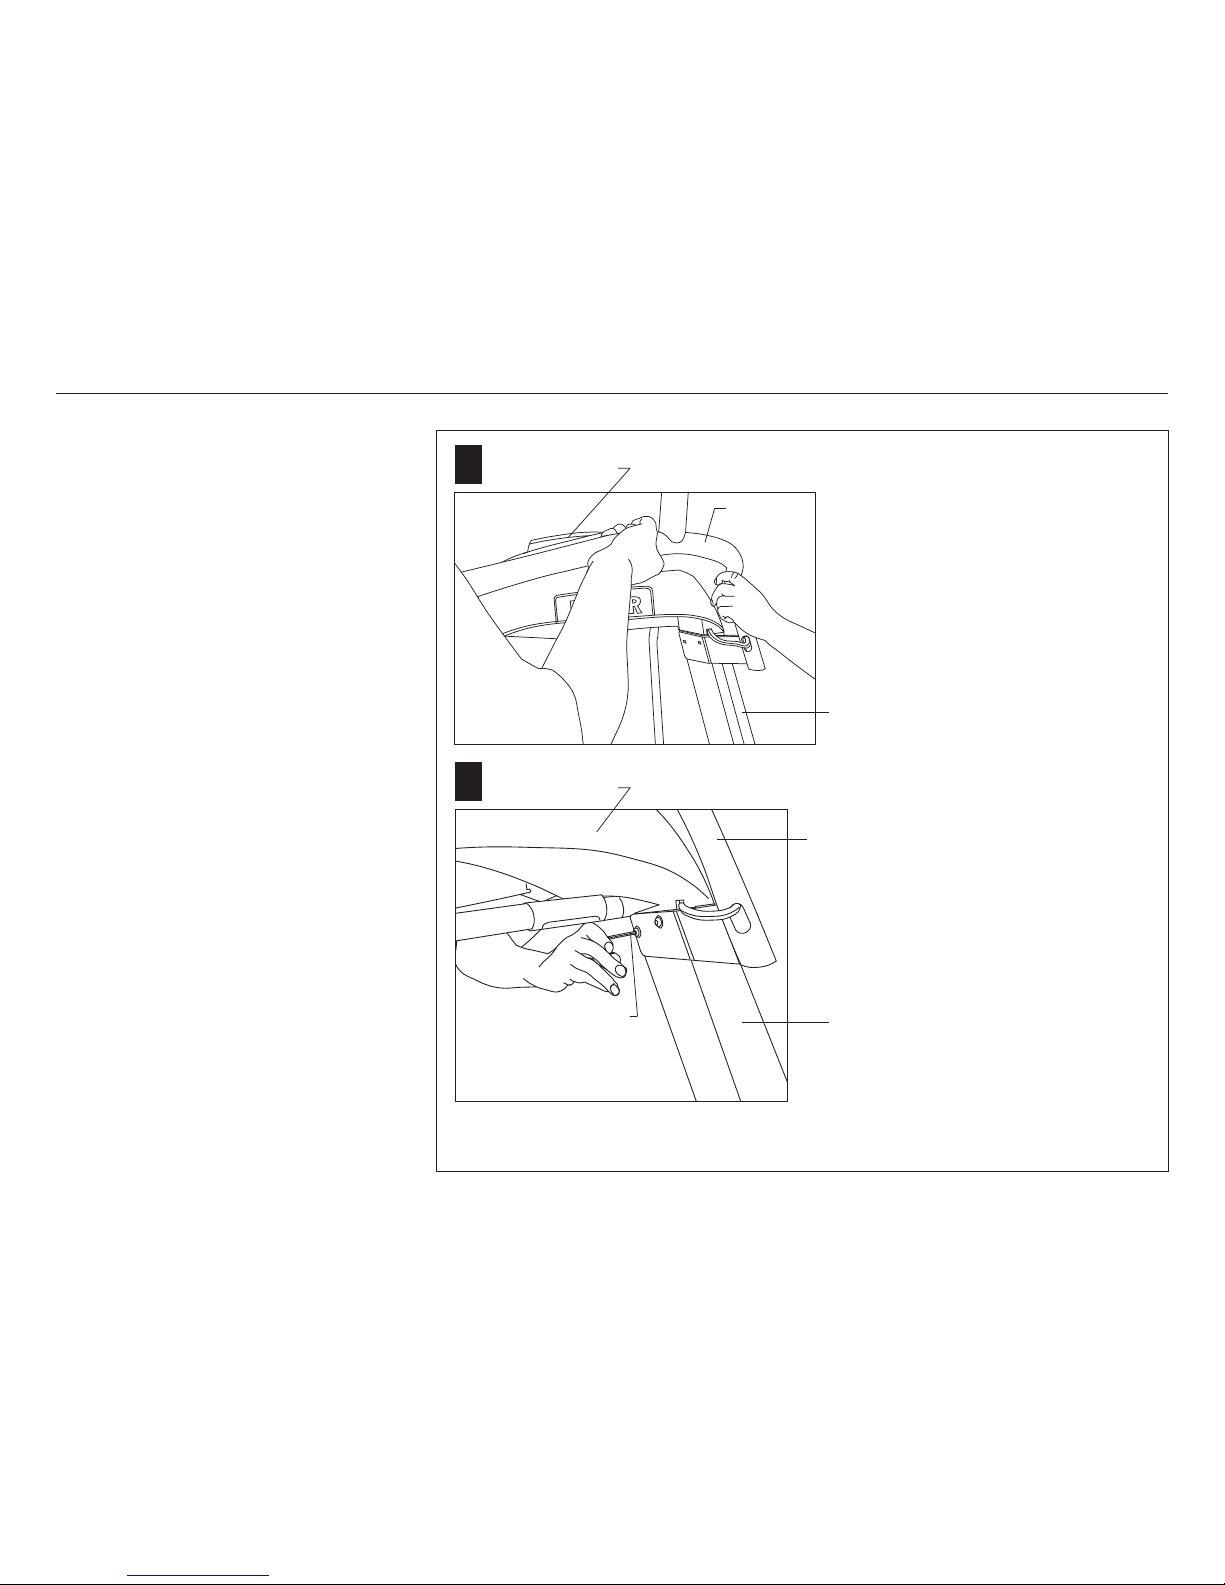
3. Continue to feed the coaxial/power cable and its
two connectors through the left bracket arm.
Feed the coaxial/power cable and its two
connectors back through the hole at the base of
the center tube and down the left arm of the
bracket assembly. Pull the cables from the side
slot. Continue pulling until no cable (except the
coiled controller cable) protrude from the hole at
the base of the center tube.
Important: Do not feed the coiled controller
cable through the bracket arm. It can be left
hanging from the base of the center tube.
3
Coaxial/power
cable
Controller
cable
Bracket assembly
Left bracket arm
Install the Bracket Assembly
Controller
cable
Power
connector
Coaxial
connector
Side slot
Cardio Theater Integrated Bracket Assembly Instructions
page 8
4. Attach the power extension cable to the power
connector.
5. Set the bracket assembly aside.
6. Remove the fasteners that secure the display
console to the treadmill.
Use a hex key to remove the four screws and
washers that secure the display console to the
upright supports on the treadmill. Keep the
washers on the screws and set them aside.
Important: Ask someone for help before
attempting the next step.
7. Position the bracket assembly.
Ask your assistant to lift the bracket assembly
and position it parallel along the back of the
display console.
8. Thread the coaxial/power cable through the left
upright support.
While your assistant holds the bracket
assembly, carefully lift the left side of the
display console to expose the slot at the
bottom edge of the console.Thread the coaxial/
power cable with its two connectors (and power
extension cable) through the slot and down into
the left upright support. Continue feeding
the cable through the upright support until both
cable connectors exit the opening at the base.
6
Upright support
Display console
Display console
Left upright
support
Coaxial/
power
cable
Display console
Bracket
assembly
Install the Bracket Assembly
4
Power extension
cable
Power
connector
7
8
Cardio Theater Integrated Bracket Assembly Instructions
page 9
9. Align the mounting holes.
Ask your assistant to slide the bracket
assembly to the inside of the upright supports
and align the mounting holes.
Important: Continue feeding the remaining
cable so that no cable protrudes or gets
pinched while mounting the bracket.
10. Replace the fasteners.
Use a hex key to replace the four screws and
washers removed in step 6. For alignment
purposes, tighten the rear two screws first.
Wrench tighten the remaining two fasteners so
that the display console and bracket assembly
are securely attached to the upright supports on
the treadmill.
9
Install the Bracket Assembly
Display console
Bracket
assembly
Left upright
support
10
Left upright
support
Bracket
assembly
Display console
Tighten rear two
screws first.

Cardio Theater Integrated Bracket Assembly Instructions
page 10
4
Attach the LCD Screen
2
Plastic
cover
3
Metal
mounting
bracket
Attach the LCD
Screen
Important: The screen spacer is used only for the
Cardio Theater PVS4/5/15 LCD Screen.
1. To protect the LCD Screen for the next few
steps, place it screen side down on a clean
work surface.
Important: Use proper materials to protect the
LCD Screen while you remove the plastic
cover and metal mounting bracket from the
back of the LCD Screen.
2. Remove the plastic cover.
Use a Phillips-head screwdriver to remove
the two screws holding the plastic cover to
the LCD screen. Discard the plastic cover and
the screws.
3. Remove the metal mounting bracket.
Remove the four screws securing the metal
mounting bracket. Discard the mounting
bracket and the four screws.
4. Retrieve four new Phillips-head screws
from the bracket assembly package.
Note: Use the longer screws if attaching the
screen spacer with the PVS4/5/15 LCD Screen.
5. Attach the LCD Screen to the bracket assembly.
If you have the Cardio Theater PVS4/5/15 LCD
Screen, you will need to insert the screen
spacer between the screen and bracket to
ensure a proper fit.
LCD
screen
5
Note: The screen spacer rests between the
bracket assembly and the PVS4/5/15 LCD
Screen.
Screen spacer
(PVS4/5/15 LCD Screen only) Bracket assembly
LCD
screen
Table of contents
Other Precor Treadmill manuals

Precor
Precor Experience TRM700-16 User manual

Precor
Precor C966i User manual

Precor
Precor 904 User manual

Precor
Precor C954 User manual

Precor
Precor M9.33i User manual

Precor
Precor C934 User manual

Precor
Precor 903 User manual

Precor
Precor C932 User manual

Precor
Precor Electronic M9.4 User manual

Precor
Precor M9.3s User manual

Precor
Precor Experience 800 User manual

Precor
Precor C932 User manual

Precor
Precor M9.55 User manual

Precor
Precor 9.31 User manual

Precor
Precor M9.57 User manual

Precor
Precor M9.5sp User manual

Precor
Precor 905e User manual

Precor
Precor 9.31 User manual

Precor
Precor M 9.1 User manual

Precor
Precor 9.41s User manual