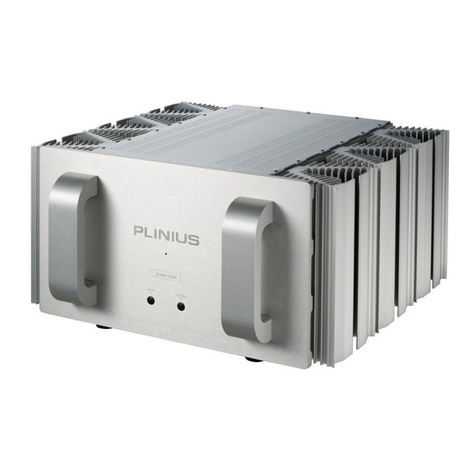
Plinius P10 User manual

The heart of music
www.pliniusaudio.com
P10
Power Amplifier
Instruction Manual


Contents
Introduction ...............................................................................................................2
Design Philosophy ...............................................................................................3
Unpacking ....................................................................................................................4
Placement & Ventilation ....................................................................................4
Care & Maintenance............................................................................................5
Precautions ................................................................................................................6
Front Panel Functions ........................................................................................6
Rear Panel Functions .........................................................................................7
Installation & Operation ....................................................................................9
Product Features ..................................................................................................12
Loudspeaker Selection .....................................................................................13
Troubleshooting .......................................................................................................14
Specifications ..........................................................................................................15
Index ................................................................................................................................16
All operational, technical and descriptive material in this publication
is subject to change at any time without notice. For further product
information or queries, please contact your Plinius dealer.
Plinius products are designed and manufactured by
Plinius Audio Limited, New Zealand.

2
PLINIUS P10
Introduction
Congratulations on your decision to become the proud owner of this
Plinius P10 Power Amplifier.
This manual has been prepared to help you understand the operation of your amplifier,
and to provide information about its design and the variety of ways it may be used.
We have designed and manufactured this amplifier to reproduce your favourite music
faithfully and accurately. With a little care and a full understanding of the operating
recommendations in this manual, your Plinius P10 Power Amplifier will provide years of
high-quality, trouble-free performance.
Please take the time to read this manual thoroughly before using your amplifier.
SERIAL NUMBER
FINAL TEST CERTIFIED BY

3
POWER AMPLIFIER
Design Philosophy
From a distance you can see that the design of the Plinius products is more than
an applied styling exercise to the front panel. We have started from the ground up
to produce a casing for our electronics that is unrivalled in its physical strength and
visual simplicity.
Wherever possible we have reduced the number of parts needed and then invested
massively in refining and producing the remaining parts to the highest quality
achievable with state of the art computer controlled machines allied with expert
craftsman. Examples of this approach include the hydraulically formed corners on
the amplifiers giving much greater strength and the one piece housing for the remote
control that looks, feels and genuinely is robust.
As with music that you are not familiar with, truly innovative new designs can take time
to understand and enjoy. How often have you heard music that you were first unsure
of, that over repeated listening, has become a firm favourite?
Our designs are fundamentally different to many other companies, and we hope that
you will take the time to explore their unique character and qualities because we have
not made them different simply to be different. We genuinely believe that their visual
and tactile qualities do improve the experience of listening to music and that is our
design goal!
Ross Stevens
DESIGN DIRECTOR

4
PLINIUS P10
Unpacking
Open the box from the top and remove the accessories from the foam end caps.
You may now proceed to lift the unit from the box, Once the unit is removed you can
proceed with the removal of the foam end caps. These caps are designed to fit on
the front and back of the unit for maximum protection. Retain the packaging for future
transportation of this unit.
Placement & Ventilation
This Plinius product may operate at a moderately high temperature, especially
during extended listening sessions. With this in mind, we recommend the following
guidelines for placement and ventilation:
• The ideal location is upon a rigid stand, away from direct contact with any
temperature sensitive materials, furniture or deep pile carpets.
• Ventilation through and around the amplifier should be kept unimpeded.
• Ensure heat vents (slots in the base and lid) are not covered or restricted in any way.
• Equipment racks should be of an open type with no closed side panels and no
closed front or rear panels. Ensure a minimum of 100mm clearance on all sides of
your Plinius unit to other equipment and the shelf above.
• If the unit is in an enclosed cabinet, the clearance should be greater than 400mm
on all sides. Ensure the space between the chassis and shelf below the unit is
unobstructed at all times.
• When stacking separate audio components, ensure a minimum of 400mm
clearance above the top unit is maintained for suitable airflow.
• NOTE: This unit has been designed for use in moderate climates only, not for tropical
conditions.
The design of this Plinius product incorporates a very high level of mechanical
decoupling of the input and output. It can however still be influenced by acoustical
feedback in the operating environment. The use of acoustic cones or a suitably
spiked amplifier stand or table may further enhance the performance of this amplifier.
Consult your Plinius dealer for further advice if required.

5
POWER AMPLIFIER
Care & Maintenance
With simple care and maintenance your Plinius product can be kept looking and
operating like new for many years to come.
MAINTAINING THE CONNECTORS
Exposed connectors such as the RCA connectors will be subject to environmental
factors, and over time the surface may degrade. This can be greatly reduced by fitting
readily available ‘RCA caps’ to reduce the effects of environmental elements on the RCA
connectors. These RCA caps or RCA shorting caps can also provide sonic benefits.
Connector cleaning products are also available to clean the RCA and cable connectors
and frequent checks and cleaning will help maintain a good signal connection.
NOTE: DO NOT use RCA shorting caps on output connectors or power amplifier input
connectors. Use RCA shorting caps on unused preamplifier stage input connectors only.
Standard RCA shielding caps can be used on any unused input or output connectors.
MAINTAINING THE SWITCHES
Switches should be maintained by using each various switch setting periodically.
Even if a switch or a switch setting is not used, it is a good idea to toggle small
switches and turn rotary switches though the full range of the switch several times in
succession to keep the contacts active. Performing this simple action will promote
longevity of the switch contacts.
SURFACE CLEANING
From time to time you may wish to clean the surface of your Plinius equipment to
remove dust, or any material build up from the atmosphere or on commonly used
controls. Your Plinius product is made up of parts that have a hard anodised or a
powder coat finish and will clean easily without being damaged.
Cleaning should be carried out using a soft cleaning cloth, dry or with either a small
amount of water or a very mild surface cleaner, while observing the following guidelines:
• As a safety precaution, always switch the equipment off prior to cleaning
• Always use a cloth that is soft and clean
• Never use abrasives or polishing compounds anywhere on the unit
• Never apply liquid directly to the surface of the unit
• Use the cloth dry or with mild surface cleaners of either liquid or foaming type
• Apply only small amounts of cleaner to the cloth
• DO NOT rub the surface but wipe clean only. Excessive rubbing may dull powder
coat or wear the screen printed text.

6
PLINIUS P10
Precautions
PLEASE TAKE SPECIAL NOTE OF THE FOLLOWING PRECAUTIONS
BEFORE OPERATING YOUR NEW AMPLIFIER.
• The Plinius P10 Power Amplifier can deliver in excess of 200 watts into 8 ohms.
This amplifier is also capable of a very large peak current delivery.
• The Plinius P10 Power Amplifier operates in Class AB. It is capable of generating
heat that could have an adverse effect on other electronic equipment, furniture, etc.
• DO NOT leave flammable material on the amplifier whilst running, as this could
pose a serious fire risk.
• This amplifier operates at hazardous voltage levels. There are some alterations that
may be made by you, the owner, however, we recommend that any work requiring
removal of the lid be referred to a suitably qualified & experienced service technician.
• DO NOT attempt to connect any input of this amplifier to its own outputs.
• DO NOT earth any output terminal or connect any of these terminals together
without following the instructions in this manual or seeking qualified assistance.
• DO NOT place this amplifier in any position where liquids, or any foreign material
may accidentally enter it.
• DO NOT connect any voltage source, short circuit, earth/ground or appliance
(other than suitable high fidelity loudspeakers) to the amplifier output terminals.
• DO NOT expose the unit to dripping or splashing.
• DO NOT place objects filled with liquids on the unit, e.g. vases.
• DO NOT place sources of naked flame on the unit, e.g. candles.
Front Panel Functions
1. DISPLAY LED
The LED on the front panel indicates the mode of operation. When first switched on,
the display LED will vary in brightness until the initialisation sequence is completed,
after which the LED remains lit. Whenever the remote trigger is activated to switch
the unit to standby, the LED will vary in brightness.
1

7POWER AMPLIFIER
Rear Panel Functions
This panel incorporates the terminals for connecting the input signal from a
preamplifier, outputs to the loudspeakers, and mains supply. Please remember that
your Plinius P10 Power Amplifier is a high quality electronic instrument capable of
an exceptional level of performance. Be sure that you understand your system’s
requirements fully before you make any connection to this amplifier.
1. MAINS SWITCH
The heavy-duty rocker switch in the centre of the panel turns the Mains/Line Power to
the amplifi er ON or OFF. The amplifi er draws a moderately high current when switched
on, so it is not good practice to rapidly turn the Mains switch on and off repeatedly.
2. INPUT TERMINALS
The input terminals for your Plinius P10 Power Amplifier are easily accessible at the
centre of the rear panel.
RCA INPUTS LEFT & RIGHT: These standard RCA terminals are for use with
unbalanced signals from most signal sources such as audio preamplifiers.
XLR BALANCED INPUTS LEFT & RIGHT: XLR connectors fitted to this amplifier are for
use with balanced line signals from audio preamplifiers. Balanced signals are carried
via a three way cable.
The XLR pin configuration used in all Plinius product is:
PIN 1 to GND
PIN 2 to +Signal
PIN 3 to –Signal
NOTE: Because of the way our XLR and balanced inputs are configured it is not
possible to connect both XLR and RCA at the same time.
1
2 2
3
8
7
5
6
4 4

8
PLINIUS P10
3. INPUT SELECTION SWITCH
This switch at the centre of the inputs is used to select the pair of input sockets
required as described above. Up selects the RCA input connections, while down
selects XLR input.
4. OUTPUT TERMINALS
Connections for the loudspeakers are provided on the left and right sides of the rear
panel. Two parallel pairs of five way binding posts for each channel are fitted – these
provide ease of use with bi-wiring and multiple cables requiring a large contact area.
5. GROUND LIFT SWITCH
This switch is located below the remote trigger terminals, and allows the signal
ground to be disconnected from the chassis. In some installations a hum loop
may exist due to duplicate ground paths from different equipment. Use this switch
to remove the connection from 0V to ground thus allowing some flexibility in your
particular set-up.
6. REMOTE TRIGGER TERMINALS
In order to integrate more effectively into a home theatre system, the Plinius P10 has
remote trigger terminals fitted to the rear panel. By connecting a processor with a
remote trigger signal to these terminals, the P10 can be put in and out of standby by
the processor to which it is connected. When in standby, the amplifier draws less
current and will operate at minimum temperature. The output relays are also open,
disconnecting the loudspeakers. This may be of advantage in a multi-amplifier and/or
remote installations. The standby mode can only be activated via the remote trigger
terminals. Polarity of the connections to the remote trigger is not important.
7. MAINS POWER CORD IEC SOCKET
This connector is where the mains supply cable from your wall connects to the
amplifier. You will notice that a fuse holder is mounted within this connection, and it
holds a mains fuse to provide surge and overload protection for your amplifier.
8. RAIL FUSES
These tubular fuse holders house the positive and negative rail protection fuses.
Depress and turn anti-clockwise to open. An LED is fitted next to each fuse holder to
indicate a blown fuse.
Other manuals for P10
2
Table of contents
Other Plinius Amplifier manuals

Plinius
Plinius Integrated Amplifier Hiato User manual

Plinius
Plinius Reference M-10 User manual

Plinius
Plinius Odeon User manual

Plinius
Plinius KORU User manual

Plinius
Plinius 9100 User manual

Plinius
Plinius P100 User manual

Plinius
Plinius P10 User manual

Plinius
Plinius SB-301 User manual

Plinius
Plinius SA-50 User manual

Plinius
Plinius 9200 User manual

Plinius
Plinius SB-300 User manual

Plinius
Plinius SB-301 User manual

Plinius
Plinius SB-301 User manual
Plinius
Plinius 8150 Service manual

Plinius
Plinius SA-103 User manual

Plinius
Plinius P8 User manual

Plinius
Plinius SA-103 User manual

Plinius
Plinius Odeon User manual

Plinius
Plinius 8150 User manual

Plinius
Plinius P8 User manual