MaxiCool TC12 User manual

USER MANUAL
TC12- Monobloc
WALL MOUNTED AIR CONDITIONER
WITH HEAT PUMP AND WIFI SMART APP


1
SAFETY INSTRUCTIONS
IMPORTANT!
AIR CONDITIONERS MUST ALWAYS BE STORED AND TRANSPORTED
UPRIGHT, OTHERWISE IRREPARABLE DAMAGE MAY BE CAUSED TO
THE COMPRESSOR; IF IN DOUBT WE SUGGEST WAITING AT LEAST 24
HOURS FOLLOWING INSTALLTION BEFORE STARTING THE UNIT.
⚫Carefully read the instructions before installing and/or operating the unit.
⚫This appliance is for indoor use only.
⚫This unit must be only connected to a 220-240 V / 50 Hz earthed outlet.
⚫Installation must be in accordance with regulations of the country where the unit is used.
⚫If you are in any doubt about the suitability of your electrical supply have it checked and, if
necessary, modified by a qualified electrician.
⚫This air conditioner has been tested and is safe to use. However, as with any electrical
appliance - use it with care.
⚫Disconnect the power from the appliance before dismantling, assembling or cleaning.
⚫Avoid touching any moving parts of the appliance.
⚫Never insert fingers, pencils or any other objects though the guard.
⚫This appliance is not intended for use by persons (including children) with reduced physical,
sensory or mental capabilities. It is also not intended for use by those with a lack of
experience and knowledge, unless they have been given supervision or instruction
concerning the use of the appliance by a person responsible for their safety.
⚫Do not leave children unsupervised with this appliance.
⚫Do not clean the unit by spraying it or immersing it in water.
⚫Never connect the unit to an electrical outlet using an extension cord. If an outlet is not
available, one should be installed by a qualified electrician.
⚫Do not operate the unit unless it has been fully installed following the guidance provided
within this manual.
⚫Never operate this appliance if the cord or plug is damaged. Ensure the power cord is not
stretched or exposed to sharp objects/edges.
⚫A damaged supply cord should be replaced by the manufacturer or a qualified electrician in
order to avoid a hazard.
⚫Any service other than regular cleaning or filter replacement should be performed by an
authorised service representative. Failure to comply could result in a voided warranty.
⚫Do not use the appliance for any purpose other than its intended use.
⚫Avoid restarting the air conditioner unless 3 minutes have passed since being turned off. This
prevents damage to the compressor.
⚫Never use the mains plug as a switch to start and turn off the air conditioner. Use the
provided ON/OFF button located on the control panel.
⚫The appliance should not be installed in laundry or wet rooms.
⚫The appliance must be installed in a room without sources of ignition (for example: open
flames, an operating gas appliance or an operating electric heater).
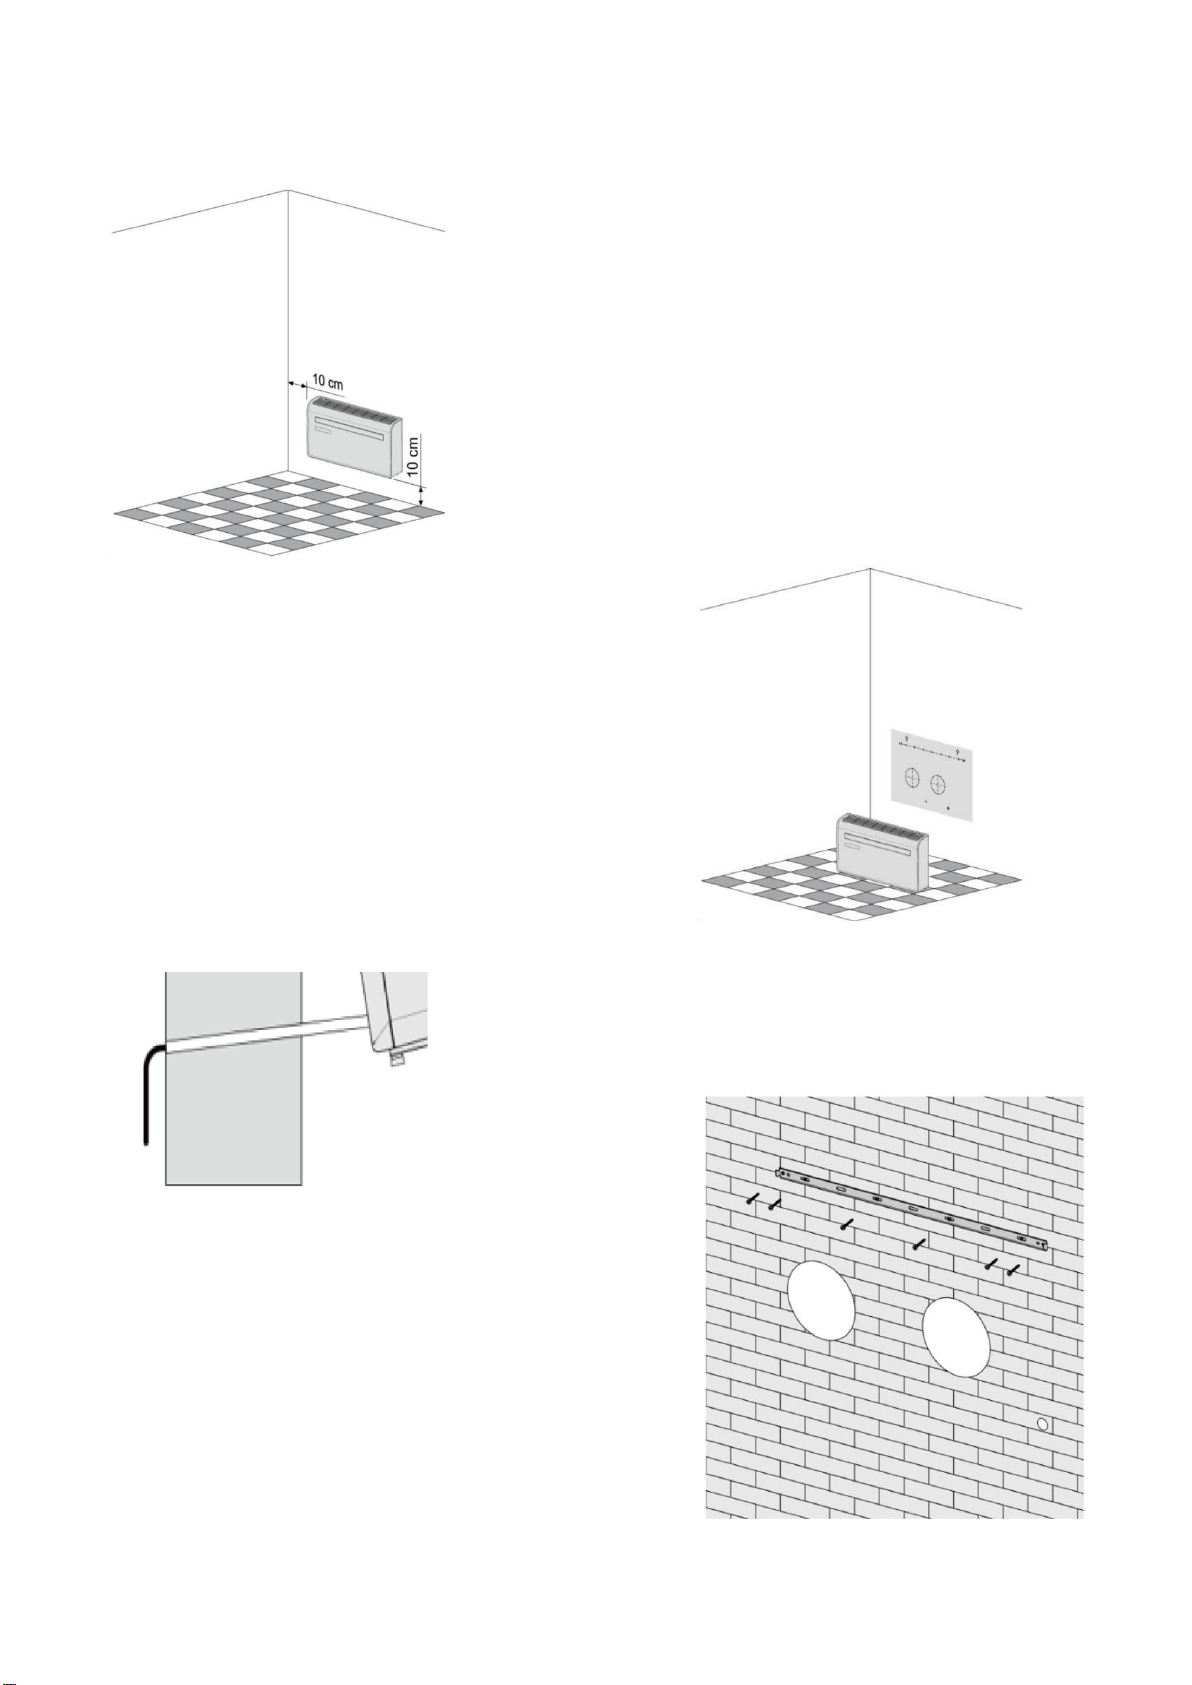
⚫The unit must be installed on a solid vertical wall by a competent person. The electricity
supply must only be connected after installation is complete.
⚫R290 refrigerant gas complies with European environmental directives.

2
⚫R290 has a low GWP (Global Warming Potential) of 3.
⚫The air conditioner contains about 290g of R290 refrigerant gas.
⚫Do not install or store in an unventilated space with an area smaller than 15 m2per unit. The
room must be such as to prevent stagnation of possible leaks of refrigerant gas as there could
be a danger of fire or explosion hazard should the refrigerant come into contact with electric
heaters, stoves or other sources of ignition.
⚫If the appliance is installed, used or stored in an unventilated room, the room must be such
as to prevent stagnation of possible leaks of refrigerant gas as there could be a danger of fire
or explosion should the refrigerant come into contact with electric heaters, stoves or other
sources of ignition.
⚫Refrigerant gas may be odourless.
⚫Do not use the product and contact the retailer for advice, if damage has occurred to the unit
which may have compromised the refrigerant system.
⚫Any repairs or maintenance must only be carried out on the unit by a suitably qualified
engineer. Before opening and servicing the unit the authorized engineer must be in
possession of a copy of the manufacturer’s service manual and must follow the safety
information contained within it to ensure all hazards are minimized.
⚫The refrigerant system should not be perforated or punctured.
Energy Saving and Unit Safety Protection Tips
⚫Do not cover or restrict the airflow from the outlet or inlet grills.
⚫Keep the filters clean . Under normal conditions , filters should only need cleaning once every
three weeks ( approximately ) . Since the filters remove airborne particles , more frequent
cleaning maybe necessary , depending on the air quality.
⚫For the initial start-up set the fan speed to maximum and the thermostat to 4-5 degree lower
than the current temperature . After , set the fan switch to low and set the hemostat to your
desired setting.
⚫To protect the unit , we recommend not using the cool mode when the ambient temperature
is higher than 35℃.
NOTE : Some pictures and information may vary from the final product . This is due to continual
product improvement.

3
PRODUCT OVERVIEW
PRODUCT DIAGRAM
FRONT
BACK
WALL HANGING MOUNTS
BACK PANEL
AIR INLET
DRAINAGE PIPE
AIR OUTLET
FRONT PANEL
AIR INLET
CONTROL PANEL
LOUVR
E

4
FEATURES
◆Simple operation.
◆Self-evaporative function with energy saving technology.
◆Sleek design that seamlessly fits into any style home.
◆Bright LED screen-indicates temperature and current mode.
◆On / off timer function-allows you to choose when the unit operates.
◆WIFI App control providing additional functionality.
◆Three fan speeds.
◆Four modes to suit your every need including : Cooling / Heating / Fan / Dry
◆Silent running option , perfect for a restful night sleep.
WHATS INCLUDED
DIAGRAMS FOR ILLUSTRATIVE PURPOSES ONLY
WALL BRACKET
REMOTE CONTROL
PLASTIC DUCTING
SHEET (X2)
FIXED PLATE
2PCS TAPPING SCRE
(4x10mm)
VENT COVER ASSEMBLY (X2)
(CHAIN, INDOOR RING AND
OUTDOOR COVER)
7PCS SCREWS (5×60mm)
7PCS WALL PLUGS
(8×40mm)
WALL TEMPLATE
AIR CONDITIONER

5
INSTALLATION
TOOLS REQUIRED
BEFORE STARTING INSTALLATION, PLEASE ENSURE YOU HAVE ALL SUITABLE EQUIPMENT
AVAILABLE AND UNDERSTAND THE STEPS INVOLVED IN INSTALLATION. IF IN ANY DOUBT,
PROFESSIONAL ADVICE SHOULD BE SOUGHT.
THE INSTALLER MUST ENSURE THAT THE PLANNED POSITION OF THE AIR CONDITIONER IS
SUITABLE, AND THAT THERE ARE NO CABLES AND PIPES INSIDE THE WALL, AND NO OTHER
OBSTRUCTIONS FOXED ON THE WALL, WHICH WOULD PRESENT A DANGER AND/OR PREVENT
COMPLETION OF INSTALLATION.
SPIRIT LEVEL
DRILL
TAPE MEASURE
180mm CORE DRILL
8mm MASONRY DRILL
BIT
SHARP KNIFE
20mm MASONRY DRILL BIT
PENCI
L

6
INSTALLATION
This unit must be installed on an external wall, as it vents directly out
of its rear.and ensure the wall is flat, solid and reliable.
Leave at least 10 cm of space to the left, right and base of the machine.
At least 20cm of space must be left above the unit to help air flow
smoothly and stay away from curtains, plants, faucets, furniture and
others appliances etc.
Paste the supplied installation template paper in position on the
wall, ensuring that the reference line is level using a spirit level.
The hole for the drainage pipe must be drilled using a 25mm Drill bit.
Ensure the hole is at a downward angle (min 5 degrees) so that the water
will drain correctly.
Use a 180mm core drill to drill the two holes for the units
ventillation, ensuring that both the holes are aligned with the
template.
Use the template to mark the position of the screws for the
hanging rail, using a spirit level to ensure it is straight and level.
Drill the marked holes using a suitable 8mm drill bit and insert
wall plugs. Line the hanging rail with the holes, and fix the rail
into position using the supplied screws.
Ensure that the hanging rail is securely fastened onto the wall,
and that there is no risk of the unit tipping or falling.

7
Roll the plastic vent sheets into a tube and
feed them from the inside into the holes
previously made. Ensure the tubes sit
flush to the interior wall.
Go outside and trim off the excess vent tube using a sharp knife,
keeping the edge as neat as possible.
、
Insert the indoor fixing ring from the
vent cover onto the indoor side of the
air vent. Then fold the external vent
cover in half. Attach the chains to each
side of the vent cover, before sliding
the cover outside through the vent
hole.
Expand the external cover, before tightly fixing the chains by
hooking onto the indoor fixing ring. This will hold the external
cover firmly in position. Repeat for the second vent.

8
Once the chains are fitted and secure, any excess chain should be
removed by cutting the chain.
Lift the unit onto the wall, align the hanging holes with the
hooks on the hanging rail and gently rest the unit into place.
At the same time, slide the drain pipe through the drainage
hole.
NOTE:
1st: please ensure that the backside of product is tightly attached on
the wall to avoid additional vibration and noise.
2nd : The end of the external water pipe must be placed in an open
space or drain. Avoid damage or constriction to the drainage pipe to
ensure the unit drains.
Fixed plate
4x10 tapping screw
Table of contents
Other MaxiCool Air Conditioner manuals
Popular Air Conditioner manuals by other brands

Fujitsu
Fujitsu Inverter ASBA30JFC operating manual

Toshiba
Toshiba RAS-M10SMUV-E installation manual

Daikin
Daikin FXLQ20MAVE Operation manual

Hitachi
Hitachi RAS-E24CAK instruction manual

CIAT
CIAT Magister 2 Series Installation, Operation, Commissioning, Maintenance

Bestron
Bestron AAC6000 instruction manual


