Kolin KLG-IF70-2C1M User manual

Thank you for choosing these Air Conditioners, please read this owner’s manual carefully
before operation and retain it for future reference.
KOLIN reserves the right to interpret this manual which will be subject to any change due to
product improvement without further notice.
KOLIN Philippines International, Inc. reserves the final right to interpret this manual.
air conditioner
works
for
years
User Manual
Model:
KLG-IF70-2C1M

Contents
1 Safety Precautions ······································································· 1
2 Outline of the Unit and Main Parts············································· 2
3 Preparative for Installation··························································· 3
3.1 Standard Accessory Parts······························································ 3
3.2 Selection of the Installation Location············································ 4
3.3 Connection Pipe Requirement ······················································ 6
3.4 Electrical Requirement···································································· 7
4 Installation of the Unit··································································· 8
4.1 Installation of the Indoor Unit························································· 8
4.2 Installation of the Outdoor Unit···················································· 10
4.3 Installation of the Connection Pipe············································· 11
4.4 Vacuum and Gas Leakage Inspection ······································· 15
4.5 Installation of the Drain Pipe························································ 17
4.6 Electrical Wiring············································································· 19
5 Installation of Controllers··························································· 22
6 Test Running················································································ 23
6.1 Trial Operation and Testing·························································· 23
6. 2 Working Temperature Range······················································ 30
7 Troubleshooting and Maintenance··········································· 30
7.1 Troubleshooting············································································· 30
7.2 Routine Maintenance···································································· 32

1
1 Safety Precautions
WARNING!
This mark indicates procedures which, if improperly performed, might lead to the
death or serious injury of the user.
CAUTION!
This mark indicates procedures which, if improperly performed, might possibly
result in personal harm to the user, or damage to property.
WARNING!
(1). For operating the air conditioner pleasantly, install it as outlined in this installation manual.
(2). Connect the indoor unit and outdoor unit with the room air conditioner piping and cord available
from our standard parts. This installation manual describes the correct connections using the
installation set available from our standard parts.
(3). Installation work must be performed in accordance with national wiring standards by authorized
personnel only.
(4). If refrigerant leaks while work is being carried out, ventilate the area. If the refrigerant comes in
contact with a flame, it produces toxic gas.
(5). Do not power on until all installation work is complete.
(6). During installation, make sure that the refrigerant pipe is attached firmly before you run the
compressor.
Do not operate the compressor under the condition of refrigerant piping not attached properly
with 2-way or 3-way valve open.
This may cause abnormal pressure in the refrigeration cycle that leads to breakage and even
injury.
(7). During the pump-down operation, make sure that the compressor is turned off before you remove
the refrigerant piping.
Do not remove the connection pipe while the compressor is in operation with 2-way or 3-way
valve open.
This may cause abnormal pressure in the refrigerant cycle that leads to breakage and even
injury.
(8). When installing and relocating the air conditioner do not mix gases other than the specified
refrigerant (R410A) to enter the refrigerant cycle.
If air or other gas enters the refrigerant cycle, the pressure inside the cycle will rise to an
abnormally high value and cause breakage, injury, etc.
(9). This appliance is not intended for use by persons (including children) with reduced physical,
sensory or mental capabilities, or lack of experience and knowledge, unless they have been
given supervision or instruction concerning use of the appliance by a person responsible for their
safety.
(10). Children should be supervised to ensure that they do not play with the appliance.
(11). If the supply cord is damaged, it must be replaced by the manufacturer, its service agent or
similarly qualified persons in order to avoid a hazard.

2
2 Outline of the Unit and Main Parts
Fig. 2.1
Notes: The connection pipe for this unit should be prepared by the user.

3
3 Preparative for Installation
3.1 Standard Accessory Parts
The standard accessory parts listed below are furnished and should be used as
required. Table 3.1
Indoor Unit Accessories
No.
Name
Appearance
Q'ty
Usage
1
Wireless Controller +
Battery
1+2
To control the indoor unit
2
Insulation
1
To insulate the gas pipe
3
Insulation
1
To insulate the liquid pipe
4
Installation Paperboard
2
To insulate the drain pipe
5
Fastener
4
To fasten the sponge
6
Nut
1
To connect gas pipe
7
Nut
1
To connect liquid pipe
Table 3.2
Outdoor Unit Accessories
No.
Name
Appearance
Q'ty
Usage
1
Drain Plug
3
To plug the unused drain
hole.
2
Drainage Connecter
or
1
To connect with the hard
PVC drain pipe

4
3.2 Selection of the Installation Location
WARNING!
The unit must be installed where strong enough to withstand the weight of the unit and fixed
securely, otherwise the unit would topple or fall off.
CAUTION!
①. Do not install where there is a danger of combustible gas leakage.
②. Do not install the unit near heat source, steam, or flammable gas.
③. Children under 10 years old must be supervised not to operate the unit.
Decide the installation location with the customer as follows:
3.2.1 Indoor Unit
(1). Select a place, avoid the inflammable gas produce or leakage.
(2). Select a place avoid the water vapor or oil sprayed on the unit.
(3). Ensure that airflow can reach every conner of the room.
(4). Choose a place so that the connection pipe could be easily pulled out.
(5). Select the place where the airflow of the unit can not be blocked.
(6). Select the position where the few outer air influenced.
(7). Select the firm and flat ground.
(8). Ensure sufficient clearance and space for service and maintenanc.
(9). Ensure the installation of indoor unit is in conformity with the requirements of
installation dimension drawing;
(10). Do not use the unit in the immediate surroundings of a laundry a bath a
shower or a swimming pool.
(11). A location from which the condensation water can be drained out
conveniently.
(12). Leave service space around the unit as required in Fig. 3.1.

5
Unit: mm
Fig. 3.1
3.2.2 Outdoor Unit
WARNING!
①. Install the unit where it will not be tilted by more than 5°.
②. During installation, if the outdoor unit has to be exposed to strong wind, it must be fixed securely.
If possible, do not install the unit where it will be exposed to direct sunlight. (If
necessary, install a blind that does not interfere with the air flow.)
(1). Install the outdoor unit in a place where it will be free from being dirty or getting
wet by rain as much as possible.
(2). Install the outdoor unit where it is convenient to connect with the indoor unit.
(3). Install the outdoor unit where the condensate water can be drained out freely
during heating operation.
(4). Do not place animals and plants in the path of the warm air.
(5). Take the air conditioner weight into account and select a place where noise
and vibration are small.
(6). Install the outdoor unit where is capable of withstanding the weight of the unit
and generates as less noise and vibration as possible.
(7). Provide the space shown in Fig. 3.2, so that the air flow is not blocked. Also for
efficient operation, leave three of four directions of peripheral constructions
open.

6
Unit: mm
Fig. 3.2
3.3 Connection Pipe Requirement
CAUTION!
The maximum length of the connection pipe is listed in the Table below. Do not place the units
between which the distance exceeds the maximum length of the connection pipe.
Table 3.3
Item
Model
Size of Fitting
Pipe(Inch)
Max. Pipe
Length (m)
Max. Height
Difference between
Indoor Unit and
Outdoor Unit (m)
Drainage pipe(Outer
Diameter ×wall
thickness) (mm)
Liquid
Gas
KLG-IF70-2C1M
3/8
3/430 10
φ17×1.75
Note:
①.The connecting pipe should be thermally insulated properly.
②.The pipe wall thickness shall be 0.5-1.0 mm and the pipe wall shall be able to
withstand the pressure of 6.0 MPa. The longer the connecting pipe, the lower
the cooling and heating effect performs.
③.The pipe wall thickness shall be 0.5-1.0 mm and the pipe wall shall be able to
withstand the pressure of 6.0 MPa. The longer the connecting pipe, the lower
the cooling and heating effect performs.

KLG-IF70-2C1M
KLG-IF70-2C1M
230V ~ 60Hz
230V ~ 60Hz 40 6.0
8
4 Installation of the Unit
4.1 Installation of the Indoor Unit
WARNING !
①. The unit installation work must be done by qualified personnel according to the local rules and this
manual.
②. When removing the unit to the other place, please firstly contact with the local maintenance
center.
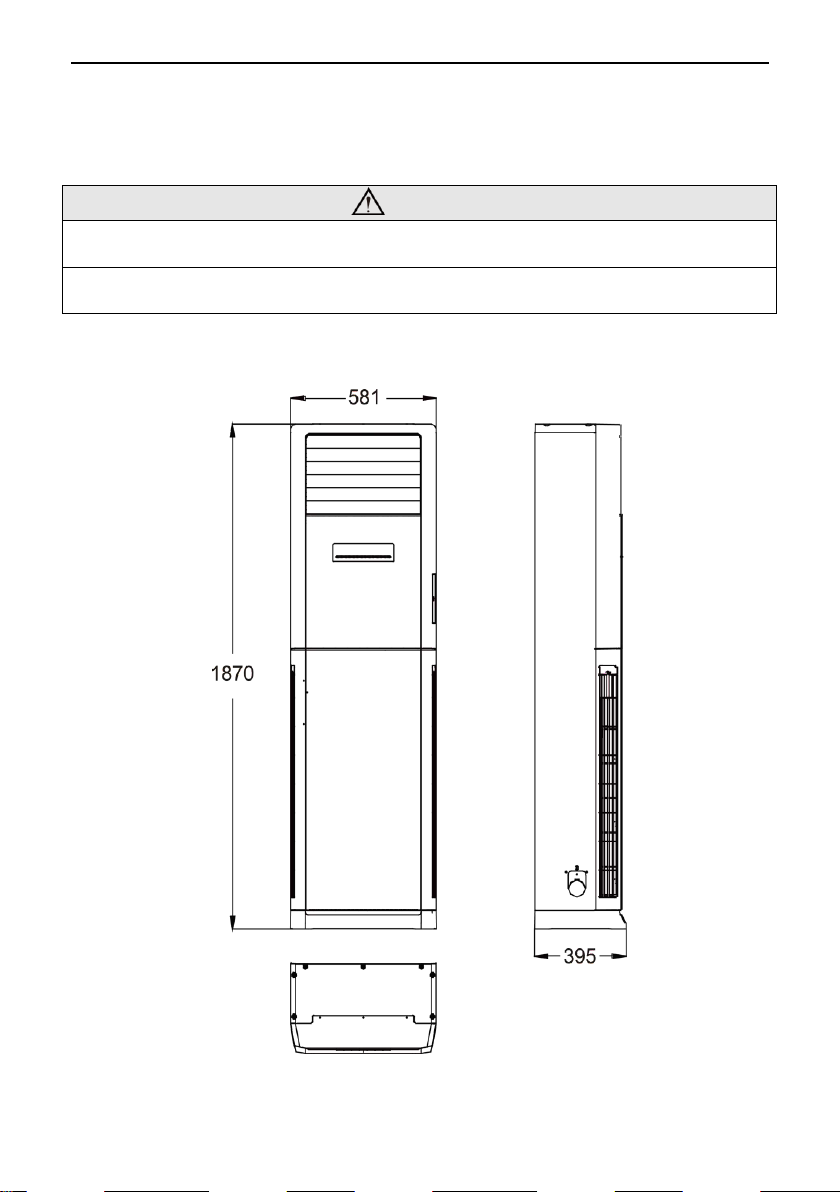
4.1.1 Indoor unit dimension
Unit: mm
Fig. 4.1
Table of contents
Other Kolin Air Conditioner manuals

Kolin
Kolin KLM-SC40-4F1M User manual

Kolin
Kolin KLM-IF70-3D3M User manual

Kolin
Kolin e Series User manual

Kolin
Kolin KSM-IW10WAE-7J1M User manual

Kolin
Kolin KEA-60BDRDCA User manual

Kolin
Kolin KLM-SS40-4F1M User manual

Kolin
Kolin KAM-75BMC User manual

Kolin
Kolin KLM-IS70-3D3M User manual

Kolin
Kolin Primus Gold KSG-IWF-10WFY-8K1M32 User manual

Kolin
Kolin KLG-SF70-4D3M User manual


Popular Air Conditioner manuals by other brands


Fujitsu
Fujitsu Inverter ASBA30JFC operating manual

Toshiba
Toshiba RAS-M10SMUV-E installation manual

Daikin
Daikin FXLQ20MAVE Operation manual

Hitachi
Hitachi RAS-E24CAK instruction manual

CIAT
CIAT Magister 2 Series Installation, Operation, Commissioning, Maintenance

Bestron
Bestron AAC6000 instruction manual


