
Koldware 6KK61BFA0 User manual

1
Owner’s Manual
WPC-15000
Please read and save these instructions. Read carefully before attempting to assemble, install, oper-
ate or maintain the product described.
Protect yourself and others by observing all safety information. Failure to comply with instructions
could result in personal injury and / or property damage! Retain instructions for future reference.
KOLDWAVE Portable Air Condioners feature spot cooling for large
areas where cooling of the enre area is not praccal. A dedicated
spot cooling thermostat controls the unit in this applicaon. These
air condioners can also be used in smaller areas for room cooling.
A control panel provides ease of use and contains a self-diagnosc
funcon and display, showing operang modes, room and set
temperatures, and faults. If an abnormal operaon occurs, a visual
display of the fault is shown. Caster wheels are included for easy
portability. Suitable applicaons include: a factory or work place,
industrial kitchen, computer room, emergency cooling, etc.
Aer unpacking the unit, carefully inspect unit for any damage that may have occurred during
transit. Check for any loose, missing, or damaged parts.
Descripon
Unpacking
6KK61BFA0 /
6KK92BCA3AA00
Figure 1
Owner’s Manual
Specicaons
6KK61BFA0 / 6KK92BCA3AA00
Portable Air Conditioners
Model No. Power Supply Ph-V-Hz Cooling
Capacity Btu/h
Power Consump-
on Was
EER Btu/
Wh
Rated Cur-
rent Amps
6KK61BFA0
Single Phase, 208/230V, 60Hz 61,000 7,000 8.6 32
6KK92BCA3AA00
3 phases, 460V, 60Hz 92,000 10,500 8.8 17.2
Model No. Nema Plug Power Cord
Gauge AWG
Power Cord
Length
Dimensions
W x D x H - in. (mm)
6KK61BFA0
6-50P 8 6 28.9 x 51.6 x 59.8
(735 x 1,310 x 1,520)
6KK92BCA3AA00
Hard wired 10 10
6KK61-IOM-4

2 3
Owner’s Manual
6KK61BFA0 / 6KK92BCA3AA00
Specicaons (Connued)
Model No. Weight (Net / Gross) Lbs(kg) No. of Cool Air
Outlets Pcs
Condensate tank
Gallons(Liters)
Ambient temperature
range °F( °C)
6KK61BFA0
661/694 (300/315) 3Auto Pump
Included 64~113(18~45)
6KK92BCA3AA00
761/793 (345/360) 3
Model No. Seng temperature
(Room cool mode) °F( °C)
Seng temperature
(Spot cool mode) °F( °C)
6KK61BFA0
64~86 (18~30) 32~86 (0~30)
6KK92BCA3AA00
Model No. Applicaon Area
(Room cool mode) ²(m²)
Refrigerant
Type / oz(g)
Design Pressure - Hi/
Low Psig
6KK61BFA0
1,700 (159) R-410A
/ 112 (3200) 465 / 250
6KK92BCA3AA00
2,551 (237) R-410A
/ 141 (4,000) 450 / 250
Model No. Indoor Air Flow
CFM(CMM)
Wheels
pcs / diameter
Hot Air Duct Di-
ameter In.(mm)
Maximum Exhaust
Duct Lenght (m)
6KK61BFA0
1,700 (48) 4 / 127mm 20 (500) 100 (30)
6KK92BCA3AA00
2,890 (48) 4 / 127mm 20 (500) 100 (30)
Safety Devices
Compressor overload protector, An-freezing thermis-
ter, Condensate overow protecon, Automac restart
(Power interrupon), Compressor me delay program,
High pressure switch
Features
Temperature control, Self-diagnosc funcon, Washable
lters, °F( °C) display, O-mer, Drain pump installed ,
20ʺ Hot air exhaust flange included
3
Owner’s Manual
6KK61BFA0 / 6KK71BCA0 / 6KK92BCA3AA00
General Safety Informaon
Please read this manual carefully for instrucons on correct installaon and usage. Please read
all safeguards.
1. Transport and store the unit in an upright posion only. Leave unit in an upright posion for at
least 3 hours before rst use.
2. Always place the unit on an even, level surface.
3. Ensure the unit is connected to a grounded power supply of the correct rang / capacity.
4. The unit will cool when the room temperature is between 18°C (64.4°F) ~ 45°C(113°F) depend-
ing on the thermostat seng.
5. DO NOT use this unit for funcons other than those described in this instrucon manual.
6. DO NOT lt the unit.
7. DO NOT cover or obstruct the unit’s inlet and outlet grilles.
8. DO NOT use the unit in areas where it will be exposed to rain or water.
9. NEVER unplug the unit while it is operang.
Thank you for selecng this Koldwave Portable Air Condioner. It provides you with spot cooling
for large areas where cooling of an enre area is not praccal or possible. Please read this manual
before installing the 6KK61BFA0, 6KK71BCA0 or 6KK92BCA3AA00 as it provides important informa-
on that should be followed during installaon and maintenance of the Portable Air Condioner,
allowing you to correctly set up your system for the maximum safety and performance. Included is
informaon on customer support and service, if it is required. If you experience a problem with the
unit, please refer to the Troubleshoong secon in this manual to correct the problem. If the prob-
lem is not corrected, please collect informaon so that the Technical Support personnel can more
eecvely assist you.

4 5
Owner’s Manual
6KK61BFA0 / 6KK92BCA3AA00
10. DO NOT place any foreign objects on the unit.
11. DO NOT operate the unit with wet or damp hands.
12. DO NOT allow chemical substances to come into contact with the unit.
13. DO NOT operate the unit in the presence of ammable substances or vapors such as alcohols,
pescides, gasoline, etc.
14. DO NOT use the plug to start and to stop the unit. Always use the control panel to start and
to stop the unit.
15. Always turn o the unit when it is not in use and unplug the power plug from the electrical
outlet.
16. Always turn the unit o and unplug the main power plug from the electrical outlet before
cleaning, moving or performing maintenance.
17. AVOID the use of adapter plugs or extension cords. If it is necessary to use an extension cord
or an adapter plug to operate the unit, ensure that they are correctly rated for the applica-
on. Consult a local qualied lectrician and all local electrical codes to ensure proper setup.
18. DO NOT unplug the unit by pulling on the electrical cord. Keep electrical cord away from heat
sources and always completely unroll the cord to avoid overheang. If the power cord be-
comes damaged, a qualied service agent, qualied electrician, or similarly qualied person
must replace it, in order to avoid a hazard or shock.
19. The lters must be used with the product at all mes. When the lters are removed for clean-
ing, always ensure that the unit has been turned o and unplugged from the electrical outlet.
20. Regularly clean the lters to maintain eciency. If the lters are not cleaned regularly, the
units output performance and eciency will decline and energy consumpon will increase.
21. DO NOT operate the unit with a damaged power cord or plug, aer it malfuncons, has been
dropped or damaged.
22. Only use in the upright posion on an even, at surface. Unit must be posioned at least 24
inches (60 cm) from the nearest object in any direcon.
23. Stop operaon immediately if abnormal noise or odor is noced. Contact a local service
center.
24. Appliance is not to used by children or persons with reduced physical, sensory or mental
capabilies, or lack of experience and knowledge, unless they have been given supervision or
instrucon.
25. Children being supervised not to play with appliance.
26. That the appliance shall be installed in accordance with naonal wiring regulaons.
27. If the supply cord is damaged, it must be replaced by the manufacturer, its service agent or
similarly qualied persons in order to avoid a hazard.
SAVE THESE INSTRUCTIONS
DO NOT use the unit in wet environments, such as a laundry room, to avoid
the risk of electrical shock.
DO NOT operate the unit in explosive or ammable environments.
DO NOT operate a unit with a damaged power cord.

5
Owner’s Manual
6KK61BFA0 / 6KK71BCA0 / 6KK92BCA3AA00
Front and Right Side View
Condenser / filter
Figure 3
Figure 2
Back and Le Side View
Caster
Electrical access panel
Drain pump hose connector
Handle
Cool air outlet
Display / Control board
Top fan exhaust flange
Evaporator / filter
Condenser / filter
Drain pump included
Figure 8
Figure 7
Figure 4 Figure 5
Figure 6
1. Remove cool air outlet hose(s) from
carton.
2. Place the cool air outlet hose(s) on
the front top of air condioner.
3. Use screws (enclosed inside of box
with cool air outlet hose(s) to install
the cool air outlet hose(s)
on the air condioner as shown in
Figure 5.
1. Take out the cord holder
from the accessory box.
2. Place the cord holder on
the back side of air condioner.
3. Use screws (enclosed inside of
accessory box ith cord
holder)to install the cord
holder on the air condioner
as shown in Figure 4.
TOP FAN EXHAUST FLANGE
1. Remove the top fan exhaust flange from carton.
2. Place the top fan exhaust flange on the top of air
condioner.
3. Use screws (enclosed inside of box with the top fan
exhaust flange) to install the top fan exhaust flange on air
condioner as shown in Figure 6.
HANDLE
1. Remove a handle from carton.
2. Place the handle on upper side of rear panel.
3. Use screws (enclosed inside of box with a handle)
to install the handle as shown in Figure 7.
POWER CORD HOLDER
DISCHARGE DUCTS
/SUPPLY AIR DUCT
A condenser plenum can be purchased separately. condenser plenum
fits over the condenser to duct condenser air to the unit to improve
cooling efficiency.
1. Remove the Filter("A")
2. Check the Filter("C") is inserted properly in condenser plenum("B")
3. Install "B" which contains "C" by using driver with enclosed
bolts(6EA) as Figure 8.
CONDENSER PLENUM
(Oponal)
A
B
C
Assembly
COMPONENT PARTS
6 7
Owner’s Manual
6KK61BFA0 / 6KK92BCA3AA00
Installaon
MOVING THE UNIT
PLUGGING IN THE UNIT
Unlock the casters and push the unit using the side handles to a at, level surface and set the
caster brakes to the locked posion.
Check the prongs and surface of the power cord plug for dust/dirt. If dust and/or dirt are pres-
ent, wipe o with a clean, dry cloth.
Check the power cord, plug and prongs for damage or excess play.
If any damage or excess play is found, contact a qualied repair technician or a qualied electri-
cian to perform replacement or repair of the power cord, plug or prongs.
NOTE: Make sure the AC outlet is free of dirt, dust, oil, water, or any other foreign material.
WARNINGS REGARDING PROPER LOCATION FOR INSTALLATION
Do not use the unit in explosive environments or in areas where ammable
gas leakage may occur.
Do not use the unit in areas where it will be exposed to rain or water.
Do not use the unit in a corrosive atmosphere.
Do not use the unit above 18°C(64°F) ~ 45°C(113°F).
Do not install the unit on uneven or sloping surface. The unit may roll or
topple over even if the casters are set to the locked posion.
If the power cord or plug is damaged, repair should only be performed by
qualied electrical personnel.
Do not connect / disconnect the power cord or aempt to operate buons
with wet hands. This could result in electrical shock.

7
Owner’s Manual
6KK61BFA0 / 6KK71BCA0 / 6KK92BCA3AA00
Operaon
CONTROL PANEL
1. POWER BUTTON: Acvates unit when POWER BUTTON is pressed. (Fan starts on low speed). If
power buon is pressed during operaon, unit stops.
2. BLOWER BUTTON: Changes fan speed from (Low) to (High) when pressed.
3. SPOT/COOL BUTTON: Acvates compressor and begins producing cool air 5 seconds aer but-
ton is pressed. Regulates temperature based on outlet cool air temperature.
4. ROOM/COOL BUTTON: Acvates compressor and produces cool air 5 seconds aer buon is
pressed. Regulates temperature based on inlet ambient air temperature.
5. SET TEMP BUTTONS: Change target temperature/data value by +/- 1. Change data value by +/-
10 by pressing connually. Press the SET TEMP BUTTONS to set temperature. Upper buon is
to heighten temperature and Lower buon is to lower temperture.
6. ALARM: Alarm indicator lights (blinks) and indicates abnormal system operaon. If Alarm oc-
curs, compressor stops. System operaon stops when ALARM light is acvated (blinks) longer
than 3 minutes.
7. CURRENT TEMP: Displays current room temperature in display in Fahrenheit. (In Room Cool
Mode only). SPOT/COOL Mode – Displays outlet (cool air) temperature during normal opera-
ons. In order to change °F to °C, press SPOT/COOL and ROOM/COOL buons together for 2
seconds. C will blink 2 mes and Figure will change to °C. ALARM codes blink and are displayed
when abnormal operaon occurs.
8. TARGET TEMP: displays the unit set temperature for ROOM/COOL mode only.
OFF-TIMER: Enter to Timer Seng Mode if you press BLOWER Buon and SPOT/COOL Buon
together for 1 seconds. Press UP/DOWN Buon to set the mer unl it shows the gure you
want to set. Aer 5 seconds, the gure will be memorized and the compressor will stop aer the
me set.
AUTO RESTART: If the unit goes o due to an electrical interrupon, the unit will automacally
restart when the power resumes.
1 2
5
3 4
6
87
Figure 9

8 9
Owner’s Manual
6KK61BFA0 / 6KK92BCA3AA00
Maintenance
FILTER CLEANING (See Figures 10 and 11)
There are three lters in the unit. The evaporator lter is located at the front of the unit. The
condenser lters are located at the side of the unit.
1. loosen up 2 bolts on the front lter guard.
2. Slide lter up and use a vacuum cleaner to remove the dust from the lter.
3. If the lter is heavily covered with dust and dirt, warm water and mild soap or neutral deter-
gent may be used to wash the lter. Do not use any other chemicals to clean lter, as they will
likely damage the lter.
4. Dry the lter in a shaded area before replacing it. Do not operate the unit without the lter
installed and the lter guard in the closed posion.
5. Replace the clean lter and close the lter guard.
6. To clean the condenser lters, li up on the side lters from the middle bar slightly and then
angle the lters outwards from the boom and remove.
7.Use the same cleaning procedure as above (3 – 5).
8. To replace the condenser lter, place the top of the lter in the guide and slide the lter up
unl the boom of the lter clears the frame. Then push the boom of lter into the guide
and let lter gently fall inside the guide.
NOTE: For eecve cooling clean the lter at least every 2 weeks.
– For your convenience, record the complete model number and product name (located on the
Product Idencaon Plate), the purchase date, purchase locaon, serial number, and warranty
period in the table below.
– Also, aach your purchase receipt as proof of purchase to this instrucon manual for future
reference.
– To ensure your product is covered by warranty, the complete faulty product along with your
original purchase receipt must be provided at the place of purchase.
Do not operate without the lter ed.
Do not operate the unit with a damaged cord or plug, aer the unit malfunc-
ons, or if the unit has been dropped or damaged.
– Loosen up 2 bolts on
the front filter guard.
– Slide filter up and use
a vacuum cleaner to remove
the dust from the filter.
– Remove dust from the filt
er
using a vacuum cleaner
hose aachment.
– If required wash the filter i
n
luk
ewarm water with a mild
detergent. Leave to dry in
a shaded area before
reinstalling.
Figure 10 – Removing Filters Figure 11 – Removal of Dust

9
Owner’s Manual
6KK61BFA0 / 6KK71BCA0 / 6KK92BCA3AA00
Maintenance (Connued)
– To ensure your product is covered by warranty, the complete faulty product along with your
original purchase receipt must be provided at the place of purchase.
Product Portable Air Condioner
Model No.
Date of Purchase
Place of Purchase
Serial No.
Period of Warranty
Customer: Please read and keep this
manual for future reference and keep
sales receipt as proof of purchase.
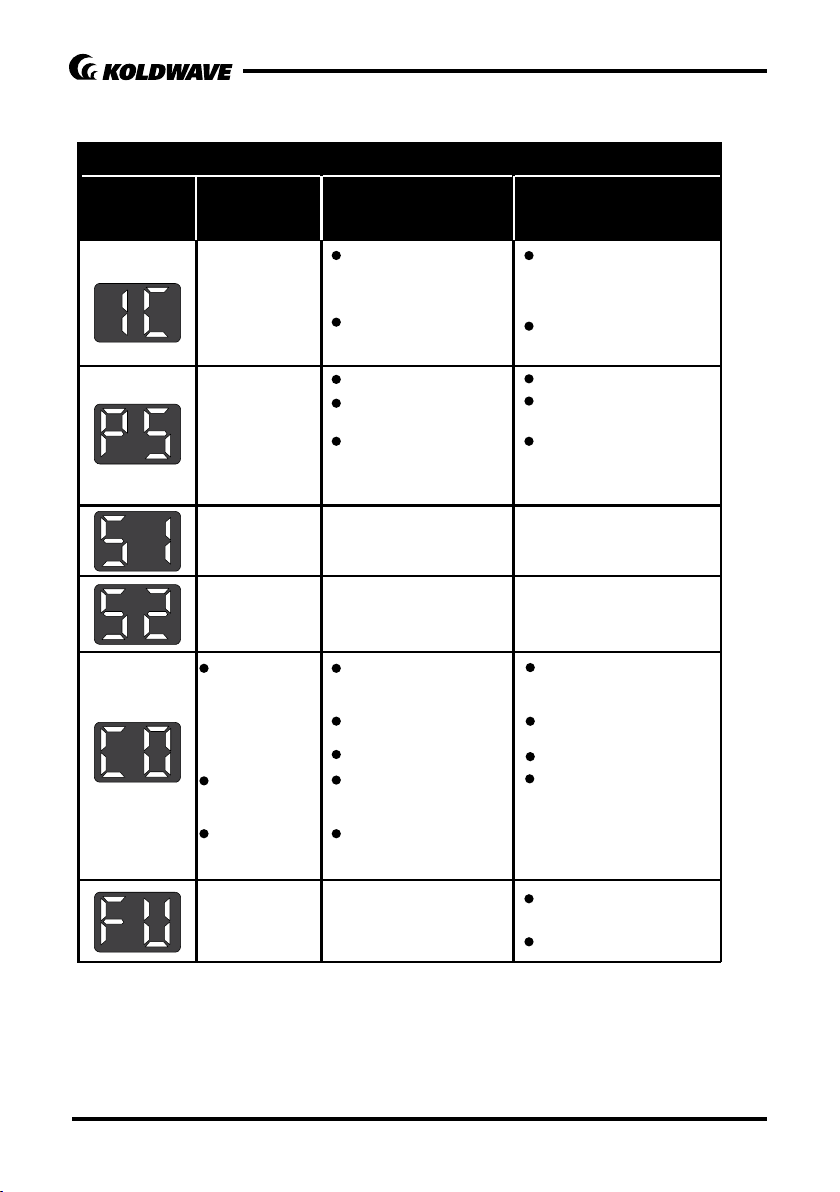
SELF-DIAGNOSTIC CODES (See Table 1)
The alarm light is acvated if abnormal operaon occurs, and a code is displayed on the control
panel. The compressor and condenser fan motor will stop operang. The evaporator fan will con-
nue to run for 3 minutes. If the fault is reced within 3 minutes, the unit will resume opera-
on. If the fault persists for more than 3 minutes, the evaporator fan also stops. The fault must
be reced before the unit can resume normal operaon.
10 11
Owner’s Manual
6KK61BFA0 / 6KK92BCA3AA00
Frost prevenon
sensor and
Abnormal
temperature
sensor value
Refrigerant high
pressure switch
Abnormal
temperature
sensor value
Abnormal
temperature
sensor value
Evaporator motor
overload
(for 6KK92)
Drain pump
alarm
Indoor heat exchanger
temperature too low
TH3 temperature sensor
has a loose or broken
connecon
Blocked air filter
Blocked / kinked exhaust
duct
Ambient temperature
is too high
TH1(Outlet) temperature
sensor has a loose or
broken connecon
TH2(Inlet) temperature
sensor has a loose or
broken connecon
Drain pump defecve or
improper hose connecon
(including kink or blockage)
Ambient temperature is
too high
Unstable voltage supply
Defecve compressor
Abnormal operaon of
evaporator motor
(for 6KK92)
Abnormal operaon of
condenser motor
(for 6KK92)
Do not use the air
condioner if ambient
temperature is lower than
18°C (64°F)
Contact a qualified service
agent
Clean air filter
Ensure exhaust duct is not
blocked / kinked
Do not use the air
condioner if ambient
temperature is higher than
45°C (113°F)
Contact a qualified service
agent
Contact a qualified service
agent
Do not use the air condioner
if ambient temperature is
higher than 45°C (113°F)
Contact a qualified service
agent
Replace compressor
Contact a qualified service
agent
Check the hose connecon
and hose
Replace drain pump
SELF-DIAGNOSTIC ALARM CODES
Alarm
Display ProblemCause Correcve Acon
Compressor
overload
Condenser motor
overload
(for 6KK92)
愚決檺律
;ΠΕΖΝ ͽͲ΅ͶʹͲΆ΅ͺͿ
Ͳ΅Ϳ
͵Ͳ;ͶͺʹͽΈʹ
惾剳
岂憮斲決溎 Ω
惾剳殯Έʹ
洇殯微塾
沗昷 円皦 筛汾
朞洛斲穳
沲滎汆怺塶姷嵷滆惾畲嵦
汾曊愯憛樮廇汾曊
汾曊族旇籗族壊
祢彺熞庲岂惾嘪決砋瑚砋
汾曊匶渆壊彺愕昪凊洢击穊床
歾刃汞獞朞昦抏汆昦汆汾曊篊洎埮昦沊
ʹ怾割犚儆
Table 1- Alarm Codes
This manual suits for next models
1
Table of contents
Other Koldware Air Conditioner manuals

Popular Air Conditioner manuals by other brands






Fujitsu
Fujitsu Inverter ASBA30JFC operating manual

Toshiba
Toshiba RAS-M10SMUV-E installation manual

Daikin
Daikin FXLQ20MAVE Operation manual

Hitachi
Hitachi RAS-E24CAK instruction manual

CIAT
CIAT Magister 2 Series Installation, Operation, Commissioning, Maintenance

Bestron
Bestron AAC6000 instruction manual





