Kohler K-5848 User manual

Installation Guide
Cast Iron Undercounter Sinks
Mproduct numbers are for Mexico (i.e. K-12345M)
Los números de productos seguidos de
Mcorresponden a México (Ej.
K-12345M)
Français, page ″Français-1″
Español, página ″Español-1″
K-5848 K-5902
K-6589
1007290-2-C

Tools and Materials
Before You Begin
CAUTION: Risk of personal injury or product damage. Cast
iron sinks are very heavy. Get assistance lifting the sink into
place.
Observe all local plumbing and building codes.
Shut off the hot and cold water supplies.
Inspect the drain and supply tubing. Replace if necessary.
Prior to installation, unpack the new sink and inspect it for
damage. Return the sink to its protective carton until you are
ready to install it.
Due to the nature of undercounter installations, Kohler Co.
recommends that undercounter sink installations be performed by
trained and experienced installers.
To ensure a safe and damage-free installation, two people should
install the sink.
Plan the sink installation so future removal from underneath the
countertop is possible without damaging the countertop.
For multiple-bowl installations, additional support will be
required between bowls installed in countertops that are less than
1″(2.5 cm) thick.
For multiple-bowl, undercounter installations, a minimum
distance of 3-3/8″(8.6 cm) is required between the cutouts.
A minimum countertop thickness of 1″(2.5 cm) is required if
using the anchors provided.
Do not use adhesives or adhesive sealants with this product.
Sealant
Tape
Measure
Keyhole/Compass
Saw
Template
(supplied)
Safety
Glasses
• 1/2" or larger drill bit
• Hole saw (1-3/8" dia.)
• Two adjustable wrenches
Pencil
Drill
Scissors
Plus:
1007290-2-C 2 Kohler Co.

Before You Begin (cont.)
All information in these instructions is based on the latest product
information available at the time of publication. Kohler Co.
reserves the right to make revisions in the design of products
without notice, as specified in the Price Book.
Kohler Co. 3 1007290-2-C

1. Preparation
Install the water supplies and drain piping according to the
roughing-in information.
NOTE: You may require different, more specialized tools to install
this sink to countertop materials other than wood or wood
composites.
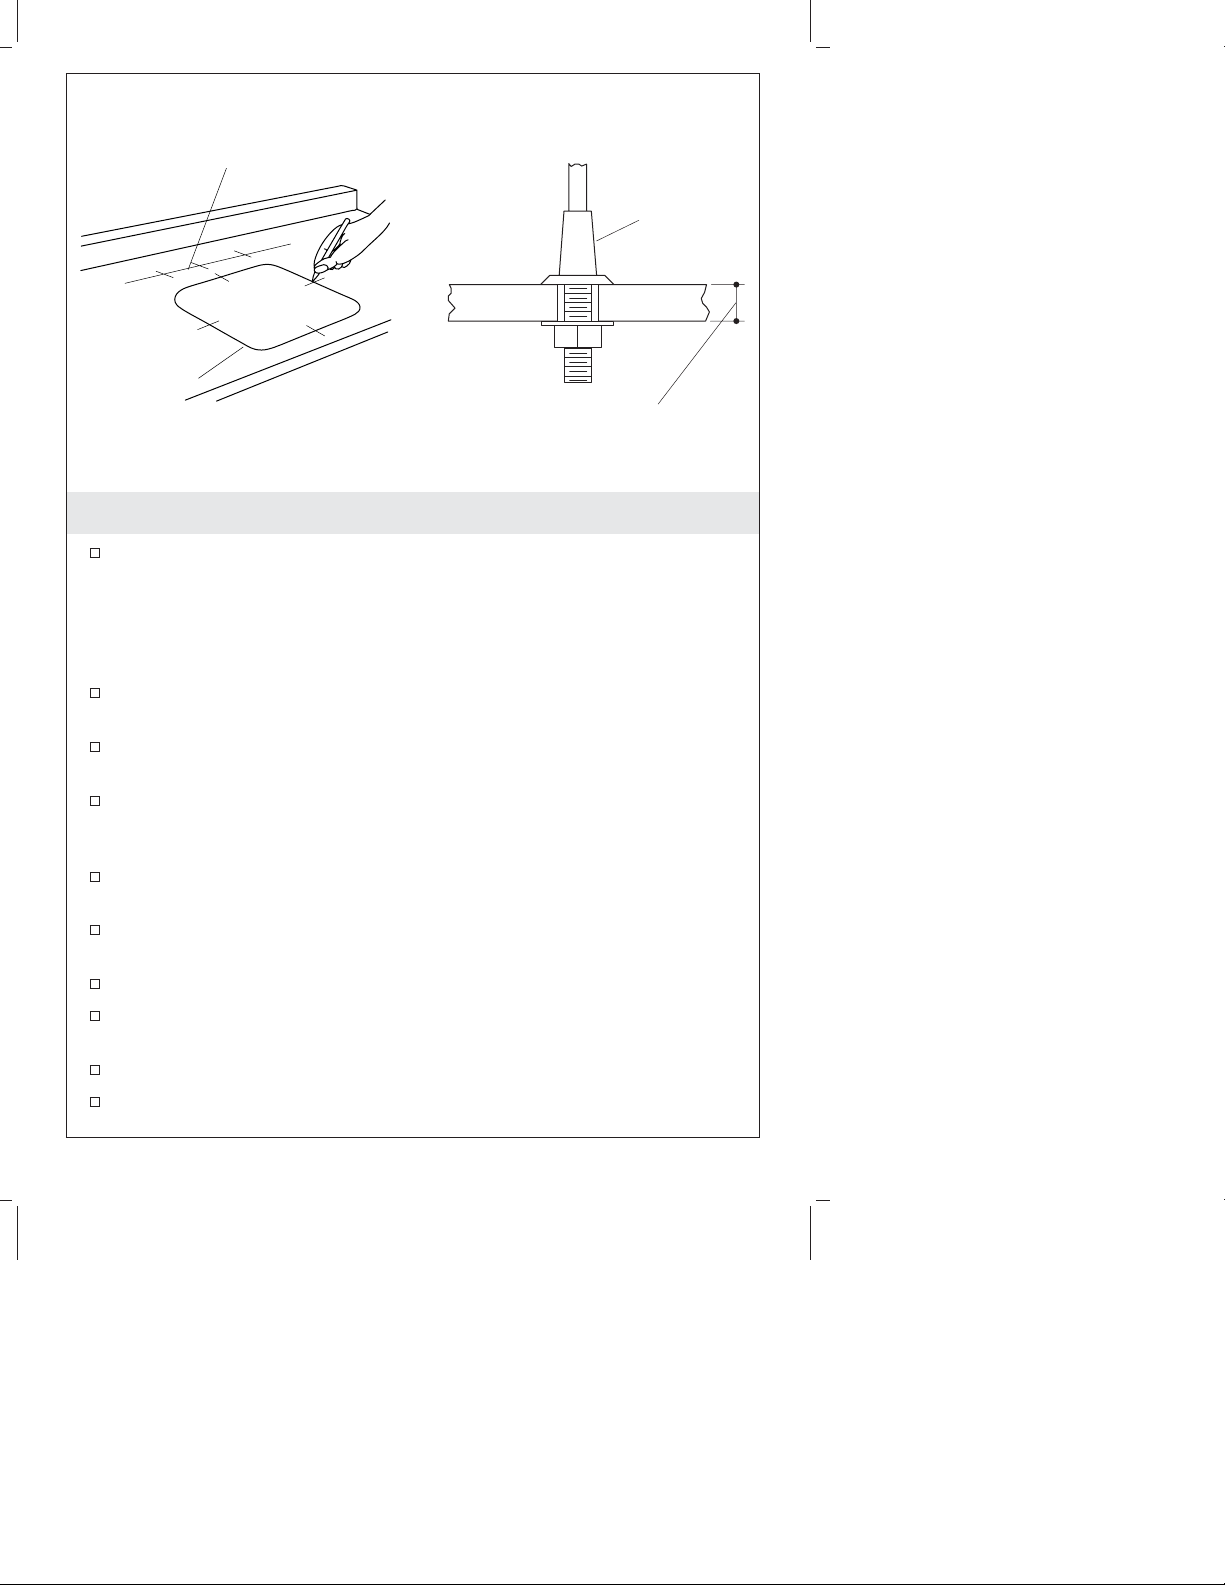
Cut along the inside of the template line where indicated for the
countertop opening.
Position the template on the countertop. Check for adequate
clearance between the sink, faucet, backsplash and cabinet.
For multiple-bowl installations, additional support will be
required between bowls installed in countertops that are less than
1″(2.5 cm) thick.
For multiple-bowl, undercounter installations, a minimum
distance of 3-3/8″(8.6 cm) is required between cut-outs.
Trace around the template on the countertop with a pencil.
Centerlines are provided to help align the opening.
Mark the faucet hole centerline on the countertop.
Verify there is adequate clearance between the sink, faucet,
backsplash and cabinet.
Measure the thickness of the countertop.
Determine the threaded shank length of the faucet.
TEMPLATE
Cutting Line
Faucet Centerline
Countertop Thickness
Faucet
Assembly
1007290-2-C 4 Kohler Co.

Preparation (cont.)
Compare the measurements to verify that the faucet will fit on
the countertop as required. If the faucet will not fit, you will need
to select a different faucet or countertop.
Kohler Co. 5 1007290-2-C

2. Undercounter Installation
CAUTION: Risk of product damage. Do not cut, drill, or
sand the countertop while it is positioned over the fixture.
Cut out the opening by carefully following the pencil line traced
from the template.
Equally space the appropriate number of clamps, and mark the
clamp-mounting holes on the underside of the countertop.
•K-5848-2U: 12 clamps.
•K-5902-1U: 8 clamps.
•K-6589-U: 4 clamps.
For Wood Countertops
Pre-drill the wood screw holes at the marked locations.
Waterproof any exposed areas of wood.
For Marble/Stone Countertops
Position the countertop upside down on foam padding to protect
the surface. Drill 3/8″holes 5/8″(1.6 cm) deep at the marked
locations to accommodate the anchors provided.
Use a setting tool and hammer to secure the anchors flush with
the countertop bottom surface.
Install the clamps.
Countertop Opening - Bottom View
Clamp
Screw
Anchor
Bottom View
Countertop
Sealant
Sink
Screw
Clamp
Edge
Countertop
Opening
2" (5.1 cm)
1007290-2-C 6 Kohler Co.

Undercounter Installation (cont.)
For All installations
If the countertop has not been installed, install it at this time.
Drill the faucet holes according to the faucet installation
instructions.
Install the faucet to the countertop according to the faucet
manufacturer’s instructions.
Install the strainer to the sink according to the strainer
manufacturer’s instructions.
Turn the clamps parallel to the opening to allow for easy
installation of the sink.
Clean the top of the sink rim with a non-abrasive cleaner.
Clean the underside of the countertop around the cut-out area,
making sure the surface is smooth, clean, and free of defects.
Apply a generous bead of sealant to the top surface of the sink
rim. CAUTION: Risk of personal injury or product damage. Cast
iron sinks are very heavy. Get help lifting the sink into place.
Position and align the sink with the countertop cut-out.
Rotate the clamps over the sink rim, and carefully tighten them
until they are just snug.
Check the alignment of the sink with the cut-out. Then securely
tighten the clamps.
Optional: Apply a bead of sealant between the countertop and
the top of the sink rim.
Immediately wipe away any excess sealant, and fill any voids as
needed.
Allow the sealant to cure for at least 30 minutes before
proceeding.
Connect and tighten the trap to the strainer, and complete the
water supply connections to the faucet according to the
instructions packed with the faucet.
Run water into the sink and check for leaks.
Clean up with a non-abrasive cleaner.
Kohler Co. 7 1007290-2-C

Guide d’installation
Éviers en fonte sous comptoir
Outils et matériels
Avant de commencer
ATTENTION : Risque de blessure corporelle ou
d’endommagement du produit. Les éviers en fonte sont très
lourds. Demander de l’assistance pour mettre l’évier en place.
Respecter tous les codes de plomberie et de bâtiment locaux.
Couper les alimentations d’eau chaude et d’eau froide.
Inspecter le drain et la tuyauterie d’alimentation. Remplacer si
nécessaire.
Avant l’installation, déballer le nouvel évier et l’examiner pour en
déceler tout dommage. Remettre l’évier dans son emballage
jusqu’à être prêt à l’installer.
Vu la nature particulière des installations sous comptoir, Kohler
Co. recommande que les installations des éviers sous comptoir
soient effectuées par des installateurs formés et expérimentés.
Pour assurer une installation sécurisée et sans dommage,deux
personnes devraient installer l’évier.
Planifier l’installation de l’évier de façon à ce qu’un futur
démontage d’en-dessous le comptoir soit possible sans
dommages.
Mastic
Mètre
ruban
Petite scie égoïne
Gabarit
(fourni)
Lunettes de
protection
• Mêche de 1/2" ou plus large
• Scie à orifices (Ø 1-3/8")
• Deux clés à mollette
Crayon
à papier
Perceuse
Ciseaux
Plus:
Kohler Co. Français-1 1007290-2-C

Avant de commencer (cont.)
Pour des installations à cuvettes multiples, un support
additionnel sera nécessaire entre les cuvettes installées sur des
comptoirs d’une épaisseur de moins de 1″(2,5 cm).
Pour les cuvettes multiples, les installations sous comptoir, une
distance minimum de 3-3/8″(8,6 cm) est requise entre les
découpes.
Une épaisseur de comptoir minimum de 1″(2,5 cm) est requise si
les ancrages fournis sont utilisés.
Ne pas utiliser pas de matériaux d’étanchéité ou adhésifs avec ce
produit.
Toutes les informations contenues dans ces instructions sont
basées sur les données les plus récentes relatives au produit au
moment de la publication. Kohler Co. se réserve le droit
d’apporter toutes modifications sur le design des produits et ceci
sans préavis, tel que spécifié dans le catalogue des prix.
Kohler Co. Français-2 1007290-2-C
1. Préparation
Installer les alimentations d’eau et tuyauterie du drain selon
l’information du plan de raccordement.
REMARQUE : Des outils plus spécialisés pour installer cet évier sur
un comptoir autre qu’en bois ou en bois de synthèse peuvent être
requis.
Découper le long de la ligne intérieure du gabarit pour
l’ouverture du comptoir.
Placer le gabarit sur le comptoir. Vérifier l’espacement adéquat
entre l’évier, le robinet le dosseret et le meuble.
Pour des installations à cuvettes multiples, un support
additionnel sera nécessaire entre les cuvettes installées sur des
comptoirs d’une épaisseur de moins de 1″(2,5 cm).
Pour les cuvettes multiples, les installations sous comptoir, un
espace minimum de 3-3/8″(8,6 cm) est requis entre les découpes.
Tracer au crayon le gabarit sur le comptoir. Les lignes centrales
sont fournies pour aider à aligner l’ouverture.
Marquer l’axe central de l’orifice du robinet sur le comptoir.
Vérifier qu’il y ait un espace adéquat entre l’évier, le robinet, le
dosseret et le meuble.
Mesurer l’épaisseur du comptoir.
Déterminer la longueur du manche fileté du robinet.
GABARIT
Ligne de
découpe
Axe central
du robinet
Épaisseur du
comptoir
Ensemble
du robinet
1007290-2-C Français-3 Kohler Co.
This manual suits for next models
2
Table of contents
Languages:
Other Kohler Washer manuals

Popular Washer manuals by other brands

Tricity Bendix
Tricity Bendix AW 1000 W Operating & installation instructions

Panasonic
Panasonic NA-F60L5WRB operating instructions

GE
GE WSLP1500 Dimensions and installation information

Electrolux
Electrolux EWF1284EDW Service manual

Bosch
Bosch WAN2829BSN User manual and installation instructions

LG
LG TV2516DV3B owner's manual