Kohler K-13931 User manual

Installation Guide
Bedpan Washers
Mproduct numbers are for Mexico (i.e. K-12345M)
Los números de productos seguidos de
Mcorresponden a México (Ej.
K-12345M)
Français, page “Français-1”
Español, página“Español-1”
K-13931 K-13938
1034409-2-A

Thank You For Choosing Kohler Company
We appreciate your commitment to Kohler quality. Please take a few
minutes to review this manual before you start installation. If you
encounter any installation or performance problems please don’t
hesitate to contact us. Our phone numbers and web site are listed on
the back cover. Thanks again for choosing Kohler Company.
Tools and Materials
Adjustable
Wrench
Strap
Wrench Thread
Sealant
Phillips
Screwdriver
Blade
Screwdriver
• 9/16" or larger drill
bit for wall material
• Piping support
brackets
• Rags
Plus:
1034409-2-A 2 Kohler Co.
Before You Begin
CAUTION: Risk of property damage. To support the bedpan
washer and piping, provide sufficient reinforcement or mounting
brackets as required inside the wall.
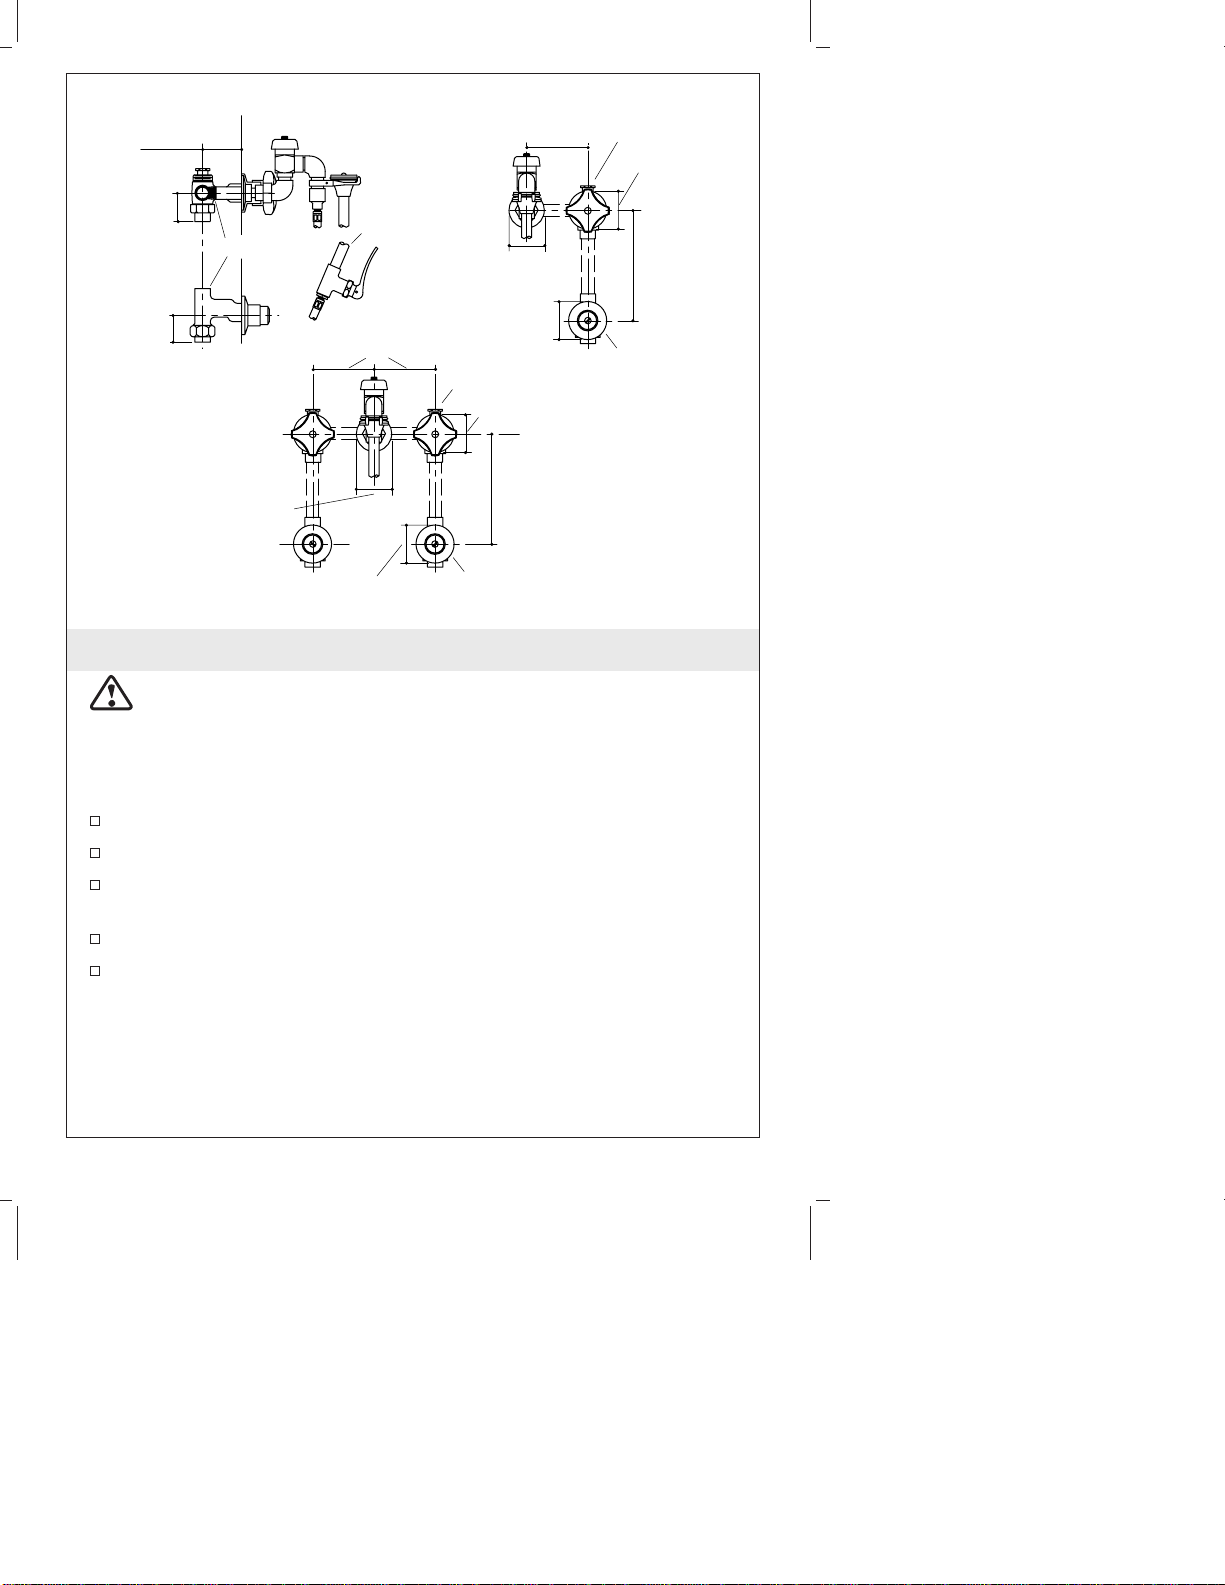
NOTE: Refer to the roughing-in diagram for dimensional
information.
Shut off the main valve and water supply.
Observe all local plumbing codes and building codes.
Plumb using 1/2″NPT pipe or 1/2″copper tubing, elbows, and
adapters. Secure the piping to reinforcements in the wall.
Do not remove plastic thread protectors until instructed.
Kohler Co. reserves the right to make revisions in the design of
bedpan washers without notice, as specified in the Price Book.
K-13931
K-13938
1/2" N.P.T.
2-1/4" (5.7 cm)
Min.
3" (7.6 cm)
Max.
1-3/4"
(4.4 cm)
1-3/4"
(4.4 cm)
Spray
1/2" Supply
Valve
1/2" Supply
Valve
1/2" Supply
Valve
1/2" Supply
Valve
4"
(10.2 cm)
4"(10.2 cm)
2-5/16" (5.9 cm) D.
2-5/16"
(5.9 cm) D.
2-1/2" (6.4 cm) D.
2-1/2" (6.4 cm) D.
2-1/2"
(6.4 cm) D.
2-1/2"
(6.4 cm) D.
8" (20.3 cm)
8" (20.3 cm) Optional
Kohler Co. 3 1034409-2-A

1. Install the Valve Body
NOTE: Apply a thread sealant where applicable.
NOTE: Do not remove thread protectors at this time.
Thread the plug button into the top of the supply valve.
Install both the supply valve and the check valve according to the
roughing-in diagram. Install two supply valves and two check
valves for a two handle bedpan washer.
Thread one supply nipple into the supply elbow outlet in the
wall. Repeat for a two handle bedpan washer.
Apply a bead of plumbers putty or other sealant to backside of
the flange according to the putty manufacturer’s instructions.
Slide one flange onto and over the supply nipple until it is snug
against the finished wall. Secure with the flange setscrew. Repeat
for a two handle bedpan washer.
Remove any excess putty or sealant.
Plug
Supply
Valve
Elbow
1/2" Piping
or Tubing
Water
Supply
Thread
Protectors
Check
Valve
Elbow
Supply
Outlet Supply
Nipple
Screw
Flange
Apply Plumbers
Putty.
1034409-2-A 4 Kohler Co.

2. Install the Handles and Check Valves
NOTE: Handles that are marked ″Cold″with a blue tape must
always be installed onto the right valve as viewed from the front of
the bedpan washer.
One Handle Installation
To install one handle, remove the thread protector from the valve.
Turn the valve to the closed position.
Apply a bead of plumbers putty or other sealant to backside of
the escutcheon according to the putty manufacturer’s instructions.
Thread the escutcheon onto the valve body until it is snug against
the finished wall.
Remove any excess putty or sealant.
Press the spline adapter into the valve stem.
Press the handle onto the escutcheon and spline adapter. Secure
with a screw.
Insert one button cap into the top and over the screw.
Supply
Valve
Spline
AdapterEscutcheon Escutcheon
Valve
Stem
Handle
Round-Head
Screw
Button
Cap
Apply
Plumbers
Putty.
Apply
Plumbers
Putty.
Check Valve
Shield
Kohler Co. 5 1034409-2-A

Install the Handles and Check Valves (cont.)
Repeat for a two handle bedpan washer.
Check Valve Installation
To install one check valve, remove the thread protector.
Apply a bead of plumbers putty or other sealant to backside of
the escutcheon according to the putty manufacturer’s instructions.
Thread the escutcheon onto the check valve until it is snug
against the finished wall.
Remove any excess putty or sealant.
Thread the shield onto the check valve until tight.
Repeat for a two handle bedpan washer.
1034409-2-A 6 Kohler Co.

3. Install the Vacuum Breaker
NOTE: Apply a thread sealant where applicable.
Rotate the nut and union joint counterclockwise until they are
removed from the vacuum breaker assembly.
Slide the nut with threads facing out, half way down the supply
nipple.
Thread the union joint onto the supply nipple.
Thread the vacuum breaker assembly onto the union joint until
tight. Ensure that the vacuum breaker assembly is vertically
aligned.
Slide the nut onto the vacuum breaker assembly and thread until
tight.
Rotate the vacuum breaker clamp to point straight out from the
left side of the vacuum breaker assembly. Secure with a screw.
Vacuum
Breaker
Assembly
Supply
Nipple
Nut
Union
Joint
Clamp
Kohler Co. 7 1034409-2-A

4. Install the Hose Assembly
Thread one end of the flexible hose into the vacuum breaker
assembly outlet. Securely tighten.
Thread the other end of the flexible hose into the sprayer outlet.
Securely tighten.
Hang the spray nozzle from the rotated valve assembly clamp.
Vacuum
Breaker
Assembly
Hose
Sprayer
1034409-2-A 8 Kohler Co.

5. Installation Checkout
NOTE: The water flow from the sprayer can be limited by adjusting
the angle valve.
NOTE: The water temperature can be reset by adjusting the angle
valve.
One Handle Bedpan Washer
For a one handle bedpan washer, turn on the main water supply.
Open both the check valve and the supply valve.
Check for leaks. Repair as needed.
Remove the screw, face, and washer from the sprayer.
Run water through the hose for approximately one minute to
remove debris.
Test and verify that the sprayer operates normally.
Two Handle Bedpan Washer
For a two handle bedpan washer, repeat with the other check
valve and supply valve.
Turn the water off.
Remove any debris from the sprayer and reinstall.
Test and verify that the sprayer operates normally.
Face Screw
Washer
Sprayer
Kohler Co. 9 1034409-2-A

Guide d’installation
Appareil de nettoyage à cuvettes
Outils et matériels
Merci d’avoir choisi la compagnie Kohler
Nous apprécions votre engagement envers la qualité Kohler. Veuillez
prendre s’il vous plaît quelques minutes pour lire ce manuel avant de
commencer l’installation. Ne pas hésiter à nous contacter en cas de
problème d’installation ou de fonctionnement. Nos numéros de
téléphone et adresse Internet sont au verso. Merci encore d’avoir choisi
la compagnie Kohler.
Cléàmolette
Cléà
sangle Jointd'étanchéité
pourfiletage
Tournevis
cruciforme
Tournevisplat
• Mêche à mur de
9/16" ou plus large
• Support de
tuyauterie
• Chiffons
Plus:
Kohler Co. Français-1 1034409-2-A
This manual suits for next models
1
Table of contents
Languages:
Other Kohler Washer manuals

Popular Washer manuals by other brands

Tricity Bendix
Tricity Bendix AW 1000 W Operating & installation instructions

Panasonic
Panasonic NA-F60L5WRB operating instructions

GE
GE WSLP1500 Dimensions and installation information

Electrolux
Electrolux EWF1284EDW Service manual

Bosch
Bosch WAN2829BSN User manual and installation instructions

LG
LG TV2516DV3B owner's manual