
JKEXER EPIC 823 User manual
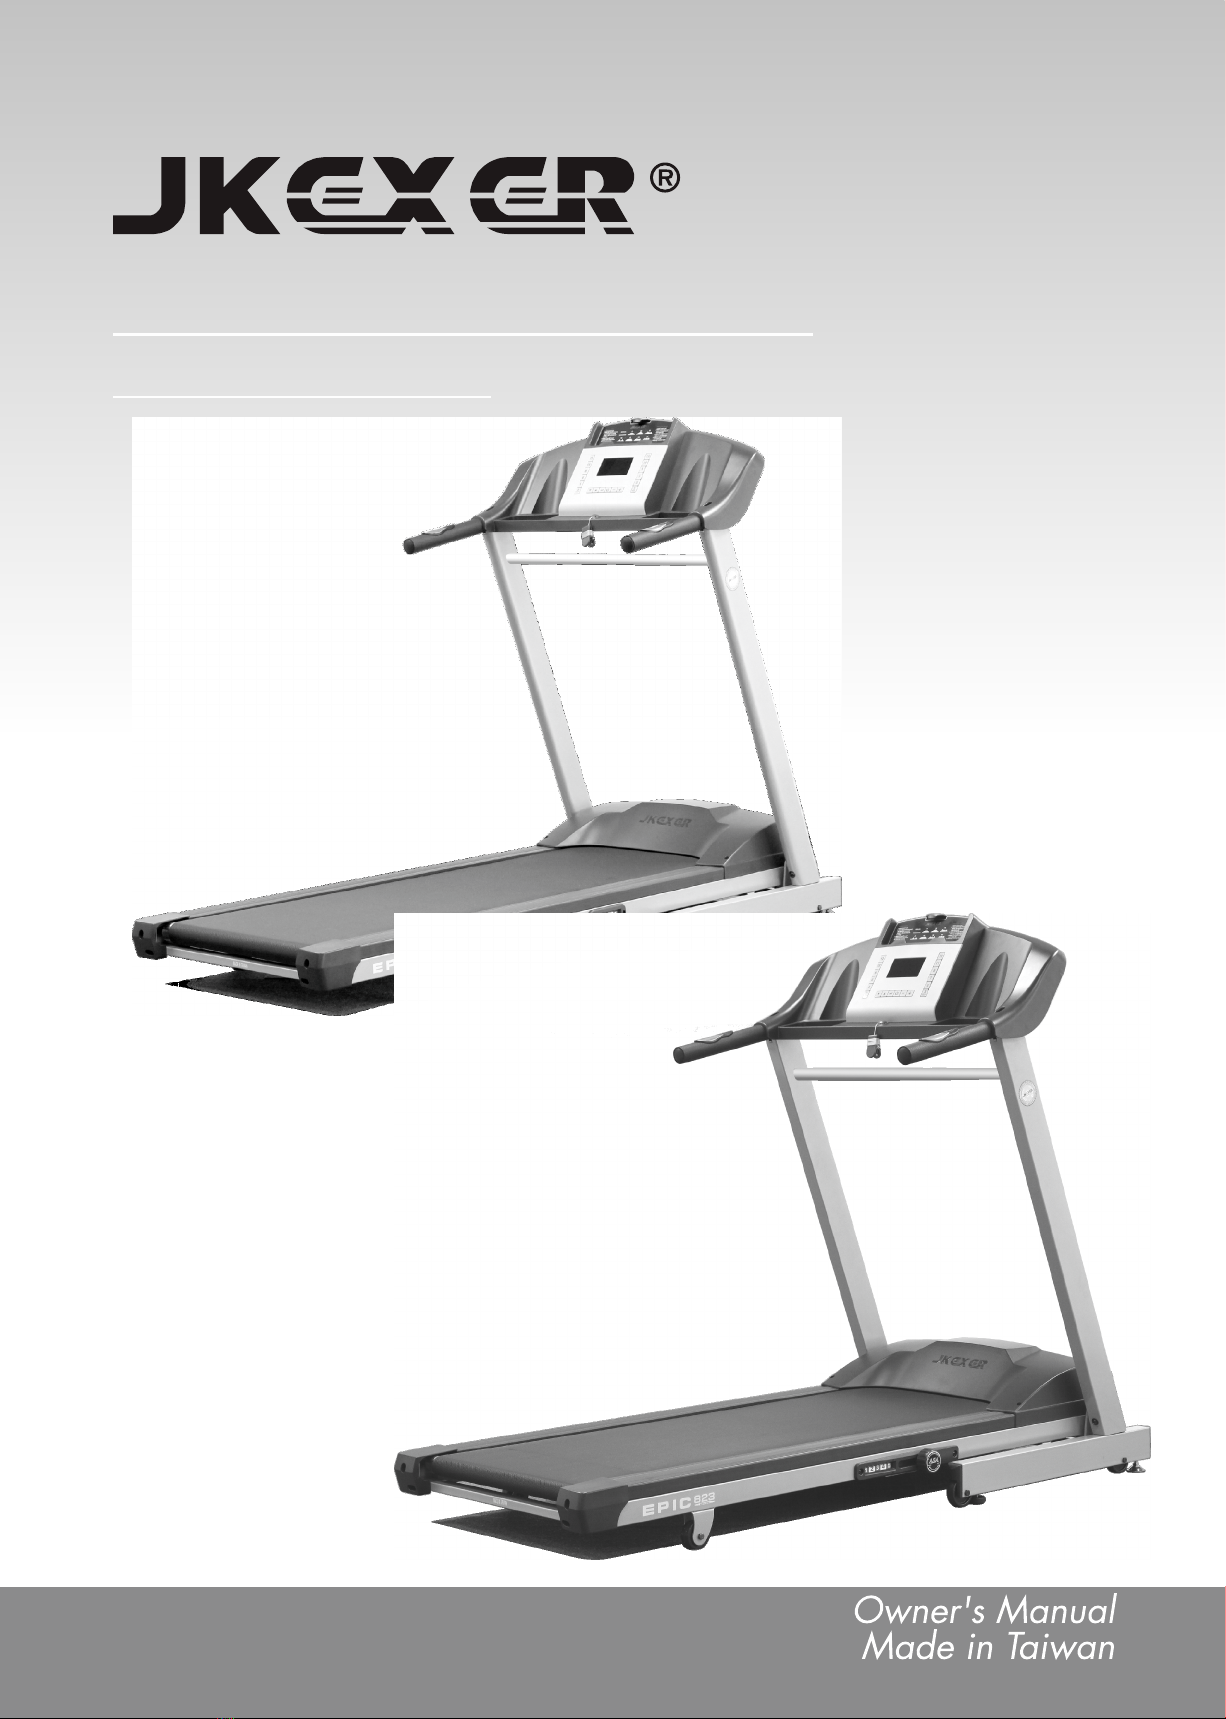
MOTORIZED TREADMILL
EPIC 823 / 825
823
825

..............................
..........................
..........
...................................
.........................................
......................................
...................................
............................................
..............................
......................................
.....................................
..........................................
..........................
..............................................
................................
.............................
..........................................
....................................................
...................................
..........................
....................
...................................................
................................
...................................................
......................
..........................................
..................................................
...................
IMPORTANT SAFETY INSTRUCTIONS
ELECTRICAL GROUNDING INSTRUCTIONS
CAUTION: BEFORE AND AFTER RUNNING ON THE TREADMILL
RUNNING DECK LUBRICATION
ASSEMBLY PARTS LIST
ASSEMBLY INSTRUCTIONS
POSITIONED FOR OPERATION
HOW TO OPERATE
MASTER POWER SWITCH LOCATION
PROFILE FOR PROGRAMS
COMPUTER INSTRUCTIONS
FUNCTIONS DISPLAY
ERROR MESSAGE & TROUBLE SHOOTING
ASA OPERATION
HOW TO FOLD UP FOR STORAGE
HOW TO FOLD DOWN FOR EXERCISE
HOW TO TRANSPORT
WARNING
ALIGNING THE RUNNING BELT
ADJUSTING THE RUNNING BELT TENSION
CLEANING AND INSPECTING THE RUNNING BELT
CLEANING
INSPECT FASTENERS AND WIRING
STORAGE
HOW TO WORK OUT SAFELY AND EFFICIENTLY
EXPLODED DRAWING
PARTS LIST
HOW TO MAINTAIN YOUR MOTORIZED TREADMILL
P. 1
P. 2
P. 3
P. 3-4
P. 5
P. 6-8
P. 8
P. 8-10
P. 10
P. 10
P. 11
P. 12
P. 13
P. 13
P. 14
P. 14
P. 14
P. 14
P. 15
P. 15
P. 15
P. 16
P. 16
P. 16
P. 16
P. 17-19
P. 18-20
P. 21
TABLE OF CONTENTS
We reserve the right to make change at any time without notice,
in colors, parts and materials.

IMPORTANT SAFETY INSTRUCTIONS
CAUTIONS
* This computer with function of pulse detection is designed for users' reference when
doing exercise, it can not be used for medical purpose.
* Never operate the treadmill if it has been dropped or damaged, or exposed to water
Contact with your distributor for service recommendations.
* Before starting any exercise program, it is recommended that you consult your physician.
* Stop using this appliance if you feel dizziness or discomfort.
* Medical approval and close supervision is necessary when appliance is used by or near
handicapped individuals.
* Use the treadmill only for its intended use as described in this manual.
* Do not pull the treadmill by the power cord or use it as a handle.
* Keep power cord away from heated surfaces and oven flame.
* Do not use or store outdoors.
* Do not operate where aerosol products are being used or where oxygen is being
administered.
* While turning on the power, please stand beside the treadmill, not on the treadmill.
* The weight limit is 136KGS (300LBS) for EPIC 823, 159KGS (350LBS) for EPIC 825.
* Do not operate in a wet or moist condition.
* Do not use the treadmill on a carpet that is greater than 1/2 inch in height.
* Do not operate under a blanket. Excessive heating can occur and cause fire, electrical
shock, or injury to persons.
* Never insert any object into any opening on the treadmill.
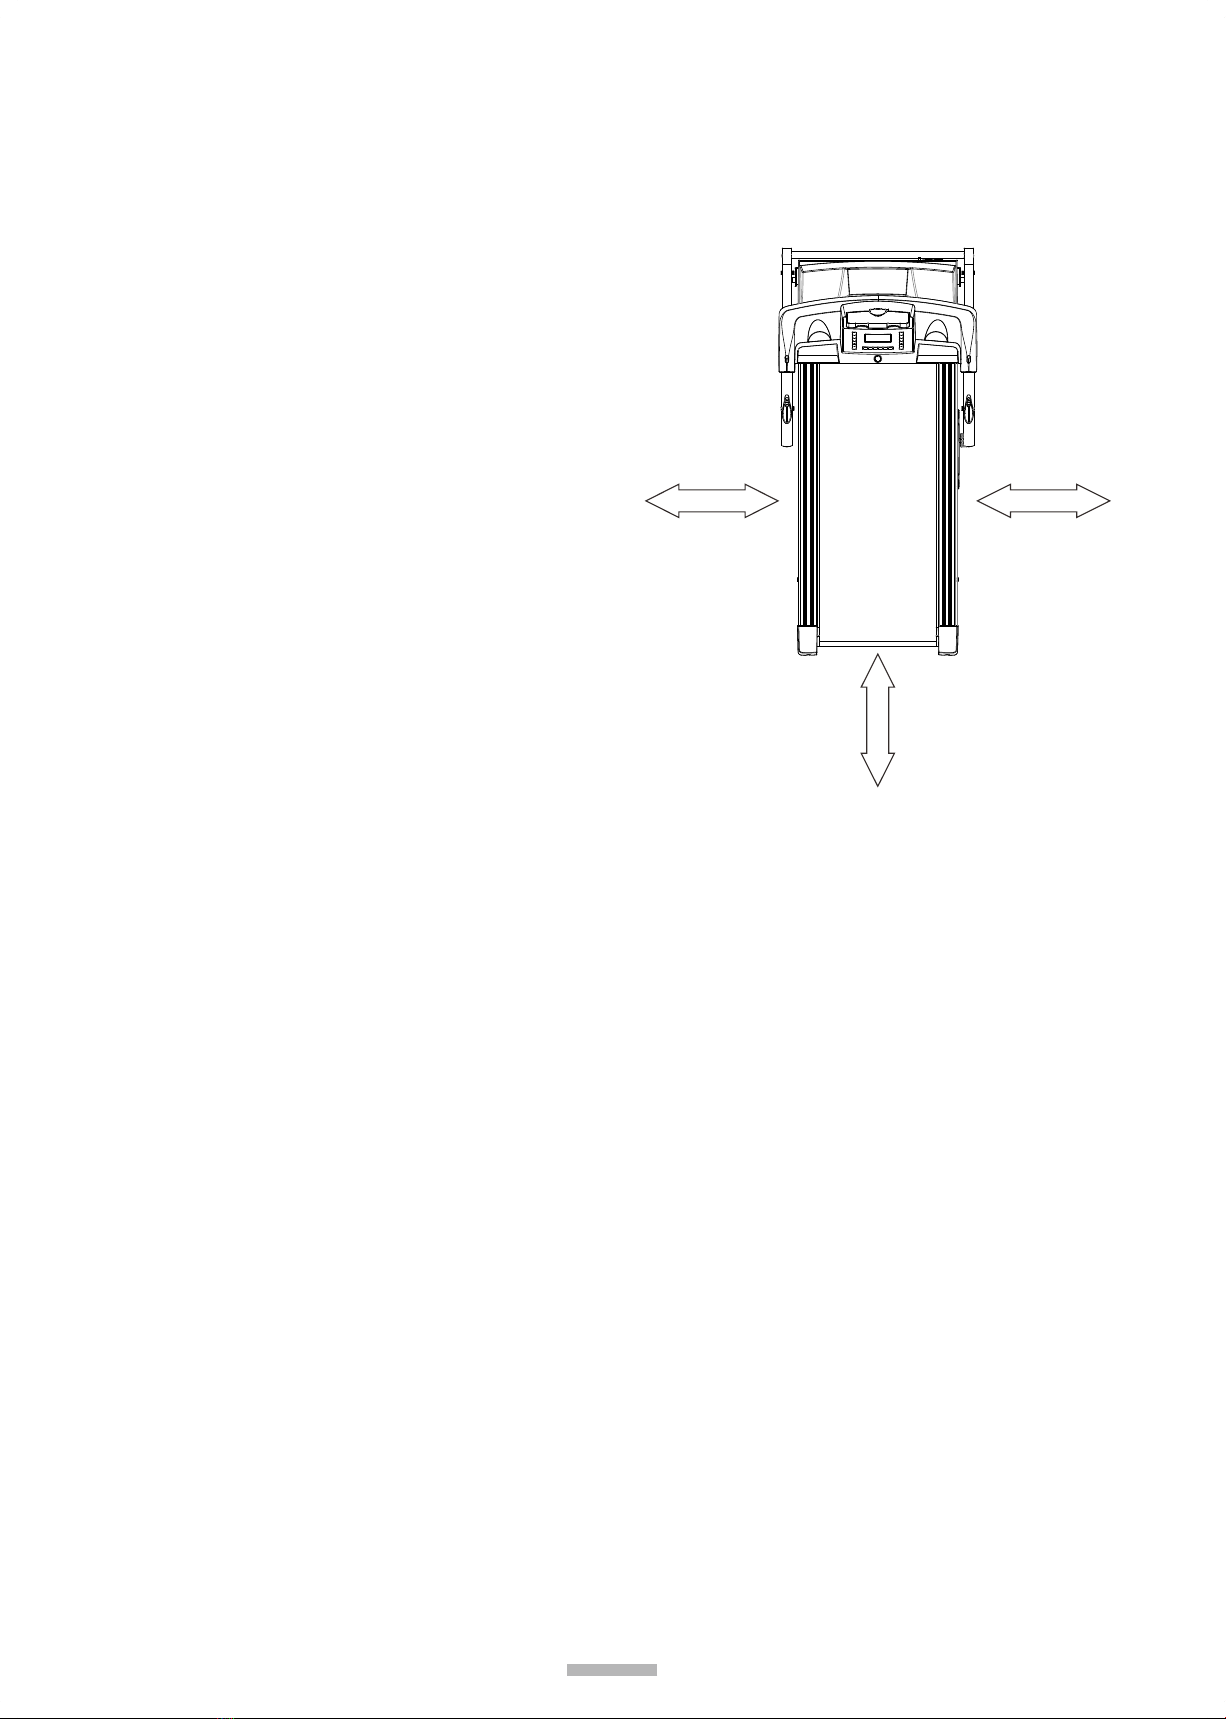
* Keep the treadmill on a solid, level surface with sides at least two feet from any wall. Be
sure the area around the treadmill remains clear during use and has adequate clearance,
see illustration below.
WARNING
* This treadmill requires a dedicated circuit as 110V/220V 15/10AMP separately that is not
shared by any other electrical appliances. Failure to do so can damage the electronics
and the motor, and will void the warranty.
* To reduce the risk of electric shock, always unplug the power cord from electrical outlet
immediately after using and before cleaning, assembling or servicing.
* Never leave the treadmill unattended when plugged in. Disconnect by turning off the
master power switch and unplugging from outlet.
* Always keep hands and feet off the treadmill while others are using it.
* Never place hands or feet under the treadmill.
* Do not allow children on or around treadmill.
Please read the following basic precautions prior to use of the treadmill:
* Never operate the treadmill with the air openings blocked.
* Keep air openings free of lint, hair and the likes.
1
This product must be grounded. If it should
malfunction or break down, grounding provides
a path of least resistance for the electric
current, reducing the risk of electric shock.
This treadmill is equipped with a cord having
an equipment grounding connector and a
grounding plug. The plug must be plugged into
an appropriate outlet that is properly installed
and grounded in accordance with all local
codes and ordinances.
DANGER
Improper connection of the treadmill grounding
can result in the risk of electric shock. Check
with a qualified electrician if you are in doubt as
to whether the product is properly grounded.
Do not modify the plug provided with the
treadmill.
If it will not fit your outlet, have a properly
grounded outlet installed by a qualified
electrician. This unit must be plugged into a
nominal 110 Volt, 60 Hz, 15 AMP or 220 Volt ,
50 Hz, 10 AMP circuit, which has a grounding
plug. Outlets that service multiple appliances,
or have fluctuating voltage of more than 5%,
may result in erratic performance or cause
damage to the treadmill electronics. Using
electrical power other than that which has been
specified will ultimately void any warranty,
implied or otherwise. Never remove or bypass
the electrical ground contained in the
treadmill's three-lug with an adapter.
The difference in the RPM of motor is ±10%
* Do not plug into the same outlet with any
other electrical appliance while using this
treadmill.
* Do not walk or jog barefoot or without shoes.
* Do not walk or jog in loose shoes or slippers.
Athletic shoes are always recommended
while using this treadmill.
* Never walk or jog while wearing loose fitting,
long garments such as slacks pajamas or
dresses.
* When walking or jogging always stay on the
forward part of the treadmill.
* Never jog or walk faster than is comfortable
for you.
* Do not jump up on the treadmill from side to
side.
* Do not place any liquids on any parts of the
treadmill.
2 FEET MIN.
2 FEET MIN.2 FEET MIN.
LEFT
SIDE
RIGHT
SIDE
REAR
TOP
VIEW
FRONT
ELECTRICAL GROUNDING INSTRUCTIONS
2

CAUTION:
BEFORE AND AFTER RUNNING ON THE TREADMILL
Before Running:
1. Read the manual first for familiarization of the computer and other important features.
2. Before starting the treadmill, always stand on two side rails on both sides (not on the
running belt) as shown on drawing.
3. Have safety key properly place on the computer console, and have safety clip securely
attach to an article of your clothing.
4. Start the treadmill and allow it to reach at speed of at least 1.0kph, hold your hand on the
handlebar then walk on the running belt to start your exercise program.
After Running:
1. If you hear any abnormal noise from motor, please stop using and contact with your
distributor for necessary maintenance.
2. Please refer to below RUNNING DECK LUBRICATION to do necessary periodical
maintenance for long-term and functional operation.
PLEASE NOTE WITHOUT DOING PERIODICAL MAINTENANCE MIGHT VOID THE
WARRANTY.
RUNNING DECK LUBRICATION
Why to lubricate?
If the lubricant dries out, the friction between the belt and the deck will rise and place undue
stress on the drive motor, drive belt and electronic motor control board, which could result in
catastrophic failure of these expensive components.
When to lubricate?
High-efficient and low-friction running deck is used on this machine. The deck comes pre-
lubricated and subsequent lubrication should be done in every 180 KM, or every 3 months of
operation, whichever comes first. Keeping the deck lubricated at the recommended intervals
ensures the longest life possible for your treadmill.
3
12
3
What to lubricate?
Do not lubricate with other than our approved lubricant. Your treadmill comes with one 30ml tube of
silicone. For further lubrication, you may order from distributor for our 200ml silicone:
200ml silicone in one bottle with 35cm applicator.
100% silicone, non-petroleum base, contains of no harmful solvents, non-toxic and
nonflammable.
Pump action spray bottle.
Good for treadmill that used non-petroleum based lubricant.
How to lubricate?
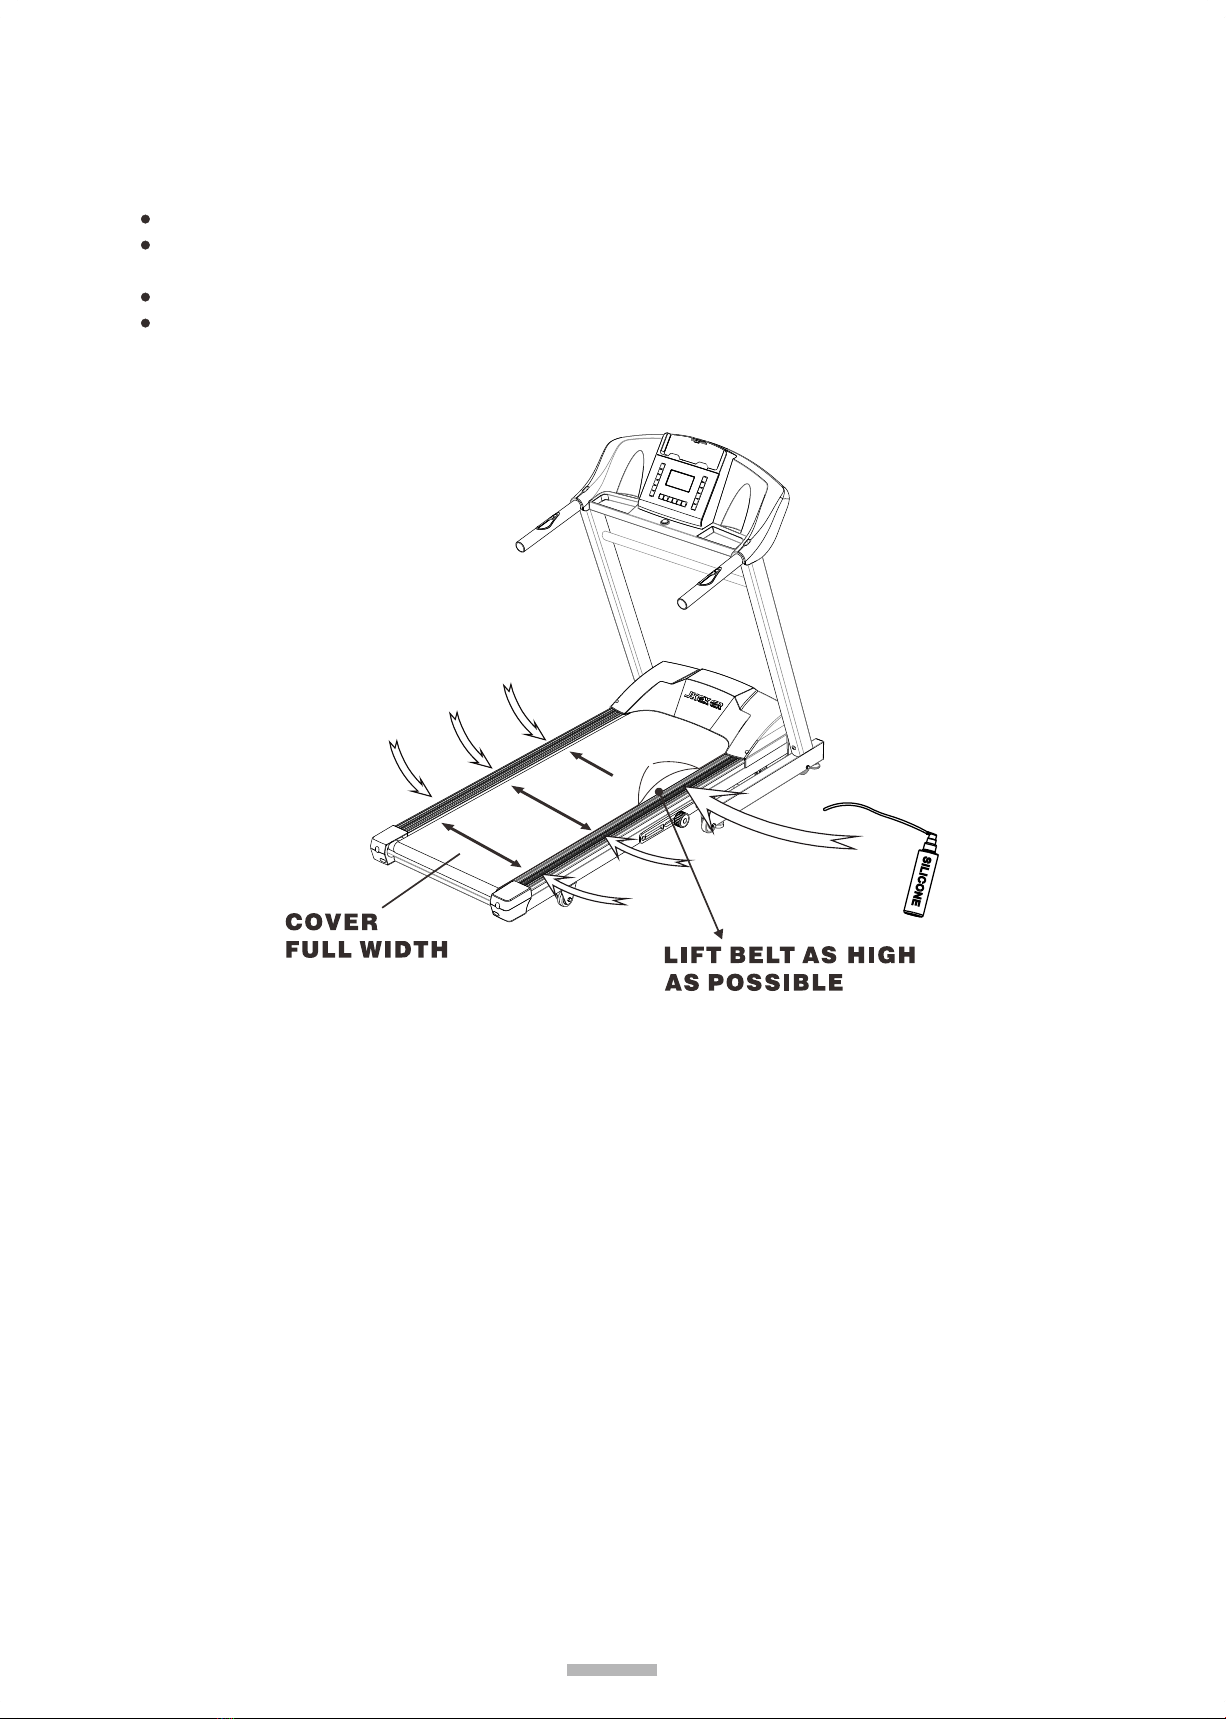
Follow drawing, lift running belt as high as possible, wipe the deck and the edge of the above
belt with a clean lint free cloth to remove any dirt on both sides. Then inserting straw from silicone
bottle from either side of the running belt to reach to the deck surface about 18 inches from motor
cover, pump out the silicone of the tube across the deck, parallel to the motor cover, in about one
foot line. The one foot line should be in the middle of the deck at approximately equal distance from
both side edges of the belt. Repeat above procedures to distribute onto 3 spots on the running deck
as shown on drawing. Once the silicone is applied, you should walk, not run, at low speed on the
treadmill for at least 5 minutes to ensure it is evenly distributed.
You want the lubricant to be applied about the spot that your feet would hit the belt as you are
walking. This should be about 18 inches from the motor cover. You may walk on the treadmill to see
where your feet land on the belt. Please note if you mostly run on the treadmill, the spot where your
feet land may be different from the spot in walking.
Note:
1. IF belt is stuck under side rail, use a screwdriver to lever out for easy lubrication.
2. IF belt is not centered, please refer to Aligning The Running Belt.
3. IF static symptom happens, adding silicone on the running deck will also help solve it.
4

1
2
3
4
5
6
AB
C
D
F
E
ASSEMBLY PARTS LIST
FOR EPIC 823 / 825
1.
2.
3.
4.
5.
6.
A.
B.
C.
D.
E.
F.
.............................
.............................
...............................
.............................
..............................
............................
...........................
..................................
...........................
.................................
...........................
.................................
1
2
1
1
1
1
2 + 2
2
6 + 6
4
4 + 4
1 + 1 + 1
MAIN FRAME
FRONT POST
CONSOLE
HANDLEBAR
CROSS BAR
POWER CABLE
BOLT & WASHER
BOLT
BOLT & WASHER
SCREW
BOLT & WASHER
TOOLS
5

ASSEMBLY INSTRUCTIONS
Step 1.
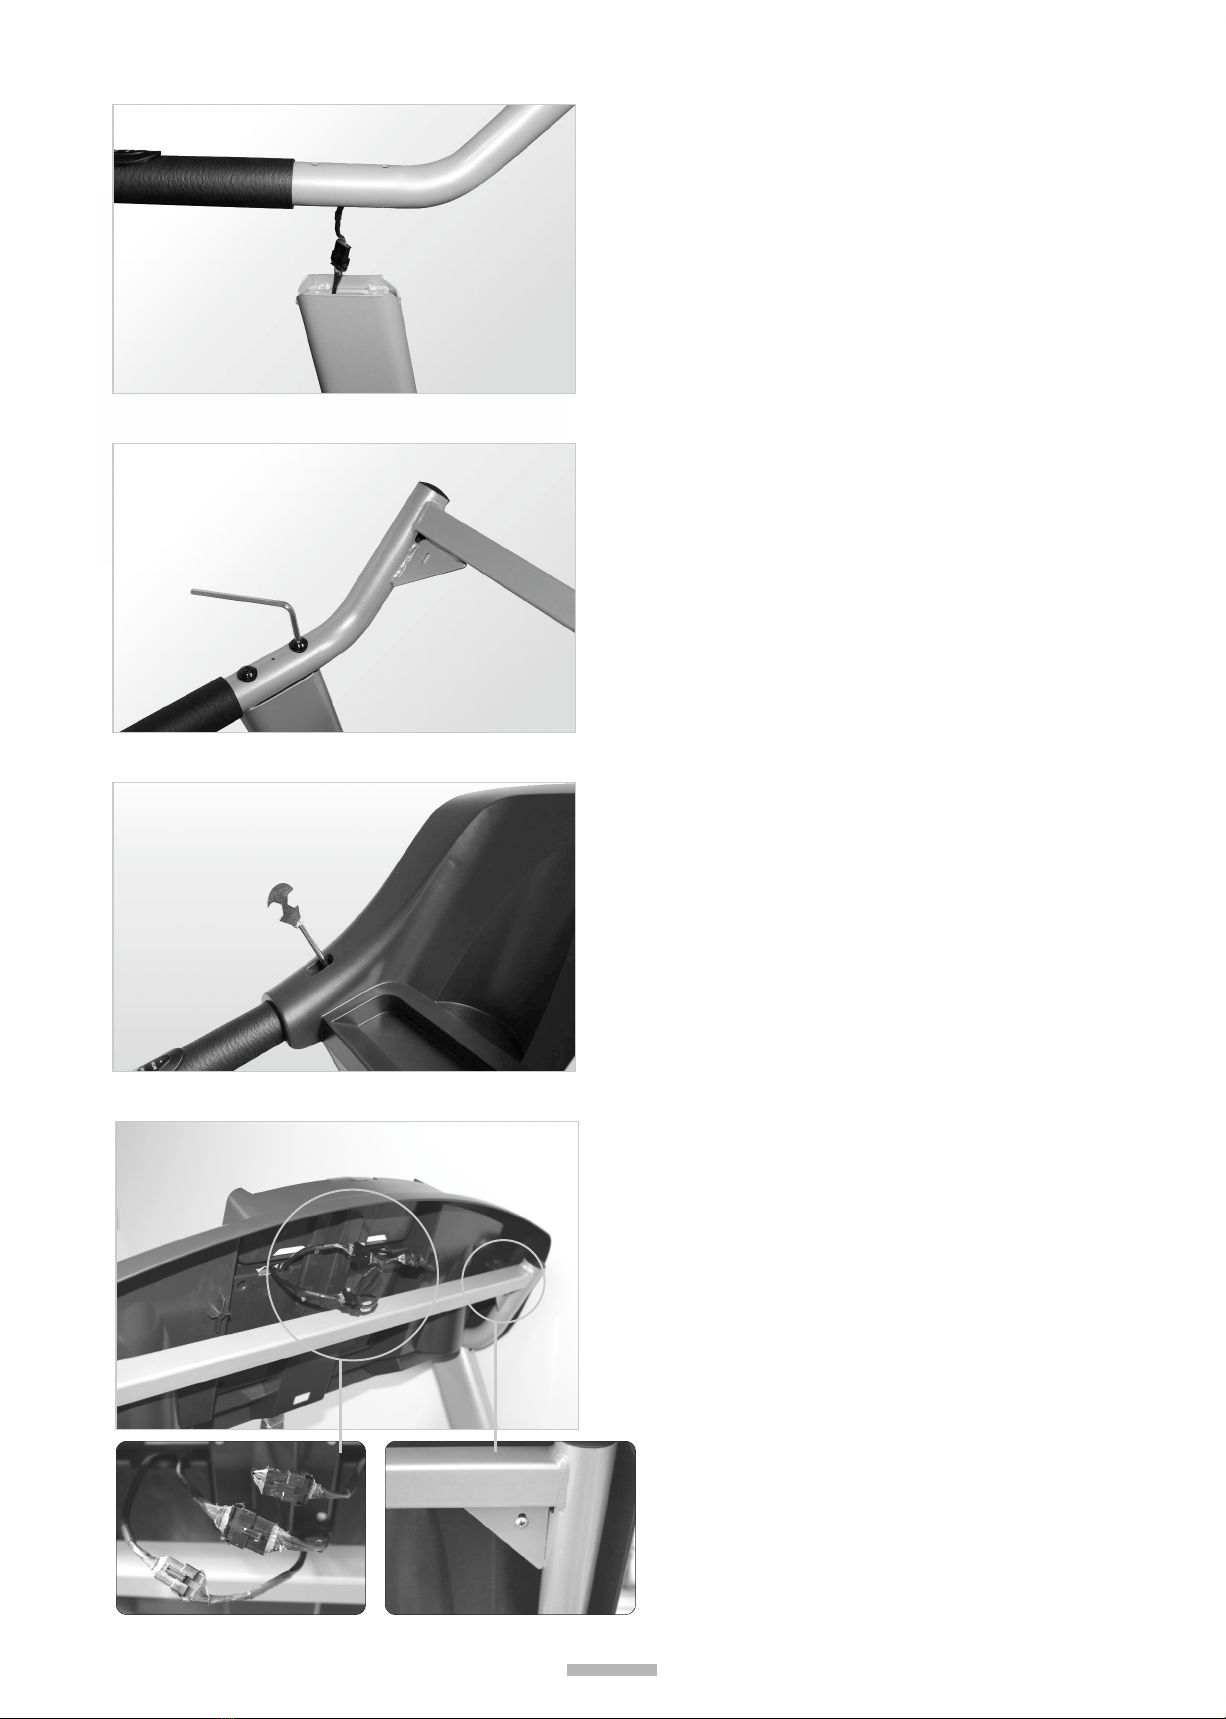
Please note there are 2 Front Posts (2) for
right and left. The post for the right side is
with cable inside. Well connect the cable
from the bottom of right post to the cable
from Main Frame (1), then insert this right
post onto the U-bracket on the right side of
Main Frame (1). Also insert another post
onto the left side of Main Frame.
Step 3
Use Bolt & Washer (A) to go through 2
Front Posts (2) to fix.
Step 2
Use Bolt & Washer (C) to fix Front Posts
to the U-brackets. But do not tighten the
bolts yet.
2-1: Attach Cross Bar (5) to two inner
sides on both Front Posts (2) as
photo shown. Please be careful not
to scratch the paint off.
2-2: Use Bolt (B) to fix Cross Bar (5)
onto Front Posts (2).
PHOTO (2-2)
6
PHOTO (2-1)
Step 5.
Use Bolt & Washer (E) to fix Handlebar
onto Front Posts.
Step 4.
Mount Handlebar (4) at the top of two
Front Posts (2), well connect the cable
from right side of Handlebar to the cable
from right Front Post.
Step 6.
Place Console (3) on the Handlebar (4)
and use screw (D) to fix console onto
Handlebar.
Step 7.
Also take screw (D) to fix Console to the
Handlebar from under side as photo
shown. Well connect 3 cables from
Computer to the cables from Handlebar.
Then tighten all bolts (C).
7

Step 8.
Plug in the power cable for operation .
POSITIONED FOR OPERATION
There are balancers at the front bottom.
Adjust these balancers to make sure
main frame is stably positioned on the
ground for exercise.
HOW TO OPERATE
For quick start (manual)
Press Start/Stop button to start running. Time, distance, and calories will count up from 0. First dot
flashes on the Dot Matrix, and 0 appears. 0 jumps to 1 means you have run 400 meters. And you may
press Speed / button or Incline / button to adjust speed and incline as you like. Or you
may also press quick speed / incline buttons on both sides of computer to fast reach speed & incline
you prefer.
For P1 ~ P7 program
1. Press Speed / button or Incline / button to choose program 1, 2, ..... 7.
2. Press Enter button and Speed / button or Incline / button to choose L1 ~ L3.
3. Press Enter button, default setting 32:00 flashes, press Speed / button or Incline /
button to set desired workout time from 10 ~ 99 minutes.
4. Press Start/Stop button to start running.
For User program
1. Press Speed / or Incline / button to choose U1 or U2 for interval setting.
2. Press Enter button, default time 32:00 appears.
3. Press Speed / or Incline / button to set workout time, Press Enter button, U1 shows
on pulse window, 0 / 0.8 flashes on incline / speed window, first dot flashes on Dot Matrix.
4. Press Speed / and Incline / button to set desired speed and incline for the first interval.
nd
Press Enter button to jump to 2 dot. Repeat this operation to finish setting all 14 Intervals.
5.Press Enter and Start/Stop button to start operation.
For H1, H2 Heart Rate Control program (HRC 1, HRC 2)
1. Press Speed / or Incline / button to choose H1 or H2.
2. Press Enter button, default setting age 30 flashes.
8
This manual suits for next models
1
Table of contents
Other JKEXER Treadmill manuals

JKEXER
JKEXER Turbo 772 User manual

JKEXER
JKEXER CHEER 465 User manual

JKEXER
JKEXER AeroWork 897 User manual

JKEXER
JKEXER Turbo 776 User manual

JKEXER
JKEXER FitLux 665 User manual

JKEXER
JKEXER M-POWER 870 User manual

JKEXER
JKEXER VIGOR 736 User manual

JKEXER
JKEXER 8010A User manual

JKEXER
JKEXER VIGOR 735 User manual
Popular Treadmill manuals by other brands




Smooth Fitness
Smooth Fitness EVO 3i user manual

NordicTrack
NordicTrack NETL81810.0 user manual

Schwinn
Schwinn 830/Journey 8.0 Assembly manual / owner's manual

Keys Fitness
Keys Fitness HealthTrainer HT-740T owner's manual

Spirit
Spirit XT8 Service manual

NordicTrack
NordicTrack T 14.0 Treadmill Manuel de l'utilisateur