ELECRAFT K3S User manual

ELECRAFT K3S
HIGH-PERFORMANCE
160 – 6 METER TRANSCEIVER
KIT ASSEMBLY MANUAL
Revision B, July 16, 2015
Copyright © 2015, Elecraft, Inc.
All Rights Reserved
E740259

2
Contents
Key to Symbols and Text Styles ............................ 3
Introduction ............................................................ 4
Customer Service and Support .................................. 4
Technical Assistance ............................................. 4
Preventing Electrostatic Discharge Damage ......... 6
How ESD Damage Occurs ........................................ 6
Preventing ESD Damage ........................................... 6
Preparing for Assembly ......................................... 7
Overview of the Kit ................................................... 7
Tools and Test Equipment Required ......................... 9
Unpacking and Inventory ........................................ 10
.Standoffs ............................................................ 10
Lock Washers ...................................................... 10
Screws ................................................................. 11
Assembly ............................................................. 12
Front Panel and DSP ............................................... 13
Front Panel and DSP Description........................ 13
Front Panel Assembly Procedure ........................ 13
Mounting the Sub Receiver Auxiliary DSP
Board ................................................................... 22
Installing the KDVR3 Digital Voice Recorder
Option .................................................................. 24
Mounting the DSP Board Assembly on the
Front Panel .......................................................... 25
RF Board and Chassis ............................................. 27
RF Board Description ......................................... 27
RF Board and Chassis Assembly ........................ 29
Installing Antenna Connectors on the Rear
Panel. ................................................................... 35
Mount Front Panel Assembly on the Chassis ...... 39
Installing the KIO3B Interface ............................ 41
Installing Battery BT1 ......................................... 43
Installing the KANT3A input module or
KAT3A antenna tuner ......................................... 48
Installing the Right Side Panel ............................ 49
Resistance Checks ............................................... 52
Initial Power On Check ....................................... 53
KREF3 Reference Oscillator ................................... 53
Installing the KSYN3A Synthesizer ........................ 56
Loudspeaker, Top Cover and KPA3A Shield .......... 59
KPA3A Shield ..................................................... 61
Installing the KNB3 Noise Blanker ..................... 61
Installing the Chassis Stiffener ............................ 62
Bottom Cover .......................................................... 63
Bottom Cover Description ................................... 63
Bottom Cover Hardware Installation Procedure .. 63
KBPF3A General Coverage Receive Option ........... 66
KBPF3A Description ........................................... 66
KBPF3A Installation Procedure .......................... 66
Power Amplifier Jumper Block ............................... 66
Battery BT1 ............................................................. 67
Battery BT1 Installation Procedure ..................... 67
Finishing the Enclosure ........................................... 67
Fan Opening Cover .............................................. 67
AUX RF Cable .................................................... 68
Bottom Covers ..................................................... 68
Top Cover ............................................................ 71
Test and Calibration ............................................. 73
Initial Power Checks ................................................ 73
Synthesizer Check ................................................... 73
Filter Setup .............................................................. 74
Reference Oscillator Calibration ............................. 74
TX Gain Calibration ................................................ 74
Option Modules ....................................................... 75
Enable Modules ....................................................... 75
KPA3A 100-Watt Amplifier Installation ................. 75
KRX3A Sub Receiver Installation ........................... 75
Other Calibration Procedures .................................. 7 5
Wattmeter Calibration (Optional) ............................ 75
S-Meter Calibration (Optional) ................................ 7 5
Appendix A, Illustrated Parts List.............................. A1
Elecraft manuals with color images may be downloaded from
www.elecraft.com.

3
Key to Symbols and Text Styles
Identifies important information.
-100 Characters displayed on the LCD screen
DISP Tap switch function (labeled above a switch)
AVERAGE Hold switch function (labeled below a switch; hold for 1/2 sec. to activate)
MENU:Font Typical menu entry

4
Introduction
This manual will guide you through assembly of your Elecraft K3S transceiver. We’re confident that you’ll find
the K3S easy to build, even if you’ve had no prior kit-building experience.
Every modern transceiver is complex, and the K3S is no exception. The kit includes nearly 300 individual
components, including over a dozen PC boards and a multi-element modular chassis. But the unique design of
the K3S eliminates some of the tedious aspects of construction, enabling you to complete assembly in far less
time than previous high-performance transceiver kits. Also, virtually all of the alignment is handled in firmware
using test capabilities built into the K3S.
If you should you have difficulty, you'll have our full support via phone and e-mail. In addition, we hope you'll
join our growing and enthusiastic community of owner/builders via the Elecraft reflector.
Further information about the Elecraft K3S, including specifications, installation, and operation instructions, can
be found in the Owner’s Manual.
Elecraft manuals with color images may be downloaded from www.elecraft.com.
Customer Service and Support
Technical Assistance
You can send e-mail to [email protected] and we will respond quickly - typically the same day Monday
through Friday. Telephone assistance is available from 9 A.M. to 5 P.M. Pacific time (weekdays only) at
831-763-4211. Please use e-mail rather than calling when possible since this gives us a written record of the
details of your problem and allows us to handle a larger number of requests each day.
Repair / Alignment Service (We want to make sure everyone succeeds!)
If necessary, you may return your Elecraft product to us for repair or alignment. (Note: We offer unlimited email
and phone support to get your kit running, so please try that route first as we can usually help you find the
problem quickly.)
IMPORTANT: You must contact Elecraft before mailing your product to obtain authorization for the
return, what address to ship it to and current information on repair fees and turn-around times. (Frequently we
can determine the cause of your problem and save you the trouble of shipping it back to us.) Our repair location
is different from our factory location in Aptos. We will give you the address to ship your kit to at the time of
repair authorization. Packages shipped to Aptos without authorization will incur an additional shipping charge
for reshipment from Aptos to our repair depot.

5
Elecraft's 1-Year Limited Warranty
This warranty is effective as of the date of first consumer purchase (or if shipped from factory, date product
is shipped to customer). It covers both our kits and fully assembled products. For kits, before requesting
warranty service, you should fully complete the assembly, carefully following all instructions in the manual.
Who is covered: This warranty covers the original owner of the Elecraft product as disclosed to Elecraft at
the time of order. Elecraft products transferred by the purchaser to a third party, either by sale, gift or other
method, who is not disclosed to Elecraft at the time of original order, are not covered by this warranty. If the
Elecraft product is being bought indirectly for a third party, the third party's name and address must be
provided to Elecraft at time of order to insure warranty coverage.
What is covered: During the first year after date of purchase, Elecraft will replace defective or missing parts
free of charge (post-paid). We will also correct any malfunction to kits or assembled units caused by
defective parts and materials. Purchaser pays inbound shipping to Elecraft for warranty repair, Elecraft will
pay shipping to return the repaired equipment to you by UPS ground service or equivalent to the continental
USA and Canada. Alaska, Hawaii and outside U.S. and Canada actual return shipping cost paid by owner.
What is not covered: This warranty does not cover correction of kit assembly errors. It also does not cover
misalignment; repair of damage caused by misuse, negligence, or builder modifications; or any performance
malfunctions involving non-Elecraft accessory equipment. The use of acid-core solder, water-soluble flux
solder, or any corrosive or conductive flux or solvent will void this warranty in its entirety. Also not covered
is reimbursement for loss of use, inconvenience, customer assembly or alignment time, or cost of
unauthorized service.
Limitation of incidental or consequential damages: This warranty does not extend to non-Elecraft
equipment or components used in conjunction with our products. Any such repair or replacement is the
responsibility of the customer. Elecraft will not be liable for any special, indirect, incidental or consequential
damages, including but not limited to any loss of business or profits.

6
Preventing Electrostatic Discharge Damage
There is no climate or work location where the components of your K3S are safe from Electrostatic Discharge
(ESD) unless you take specific steps to prevent such damage. Many of the components in your K3S can be
damaged by static discharges of only a few volts: far too little for you to notice. It is those low-voltage but
destructive discharges that easily happen anywhere and under virtually any environmental conditions.
ESD damage may not be apparent at first. The damaged components may not fail completely. Instead, the
damage may result in below-normal performance for an extended period of time before you experience a total
failure.
How ESD Damage Occurs
Whenever an object containing a static charge touches a circuit in your K3S, current will rush into the circuit
until the components reach the same voltage as the source of the static charge. If the voltage or current that
passes through a component in your K3S during that brief period exceeds its normal operating specifications, it
may be damaged or destroyed.
Preventing ESD Damage
ESD damage cannot occur if there is no voltage difference between the components in your K3S and any object
that touches them. That is how anti-static packaging works. Anti-static bags allow the static charge to flow over
their surface, so that any part of the bag that touches the components inside are all at the same potential at all
times. Anti-static foam keeps the leads of sensitive components at the same potential.
At your work bench, avoiding a dangerous voltage is achieved most easily by tying everything together and
connecting them to a common mains safety ground. This includes your K3S, individual boards or other sensitive
components as well as everything they may touch at the work table.
Inexpensive static dissipating work mats are readily-available that will steadily and safely drain off any charges
built up on parts or circuit boards placed on them. They are supplied with a lead that connects the mat to the
common workbench ground. Also, metal cabinets on test equipment used on the bench should be tied together
and connected to the common ground.
Most importantly, you must have a way of continuously draining off any static charges that occur on your body.
Such charges are easy to create, even while sitting quietly at the work bench. Moving your feet on the floor,
shifting position in your chair or even moving your arms so that clothing rubs against itself can all produce
destructive static charges. You can discharge yourself by touching an unpainted metal ground, but that will last
only until you move in a way that produces a new static charge. The safest technique is to wear a grounded wrist
strap with a series 1-megohm resistor that continuously drains off any charges. Such wrist straps are readily-
available and inexpensive.
WARNING
DO NOT attach a ground directly to yourself without a current-limiting resistor as this poses
a serious shock hazard. A wrist strap must include a 1-megohm resistor to limit the current
flow. If you choose to touch an unpainted, metal ground to discharge yourself, do it only
when you are not touching any live circuits with your other hand or any part of your body.

7
We strongly recommend you take the following anti-static precautions (listed in order of importance) to avoid
trouble:
Leave ESD-sensitive parts in their anti-static packaging until you install them. The packaging may be a
special plastic bag or the component’s leads may be inserted in conductive foam. Parts which are
especially ESD-sensitive are identified in the parts list and in the assembly procedures.
Wear a conductive wrist strap with a series 1-megohm resistor. If you do not have a wrist strap, touch a
ground briefly before touching any sensitive parts to discharge your body. Do this frequently while you
are working. You can collect a destructive static charge on your body just sitting at the work bench. DO
NOT attach a ground directly to yourself as this poses a serious shock hazard.
Use a grounded anti-static mat on your work bench.
If you choose to use a soldering iron to work on your K3S for any reason, be sure the iron is ESD-safe
with a grounded tip tied to the same common ground used by your mat or wrist strap.
Preparing for Assembly
Overview of the Kit
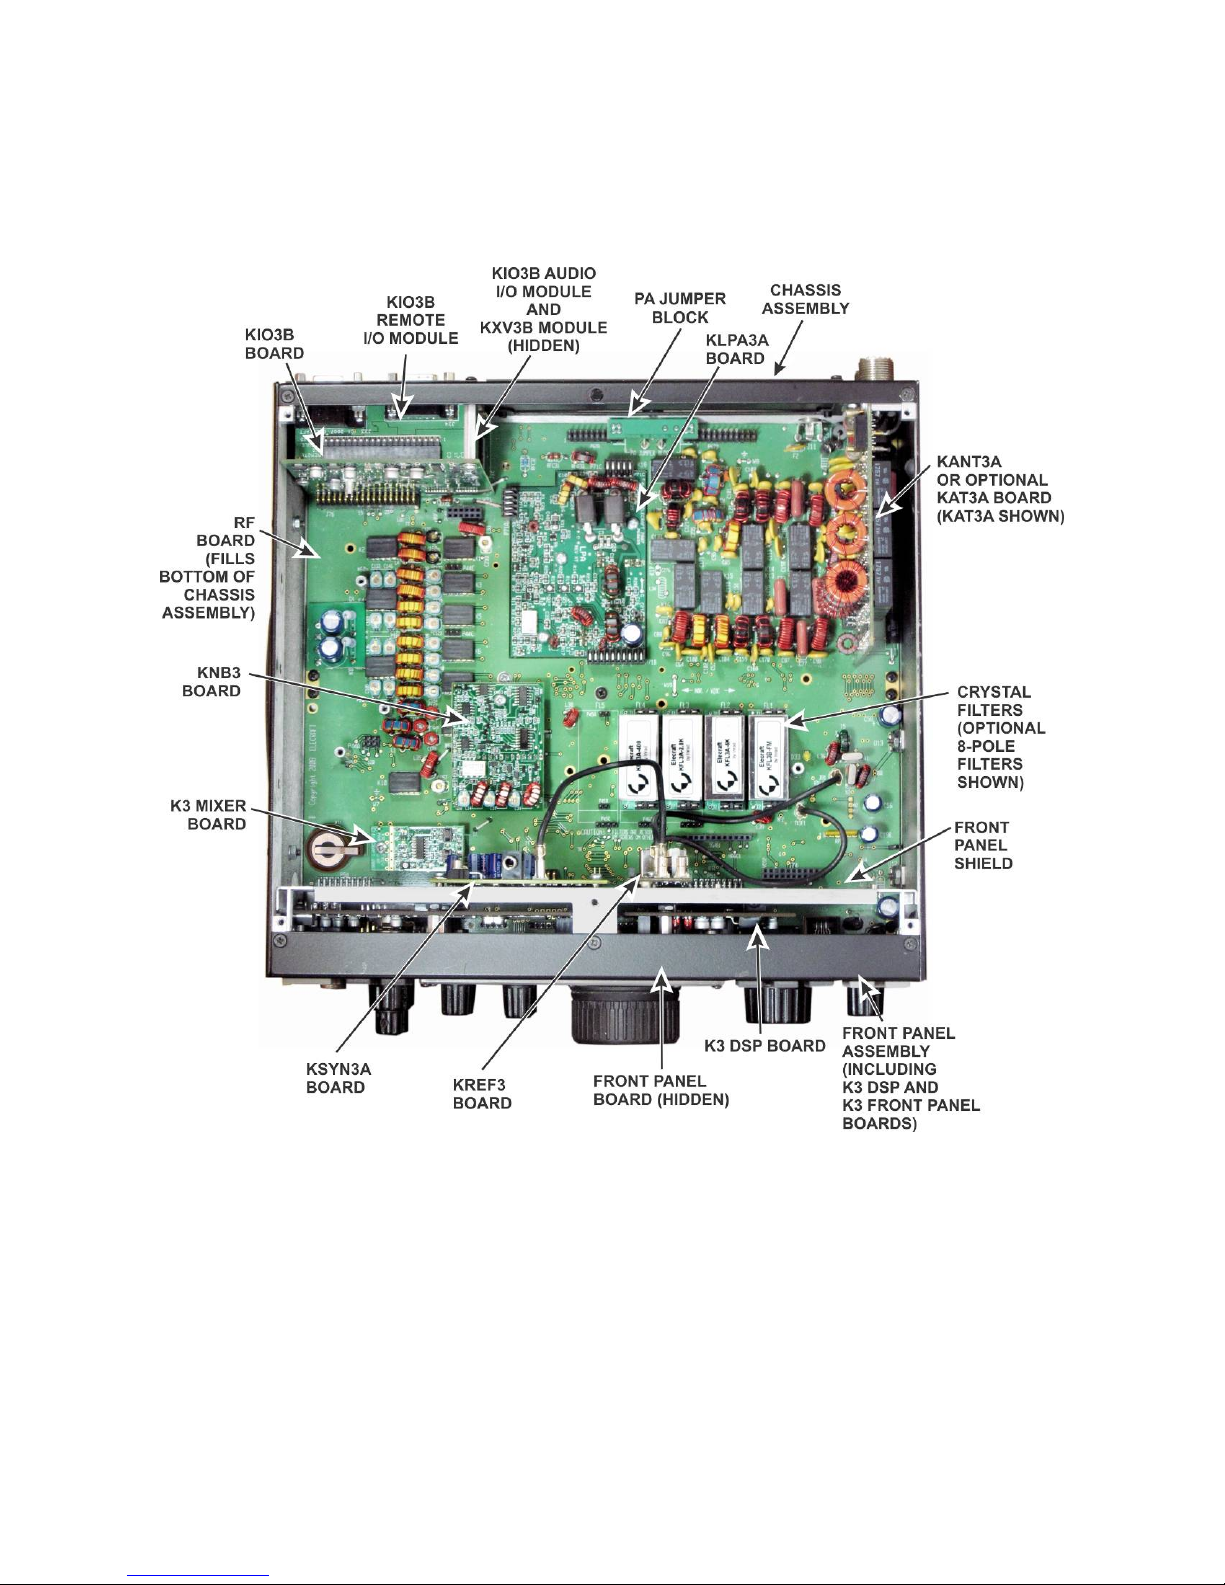
The kit comprises two major assemblies: the main chassis and the front panel. Figure 1 shows an assembled
K3S/10 with its top cover removed.
The main chassis is literally built up around the RF circuit board, which fills the entire bottom of the unit of the
chassis assembly. Panels are mounted around the RF board using Elecraft’s 2D fasteners. These fasteners allow
individual removal of any one panel, if needed, to gain access to the inside of the radio for servicing. Very few
cables or wires are used in the kit. Most of the other boards and optional accessories plug directly into the RF
board or one of the boards mounted on the RF board.
The front panel assembly, including the display and main operator controls, includes the front panel board and
the digital signal processing (DSP) board.
There are many options that you can add to the basic K3S/10, such as the 100 watt amplifier module, internal
antenna tuner, second receiver, additional crystal I.F. filters, etc. If you purchased these options with your K3S
kit, you will find instructions to install them at proper places in the assembly procedure to make getting your
complete K3S together and operational in the most efficient manner.
8
Figure 1. Typical Assembled K3S/10 (Less Top Cover and Chassis Stiffener Bar).

9
Tools and Test Equipment Required
1. #0 and #1 size Phillips screwdrivers. To avoid damaging screws and nuts, do not use a power
screwdriver. Use the screwdriver that best fits the screw in each step.
2. Soft cloth or other surface to lay cabinet panels on to avoid scratching. A clean static-dissipating mat is
ideal (see below). If using cloth, do not lay circuit boards on it. See Preventing Electrostatic
Discharge Damage on page 6.
3. Pliers or suitable wrenches for tightening 1/4”, 3/16” and 1/2” nuts. The 1/2” size is used to tighten nuts
on the front panel controls. If available, a deep socket or nut driver is recommended. Pliers or an
ordinary wrench can be used, but requires care to avoid damaging the front panel paint.
4. Long nose pliers.
5. Diagonal cutters.
6. Small rule capable of measuring lengths up to 1” (2.5 cm) with an accuracy of at least 1/16” inch
(1.6 mm).
7. Digital Multimeter (DMM) for resistance checks.
8. RF 50-ohm, 5 W (minimum) dummy load with low VSWR from 160 meters through 6 meters.
9. Power supply 13.8 VDC nominal (11-15 V) with a cable and Anderson PowerPole® connector. A power
cable kit is provided with your K3S if you do not have a suitable cable with the required Anderson
PowerPole connector. The power supply must be capable of providing at least 3 Amperes for a K3S/10
and 20 Amperes for a K3S/100. (See Specifications in your Owner’s manual for more information on
power supply recommendations).
The following tools are strongly recommended:
1. ESD wrist strap.
2. Static dissipating work mat.
Optional Equipment:
1. RF Power Meter with accurate readout from 1 mW to 5 watts, minimum.
2. Signal generator with calibrated 50 µV output at 20 or 40 meters.
In addition, two Allen wrenches, 5/64” (2mm) and .050”, are supplied with your kit.
10
Unpacking and Inventory
CAUTION
Do not handle the circuit boards without anti-static protection! Doing so may damage
sensitive components. See Preventing Electrostatic Discharge Damage on page 6 for important
information before proceeding.
Before starting construction, do a complete inventory, comparing the parts in your kit with the parts list in
Appendix A, to familiarize yourself with all of the parts and to ensure the kit is complete. When inventorying,
look in the sealed envelopes to identify their contents, but not mix them up. Some screws are very similar in
length, but must be used in the correct locations described in the procedure to avoid damaging your K3S. Other
screws are stainless steel to be used on the outside of the enclosure. Note that a few extras of some screws, nuts
and washers may have been included on purpose.
All dimensions given in the assembly procedure are provided in both US customary (often called English) and
metric measurements. The native dimensions of the parts are in US Customary units. Approximate metric
equivalents are given to assist those more familiar with that system to identify the correct parts
.Standoffs
A number of threaded standoffs are used. As with the screws and washers, be sure you use the correct size as
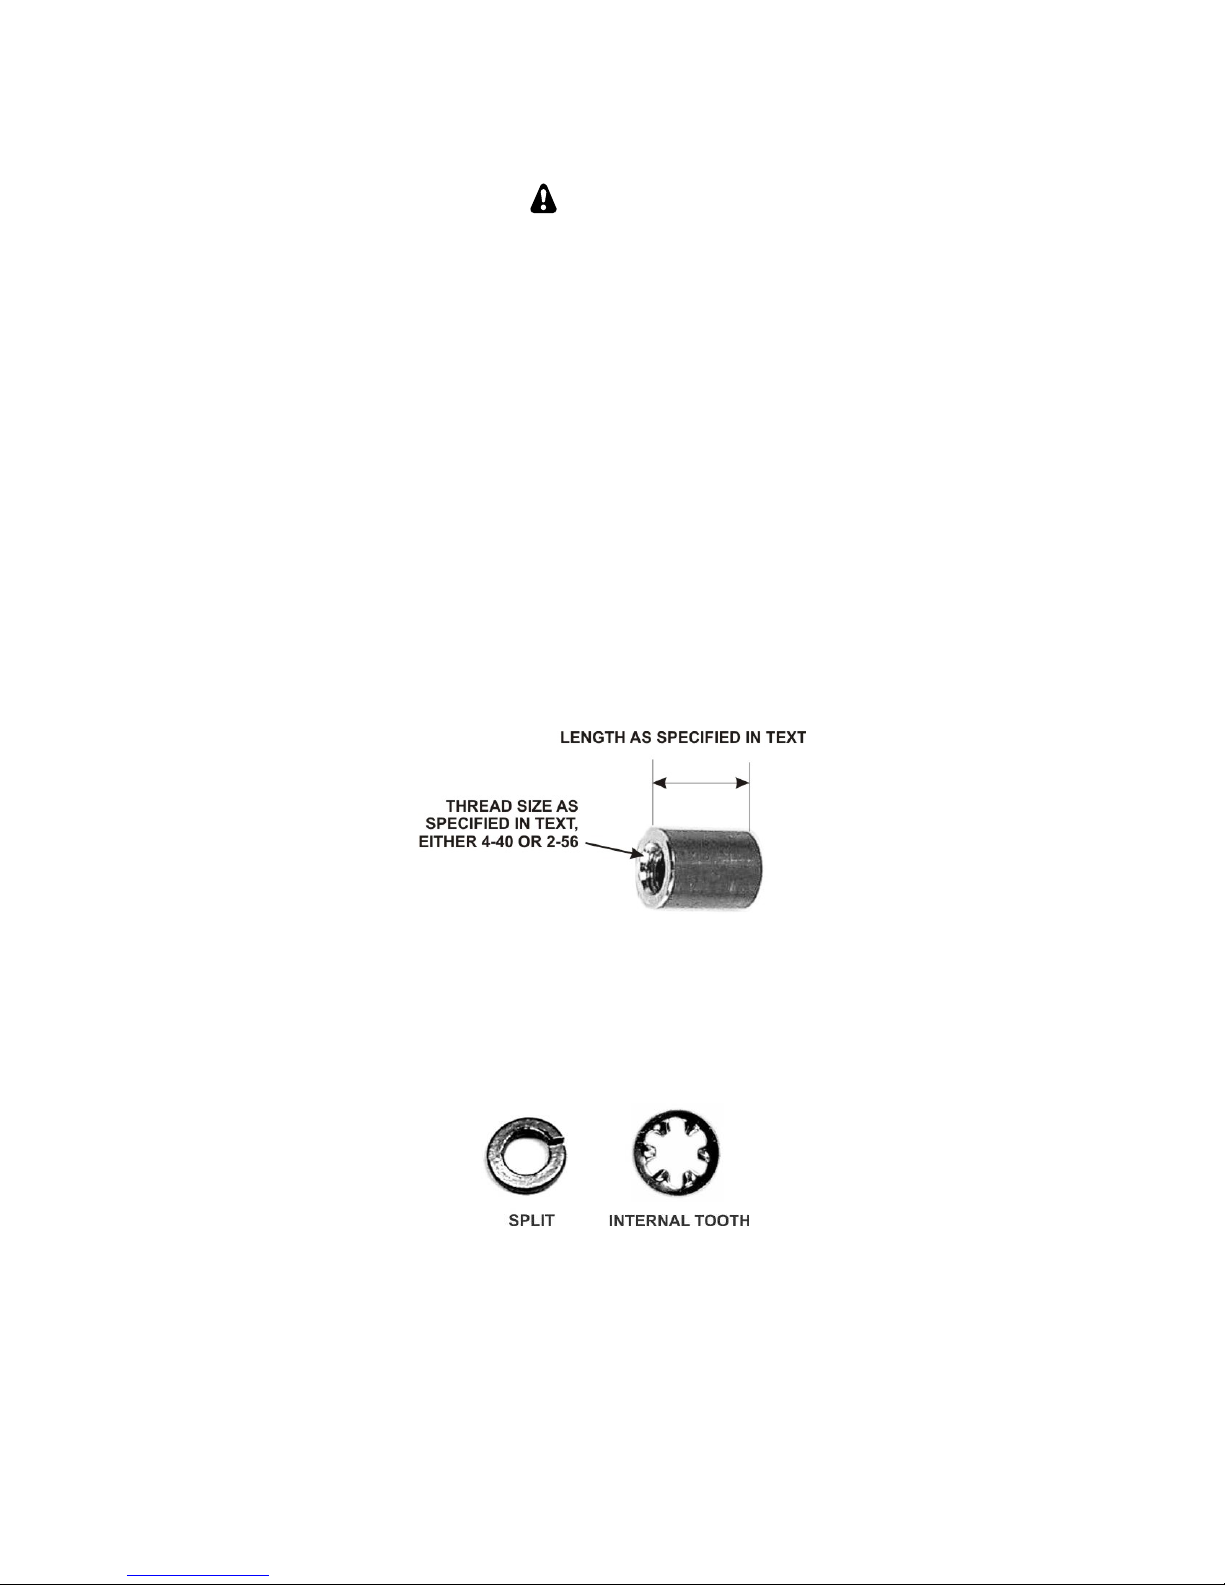
specified in the text. Standoff lengths are measured from end to end as shown in Figure 2. Standoffs threaded for
2-56 and 4-40 screws are used.
Figure 2. Typical Standoff.
Lock Washers
Two types of lock washers are used in the K3S (see Figure 3). It is important that you use only the type specified
and put the washers exactly where indicated. Failing to use the correct type may result in short circuits to nearby
circuit traces. Adding washers or placing the washers in the wrong position may cause parts to fail to fit together
properly.
Figure 3. Lock Washers.
Other manuals for K3S
6
Table of contents
Other ELECRAFT Transceiver manuals

ELECRAFT
ELECRAFT K3 User manual

ELECRAFT
ELECRAFT KX1 User manual

ELECRAFT
ELECRAFT K3 User manual

ELECRAFT
ELECRAFT KX3 Operating instructions

ELECRAFT
ELECRAFT K3 User manual

ELECRAFT
ELECRAFT K144XV Owner's manual

ELECRAFT
ELECRAFT K3S KAT3A User manual

ELECRAFT
ELECRAFT K1 User manual

ELECRAFT
ELECRAFT K3 Owner's manual

ELECRAFT
ELECRAFT K3 User manual

ELECRAFT
ELECRAFT K4 User manual

ELECRAFT
ELECRAFT KBPF3 User manual

ELECRAFT
ELECRAFT K3S User manual

ELECRAFT
ELECRAFT KX3 User manual

ELECRAFT
ELECRAFT K3S User manual

ELECRAFT
ELECRAFT K3 User manual

ELECRAFT
ELECRAFT K2 User manual

ELECRAFT
ELECRAFT KX3-2M Supplement

ELECRAFT
ELECRAFT KX3 User manual

ELECRAFT
ELECRAFT KX2 User manual