Coway CAC09-ST01F User manual

AIR
CONDITIONER
CAC09-ST01F
CAC12-ST01F
SPLIT TYPE AIR CONDITIONER
USER MANUAL
This instruction manual contains important information and recommendations that
we would advise you to comply with to obtain the best results from the air conditioner.
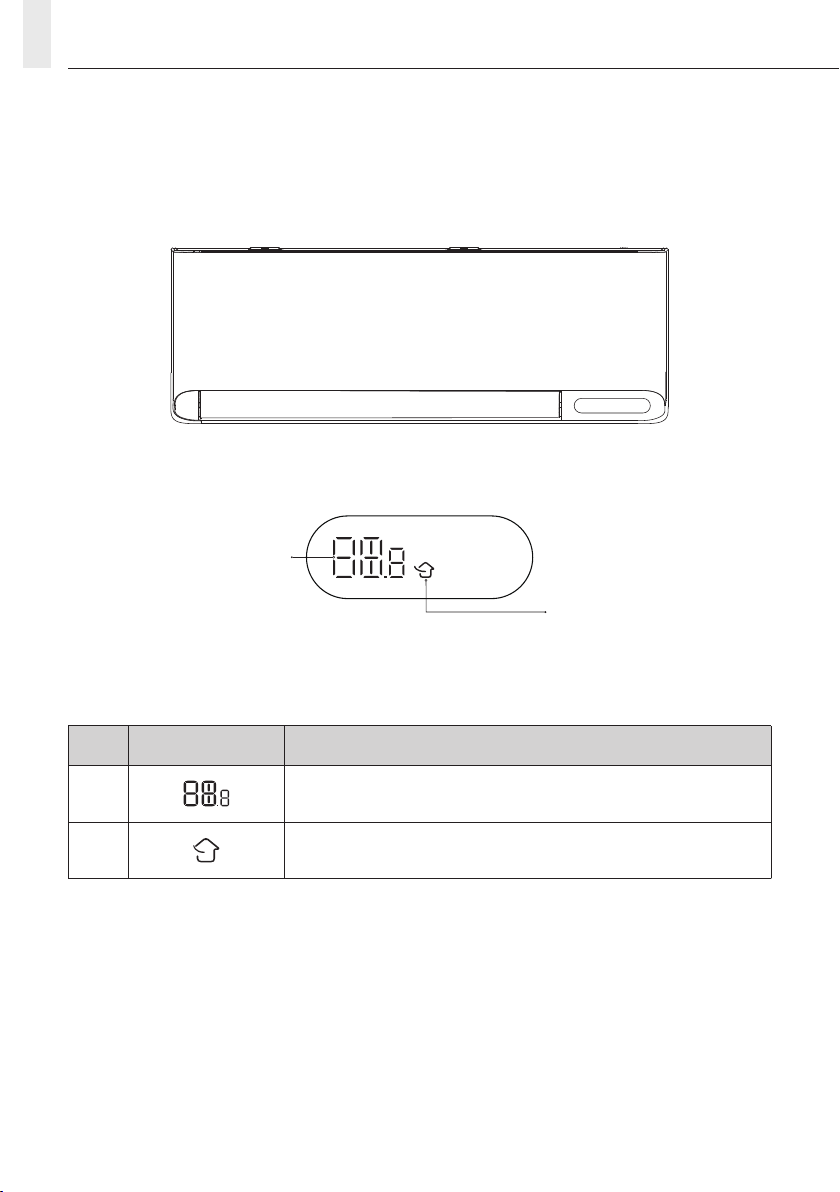
NAME OF PARTS
INDOOR DISPLAY
No. LED Function
1 Indicator for Timer, Temperature and Error codes.
2 Lights Up When Fresh Air Function is On.
Note:
The air conditioner automatically adjusts the display brightness and buzzer sound according to the ambient
light intensity. When the air conditioner detects that the ambient light is weak for a period of time, it will
automatically turn o the display temporarily. If there is a remote control or APP operation, the display
will be at the low brightness for a short time, and the buzzer will respond at a lower volume; When the air
conditioner detects that the ambient light is strong for a period of time, exit the above operation.
2
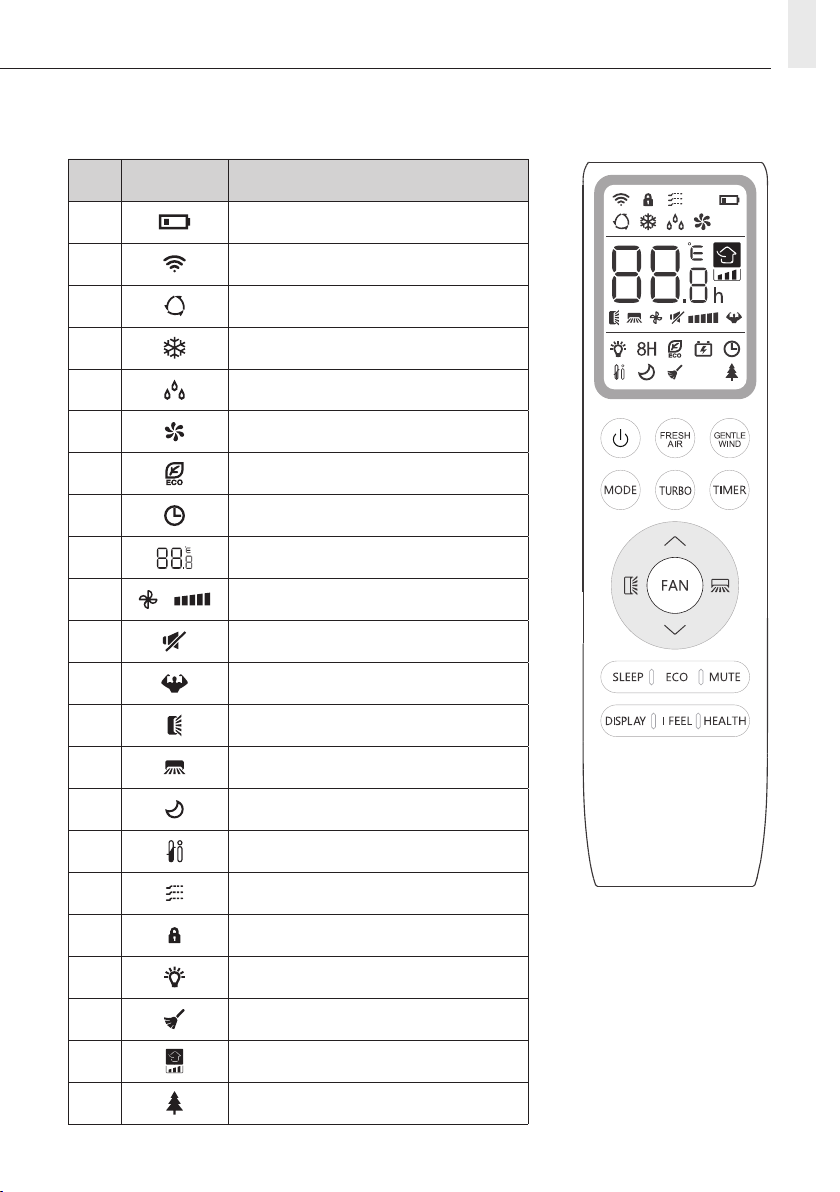
REMOTE CONTROL
REMOTE CONTROL DISPLAY
No. Symbols Meaning
1 Battery Indicator
2 Signal
3 Auto Mode
4 Cooling Mode
5 Dry Mode
6 Fan Only Mode
7 ECO Mode
8 Timer
9 Temperature Indicator
10 Fan Speed: Auto/Speed 1 to Speed 5
11 Mute Function
12 TURBO Function
13 Up-Down Auto Swing
14 Left-Right Auto Swing
15 SLEEP Function
16 I FEEL Function
17 Gentle Wind
18 Child-Lock
19 Display ON/OFF
20 Self-Clean Function
21 Fresh Air
22 Health Function
3
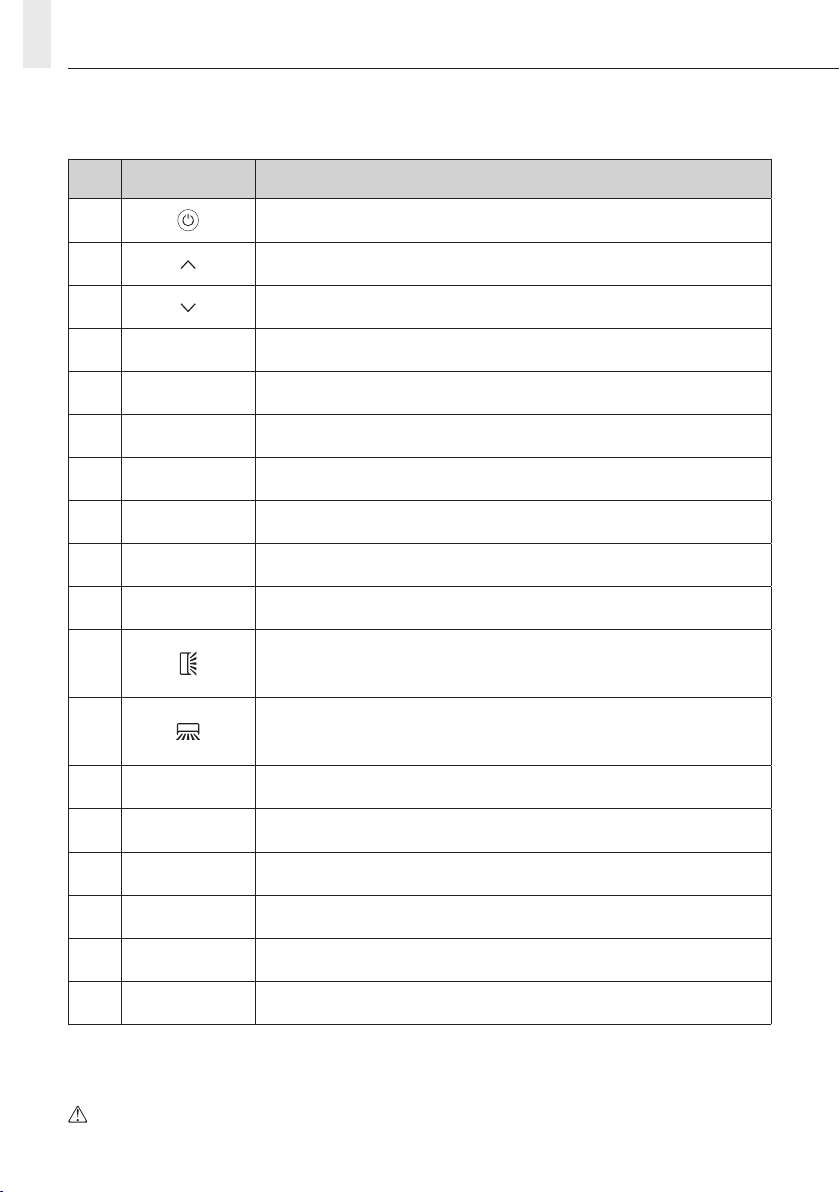
REMOTE CONTROL
No. Button Meaning
1 To turn ON/OFF the air conditioner.
2 To increase temperature or timer setting.
3 To decrease temperature or timer setting.
4MODE To select the mode of operation (AUTO, COOL, DRY, FAN).
5ECO To activate/deactivate the ECO function.
6TURBO To activate/deactivate the TURBO function.
7FAN To select the fan speed of auto/quiet/1~5/turbo.
8TIMER To ON/OFF timer.
9SLEEP To ON/OFF the sleep function.
10 DISPLAY To ON/OFF the LED display.
11 To stop or start horizontal louver movement or set the desired up/down
airow direction.
12 To stop or start vertical louver movement or set the desired left/right airow
direction.
13 I FEEL To switch-on/o the I FEEL function.
14 Quiet To switch-on/o the Quiet function.
15 MODE + TIMER To activate/deactivate the CHILD-LOCK function.
16 GENTLE WIND To activate/deactivate the GENTLE WIND function.
17 HEALTH To activate/deactivate the SELF-CLEAN function when switching OFF.
18 FRESH AIR To activate/deactivate the FRESH AIR function and select the fan speed.
The unit conrms the correct reception of each button with a beep sound.
4

REMOTE CONTROL
REPLACEMENT OF BATTERIES
Remove the battery cover plate from the rear of the remote control, by sliding it following the direction of
the arrow.
Install the batteries according to the direction (+ and -) shown on the Remote Control.
Replace the battery cover by sliding it into place.
Use 2 pieces of AAA (1.5V) batteries.
Do not use rechargeable batteries.
Replace the old batteries with new ones of the
same type when the display is no longer visible.
Note:
1. Direct the remote control toward the air conditioner.
2. Ensure that there are no objects between the remote control and the signal receptor in the indoor unit.
3. Never leave the remote control to be exposed to the rays of the sun.
4. Keep the remote control at a distance of at least 1m from the television or other electrical appliances.
5

DRY MODE
This function reduces the humidity
of the air to make the room more
comfortable.
To set the DRY mode, press MODE until
appears in the display.
DRY
REMOTE CONTROL
COOLING MODE
The cooling function allows the air
conditioner to cool the room and
reduce air humidity at the same time.
To activate the cooling function (COOL), press the
MODE button until the symbol appears on
the display.
Using the button or , set a temperature
lower than that of the room.
COOL
SWING
1. Press the swing button to activate the louver,
1.1 Press to activate the horizontal aps to
swing from up to down, the will appear
on the remote display.
1.2 Press to activate the vertical deectors
to swing from left to right, the will
appear on the remote display.
1.3 Do it again to stop the swing movement at
the current angle.
2. To manually set a specic position, long press
or for more than 3 seconds to select
dierent airow directions.
Never position the aps manually by hand.
The delicate mechanism will get seriously
damaged.
Never put ngers, sticks or other objects into
the air inlet or outlet vents. Such accidental
contact with foreign objects might cause
unforeseeable damage or injury.
FAN MODE (Not FAN button)
Fan mode is for air ventilation only.
To set the FAN mode, press MODE until
appears on the display.
FAN
AUTO MODE
Automatic mode.
To set the AUTO mode, press MODE until
appears on the display.
AUTO run mode will be set automatically according
to the room temperature.
AUTO
CHILD-LOCK function
1. Long press MODE and TIMER buttons together
for 3 seconds to activate this function, and
repeat it again to deactivate this function.
2. Using this function, not a single button will
function.
FAN SPEED function (FAN button)
Change the operating fan speed.
Press FAN button to set the running fan speed, it
can be set to AUTO/QUIET/LOW/LOW-MID/MID/
MID-HIGH/HIGH/TURBO speed circularly.
(Flash)
FAN
6

REMOTE CONTROL
TIMER function ― TIMER ON
To automatically switch on the unit
at a set time.
When the unit is switched o, you can set the
TIMER ON.
To set the unit to automatically switch on:
1. Press TIMER button, and will appear
on the remote display and ashes.
2. Press or button to set desired timer on
time. Each time you press the button, the time
increases/decreases by half an hour between 0
and 10 hours and by one hour between 10 and
24 hours.
3. Press TIMER button again to conrm.
4. After the timer is turned on, set the desired
mode (Cool/Heat/Auto/Fan/Dry), by pressing
the MODE button. Set the desired fan speed by
pressing FAN button. And press or to
set the desired operating temperature.
To cancel, press the TIMER button.
TIMER
TIMER function ― TIMER OFF
To automatically switch o the unit
at a set time.
When the unit is switched on, you can set the
TIMER OFF.
Set the unit to automatically switch o at a set time.
1. Ensure that the air conditioner is switched on.
2. Press the TIMER button once to set the timer.
Press or to set the desired time. Press
or to set the desired timer.
3. Press TIMER button second time to conrm.
Cancel it by pressing the TIMER button.
Note: All setting operations need to be done in a
consecutive manner. In the setting mode, if idle for
more than 5 seconds, it will exit the setting mode.
TIMER
TURBO function
To activate turbo function, press the TURBO
button, and will appear on the display. Press
again to cancel this function.
In cool mode, press TURBO feature, the air
conditioner will turn to quick cooling mode and
operate at the highest fan speed to blow strong air.
TURBO
Quiet function
1. Press Quiet button to activate this function,
and will appear on the remote display. Do it
again to deactivate this function.
2. When the Quiet function is on, the remote
controller will display the auto fan speed, and
the indoor unit will operate at the lowest fan
speed to provide quiet environment.
3. When pressing FAN/TURBO/SLEEP button, the
Quiet function will be cancelled. Quiet function
cannot be activated under dry mode.
Quiet
SLEEP function
Pre-set the sleep program.
Press SLEEP button to activate the SLEEP
function, it will appear on the display. Press again
to cancel this function.
After 10 hours of running in sleep mode, the air
conditioner will change to the previous
setting mode.
SLEEP
7

REMOTE CONTROL
ECO function
In this mode the appliance automatically sets the
operation to save energy.
Press the ECO button, the appears on the
display, and the appliance will run in ECO mode.
Press it again to cancel.
ECO
DISPLAY function (Indoor display)
Switch ON/OFF the LED display on panel.
If the Fresh Air function is on, pressing the DISPLAY
button will also turn the Fresh Air indicator lights
ON/OFF along with the display panel.
DISPLAY
I FEEL function
Press I FEEL button to activate this function, the
will appear on the remote display. Do it again to
deactivate this function.
This function enables the remote to measure the
temperature at its current location. It then sends
the signal to the air conditioner to optimise the
temperature around you to ensure optimal comfort.
I FEEL
SELF-CLEAN function
To activate this function, rst turn o the indoor
unit. Press HEALTH twice until you hear a beep
sound, AC will appear on the indoor LED, and
will appear on the remote display.
1. This function helps carry away the accumulated
dirt, bacteria, etc. from the indoor evaporator.
2. This function will run for 30 minutes, and it will
return to its pre-set mode. You will hear 2 beeps
when it’s nished or cancelled.
It’s normal if there are some noises during the
operation of this function. It may be due to the
plastic parts’ expansion/shrinkage from the
heating and cooling or ice-cracking sounds.
We suggest operating this function at the
following ambient conditions to avoid certain
safety protection features.
Indoor unit Temp < 86ºF (30ºC)
Outdoor unit 41ºF (5ºC) < Temp < 86ºF (30ºC)
It’s suggested to utilize this function every
3 months.
GENTLE WIND function
1. Turn on the indoor unit, and change to COOL
mode, then press GENTLE WIND button to
activate this function, will appear on
the display.
Do it again to deactivate it.
2. This function will auto-close the vertical aps,
and give you a comfortable gentle wind feeling.
FRESH AIR function
Continue to repeatedly press the FRESH AIR
button until you have selected your desired Fresh
Air fan speed or deactivate this function. 4 fan
speed (LOW/MID/HIGH/OFF).
Note:
1. This function is only available in Cooling/Fan/
Auto mode.
2. If the indoor display shows CL on the Fresh Air
indicator, the lter should be replaced. Hold the
FRESH AIR button for 5 seconds to clear the CL
indicator.
Auto fan speed Low fan speed
Mid fan speedHigh fan speed
OFF (no indicator)
(Flash)
FRESH AIR
8

OPERATION INSTRUCTIONS
Using the air conditioner beyond the specied range may cause the air conditioner protection to start
deteriorating and the air conditioner will eventually fail to operate. Therefore use the air conditioner in
the following temperature conditions.
Inverter air conditioner:
MODE Cooling Dry
Temperature
Room temperature 17℃~32℃
Outdoor temperature 15℃~50℃ (Low-temperature cooling: -15℃~50℃)
With the power supply connected, restart the air conditioner after shutdown, or switch it to another mode
during operation, and the air conditioner protection device will reset. The compressor will resume operation
after 3 minutes.
OPERATION INSTRUCTIONS
9
TEST OPERATION
Do the following inspections before test run.
Description Inspection method
Electrical safety
inspection
• Check whether the power supply voltage complies with specications.
• Check whether there is any wrong or missing connection between the power
lines, signal line and earth wires.
• Check whether the earth resistance and insulation resistance comply with
requirements.
Installation safety
inspection
• Conrm the direction and smoothness of drainage pipe.
• Conrm that the joint of refrigerant pipe is installed completely.
• Conrm the safety of outdoor unit, mounting plate and indoor unit installation.
• Conrm that the valves are fully open.
• Conrm that there are no foreign objects or tools left inside the unit.
• Complete installation of indoor unit air inlet grille and panel.
Refrigerant leakage
detection
• The piping joint, the connector of the two valves of the outdoor unit, the valve
spool, the welding port, etc., where leakage may occur.
• Foam detection method:
Apply soapy water or foam evenly on the parts where leakage may occur, and
observe whether or not bubbles appear or not, if not, it indicates that the
leakage detection result is safe.
• Leak detector method:
Use a professional leak detector and read the instruction of operation, detect
at the position where leakage may occur.
• The duration of leak detection for each position should last for 3 minutes or
more;
If the test result shows that there is leakage, the nut should be tightened and
tested again until there is no leakage;
After the leak detection is completed, wrap the exposed pipe connector of
indoor unit with thermal insulation material and wrap with insulation tape.
INSPECTIONS BEFORE TEST RUN
10
This manual suits for next models
1
Table of contents
Popular Air Conditioner manuals by other brands


Fujitsu
Fujitsu Inverter ASBA30JFC operating manual

Toshiba
Toshiba RAS-M10SMUV-E installation manual

Daikin
Daikin FXLQ20MAVE Operation manual

Hitachi
Hitachi RAS-E24CAK instruction manual

CIAT
CIAT Magister 2 Series Installation, Operation, Commissioning, Maintenance

Bestron
Bestron AAC6000 instruction manual


