Company NA Master Fade User manual


MasterFadeuser manual
01.09.2014. - 2 -
1.BEFORE YOU BEGIN
WHAT IS INCLUDED IN MASTER FADE PACKAGE:
►MasterFade console
►Power cord
►SD memory card
►Warranty Card
►User Manual
UNPACKING INSTRUCTIONS
Immediately upon receiving a fixture, carefully unpack the carton, check the
contents to ensure that all parts are present, and have been received in good
condition. Notify the shipper immediately and retain packing material for inspection if
any parts appear damaged from shipping or the carton itself shows signs of
mishandling. Save the carton and all packing materials. In the event that a fixture
must be returned to the factory, it is important that the fixture be returned in the
original factory box and packing.
AC POWER
Before powering on the unit make sure the line voltage you are applying is
within the range of accepted voltages. This fixture will accommodate 100 - 240V AC,
48/62 Hz. All fixtures must be powered directly off a switched circuit and can not run
off a rheostat (variable resistor) or dimmer circuit, even if the rheostat or dimmer
channel is used solely for a 0% to 100% switch.
CONTACT US
General Information Company NA
9 Lambertu street
Marupe, LV-2167, Latvia
Phone: +371 6780 111
Fax: +371 6755 6505
e-mail: [email protected]
web: www.na.lv
MasterFadeuser manual
01.09.2014. - 3 -
Safety Instructions
● Please keep this User manual for future consultation. If you sell the unit to another user,
be sure that they also receive this instruction booklet.
● Always make sure that you are connecting to the proper voltage, and that the line
voltage you are connecting to is not higher than that stated on the decal or rear panel of
the fixture.
●Make sure there are no flammable materials close to the unit while operating.
● Always disconnect from power source before servicing or replacing fuse and be sure to
replace with same fuse source.
● Maximum ambient temperature (Ta) is (40°C). Do not operate fixture at temperatures
higher than this.
● In the event of a serious operating problem, stop using the unit immediately. Never try to
repair the unit by yourself. Repairs carried out by unskilled people can lead to damage
or malfunction. Please contact the nearest authorized technical assistance center.
Always use the same type spare parts.
●Don’t connect the device to a dimmer pack.
● Make sure the power cord is never crimped or damaged.
●Never disconnect the power cord by pulling or tugging on the cord.
Caution! There are no user serviceable parts inside the unit. Do not open the housing or attempt any
repairs yourself. In the unlikely event your unit may require service, please contact:
„Company NA” at: +37167801110.
Please read these instructions carefully,
which includes important information about the
installation, usage and maintenance of this product.

MasterFadeuser manual
01.09.2014. - 4 -
2. DESCRIPTION
DEVICE DESCRIPTION
MasterFade is unique lighting system control device for small aplications. It combines
6 fader live lighting console with DMX recorder. The unit operates with 1 DMX universe-
512 channels. The user has a possibility to patch any DMX channel values to 6 faders
or to record any memories onto these faders with multiple pages, where functionality of
faders is controlled from touchscreen.
Another option is a possibility to record static or dynamic scenes, from other DMX
source (console), controlled by four buttons and touchscreen as well. There is a
guaranteed dynamic record length 10* hours in total for all memories.
MasterFade merges incoming DMX signal and its own recorded and played back signal
by predefined rule: HTP (Highest Takes Precedence). That means that the final attribute
value will be the highest input value.
Also, this controller supports RDM protocol and has availability to change fixtures DMX
adress, DMX mode, check lamp settings, view fixtures sensor statuses, locate the
decive and reset it by using RDM protocol options.
*Actual record length depends on the DMX input rate.
DEVICE LINKING
MasterFade is created for use mostly as a backup system where you basically record
your static or dynamic DMX signal which comes from your DMX512 lighting console.
In your DMX data chain you have to locate the MasterFade directly

MasterFadeuser manual
01.09.2014. - 5 -
HTP CONTROL RULES
MasterFade console is using Highest Takes Precedence (HTP) system. This means that if an
intensity is output from more than one fader, the highest level will be the resulting output.
OVERVIEW
Fader LEDs and Master Faders LED- these LEDs shows the status of faders. If the
fader is set to 0 value, LEDs will have no output. If faders areset to the maximal value-
LEDs will have the maximal light output. The brighter the fader LED is- the bigger value
is given to fader.
LCD touchscreen-touchscreen is the main input device for MasterFade.
Menu buttons- using these buttons you can navigate through Fader, Scene, Relay or
RDM menus. RDM menu button is also used as refresh button for RDM devices list.
Master fader- using this fader you can set the intensity of outgoing DMX signal.
Page UP/ DOWN- using these buttons you can navigate through menu sections.
Faders- faders are used to set the playback output intensity of each recording (0-100%)
and for setting the DMX address values when editing static records.

MasterFadeuser manual
01.09.2014. - 6 -
3. HOW TO POWER ON MASTERFADE.
Simply attach the power cord to PowerCon socket and switch the power switch to
positive side.
HOW TO UPDATE DEVICES FIRMWARE?
To update firmware to newer version, follow these steps:
Download newest firmware version at Company's NA website (...)
COMPUTER PART (Windows 7 example)
1. Insert SD card into reading device which is connected to your PC.
2. Open My computer
3. Open MasterFades memory card folder.
4. Delete the old firmware"MasterFade(combi)_v*.**.bin"
5. Place the new firmware into memory cards folder (same place where was the old file
located).
6. Eject memory card from computer.
MASTERFADE PART
7. Insert the memory card into MasterFade.
8. While switching the power switch to positive side, simultaneously press buttons
which are marked as "Fader" and "Scene". Firmware upgrading screen will appear. It
will show "Slave upgrade"+ loading bar and "Master update" + loading bar. When
loading bars are full, firmware is updated and device is ready to run.

MasterFadeuser manual
01.09.2014. - 7 -
HOW TO PREPARE SD CARD FOR MASTERFADE?
We are using FAT32 filesystem for our memory cards. Most oftenly SD cards are
formatted in FAT32 directly from manufacturer, but in case it isn't, you must format your
SD card in FAT32 filesystem.
To copy your files to computer or to format SD card you are going to need an SD card
reader. If you have a laptop, most propably you have a built in SD card reader which
you can use.
Demonstration, how to format a memory card on Microsoft Windows7.
1. Insert SD card into reading device which is connected to your PC.
2. Open My computer
3. You should see your memory card as new device with removable storage.
Right-click on memory card folder (icon) and click Formatas shown in picture.
4. Formatting window will pop-up. Choose FAT32 file system, insert any volume label
information and click on Start.
5. You have successfully formatted your card and it's ready to use with MasterFade.
WHAT TYPE OF MEMORY CARDS CAN IUSE?
You can use any SD card but we can't ensure that card will work properly. We
recommend using SanDisk high speed SD memory cards.
Formatting your SD Card will erase any
information stored on the card. Be sure to
remove any important files from the card
before formatting.

MasterFadeuser manual
01.09.2014. - 8 -
HOW TO CALIBRATE TOUCHSCREEN?
While turning your device on, simultaneously press page up and page down buttons
which are located under the LCD touchscreen. You will get directed to touchscreen
calibration menu where you need to press 4 touchscreen calibration points, one by one,
as accurate as possible to ensure correct touchscreen calibration.
After this procedure, the touchscreen of MasterFade should be calibrated.
HOW TO TRANSFER (BACKUP)MASTERFADE FILES TO COMPUTER?
Similarly as "How to prepare SD card for MasterFade?" you have to:
Insert SD card into reading device which is connected to your PC.
1. Open My computer
2. Inside the list "Devices with Removable Storage", find a memory card that you just
connected.
3. Copy folder "MasterFade" to safe location where you want it to be stored.

MasterFadeuser manual
01.09.2014. - 9 -
4. INTRODUCTION
MAIN MENU.
To get in the main menu, you have to press "MENU" button which is located at right
upper corner.
There you will have the following options:
ERASE;
RELEASE;
WRITE PROTECTION (ON/OF);
EXIT.
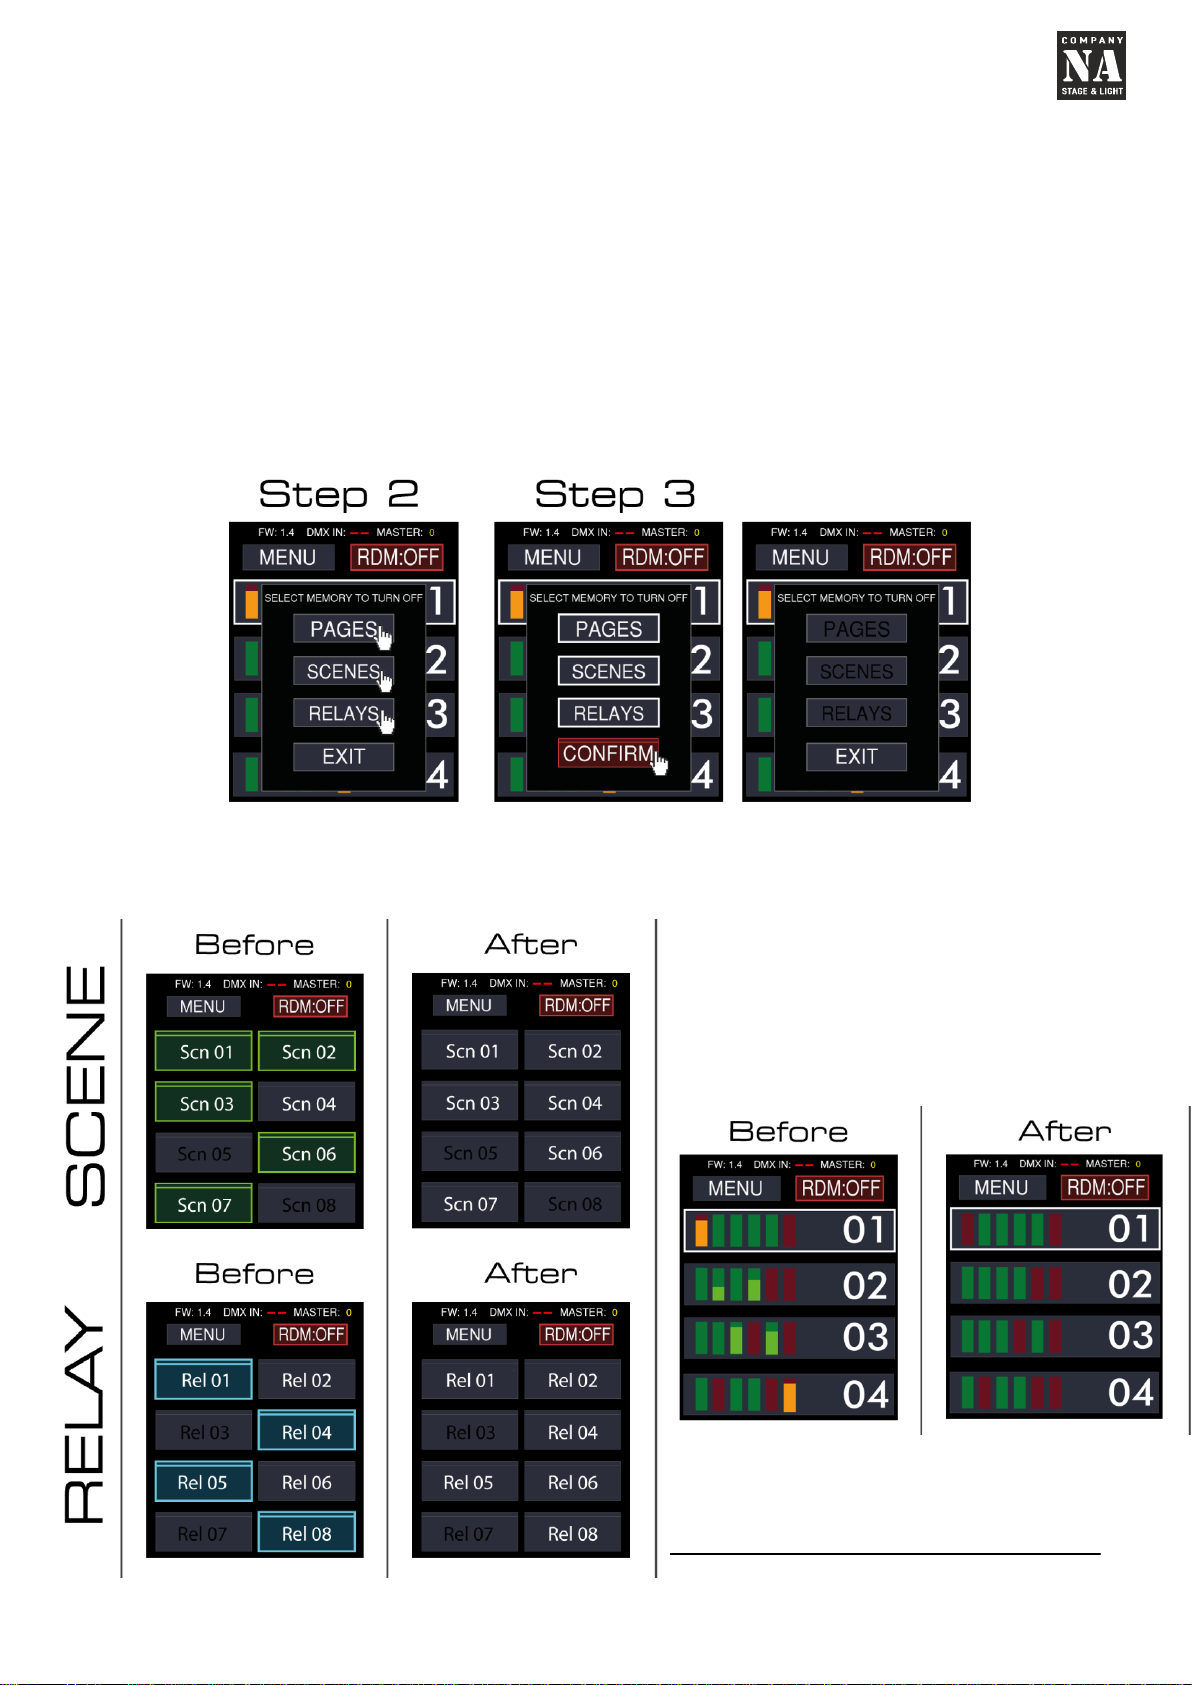
ERASE.
Under "ERASE" menu you can find options to delete pages, scenes and relays
seperately or all together.
To delete pages, scenes or relays, you must follow these steps:
Step 1: In main menu press button "ERASE". This will lead you to erasing menu.
Step 2: Select memories to erase. For example, we selected pages and relays. After
selecting them, they will turn yellow.
Step 3: Long press "CONFIRM" button. This will erase the selected memories (yellow in
color).
RESULT: Deleted memory titles will turn black. That means they are fully empty.
MasterFadeuser manual
01.09.2014. - 10 -
RELEASE:
Under "RELEASE" menu you can find options to null (release/ disable/ turn off)
activated faders, null activated scenes or null activated relays.
This is useful when you have many activated memories and deactivating them one by
one will consume much time.
To release activated memories, you have to follow these steps:
Step 1: Press "RELEASE" button in main menu.
Step 2: Select memories you want to release. For example, we took all 3 memories.
Confirmation button will appear after selecting at least 1.
Step 3: Long press "CONFIRM" button. This will disable current fader positions/
activated scenes or relays.
Result: scene and relay recordings will turn unactive
Results in page **.
FADER
Table of contents
Popular Controllers manuals by other brands

Digiplex
Digiplex DGP-848 Programming guide

YASKAWA
YASKAWA SGM series user manual

Sinope
Sinope Calypso RM3500ZB installation guide

Isimet
Isimet DLA Series Style 2 Installation, Operations, Start-up and Maintenance Instructions

LSIS
LSIS sv-ip5a user manual

Rockwell Automation
Rockwell Automation 1769-L31 installation instructions


