AirTek AT075AE User manual

User Manual / Manual de Usuario
Read and save these instructions before use /
Lea y guarde estas instrucciones antes de usar la unidad
Portable Evaporative Air Cooler
Enfriador de Aire Evaporativo Portátil
Model / Modelo: AT075AE

1EN
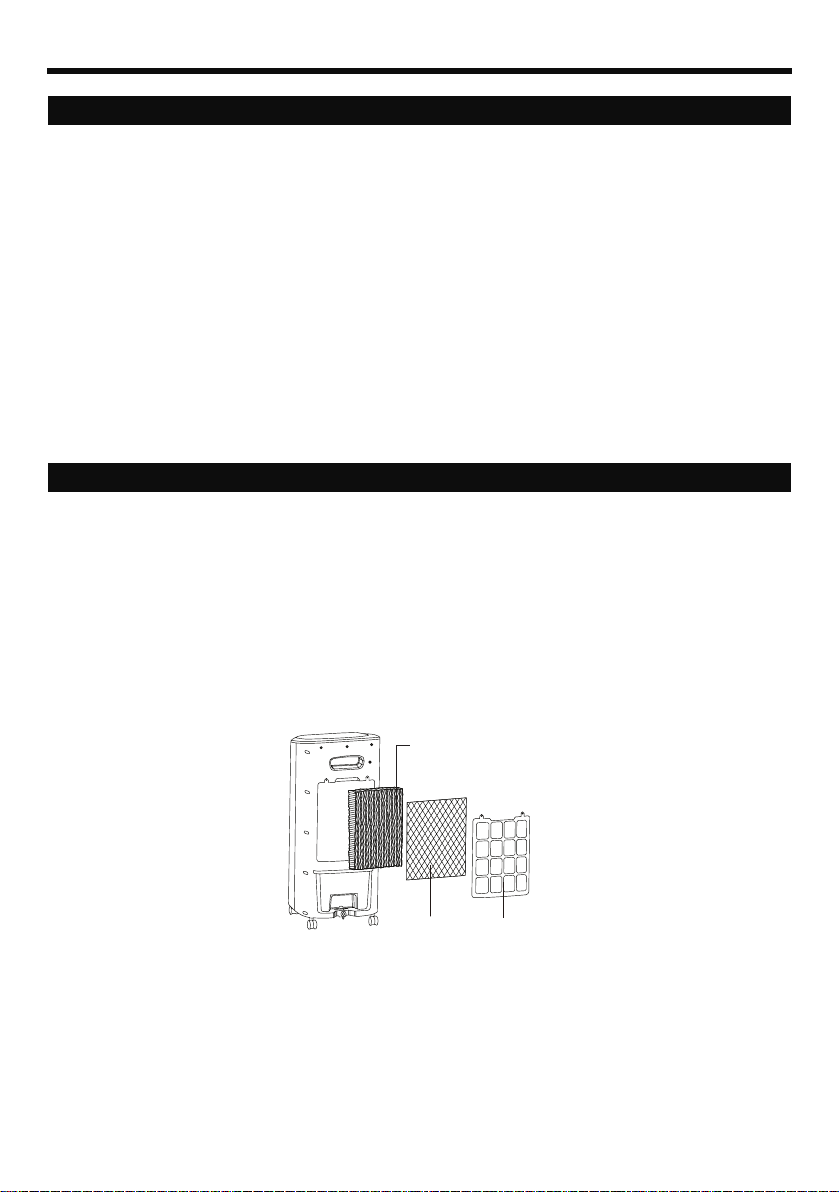
PARTS DESCRIPTION
WARNING -- READ AND SAVE THE AIR COOLER SAFETY & MAINTENANCE GUIDE AND USER
MANUAL BEFORE USING THIS PRODUCT. FAILURE TO FOLLOW THESE INSTRUCTIONS MAY
DAMAGE AND/ OR IMPAIR ITS OPERATION AND VOID THE WARRANTY. IN CASE THERE IS
ANY INCONSISTENCY OR CONFLICT BETWEEN THE ENGLISH VERSION AND ANY OTHER
LANGUAGE VERSION OF THE CONTENT OF THIS MATERIAL, THE ENGLISH VERSION SHALL
PREVAIL.
+Antibacterial Honeycomb is up to 99%A eective in killing certain types of bacteria through 48 hours of continuous use.
A Based on independent laboratory testing (report # 2020FM2738), testing the antibacterial and cleaning function of the honeycomb
cooling pads against Escherichia coli (strain #ATCC8739), Staphylococcus aureus (strain #ATCC 6538P), Klebsiella Pneumoniae
(strain # ATCC 4352) , as per testing standard JIS L 1902:2008 designed for testing antibacterial and cleaning functions for household,
and similar electrical appliances.
(6)
(5)
(4)
(3)
(2)
(1) (7)
(8)
(9)
(10)
(11)
1) Control Panel 7) Handle
2) Power Cord & Plug 8) Rear Grill
3) Louvers 9) Antibacterial Honeycomb
Cooling Pad+
4) Water Level Indicator 10) Water Tank
5) Casters 11) Water Tank Knob
6) Ice Compartment Lid

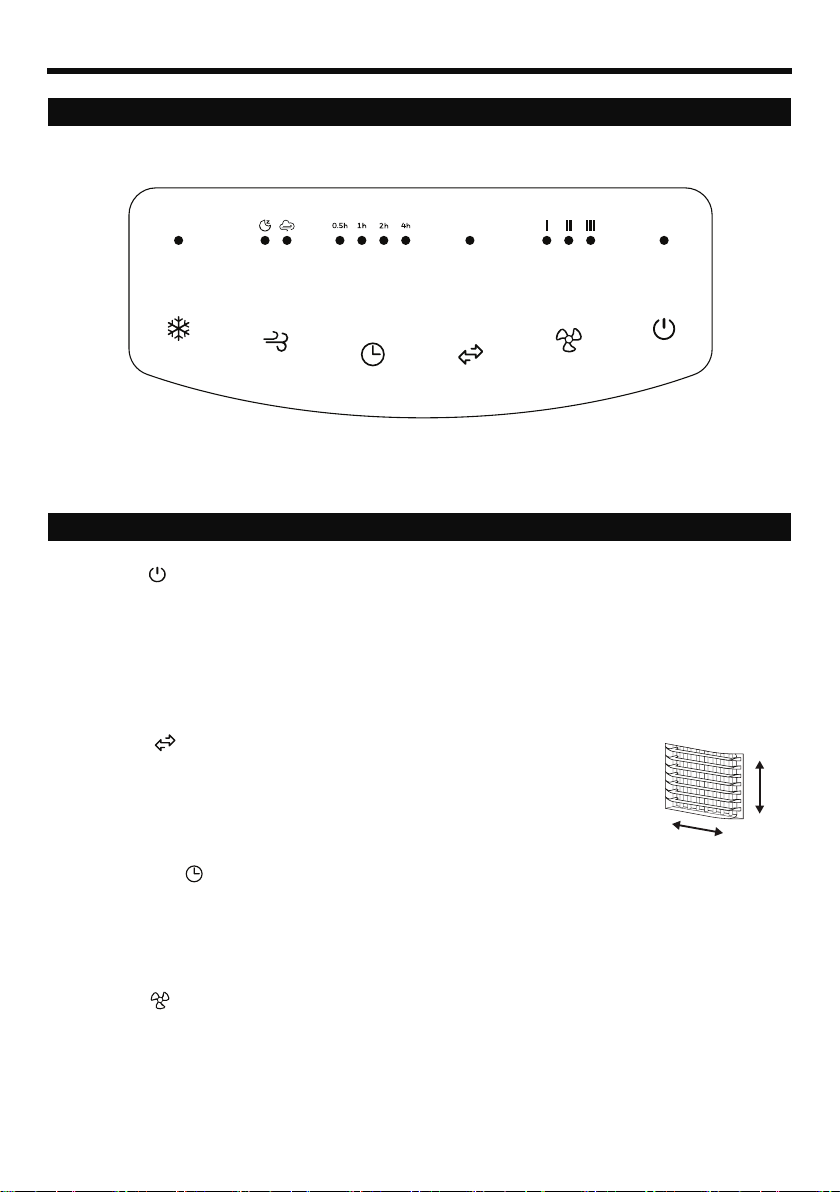
CONTROL PANEL
POWER
Press the POWER button to turn the unit on. The cooler will start automatically at medium speed. After
a few seconds the speed will switch to low. Once the unit is switched on, the Ionizer is automatically
activated. The ionizer causes the particles in the air to become heavier and fall to the oor, so the unit
will expel cleaner and fresher air.
SWING
Press the SWING button until the SWING indicator light is illuminated on the control
panel. The louvers will begin to move left to right automatically.
Vertical Air Flow - You can manually adjust the louvers to change vertical air ow.
TIMER
Press the TIMER button until the desired time duration setting is selected. When the set time has
passed, the unit will automatically turn o (unit remains in Standby mode until power cord is unplugged
from electrical socket). The TIMER function allows you to program the unit for up to 7.5 hours of use.
SPEED
Press the SPEED button repeatedly to change the speed between III (High) - II (Medium) - I (Low).
Louver Movement
FUNCTION BUTTONS
2EN
USE & OPERATION

FUNCTION BUTTONS (CONTINUED)
WIND TYPE
NOTE:
•
•
•
•
•
•
•
•
•
•
The remote control requires a CR2025 (1x3V) coin type or equivalent battery for replacement.
Open the battery compartment at the back of the remote control and insert batteries inside. Care
must be taken to insert the batteries according to the correct polarity (+ / –) markings shown inside
the battery compartment.
Always point the remote control signal transmitter towards the unit when operating. Make sure that
the signal path is not obstructed.
Remove the batteries if the unit is not going to be used for an extended period of time.
Do not drop the remote control.
Do not mix dierent types of batteries such as alkaline, carbon-zinc, or rechargeable batteries.
Do not mix old and new batteries.
Do not recharge the battery.
Exhausted batteries are to be removed from the product and safely disposed of as per local regulations.
Do not dispose of batteries in re. Batteries may explode or leak.
WARNING: Caution for ingestion of the small battery. Keep away from children and animals.
COOL
Press the COOL button until the COOL indicator light is illuminated on the control panel. This activates
evaporative cooling. The water pump will operate and you will feel the cooler air after the Honeycomb
Cooling Media is completely wet.
Note: When the COOL indicator light is switched OFF, the unit can still function in a fan only mode (without
evaporative cooling).
ON/OFF
Low / Medium / High
Controls the motion of the louvers
Controls the Timer function for automatic o
Controls cooling or fan option
Switch between Random & Sleep
POWER / IONIZER
SPEED
SWING
TIMER
COOL
WIND TYPE
:
:
:
:
:
:
Press the Wind button to select your desired wind type: Random or Sleep
Random:This mode mimic a natural breeze.
Sleep: This mode is for comfort during the night.
3EN
USE & OPERATION (CONTINUED)
REMOTE CONTROL

4EN
USE & OPERATION (CONTINUED)
Make sure to position the air cooler correctly before you set up and start using the product.
Please refer to the COOLER LOCATION section of the separate Safety & Maintenance Guide.
CAUTION:
Unplug the unit from the electrical power outlet before emptying or relling
the water tank.
To rell, rotate the water tank knob and slide out the water tank located at
the back of the unit.
The Water Level Indicator is located at the front of the unit. Rell the water
tank when water level is low. Do not ll water above the "Max." water level
mark to avoid water droplets collecting on the louvers. Check the water level
in the tank before running the COOL function. Make sure that the water in
the tank is above the minimum water level mark. Running the unit in COOL
mode with inadequate water may cause pump failure.
Note: The water capacity refers to the total volume of water that can be
contained within the air cooler water tank and water distribution system.
The water capacity in the tank at the “Max.” indicator level may be lower
than the actual water capacity of the air cooler.
Note: If ice is available, you may add ice in the top ice compartment to enhance
the cooling performance.
WARNING: Do not fill water tank with dirty water or salt water. This can
damage the unit and Honeycomb media.
COOLER LOCATION
FILLING WITH WATER
Ice Compartment
Water Tank

5EN
Below are instructions on how to clean and maintain your air cooler. If the cooler will not be used for
a long period of time, please refer to the STORAGE & MAINTENANCE GUIDELINES located in the
separate Safety & Maintenance Guide.
WARNING:
Before cleaning the unit, switch the unit OFF and disconnect from the electrical socket.
CLEANING & DRAINING THE WATER TANK
Move the unit to a location where the water can be drained. Remove the cap from the Drain plug
located at the bottom of the unit. Allow the tank to empty.
Rell the water tank with clean water and drain it completely.
Rell the water tank with clean water, up to the maximum level.
Use a damp cloth to remove the dirt and dust from the surface of the unit. Never use corrosive
elements or chemicals to clean this product.
When the product is not in use, store the unit in a dry place out of direct sunlight.
•
•
•
•
•
The unit is equipped with a low water sensor. In Cooling Mode, when water in the tank is below the
minimum level, you will hear a beeping sound and the indicator light will ash continuously. The unit will
automatically pause evaporative cooling.
Rell the water tank to deactivate the alarm in cooling mode. First switch OFF the unit and unplug from
the power outlet. Fill the water tank with water above the minimum water level mark. Plug in and switch
ON again.
To deactivate the alarm and continue using the unit as a fan (without evaporative cooling), switch the unit
OFF and then ON again. The Low Water Alarm will not activate in Fan only mode. The Low Water Alarm
will sound again if the COOL function is activated while the water tank is still empty.
LOW WATER ALARM
USE & OPERATION (CONTINUED)
6EN
Cleaning the Mesh Filter and Antibacterial Honeycomb Cooling Pad
+
Removing the Mesh Filter / Antibacterial Honeycomb Cooling Pad+:
The appliance is supplied with a Mesh Filter and Antibacterial Honeycomb Cooling Pad+.
The Mesh Filter and Antibacterial Honeycomb Cooling Pad+ are located inside the Rear Grill. See
Figure 1 for instructions on how to remove them from the unit for cleaning and maintenance.
Do not run the unit in COOL mode with stale water in the tank. You must empty the water tank and
rell with fresh water, especially if the tank has not been cleaned in a long time.
The cleaning frequency for the Antibacterial Honeycomb Cooling Pad+ depends on local air and water
conditions. In areas where the mineral content of water is high, mineral deposits may build up on
the Antibacterial Honeycomb Cooling Pad+ and restrict air ow. Draining the water tank and relling
with fresh water at least once a week will help reduce mineral deposits. If mineral deposits remain on
the Antibacterial Honeycomb Cooling Pad+, the media should be removed and washed under fresh
water. The media should be cleaned every two months or sooner, depending on your needs.
For best results allow the Antibacterial Honeycomb Cooling Pad+ to dry after each use by turning o
the cool function 15 minutes before turning the unit o.
•
•
•
•
•
Carefully pull out the rear grill from the cooler.
Slide out the Antibacterial Honeycomb Cooling Pad+.
Slide out the Mesh Filter and clean with water.
Replace or clean media with water and a damp cloth as needed.
1.
2.
3.
4.
WARNING: DO NOT operate the Air Cooler when the Rear Grill is removed from the Air Cooler, or if
there is a loose-tting Rear Grill. Doing so can cause serious injury or dangerous electrical shock.
Figure 1
Antibacterial Honeycomb
Cooling Pad
+
Mesh Filter Rear Grill
USE & OPERATION (CONTINUED)
+Antibacterial Honeycomb is up to 99%A eective in killing certain types of bacteria through 48 hours of continuous use.
A Based on independent laboratory testing (report # 2020FM2738), testing the antibacterial and cleaning function of the honeycomb
cooling pads against Escherichia coli (strain #ATCC8739), Staphylococcus aureus (strain #ATCC 6538P), Klebsiella Pneumoniae
(strain # ATCC 4352) , as per testing standard JIS L 1902:2008 designed for testing antibacterial and cleaning functions for household,
and similar electrical appliances.

1ES
DESCRIPCIÓN DE PARTES
ADVERTENCIA -- LEA Y GUARDE LA GUÍA DE MANTENIMIENTO Y EL MANUAL DE USUARIO
ANTES DE USAR ESTE PRODUCTO. EL INCUMPLIMIENTO DE ESTAS INSTRUCCIONES PUEDE
DAÑAR Y / O PERJUDICAR SU FUNCIONAMIENTO E INVALIDAR LA GARANTÍA. EN CASO DE
EXISTIR ALGUNA DISCREPANCIA O CONFLICTO, EN EL CONTENIDO DE ESTE MATERIAL,
ENTRE LA VERSIÓN EN INGLÉS Y LA VERSIÓN EN CUALQUIER OTRO IDIOMA PREVALECERÁ
LA VERSIÓN EN INGLÉS.
+ El Panel Antibacterial es hasta un 99%Aefectivo para eliminar ciertos tipos de bacterias a través de 48 horas de uso continuo.
A Basado en una prueba de laboratorio independiente (reporte #2020FM2738), en la que se probaron las funciones antibacteriales y de
limpieza del panel de enfriamiento Honeycomb contra escherichia coli (muestra #ATCC8739), Staphylococcus aureus (muestra #ATCC
6538P), Klebsiella Pneumoniae (muestra # ATCC 4352), así como una prueba estándar JIS L 1902:2008 diseñada para probar las
funciones antibacteriales y de limpieza para aparatos electrodomésticos y similares.
(6)
(5)
(4)
(3)
(2)
(1) (7)
(8)
(9)
(10)
(11)
1) Panel de Control 7) Manija
2) Cable de Alimentación
y Clavija 8) Rejilla Trasera
3) Rejillas 9) Panel de Enfriamiento
Honeycomb Antibacterial+
4) Indicador de Nivel
de Agua 10) Tanque de Agua
5) Ruedas 11) Seguro del Tanque de Agua
6) Tapa de Compartimento
para Hielo
PANEL DE CONTROL
ENCENDIDO
Pulse el botón ENCENDIDO para encender la unidad. El enfriador comenzará automáticamente a
funcionar a velocidad media. Después de unos segundos la velocidad cambiará a baja. Una vez que la
unidad está encendida, se activará automáticamente el ionizador. El ionizador hace que las partículas
del aire se hagan más pesadas y caigan al piso, de tal manera que la unidad expulsará aire más limpio
y fresco. Para apagar la unidad, pulse nuevamente el botón.
OSCILACIÓN
Pulse el botón OSCILACIÓN hasta que el indicador se ilumine en la pantalla.
Las rejillas comenzarán a moverse de izquierda a derecha de forma automática.
Flujo de aire vertical - Se puede ajustar manualmente las rejillas horizontales para
cambiar el ujo de aire vertical.
TEMPORIZADOR
Presione el botón TEMPORIZADOR hasta seleccionar la cantidad de tiempo deseado. Cuando el
tiempo seleccionado ha pasado, la unidad se apagará automáticamente (la unidad permanecerá en
modo de espera -Standby- hasta que se desenchufe el cable de alimentación de la toma eléctrica).
La función TEMPORIZADOR le permite programar la unidad hasta 7.5 horas de uso.
VELOCIDAD
Presione el botón de VELOCIDAD repetídamente para cambiar la velocidad entre
III (Alta) - II (Media) - I(Baja).
Movimiento de
Rejillas
BOTONES DE FUNCIONES
2ES
USO Y FUNCIONAMIENTO

BOTONES DE FUNCIONES (CONTINUACIÓN)
TIPO DE VIENTO
NOTA:
•
•
•
•
•
•
•
•
•
•
El control remoto requiere una pila tipo moneda CR2025 (1x3V) o una pila equivalente para su
reemplazo.
Abra el compartimento para pilas en la parte de atrás del control remoto e inserte las baterías.
Asegúrese de colocar la batería de acuerdo a la polaridad correcta (+ / –) indicada dentro del
compartimento para pilas.
Siempre apunte el transmisor de señal del control remoto hacia la unidad cuando se opera.
Asegúrese de que la ruta de la señal no esté obstruida.
Retire las baterías si la unidad no se va a utilizar durante un período prolongado de tiempo.
No deje caer el control remoto.
No mezcle diferentes tipos de baterías, alcalinas, de carbono-zinc, o pilas recargables.
No mezcle pilas nuevas con viejas.
No recargue las pilas.
Las pilas agotadas deben ser removidas del control y desechadas de forma segura de acuerdo a las
regulaciones locales.
No arrojar las pilas al fuego. Las pilas podrían explotar o derramarse.
ADVERTENCIA: Peligro de ingestión de las pilas. Manténgalas alejadas de niños y de animales.
FRÍO
Pulse el botón FRÍO hasta que el indicador se ilumine en el panel de control. Esto activará el enfriamiento
por evaporación. El agua del equipo será bombeada y humedecerá el panel de enfriamiento, después de
que los paneles estén completamente mojados, comenzará a percibir la sensación de frescura.
Nota: Cuando la luz del indicador FRÍO está apagada, la unidad puede seguir funcionando en modo
ventilador (sin enfriamiento por evaporación).
Encendido / Apagado
Baja / Media / Alta
Controla el movimiento de las rejillas verticales
Control de función de apagado automático
Controla la opción enfriamiento
por evaporación o ventilador
Cambia entre modo Aleatorio y modo Sueño
ENC/APAG/
IONIZADOR
VELOCIDAD
OSCILACIÓN
TEMPORIZADOR
FRÍO
TIPO DE VIENTO
:
:
:
:
:
:
Pulse el botón TIPO DE VIENTO para seleccionar el tipo de viento deseado: Aleatorio - Sueño
ALEATORIO:Este modo es para imitar una brisa natural.
SUEÑO: Este modo es para su comodidad durante la noche.
3ES
USO Y FUNCIONAMIENTO (CONTINUACIÓN)
CONTROL REMOTO
Table of contents
Languages:
Other AirTek Air Conditioner manuals


Popular Air Conditioner manuals by other brands


Fujitsu
Fujitsu Inverter ASBA30JFC operating manual

Toshiba
Toshiba RAS-M10SMUV-E installation manual

Daikin
Daikin FXLQ20MAVE Operation manual

Hitachi
Hitachi RAS-E24CAK instruction manual

CIAT
CIAT Magister 2 Series Installation, Operation, Commissioning, Maintenance

Bestron
Bestron AAC6000 instruction manual


