Zappiti One Se4K User manual

English ● Castellano
Quick Start Guide
Guía de Inicio rápido
Manufactured under license from Dolby Laboratories.
Dolby and the double-D symbol are trademarks of Dolby Laboratories.
DTS, the Symbol, & DTS and the Symbol together are registered trademarks & DTS 2.0+Digital Out
is a trademark of DTS, Inc. Product includes software. © DTS, Inc. All Rights Reserved.

2
Dune HD TV-303D Quick Start Guide
About Zappiti
Zappiti is a French company based in Paris. Zappiti designs and manufactures only professional grade
Video Management Systems; delivering the highest quality, outstanding performance, and best possible
user experience. The sofware development & enginering, design and support teams are located in
France (Europe).
All of the Zappiti products are designed to provide our end-user customers with convenient and intuitive
access to their entire movie library collection, in stunning 4K, High Definition resolution. The award
winning Zappiti devices are being successfully used to improve the movie watching experience, in
residential and commercial environments all over the globe.
To ensure the ultimate performance, all Zappiti devices are supplied to authorized resellers through a
worldwide network of established and well respected distribution partners.
Zappiti products are distributed in over 40 countries worldwide.
More info: zappiti.com
Getting More Information
Due to the regular evolution and the addition of new functionalities,
provided by firmware and software updates, it is impossible to cover
all functionalities in this user's guide. For this reason, we invite you to
visit our online Zappiti Knowledge Base. You will find a large amount
of tutorials and various help topics concerning the use of the media
player and Zappiti applications:
zappiti.uservoice.com/knowledgebase

3
English
3
TLista de contenidos
Table of Contents
English
Quick Start Guide
General, Key Features
Organize your Video Collection with Movie Covers
Package Contents
Exterior, IR Extender
Remote Control, Connect a Computer Keyboard / Mouse
Getting Started, HDMI Outputs, Black Border Issue (overscan)
Firmware Upgrade, Audio & Video Settings
Connecting USB Drives, Using Internal Drive, SD / MMC Cards
Zappiti Video, Zappiti Music & Zappiti Explorer, Create An Account
Accessing Network Drives and Access to Zappiti Storage
How to Transfer your Files Using Zappiti Explorer
Video and Audio Playback Options, Slideshow Function, Properties
How to Install an App, Add an App Shortcut to the Home Page
Adding a Movie File, Deleting a Movie File
Cómo identificar películas no encontradas, cómo identificar archivos 3D, 4K y UHD
4 •
5 •
6 •
7 •
8 •
9 •
10 •
11 •
12 •
13 •
13 •
13 •
13 •
Ethernet, Wi-Fi, Bluetooth, Audio/Video Mirroring14 •
Zappiti Music, How To Control Your Zappiti Using your Tablet / Smartphone14 •
15 •
16 •
16 •
Parental Control, Personal Categories, Zappiti On Start-Up, Subtitle options17 •
Default Subtitles and Language, User Support, Zappiti Db Community17 •
How to Create a Movie Collection in Zappiti Video
4
Lista de contenidos
Castellano
Guía de inicio rápido
18 •
19 •
20 •
21 •
22 •
23 •
24 •
25 •
26 •
26 •
27 •
27 •
27 •
27 •
28 •
28 •
29 •
30 •
Introducción, funciones principales
Sistema de carátulas integrado
Contenido de la caja, Extensor IR
Vista exterior
Mando a distancia, Conecte el teclado o un ratón para ordenador
encendido, Puesta en marcha
Actualización del firmware, Ajustes de audio y video
Zappiti Video, Zappiti Music y Zappiti Explorer, Grabación
Disco duro externo, Conexiones USB, Disco duro interno
Uso de tarjetas de memoria SD
Acceder a carpetas de red
Copie y administre sus archivos con Zappiti Explorer
Opciones de reproducción de video y audio, función de presentación de diapositivas
Cómo instalar una app, agregar una aplicación de acceso directo a la página de inicio
Ethernet, Wi-Fi, Bluetooth, Audio/Video Mirroring
Zappiti Music, Controle su Zappiti mediante una tablet o un smartphone
Crear una colección de películas / series con Zappiti Video
Utilisation de Zappiti Vidéo, Film non trouvé, Fichiers 3D et UHD
31 • Control parental, Categorías personalizadas, Zappiti al arrancar, Ajuste de subtítulos
31 • Subtítulos e idioma predeterminados, Zappiti Db Community, Soporte al Usuario
31 • Instalar una aplicación de terceros, agregar un acceso directo a la página de inicio
16

Vote for future features
To propose a new feature or vote for an upcoming feature, please visit: zappiti.uservoice.com
4
Quick Start Guide
General
The Zappiti One SE 4K HDR is an all-in-one solution for video playback with HDMI 2.0a,
Dual HDMI output, 4K60p, HDR and 3D capabilities.
Key Features
HDR: Display your HDR video content, while also providing increased dynamic range on your
HDR display (TV/projector).
Dual HDMI: Use the second HDMI to separate audio and video for the best performances.
4K 50/60p: Display your 4K video content in 3840x2160p at 50 Hz or 60 Hz (HDMI 2.0a).
MKV Player: Playback SD, HD and UHD video contents in MKV, M2TS, DVD / BD / UHD ISO
and other modern video file containers and formats, including top quality HEVC/H.265 video
codec, with very high bit-rates up to 400 Mbp/s.
HDD Rack Option with Hot Swap Function: Easily and quickly insert and exchange internal 3.5’’
SATA hard drives.
Network Player: Connect your Zappiti on your local network and enjoy your content from a
computer PC/MAC or a NAS via SMB.
USB Ports: Conveniently connect hard drives, USB flash drives, USB card readers, computer
mouse / keyboard, and other USB storage devices.
USB Port 3.0 and Type-C: Read or copy your files in ultra high speed.
Full Range of A/V Connectors: S/PDIF coaxial and optical audio output, audio analog RCA,
RCVBS, HDMI 2.0 CEC, HDMI Audio only, HDMI Input.
Multichannel home cinema audio: Bitstream (RAW), downmix LPCM stereo .
Hi-Res Music Playback: Play your Hi-Res Audio quality music files and control them from your
smartphone / tablet (iOS/Android) without the need of TV.
Video Output Flexibility: Output video in any resolution and format including SD, 1080p
(1920x1080), Ultra HD (3840x2160p) and true 4K (4096x2160p) up to 12-bit by primary color.
Auto Framerate: Auto framerate detection 24/50/60p (compatible 24.000 Hz / 23.976 Hz).
Playback Memory: Resume playback from the last position.
Advanced File Browser: Convenient file browser with powerful file management (select, select
all, copy, cut, past, delete, rename, ...).
Audio playback functions: Album cover art support, folder playback, random, repeat, loop...
Photo slideshows: Convenient features to easy create beautiful photo slideshow with music and
amazing transition effects.
Backlit Remote Control: High quality remote control with direct access and shortcuts with
backlit buttons and recordable buttons to control another device.
Wi-Fi 5 GHz with 2 removable antennas: Playback and transfer your video content wirelessly
with high bitrate.
●
●
●
●
●
●
●
●
●
●
●
●
●
●
●
●
●
●
●

5
English
Organize your Video Collection with Movie Covers
●
●
●
●
●
●
●
●
●
●
●
●
●
Zappiti Video Interface: Browse your movie and TV show collection with cover art and media
information: (subtitles, actors, director, release date...). Zappiti features an automatic category index
of movies and TV shows directly to the player, without requiring a computer.
Zappiti Search: Easy access to your movies or TV shows, thanks to Zappiti powerful search engine
combined with smart filters (actor, director, length, rating, release date...).
Zappiti Stand-Alone: Add, edit or delete movie covers directly on your Zappiti via the remote
control (no PC required). Change the posters, edit the synopsis, change the associate category,
create and organize your own personal categories, etc.
Zappiti on Start-up: Enable/disable start-up for Zappiti Video from system boot by Zappiti setting.
Zappiti Collections: Create and manage one collection by each family member or one collection by
HDD and switch easily from one collection to another.
Parental control: With the parental control feature, you can designate movies as ‘‘children's’’ and
block access to other movies with a PIN code. Thus, your children can safely access only their
movies! In addition, the child mode provides direct access to movies for greater ease of use.
Movie sagas: The saga films are automatically placed in groups and sorted by release date. A saga
cover dedicated to the collection is associated with the group and movies are displayed in a stun-
ning carousel with great 3D motion effects!
Zappiti Off-line: Save a collection locally and use it without any Internet connection.
Zappiti Trailers: Watch the trailer of your movies.
Zappiti Bonus Live: Watch additional contents such as Making Of, Deleted Scenes, Extracts,
Reviews, Blooper Reel, ... The additional contents are regularly updated for more results.
Zappiti Sub: Easily download the subtitle of a movie or TV show episode, directly from the Zappiti.
Zappiti Sync: Thanks to Zappiti Sync, your movie collections are automatically synchronized to
your other Zappiti Player 4K (multiroom) and to all your computers MAC and PC!
Zappiti Explorer: Zappiti Explorer is the easiest way to launch the playback of most of multimedia
files such as UHD, BD and DVD ISO, BDMV, M2TS, MKV, MP4, MOV, MP3, FLAC, JPG...
Zappiti Explorer makes file exploration so easy!

6
NOTE:
1. Zappiti One SE 4K HDR
2. IR Remote Control
3. IR Extender
4. Wi-Fi Antennas
5. HDMI 4K Cable
6. Power Adaptor
7. Quick Install Guide
Additional items (optional) may be included into the package, depending on player configuration, region, and
distributor.
Package Contents
Quick Start Guide
1
5
2
76
3 4
IR Extender
If your Zappiti is hidded behind the TV or
something else, you can use the
provided IR exender. Connect it to the
dedicated port as following:
Zappiti back panel
IR Extender
HDMI Cable
The supplied cable is compatible with 4K HDR. For longer lengths, we recommend the cables offered on
store.zappiti.com. All the proposed HDMI cables have been tested in 3840x2160 resolution at 60 Hz,
and in 4:4:4 / 10-bit in real situation on Zappiti 4K HDR media players. By choosing one of the cables
offered by Zappiti, you will have the insurance of optimal operation. Indeed, a large number of HDMI
cables yet certified 4K 60p and 2.0 are not compatible with Zappiti boosted video streams and it can
happen that the picture displays jerks, freezes, white pixels, or a black screen .

7
English
1. Wi-Fi Antenna
2. Analog Audio Output Right / Left
3. Analog Video Output CVBS
4. Coaxial Digital Audio Output
5. Optical Digital Audio Output
6. IR IN (IR extenter included)
9. USB 3.0 Host
10. LAN 10/100/1000
11. HDMI Input
12. Audio HDMI Output (Audio only)
13. Main HDMI Output (Video + Audio)
14. DC Power 12V 2A
15. Power Switch ON/OFF
7. USB 2.0 Host
8. USB TYPE-C
Rear View
Front View
Side View (Right)
1. Rack HDD Door
1. USB 2.0 Host
2. Restore
3. SD/MMC Card Reader
1. LED Indicator
Side View (Left)
1
1
1
3
23
2
2
45 6 7 8 9 1011 1213
1
1415
1

8
Remote Control
Quick Start Guide
1. POWER: Toggle power ON/OFF.
2. POWER ON: Power ON.
3. ZOOM: Zoom In / Out (overscan).
4. DELETE: Delete / Change home template.
5. POWER OFF: Power OFF.
6. ASP. RATIO: Switch the Aspect Ratio.
7. DIMMER: Toggle Front LED ON/OFF.
8. 3D: Toggle 3D mode (2D / 3D).
9. PREV: Go to the previous chapter.
10. PLAY/PAUSE: Start / Pause playback.
11. NEXT: Go to the next chapter.
12. ZAPPITI: Zappiti Media Center shortcut.
13. REPEAT: Repeat playback (file, all, off).
14. EXPLORER: Zappiti Explorer shortcut.
15. RED: For future function.
16. GREEN: Shortcut to Settings.
17. YELLOW: Shortcut to HDMI IN Recording page.
18. BLUE: Shortcut to Firmware Upgrade page.
19. HOME: Go to Main Menu (Home Page).
20. MOUSE: Switch to the virtual mouse mode.
21. MENU: Show / Hide the pop-up menu.
22. BACK: Return or Stop playback.
23-26. ARROWS: Navigate menu selection.
23,25. UP: Fast forward. DOWN: Fast backward.
24,26. LEFT/RIGHT: Timeline navigation (+/-1 min).
27. OK: Enter or validate the current item.
28-29. VOLUME +/-: Increase / Decrease volume.
30. INFO: Show / Hide the pop-up info (properties).
31-32. PAGE+/-: Timeline navigation (+/-10 sec).
33. MUTE: Mute audio.
34. NUMBER Buttons:
- 1-9: direct playback access to 10 - 90%.
- 0: Restart the playback from the beginning.
35. SUBTITLE: Subtitle switch / settings.
36. AUDIO: Audio track switch.
37-41. TV: TV remote.
37. POWER: Toggle power ON / OFF.
38-39. VOLUME +/-: Increase / Decrease volume.
41. LEARN: Record an external RC.
RC/BACKLIT: Activate backlit.
1
4
5
8
11
14
18
17
20
23
22
26
31
32
33
36
40
39
3
2
7
6
10
9
13
12
15
16
19
21
27
24
25
30
28
29
34
35
37
38
41
LEARN
Programming Buttons
1. Press and hold the LEARN button (41) until the ON button is lit in red (not blinking).
2. Please take the TV remote control then press and hold the button you want to learn (example Vol +) until the
Zappiti remote's ON button flashes red (blinking).
3. Take the Zappiti remote control and press the button (37-40) you want to assign to the programming
(example Vol +).
4. Repeat steps 2 and 3 for the other buttons to be programmed.
5. To finish programming, quickly press the LEARN button (41).
Note: It is possible to connect a keyboard and a computer mouse to the Zappiti. By default, the keyboard is set
in QWERTY. To switch the keyboard recognition to AZERTY or other key position, first connect your keyboard
to one of the available USB ports. Press the GREEN button on the remote control to access the Android settings.
Then, click Languages & input. Finally, choose your language in Current Keyboard section, Android
Keyboard & Physical Keyboard. Warning! The mouse is not compatible with Zappiti Video, Zappiti Music and
Zappiti Explorer apps. But it can be useful for third-party apps downloaded from GooglePlay or AptoideTV.
9
English
● Please use alkaline AA batteries. Please observe polarity when inserting batteries.
● Please Remove the plastic film from the Z logo of the front panel. The IR led is located behind.
● If RC functions only at short distances or stops functioning, make sure to replace the batteries.
● Point the remote control at the Zappiti. There must be no obstacles between the RC and the media player.
● Some RC buttons may be available only in certain player modes or only during playback of a certain content.
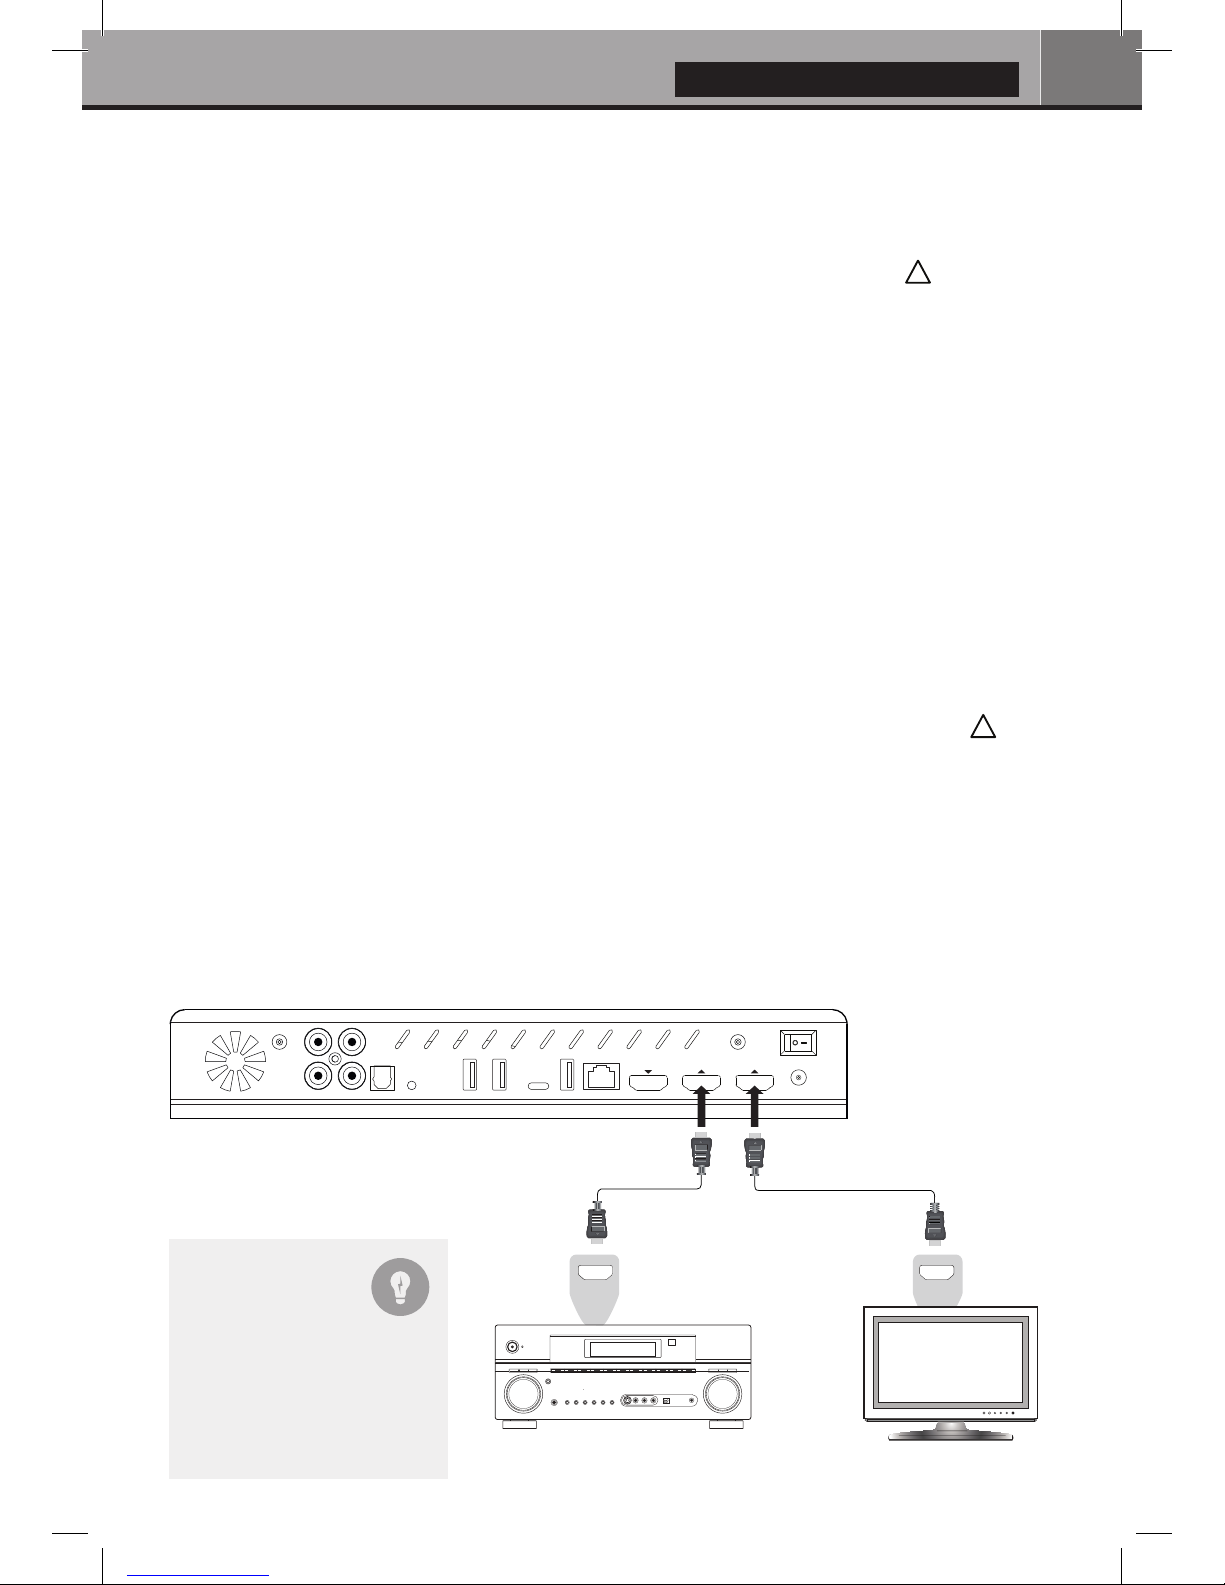
Getting Started
Please make sure there is enough space around the device for proper cooling (10 cm at minimum).
Ensure the remote control has batteries installed. Connect the player to your TV and other A/V equipment in
an appropriate way. Use HDMI connection to get the best possible audio and video quality. Make sure
to power off the player and related A/V equipment before connecting them. Ensure your TV and other
A/V equipment are configured to use proper inputs/outputs. For the best audio experience, please use
the HDMI Audio Only output if you own an AV receiver.
***Please make sure to use HDMI OUT (Main) and not HDMI IN connection to link your Zappiti to
your TV or your front projector.
Switch on the Zappiti. The media player will perform its initial boot up procedure, which may take up to
about 1 minute (depends on apps). During the boot up procedure, “Z” logo is shown on the TV.
***If you have a black screen or no video signal, please visit the Zappiti Knowledge Base.
zappiti.uservoice.com/knowledgebase
Finally, you should see the main screen with access to applications Video (Media Center), Music and
Explorer. On the top you’ll find access to the Settings and MyApps.
To adjust the player settings, press the GREEN button of your RC or click on “SETTINGS” item located
on the top of the screen. In particular, you can adjust the following settings: video, audio, and network
configurations. To choose the language of the Android menus, please use: Settings / Personal /
Language & input setting. Zappiti apps use specific language settings. To set Default Audio Language,
during video playback, press the MENU button of your RC, and click on Advance. Then you will be able
to set the Default Audio and Subtitle language.
HDMI IN
HDMI Video (Main)
HDMI Audio Only
Zappiti back panel
AV Receiver TV / projector
AUDIO/VIDEO MULTI-CHANNEL
RECEIVER
HDMI IN
Black Border
& Overscan
If you have a black border
problem all around the screen,
press the "zoom" button on the
remote control (3). You can
also adjust the aspect ratio of
your TV (Fit to Screen option).
!
!

10 Quick Start Guide
Firmware Upgrade
To access the Firmware upgrade page and update the firmware online or via USB, please press the
BLUE button of the RC. To check the most recent changes, latest firmware versions and get recovery
firmware, please visit our website at: zappiti.com/firmwares
Audio Setup
The Audio section of the Settings Menu allows you to configure preferences for audio output formats.
To access the audio settings, please go to “Settings/Device/Sound and notification”. If you are
using an AV receiver compatible with HDMI and multichannel audio, please set the HDMI output to
“Auto”. If your AV receiver is compatible HDMI but not compatible HDR, please connect your Zappiti
to your AV receiver using the HDMI Audio only output. You can also force it to “RAW” (Bitstream). If
your AV receiver is not compatible with HDMI, please set the S/PDIF output to “RAW” for bitstream or
LPCM 2Ch for stereo configuration.
Force SD Audio: The S/PDIF does not support HD Audio such as DTS-HD or Dolby TrueHD. To
convert HD audio into SD Audio (DTS-HD to DTS or Dolby TrueHD to Dolby Digital), please switch “ON”
the Force SD Audio option located in Settings/Developer options. More info:
zappiti.uservoice.com/knowledgebase
Video Setup
By default, the Zappiti is able to auto adjust the video output. But you can manually select the resolution
and frequency of the GUI. To force the output resolution, please switch “ON” the Ignoring HDMI EDID
option located in Settings/Developer options. Then go back to the general settings by pressing the
BACK button of your RC, and go to “Display”. You will be able to see all the output modes available
in Manual Settings but the Auto mode will be not available anymore. To adjust the Color Space and the
Deep Color (OFF/10/12-Bit), go to Settings/Developer options. For the best performances, we
advise you the following settings: Y’CbCr 4:4:4 / 10-Bit (if your display is compatible).
Note: the auto framerate is still activated even if you force the HDMI output in a specific resolution/fre-
quency, however, in some cases, the manual resolution mode can generate some issues.
AUDIO/VIDEOMULTI-CHANNEL
RECEIVER
Coaxial In
Optical In
Please connect one of these cables:
SPDIF Optical (Toshlink) cable
Coaxial cable
Zappiti back panel
AV Receiver
Headphones
To connect wired headphones,
please use RCA to 3.5 mm
female adapter. Then, connect
the RCA connectors to the
RCA inputs of the Zappiti.
For video playback without audio-video sync issue, please choose a
wireless headphones compatible with Apt-X Low Latency technology.
Zappiti RCA OutputHeadphones
Table of contents
Languages:
Other Zappiti Media Player manuals


