Young Living AromaLux User manual
English 2
Español 12
Deutsch 24
Français 36
Svensk 48
Languages
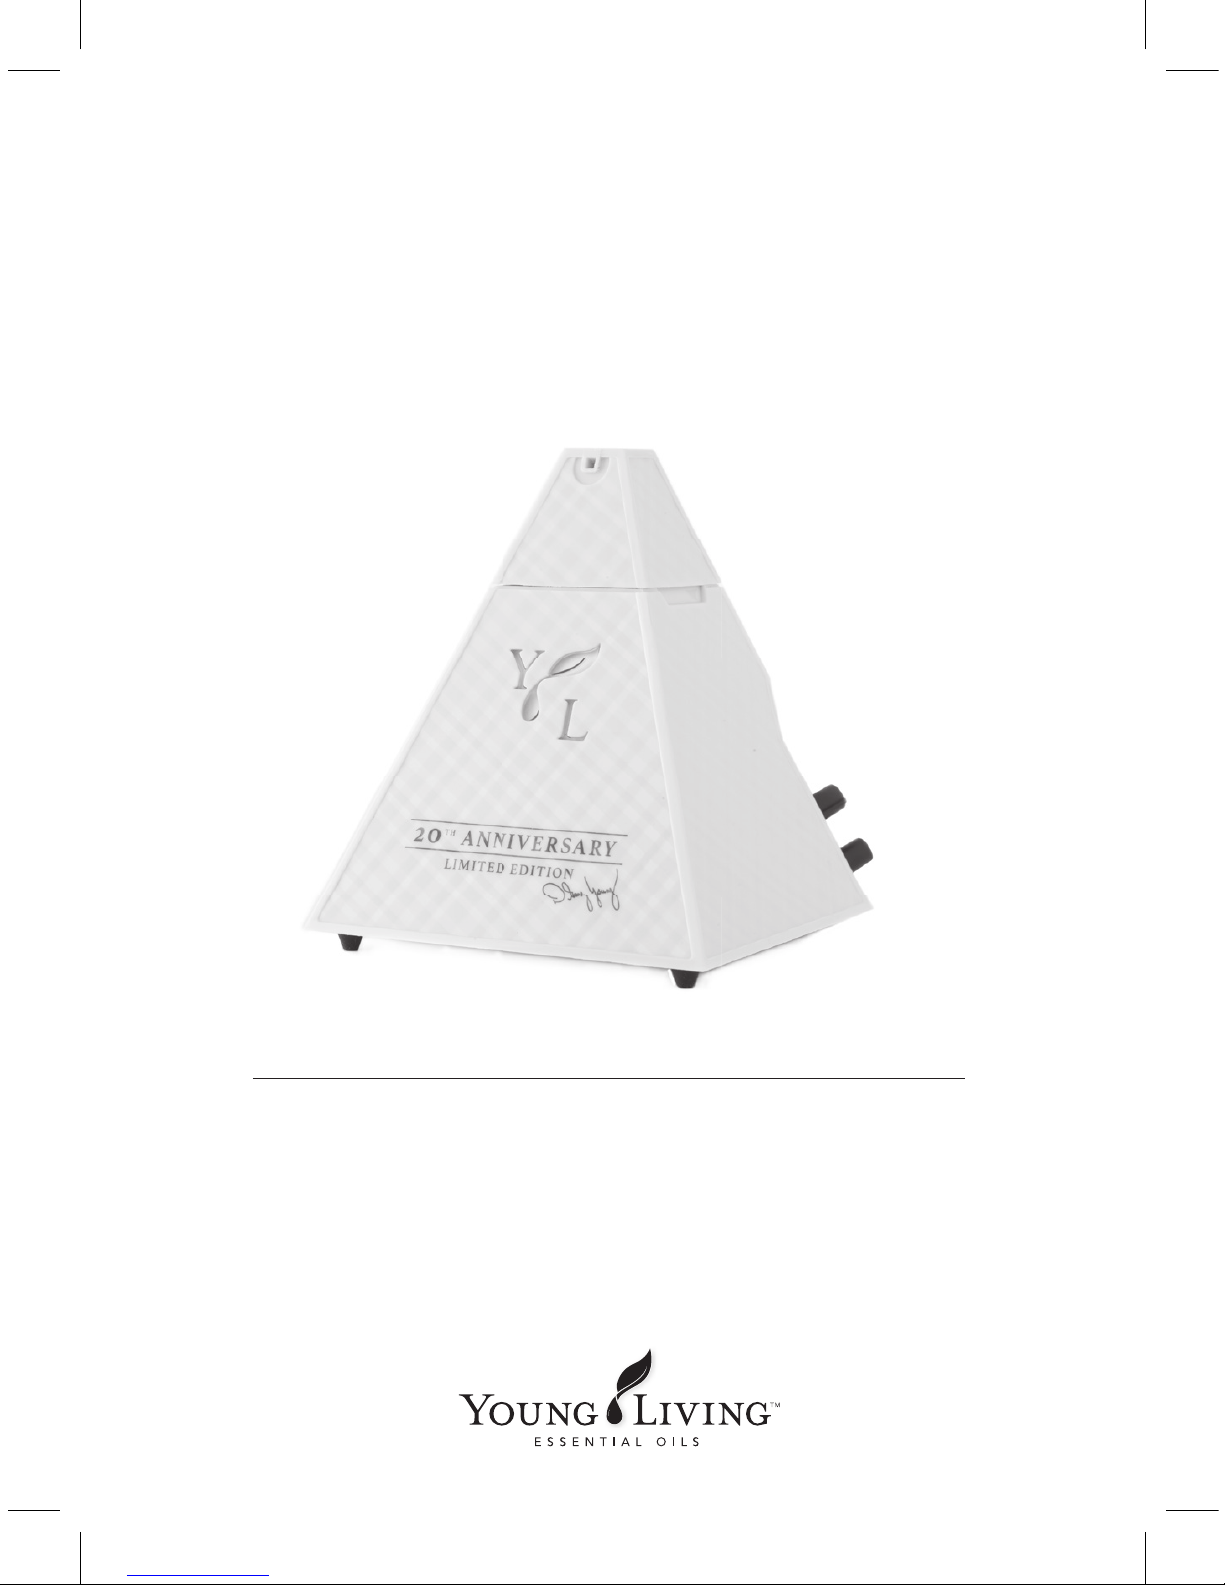
AromaLux™
OPERATION MANUAL
2
Overview
Young Living’s AromaLux Atomizing Diffuser functions as an aroma
diffuser, air purifier, and atomizer in one simple-to-use product. Its
atomizing technology transforms essential oils into a vapor of millions of
microparticles, dispersing them into the air and releasing the powerful
plant constituents found in Young Living essential oils. Designed by D. Gary
Young and available exclusively through Young Living, the AromaLux utilizes
proprietary design principles, patterns, and shapes that
enhance and harmonize the energy field in the surrounding space. Advanced
features include adjustable vapor volume, adjustable ON/OFF settings,
variable LED light controls, and a master power OFF timer. Young Living’s
AromaLux can transform any space into an inviting, aroma-filled atmosphere.
Contents
1 AromaLux atomizer top, 1 AromaLux diffuser base, 2 dip tubes—15-
ml bottle-sized, 2 dip tubes—5-ml bottle-sized, 1 AC power adaptor, 1
operation manual
ENGLISH
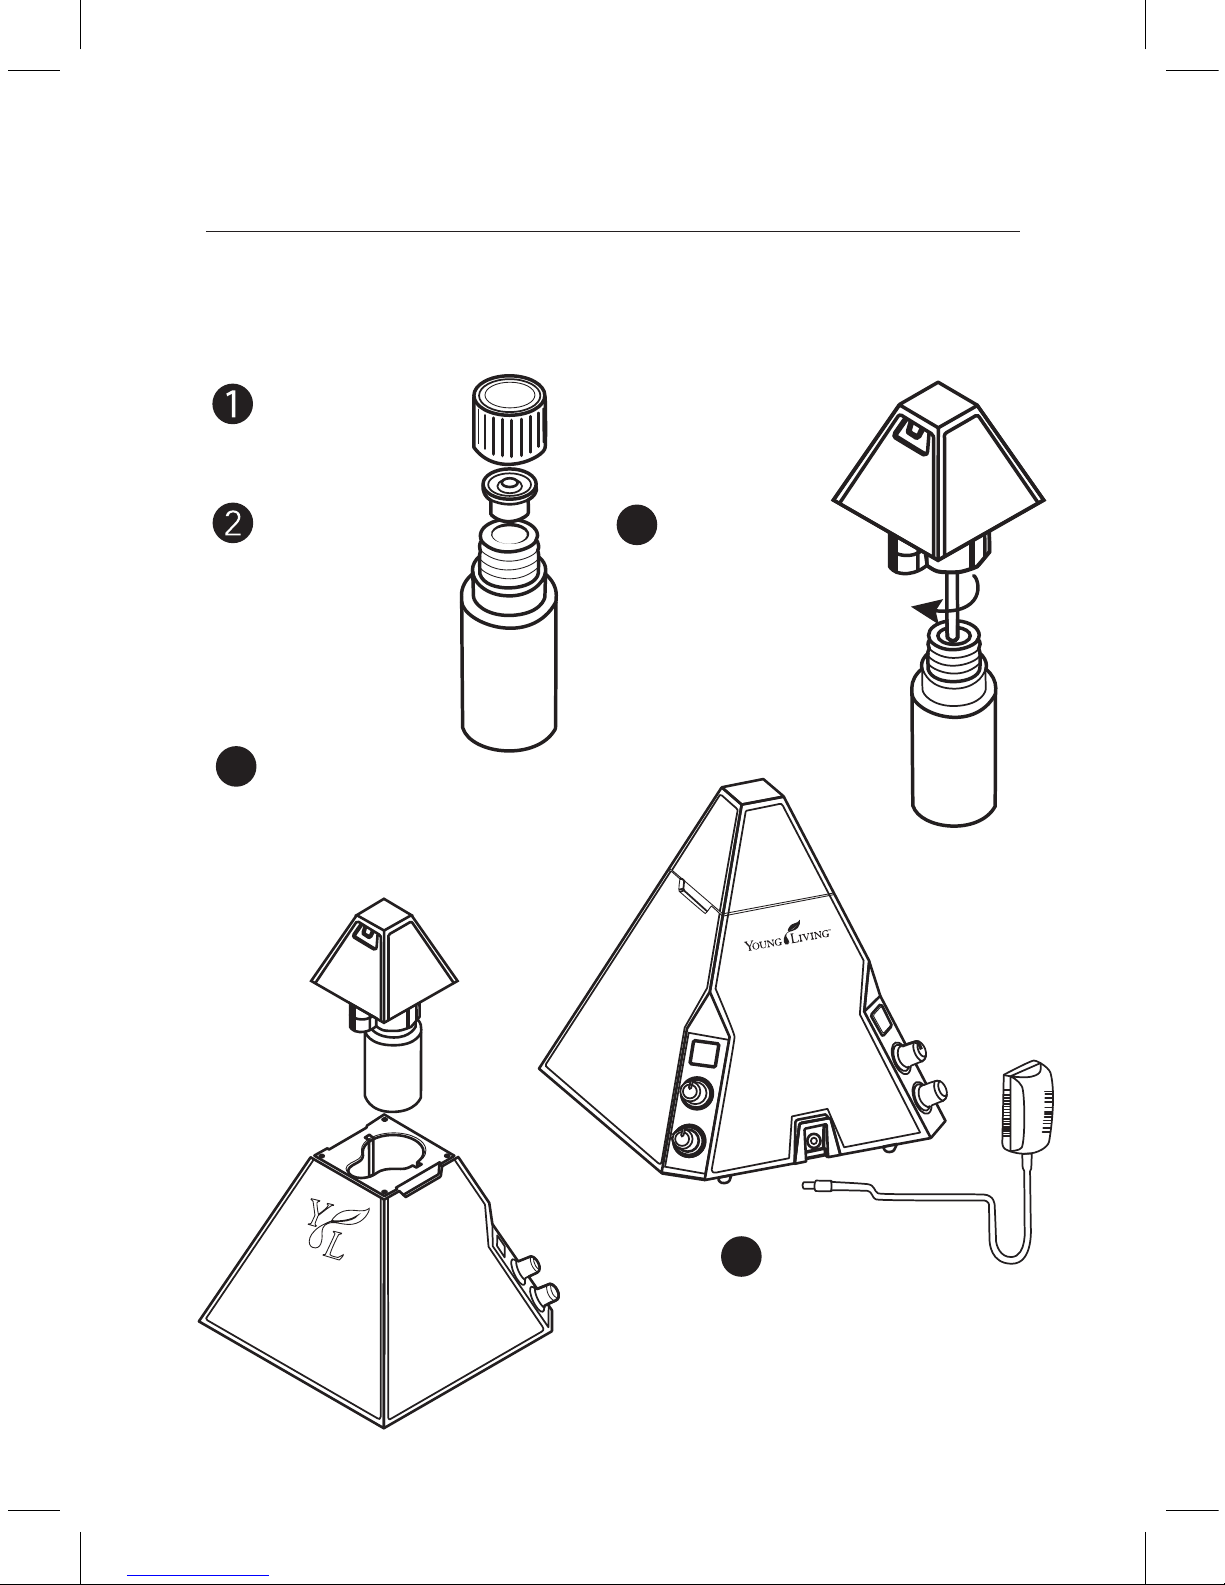
Remove cap from
essential oil bottle.
Remove orifice
reducer from bottle.
Screw bottle onto atomizer
top and tighten.
3
Insert atomizer top into diffuser base
and press down until secure.
4
Plug power adaptor into power
socket and into a power outlet.
5
3
Assembly Instructions
Using different Young Living essential oils with your AromaLux diffuser is
easy. Follow these quick steps to get started:
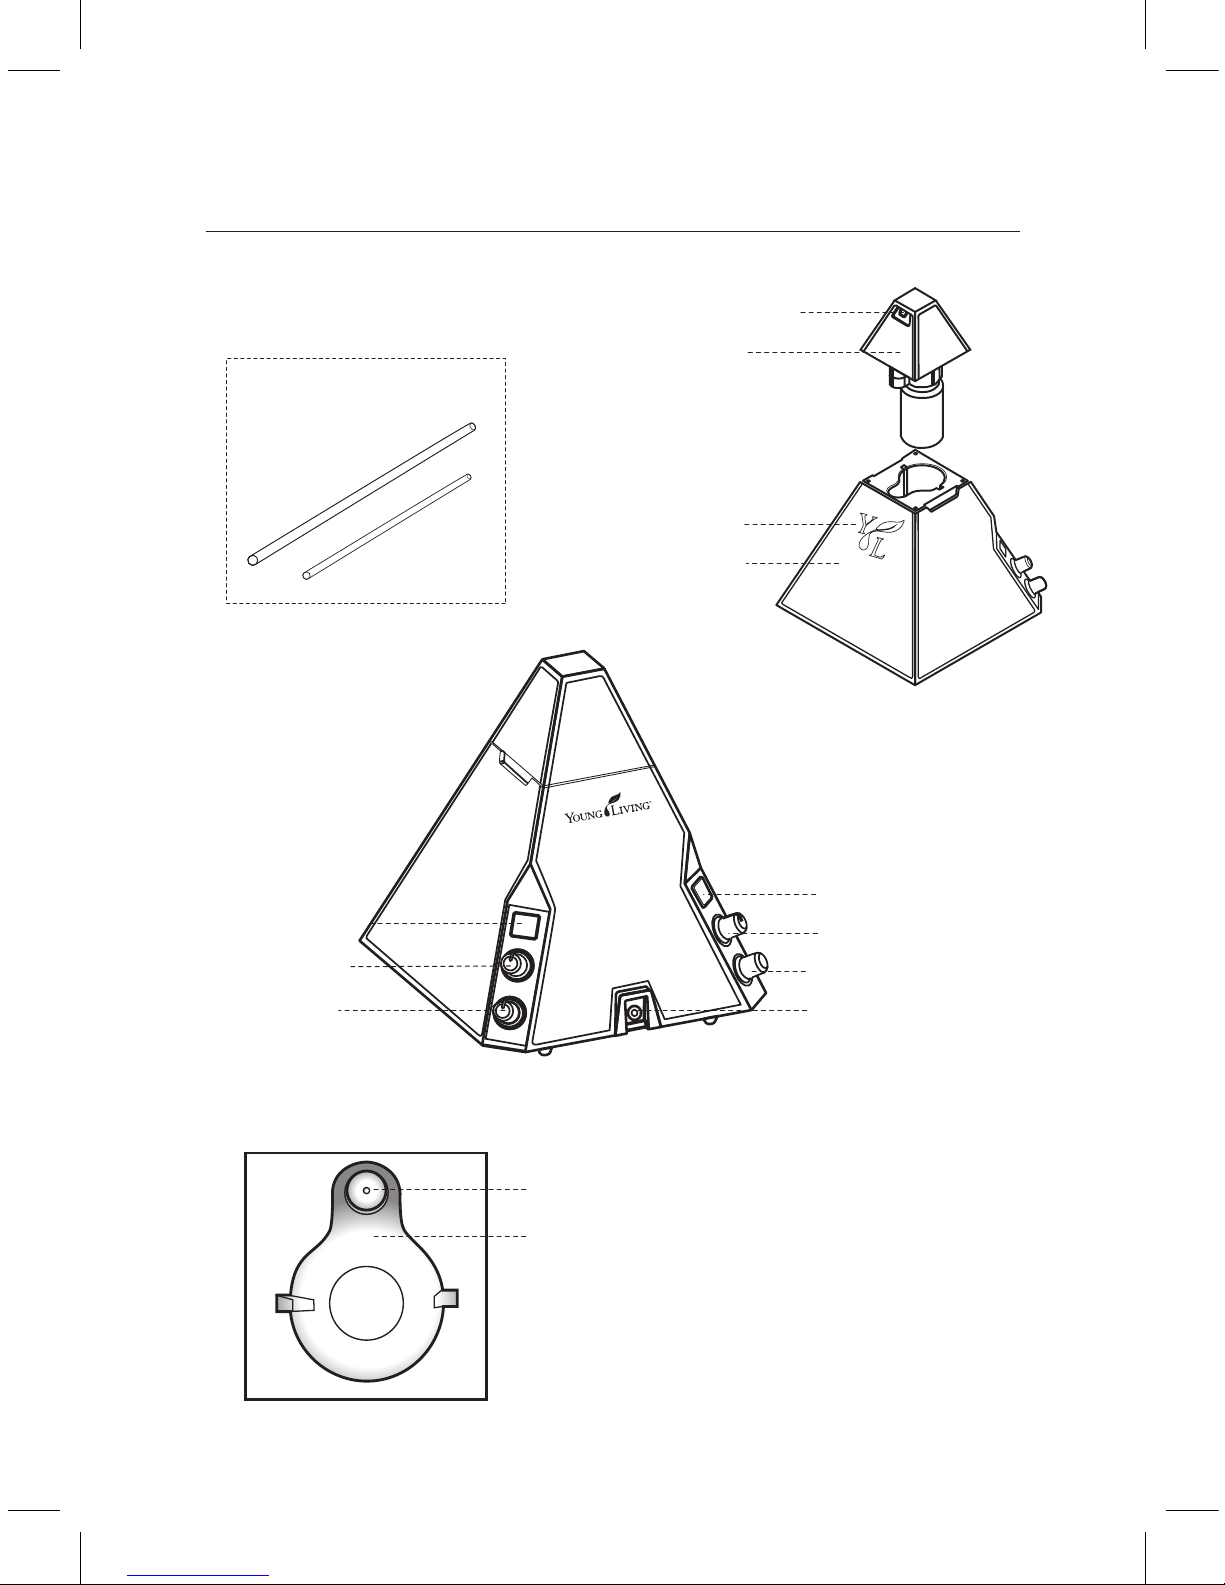
Not shown: Power adaptor
1. Oil vapor exit port
2. Atomizer top
3. Light display
4. Diffuser base
12. Airflow output nozzle
13. Base bottle cavity
8. Light control
9. Diffusion run timer
10. Diffusion pause timer
11. Power socket
5. Power ON/OFF
6. Vapor volume
7. Master timer
14. Dip tubes
4
Diffuser Components and Controls

5
Operating Instructions
• Power ON/OFF (5)—Turns power on and off.
• Vapor volume (6)—Adjust to the right for greater oil vapor volume.
• Master timer (7)—Select the number of hours you would like the unit
to run. After the unit’s internal clock reaches the set time, the unit will
automatically power off (settings 1–10 hours). Note: The master timer
does not shut off light display.
• Light control (8)—Press to cycle through light display modes.
• Mode 1 – White (default)
• Mode 2 – Red
• Mode 3 – Green
• Mode 4 – Blue
• Mode 5 – 5 second cycles each of red, green, and blue
• Mode 6 – off
Note: If the unit has powered off and the light is still displaying, press
the main power ON/OFF button to turn the light off.
• Diffusion run timer (9)—Select the number of minutes to diffuse oil
before the diffusion pause cycle (settings 1–20 minutes).
• Diffusion pause timer (10)—Select the number of minutes for the unit
to pause between diffusion cycles. The minimum pause setting is
approximately 1 minute (settings 1–20 minutes).
• Airflow output nozzle (12)—Exit port for air flowing into the atomizer top.
• Dip tubes (2 each, 5-ml and 15-ml bottle-sized) (14)—A 15-ml bottle-
sized dip tube comes preassembled in the atomizer top.
NOTE: Due to the vapor output of the AromaLux, use caution on
surfaces that are sensitive to oil vapor.
• Essential oils will have different vapor outputs based upon the weight
and viscosity of the oil.

6
• When removing the atomizer top (2) from the diffuser base, keep the
essential oil bottle in the upright position to avoid leakage.
• Push the power ON/OFF button (5) to reset all of the timers on the unit.
Cleaning
• For optimal performance, periodically run the unit with a clean bottle
filled with 5 ml to 10 ml of rubbing alcohol until the bottle is empty.
• To clean the atomizer top, remove it from the diffuser base, remove the
dip tube and attach a 15-ml bottle containing rubbing alcohol, cover the
oil vapor exit port with your finger, and then shake vigorously to force
alcohol into the upper chamber.
• If essential oil begins to build up on the unit, unplug the unit and gently
wipe off using a soft cloth and a mild cleanser.
Specifications
Bottle Sizes 5-ml or 15-ml bottles
Power 12 W (max) / soft LED light
Size 130mm x 130mm x 147mm
Weight .76 lbs. (0.345 kg)
Noise <60dB
Power Supply Input: AC110V-AC220V 50/60HZ
Output: 12V DC, 1.0A
Safety and Care Instructions
Please read and follow these safety guidelines closely to ensure safe
operation of the AromaLux.
• Unplug the AromaLux immediately and discontinue use in the event of
smoke or a burning smell.
• Never wrap the power adaptor with cloth, paper, etc. Such actions may
result in damage to the diffuser or fire.

7
• Never touch the power adaptor with wet hands; electric shock or injury
may occur.
• Any damage caused by the user does not qualify for replacement by
Young Living.
• Do not disassemble or attempt to repair the AromaLux; this will void the
warranty.
• Never immerse the AromaLux diffuser base in water. (The atomizer top
can be immersed in water as long as it is removed from the diffuser base.)
• Unplug the power adaptor when relocating the AromaLux.
• Use only the power adaptor provided by Young Living.
• Use only Young Living essential oils in the AromaLux.
• Keep the AromaLux in an upright position.
• Keep the AromaLux out of reach of children and pets.
• The AromaLux is to be used only in accordance with local laws and
regulations.
• Do not use with any substance deemed as harmful.
• Do not use metal objects to clean the AromaLux; use only a clean, dry
cloth or a cotton swab dipped in rubbing alcohol.
• Always unplug the AromaLux when cleaning the unit.
Troubleshooting
The power is switched ON, but the motor is not running.
• Check that the power adaptor is securely plugged into the power socket
on the diffuser and the wall power outlet.
• Verify that the Power ON/OFF button has been pressed ON.
• Verify that the light comes on when the light control button is pressed to
ensure that the unit is receiving power.

8
The motor is running, but very little or no vapor is being generated.
• Verify that the atomizer top is securely pressed into the diffuser base with
no gap between the base and the top. If there is a gap, remove the top
and look for obstructions in the base bottle cavity and verify that you are
using only Young Living 5-ml or 15-ml essential oil bottles.
• Turn the vapor volume knob to the right (maximum) position. If you still
don’t see vapor, use a flashlight pointed at the oil vapor exit port to
further illuminate whether any vapor is being output.
• Verify that there is oil in the essential oil bottle and that the bottle is
screwed tightly into the atomizer top.
• Verify that the correct dip tube is being used for the size of the bottle
(i.e., 15-ml dip tube for a 15-ml bottle, and 5-ml dip tube for a 5-ml
bottle). Note: The bottom of the dip tube must be below the oil level in
the bottle.
• Remove the atomizer top and verify that air is coming out of the airflow
output nozzle in the diffuser base and that it is not obstructed with
residual essential oil or other objects. If there is oil residue blocking the
nozzle, unplug the unit and wipe it off with a clean, dry cloth or cotton
swab dipped in rubbing alcohol.
• If the bottle has sufficient essential oil and the correct length dip tube is
being used but no vapor is being created, an essential oil bubble may have
formed inside the atomizing top chamber. Slightly jostling the unit or lifting
the top off of the base and reattaching it may burst the bubble.
• Verify that the dip tube has not been obstructed with residual oil. (See
“There is oil buildup in the dip tube.”)
• If there is still essential oil in the bottle and very little or no vapor is being
generated, try increasing the vapor volume knob to a higher setting.
• If you have purchased an additional atomizer top, test the diffuser base
motor by attaching a bottle of essential oil to the spare top, attaching it
to the diffuser base, and turning on the power. If vapor is generated using
the spare top, then there may be an obstruction in the original atomizer

9
top. (See cleaning instructions for better performance.)
• Verify that the white rubber washer is in the atomizer top to create an
airtight seal between the oil bottle and the atomizer top.
• Verify that the dip tube has been inserted snuggly into the atomizer top.
There is oil buildup in the dip tube.
• Check for residual oil obstructing airflow within the dip tube by removing
the dip tube from the atomizer top and soaking it in rubbing alcohol or by
blowing through the dip tube to verify that it is clear.
There is oil leaking into the base bottle cavity of the diffuser base.
• If oil is accumulating in the base bottle cavity, check to see if the oil is
leaking from the neck of the bottle when attached to the atomizer top.
If you see oil on the outside of the bottle, unscrew the bottle and verify
that the white washer is in the atomizer top housing, then screw the
bottle back into the atomizer top to ensure there is an airtight seal. To
remove residual oil in the base bottle cavity, unplug the unit and wipe
clean with a dry, soft cloth or cotton swab dipped in rubbing alcohol.
The light is on, but the motor in the base is not running.
• The master timer setting may have completed (for example, set for 3
hours). Press the power ON/OFF button to turn off the light and reset
the timer. Push the button again to turn on the unit and verify that the
motor is running.
• The diffuser may be cycling through the diffusion pause timer. Wait to
see if the unit begins to diffuse again after the pause cycle.
The light does not work.
• Press the power ON/OFF button and toggle through the light control
button to verify that the lights are not functioning. If the lights do not
work, call Customer Care for further instructions.

10
Young Living AromaLux Product Warranty
Young Living Essential Oils (YLEO), Thanksgiving Point Business Park, 3125
Executive Parkway, Lehi, Utah 84043, subject to the exclusions contained
below, warrants its AromaLux product to be free from defects in materials
and workmanship under normal consumer usage for a period of 12 calendar
months from the date of original purchase.
This Warranty Does Not Cover:
1. Defects or damage resulting from use of the product in other than its
normal and customary manner;
2. Defects or damage from misuse, accident, or neglect;
3. Defects or damage from use of natural oils other than those supplied or
sold by Young Living Essential Oils or an authorized distributor;
4. Defects or damage from use of materials other than essential oils;
5. Defects or damage from improper testing, operation, maintenance,
installation, adjustment, or any alteration or modification of any kind;
6. Breakage or damage caused by use of other than the specified voltage;
7. Products disassembled or repaired by anyone other than a Young Living
Essential Oils’ authorized agent so as to adversely affect performance
or prevent adequate inspection, verification, and testing to verify any
warranty claim. If there are any signs the diffuser had been opened, the
warranty will be void;
8. Products with labels removed or illegible serial numbers;
9. Marring such as scratches on any plastic surfaces and externally exposed
parts resulting from normal use;
10. Damage resulting from normal wear and tear; and/or
11. Damage resulting from the use of metal tools to clean the unit.
This limited warranty is the buyer’s exclusive remedy, applies to new diffusers
purchased from Young Living Essential Oils, and is non-transferable. Please
Table of contents
Languages:


