Yada Power Bank Pro User manual

User Manual
BC
IMPORTANT, RETAIN FOR FUTURE REFERENCE: READ CAREFULLY
POWER BANK PRO
WP ITM. AC532791

2
6.66 x 3.39 x 1.3 in (169 x 86.1 x 33 mm)
1.02lbs (463g)
Lithium-Ion
37 Wh
5V 2A
5V 3A / 9V 3A / 12V 3A / 15V 3A / 20V 3A
5V 2.4A / 9V 2A / 12V 1.5A
5V 3A / 9V 3A / 12V 3A / 15V 3A / 20V 3A
Up to 10W
Up to 500A
-20ºC ~ 34ºC (-4ºF ~ 93ºF)
-20ºC ~ 40ºC (-4ºF ~ 104ºF) Avg. Temp.
0ºC ~ 34ºC (32ºF ~ 93ºF)
4-5 hours (5V 2A input)
2-2.5 hours (18W USB-C input) 18W charger not included
Product Dimensions:
Product Weight:
Internal Battery:
Battery Capacity:
Input (Micro USB):
Input (USB-C):
USB-A Output:
USB-C Output:
Wireless Charging Output:
Jump Start Current:
Operating Temperature:
Storage Temperature:
Charging Temperature:
Charging Time:
TECHNICAL SPECIFICATIONS:
FEATURE OVERVIEW :
1. Power Level Indicator Lights
2. Wireless Charging Pad
3. Jumper Cables Port
4. Smart Protection Circuit
5. Wireless Charger Indicator
6. Power / Flashlight Button
7. USB-A Output
8. USB-C Input / Output
9. Micro USB Input
10. LED Flashlight, Strobe &
Hazard Modes
11. Negative Clamp (Black)
12. Positive Clamp (Red)
13. Polarity Circuit Protection Box
with Built-in LED Indicators
1
11
12
13
2
3
410
87 9
6
5

3
INSTRUCTIONS PERTAINING TO RISK OF FIRE, ELECTRIC SHOCK,
OR INJURY TO PERSONS
• Always wear safety glasses when jump starting a battery (to protect your
eyes), and gloves when handling a battery (to protect your hands).
• When jump starting a vehicle please ensure that the gray plug is securely
tted into the jump starter socket on the jump starter.
• Ensure the battery clamps are connected correctly, and the connectors are
free from rust and dirt.
• Do not allow this product to become wet. Exposure to excessive moisture
will damage the unit.
• Do not immerse the product in water.
• Do not operate the product in explosive atmospheres, such as in the
presence of ammable liquid, gas or dust.
• Do not modify or disassemble this product.
• Do not store in locations where the temperature may exceed 104ºF (40ºC).
• Charge only using the USB Cable provided.
• Under extreme heat conditions, battery leakage may occur. Avoid contact
with your skin. In case of skin or eye contact, rinse immediately with clean
water and seek medical attention.
• If battery leakage occurs, take it to your local battery recycling center for
disposal. Do not attempt to use.
• This car jump starter is for use with 12V vehicles only. Using on non-12V
vehicles may cause serious damage to the vehicle, jump starter, or injury
to the user. Refer to the owner’s manual for the vehicle if you are uncertain
what voltage the vehicle runs on.
BATTERY DISPOSAL
The battery is self-contained and not consumer replaceable. The battery must
be disposed of properly when it no longer holds a charge. Proper charging
practices will increase the life of the product. For information on battery
recycling, call toll-free 800-822-8837.
For information regarding air travel safety with batteries please check the U.S.
Department of Transportation prior to travel at:
http://phmsa.dot.gov/safetravel/batteries
or contact your airline if traveling from a country outside the U.S.
Note: The Car Jump Starter gives 37 watt hours of power.
WARNING:

4
WARNING CONT.:
IMPORTANT SAFETY INSTRUCTIONS
WARNING - When using this product, basic precautions should always be
followed, including the following:
a) Read all the instructions before using the product.
b) To reduce the risk of injury, close supervision is necessary when the product
is used near children. Children should not operate this device unless under
strict supervision by a person responsible for their safety.
c) Do not put ngers or hands into the product.
d) Do not use any
attachment that is not sold by jump starter manufacturer which
may result in a risk of re, electric shock, or injury to persons.
e) To reduce risk of damage to the electric plug and cord, pull the plug rather
than the cord when disconnecting the jump starter.
f) Do not use a battery pack or appliance that is damaged or modied.
Damaged or modied batteries may exhibit unpredictable behavior
resulting in re, explosion or risk of injury.
g) Do not operate the jump starter with a damaged cord or plug, or a
damaged output cable.
h) Do not disassemble the jump starter; take it to a qualied service person
when service or repair is required. Incorrect reassembly may result in a risk
of re or electric shock.
i) To reduce the risk of electric shock, unplug the jump starter from the outlet
before attempting any instructed servicing.
j) WARNING - RISK OF EXPLOSIVE GASES.
1) WORKING IN VICINITY OF A LEAD ACID BATTERY IS DANGEROUS.
BATTERIES GENERATE EXPLOSIVE GASES DURING NORMAL BATTERY
OPERATION. FOR THIS REASON, IT IS OF THE UTMOST IMPORTANCE
THAT YOU FOLLOW THE INSTRUCTIONS EACH TIME YOU USE THE
JUMP STARTER.
2) To reduce risk of battery explosion, follow these instructions and
those published by battery manufacturer and manufacturer of any
equipment you intend to use in vicinity of the battery. Review
cautionary marking on these products and on engine.
k) The device shall be stored indoors and protected from the elements;
l) The unit shall not be charged outdoors;
m) When in use, steps should be taken to reduce the exposure to rain, sleet,
snow, and the like.
n) PERSONAL PRECAUTIONS
1) Consider having someone close enough by to come to your aid
when you work near a lead-acid battery.
2) Have plenty of fresh water and soap nearby in case battery acid
contacts skin, clothing, or eyes.

5
3) Wear complete eye protection and clothing protection. Avoid
touching eyes while working with battery.
4) If battery acid contacts skin or clothing, wash immediately with soap
and water. If acid enters eye, immediately ood eye with running cold
water for at least 10 minutes and get medical attention immediately.
5) NEVER smoke or allow a spark or ame within the vicinity of battery
or engine.
6) Be extra cautious to reduce risk of dropping a metal tool onto battery.
It might spark or short-circuit battery or other electrical part that may
cause explosion.
7) Remove personal metal items such as rings, bracelets, necklaces, and
watches when working with a lead-acid battery. A lead-acid battery can
produce a short-circuit current high enough to weld a ring or the like to
metal, causing a severe burn.
o) When charging the internal battery, work in a well ventilated area and do
not restrict ventilation in any way.
p) Under abusive conditions, liquid may be ejected from the battery; avoid
contact. If contact accidentally occurs, ush with water. If liquid contacts
eyes, additionally seek medical help. Liquid ejected from the battery may
cause irritation or burns.
q) Do not expose a jump starter to re or excessive temperature. Exposure to
re or temperature above 130°C (266°F) may cause explosion.
r) Have servicing performed by a qualied repair person using only identical
replacement parts. This will ensure that the safety of the product is
maintained.
s) Attach output cables to a battery and chassis as indicated
below. Never allow the output clamps to touch one another.
t) Dropping, hitting, or other excessive amounts of force
to the Jump Starter may damage the unit (external and
internal), which may result in loss of operation, electrical
re, or cause other serious damage.
u) Do not overcharge the internal battery or short circuit
output connector.
v) This product is suitable for use in home, oce, household workshop or
garage. Do not operate in rough environment such as repair facility.
WARNING: This Jump Starter is only intended to jump start 12V cars, trucks,
boats, or motorcycles with an internal combustion engine and single lead-acid
battery systems. Do not use this device to jump start batteries outside of these
four types of vehicles; doing so may cause a re or other serious injuries. Refer to
the user manual for additional safety information.
WARNING CONT.:
SAVE THESE INSTRUCTIONS

6
PACKAGE CONTENTS:
Jump Starter
Power Bank Micro USB
Charging Cable
Safe & Smart
Jumper Cables
CHECKING THE POWER LEVEL:
Press the power button to check the capacity of the Jump Starter.
When charging, the indicator lights will ash one by one. The number of
solid lights indicates the battery capacity. When all the indicator lights are
solid then the
Jump Starter
is fully charged.
Indicator Lights: 1 Flashing 1 Solid 2 Solid 3 Solid 4 Solid
Battery Capacity: Below 5% 5-25% 26-50% 51-76% 76% - Full

7
We recommend using the original charging cable that came with your mobile
device, or an approved cable certied by the mobile device manufacturer. Three
mobile devices can be charged at the same time by utilizing USB-A, USB-C
Output ports & wireless charging pad. To begin charging, press once.
NOTE: The wireless charging feature only works on devices that allow Qi (inductive) wireless
charging. Only use the wireless charging pad with Qi-certied devices.
CHARGING YOUR MOBILE DEVICES:
WIRELESSLY CHARGING YOUR MOBILE DEVICES:
Press the power button once to enable wireless charging function.
When the green LED turn on, place the device on top of WIRELESS
CHARGING ICON to start. You may need to adjust the orientation to
have the best charging.
Wireless Charger
Indicator
(Green LED)
8
NOTE: Fully charge the Jump Starter upon receipt. Check battery status periodically and recharge every
2-3 months and after every use to maintain the efciency and to prolong the life of the internal battery.
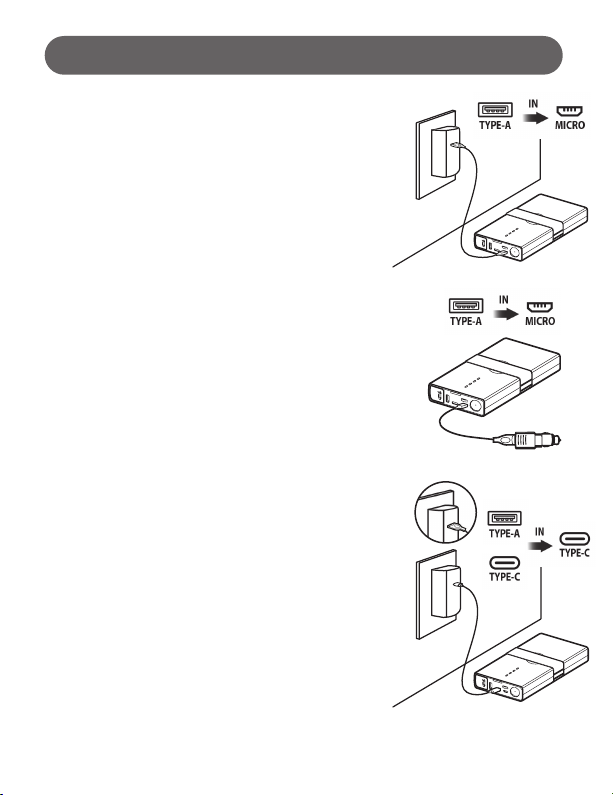
CHARGING THE JUMP STARTER:
At home:
Micro USB Cable
1. Plug included Micro USB Charging Cable
into a USB-A port on a 2A USB wall adapter
(not included).
2. Connect the Micro USB Charging Cable
into the Micro USB Charge Input Port on the
Jump Starter.
3. Disconnect the Jump Starter when it is fully
charged. Store the Jump Starter in a safe
place when not in use.
In Car:
1. Plug Micro USB Charging Cable into 12V
USB Charger (not included) then connect it
to 12V socket in vehicle.
2. Connect the Micro USB Charging Cable
into the Micro USB Charge Input Port on the
Jump Starter.
3. Disconnect the Jump Starter when it is fully
charged. Store the Jump Starter in a safe
place when not in use.
Other Charging Method
USB-A to USB-C Cable / USB-C to USB-C Cable
(cables not included)
1. Plug one end of USB-C Charging Cable into
a USB-A or USB-C port on a 18W (or above)
wall adapter (not included).
2. Connect the other end of USB-C Charging
Cable into the USB-C Charging Input Port on
the Jump Starter.
3. Disconnect the Jump Starter when it is fully
charged. Store the Jump Starter in a safe
place when not in use.
9
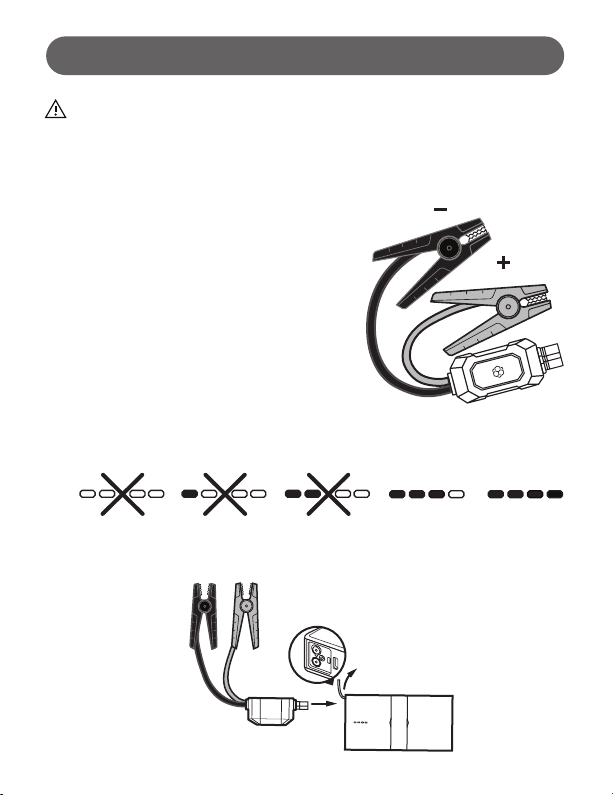
JUMP STARTING:
1. Press the power button on the
Jump Starter
once and check that the
power level indicator has 3 (51%) or more solid lights.
2. Take
the GRAY end of the jumper cable and plug it into the jump start
socket which is located underneath the black cover.
JUMP STARTING:
BEFORE YOU JUMP START!
Before you attempt to jump start your vehicle, ensure your vehicle is
in Park. Unplug all USB charging cables. Ensure manual transmission
vehicles are in Neutral with the Emergency Brake engaged.
The Cable Clamps are color-coded, RED for
POSITIVE (+) and BLACK for NEGATIVE
(-). DO NOT mix up the cables or allow the
metal ends to touch together because this
may damage the battery, charging system
and/or electronics on a vehicle.
Locate the vehicle battery and follow the
steps below.
Red
Black

10
JUMP STARTING CONT.:
3. Connect the RED clamp to the POSITIVE
(+) post on the car battery. The POSITIVE
battery post will be slightly larger than the
NEGATIVE post, and will be marked with
a PLUS (+) sign. There may also be a
RED plastic protective cover over the
positive battery post.
4. Connect the BLACK clamp to the
NEGATIVE(-) post on the car battery.
The NEGATIVE will be marked with a
MINUS (-) sign. There may be a BLACK
plastic protective cover over the negative
battery post.
NOTE: Do not connect the RED clamp
(+) and the BLACK clamp (-) at the same
time. Connect the RED clamp rst, then the
BLACK clamp.
CAUTION: DO NOT lean directly over the
battery while making jumper connections.
5. Check the LED status on the Polarity Circuit Protection Box. Proceed
to the next step unless the LED is ashing RED and BEEPING.
Reference Polarity Protection Circuit Status chart in the next section.
6. You now have 90 seconds to start your vehicle before the Jump
Starter shuts off in order to prevent the vehicle battery from reverse
charging the unit.
indicator
light box
This manual suits for next models
1
Table of contents


