Woody Valley Wani User manual

English
Wanì
Edition 2 / 03.2015

THANK YOU!
We would like to thank you for having chosen one of our products, and we invite you to read this important document, the User Manual for the
harness. Please pay special attention to the two most important paragraphs, regarding:
Insertion of the reserve parachute.
The reserve parachute is a piece of equipment that may save your life. It must be inserted so that it works correctly when it is required,
whether this happens in two days time, or two years from now.
Adjusting the harness.
The harness forms the connection between the pilot and the paraglider, and it is an essential component in optimizing performance and the
pleasure of flying. A bad harness that is well adjusted may enable you to fly well, but a good harness that is badly adjusted may put you off
flying altogether.
We are confident that this harness will give you great comfort, control, performance and enjoyment in flight. We are conscious of the fact that
reading an instruction manual is not an exciting experience. However, please remember that this product is not a citrus juicer or a mobile
phone, and that correct use of the harness helps reduce the risk of flying accidents. This manual contains all the information necessary to
assemble, adjust, fly and store your harness. Thorough knowledge of your equipment will improve your personal safety and your level of
flying.
Team Woody Valley
SAFETY NOTE
By the purchase of Woody Valley equipment, you are responsible for being a certified paraglider pilot and you accept all risks inherent with
paragliding activities including injury and death. Improper use or misuse of equipment greatly increases these risks. In no case shall Woody
Valley or Woody Valley equipment resellers be held liable for personal or third party injuries or damages under any circumstances. If any
aspect of the use of our equipment remains unclear, please contact your local reseller or Woody Valley directly.

INDEX
1- GENERAL INFORMATION..................................................................................................................................................................................... 1
1.1- CONCEPT ...............................................................................................................................................................................................................................................1
1.2- PROTECTION AND SAFETY.....................................................................................................................................................................................................................2
1.3- S.O.S. LABEL ........................................................................................................................................................................................................................................2
2- BEFORE USING..................................................................................................................................................................................................... 3
2.1- EMERGENCY PARACHUTE......................................................................................................................................................................................................................3
2.1.1- Connecting the deployment handle to the float bag ......................................................................................................................................................3
2.1.2- Connecting the reserve parachute to the harness..........................................................................................................................................................3
2.1.3- Inserting the reserve parachute...........................................................................................................................................................................................7
2.1.4- Suitable reserves................................................................................................................................................................................................................... 10
2.1.5- Extracting the reserve parachute..................................................................................................................................................................................... 10
2.2- HARNESS ADJUSTMENTS................................................................................................................................................................................................................... 11
2.2.1- Seating position and back adjustment............................................................................................................................................................................ 13
2.2.2- Shoulderpad adjustment .................................................................................................................................................................................................... 14
2.2.3- Chest-strap adjustment ...................................................................................................................................................................................................... 14
2.2.4- Leg-strap adjustment .......................................................................................................................................................................................................... 15
2.2.5- Stabilizer.................................................................................................................................................................................................................................. 16
3- FLYING WITH WANÌ............................................................................................................................................................................................ 17
3.1- PREFLIGHT CHECKS ........................................................................................................................................................................................................................... 17
3.2- POCKETS ............................................................................................................................................................................................................................................ 18

3.3- CAMEL-BAK ........................................................................................................................................................................................................................................ 20
3.4- TANDEM FLYING ................................................................................................................................................................................................................................. 21
3.5- FLYING OVER WATER.......................................................................................................................................................................................................................... 21
3.6- ASSISTED TAKE-OFF HOOK ................................................................................................................................................................................................................ 21
3.7- LANDING WITH WANÌ......................................................................................................................................................................................................................... 21
3.8- DISPOSING OF THE HARNESS............................................................................................................................................................................................................. 21
3.9- REGULATIONS FOR BEHAVIOUR IN NATURAL ENVIRONMENTS .......................................................................................................................................................... 21
4- FOLDING THE HARNESS, INSERTING THE PARAGLIDER AND USING THE RUCKSACK ................................................................................... 22
5- CHARACTERISTICS AND INSTALLATION OF OPTIONAL EQUIPMENT.............................................................................................................. 25
5.1- INSTALLATION AND ADJUSTMENT OF THE SPEED SYSTEM ................................................................................................................................................................ 25
5.2 - -- RELAX -BAR ..................................................................................................................................................................................................................................... 26
5.3 - -- LEG -COVER ..................................................................................................................................................................................................................................... 26
5.4 - -- QUICK-OUT SNAP-HOOKS................................................................................................................................................................................................................. 26
6- MAINTENANCE AND REPAIR ............................................................................................................................................................................. 27
7- WARRANTY........................................................................................................................................................................................................ 28
8- TECHNICAL DATA .............................................................................................................................................................................................. 29

1
1- GENERAL INFORMATION
This equipment must contain:
Harness
Polypropylene seat with front flexible part
Snap-hook
Reserve parachute deployment handle
2 reserve elastic loops for closing the reserve parachute
The main options available are:
Speed - bar
Relax - -- bar
Leg-Cover
Quick-out Snap-hooks
1.1- Concept
WANÌ is a new reversible harness with a self-inflating air bag, designed to ensure maximum lightness with the best passive safety tested by
us. The geometry or the belts system is the same as the Haska harness, which has demonstrated an excellent balance between
manoeuvrability and stability.
With WANÌ, the concept of reversibility has changed, diversifying the backpack from the harness. This new system considerably improves the
aesthetics of the two parts as well as their functionality, because they are designed exactly for their task.
Carefully designed in every detail, WANÌ offers a container for an emergency parachute with adjustable volume and a zip bridle cover.

2
1.2- Protection and safety
WANÌ incorporates the concept of the self-inflating system developed for Haska, which consists of the use of a steel spring which does not
serve the purpose of protecting from impact, but generates the force needed to expand the air bag and make it immediately ready for
potential impact. This means that your protective capacities are at 100% before you even start your take-off run, and that they remain as such
for the entire flight, until you fold up the harness to stow it in the rucksack. The spring also guarantees a consistent form for the airbag and
therefore performance over long periods of time, in any humidity, temperature or prolonged storage in the rucksack. Light weight and
reduced volume (once the harness is folded) are two more advantages provided by the self-inflating spring system. This system combines the
best characteristics of current protection systems (airbag and foam protection).
In order to prevent the pilot from coming out of the harness if he forgets to fasten the leg-straps, the WANì harness is equipped with the two
most effective safety systems currently available - your choice of Get-Up or T-Lock.
1.3- S.O.S. label
This red with white lettering label is clearly visible in a pocket on the right shoulder padding. On the back of this label, you can write
information that you think should be given to rescue workers in case of accident.
3
2- BEFORE USING
2.1- Emergency parachute
Emergency parachute housing is provided under the seat and has adjustable volume. This allows you to stow varying sizes of rescue
parachute. The new bridle cover system with zip simplifies parachute insertion operations.
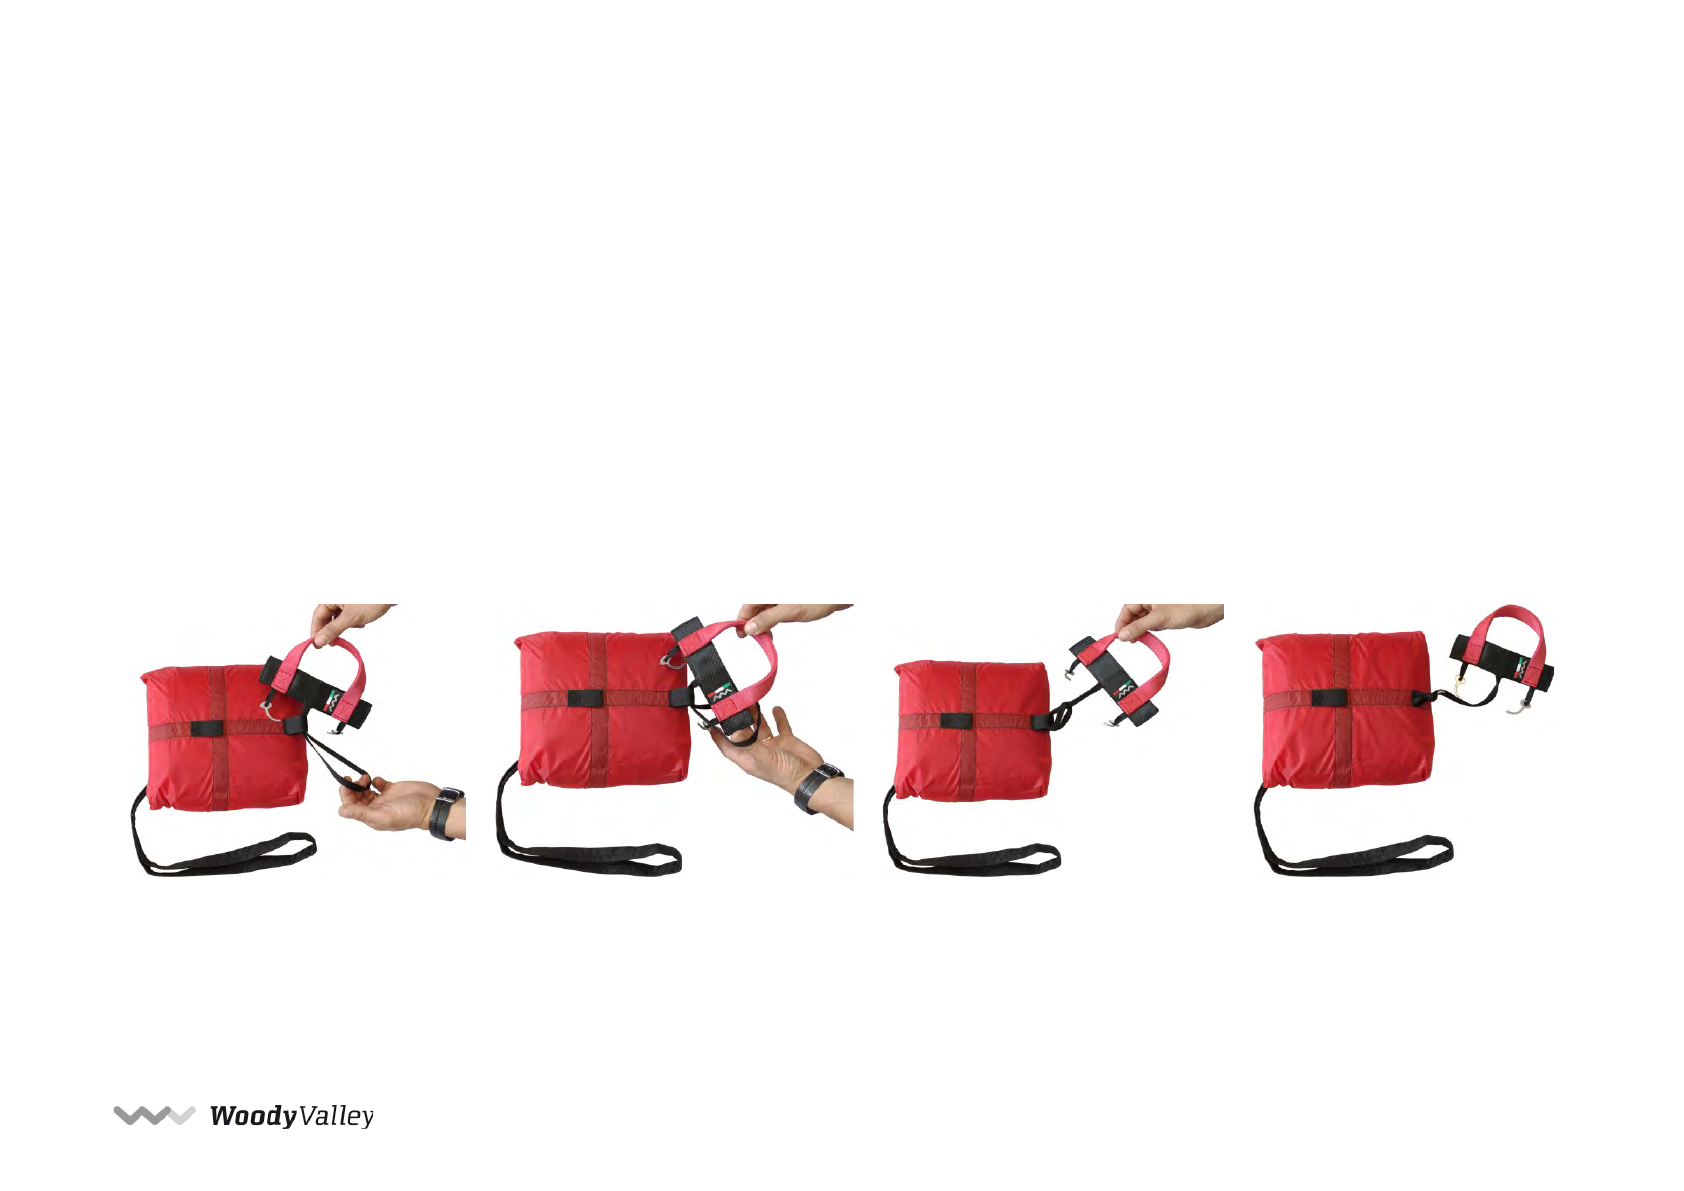
2.1.1- Connecting the deployment handle to the float bag
WANÌ is supplied with a special parachute deployment handle, identified by number 6. This handle must be used exclusively. The black handle
connection loop should be inserted as far as possible from the centre of the float bag loop and then the entire handle should be passed
through the same loop in order to obtain a tight connection.
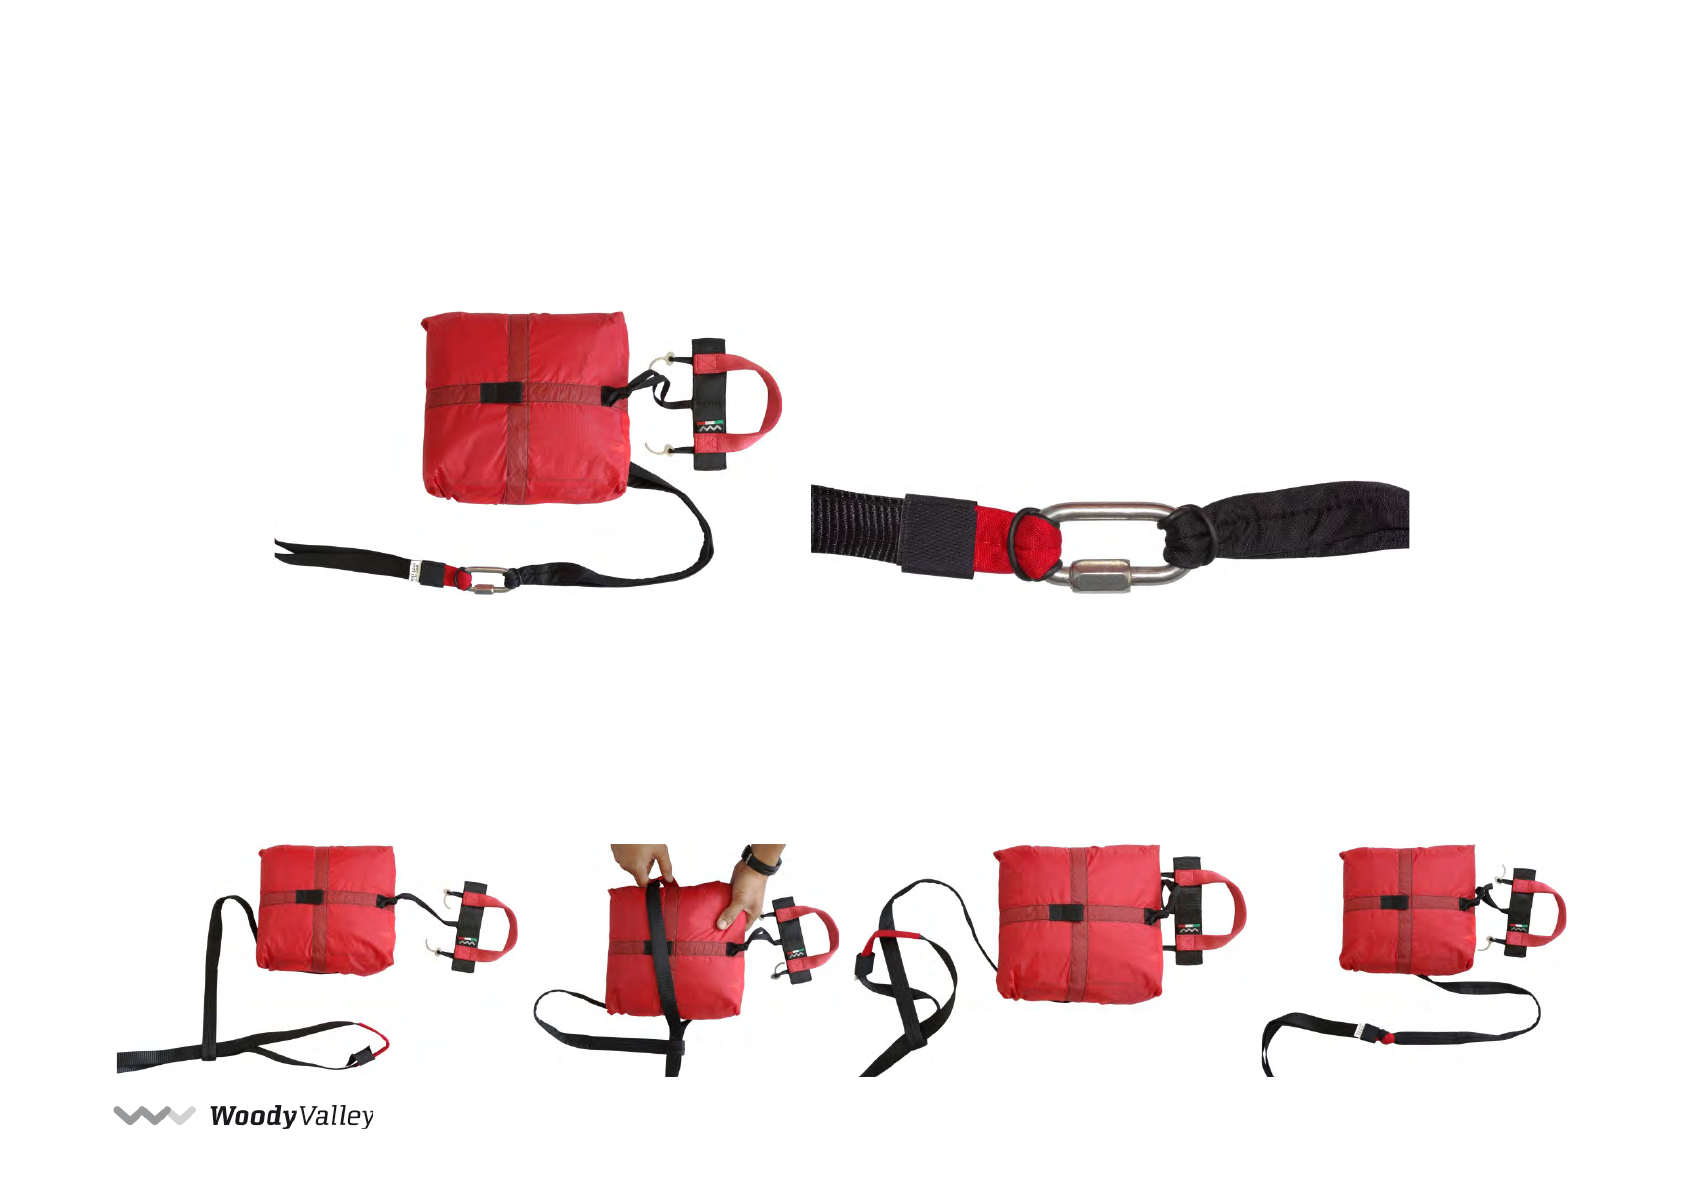
2.1.2- Connecting the reserve parachute to the harness
There are three different methods of attaching the reserve parachute bridle to the harness bridle.
4
First system:
Use a screw-lock karabiner with a breaking strength of at least 2,400 kg. In this case, the bridles should be held in position within the karabiner
using elastic bands, to prevent the karabiner from rotating and taking the strain laterally instead of vertically. The karabiner’s screw-lock
should be tightly screwed shut to avoid any possibility of it opening accidentally. This type of connection can absorb a higher opening shock
than the second system, and for this reason this is without doubt the recommended system.
Second system:
The harness bridle should pass through the emergency parachute bridle loop. Next, the emergency parachute should be passed through the
large loop of the harness bridle. The result is a connection that should be tightened as much as possible so as to prevent dangerous friction
between the two cables during emergency opening shock. To prevent the union of the two cables from loosening over time, remember to lock
the knot with the special Velcro strip, which has already been placed on the harness bridle.
5
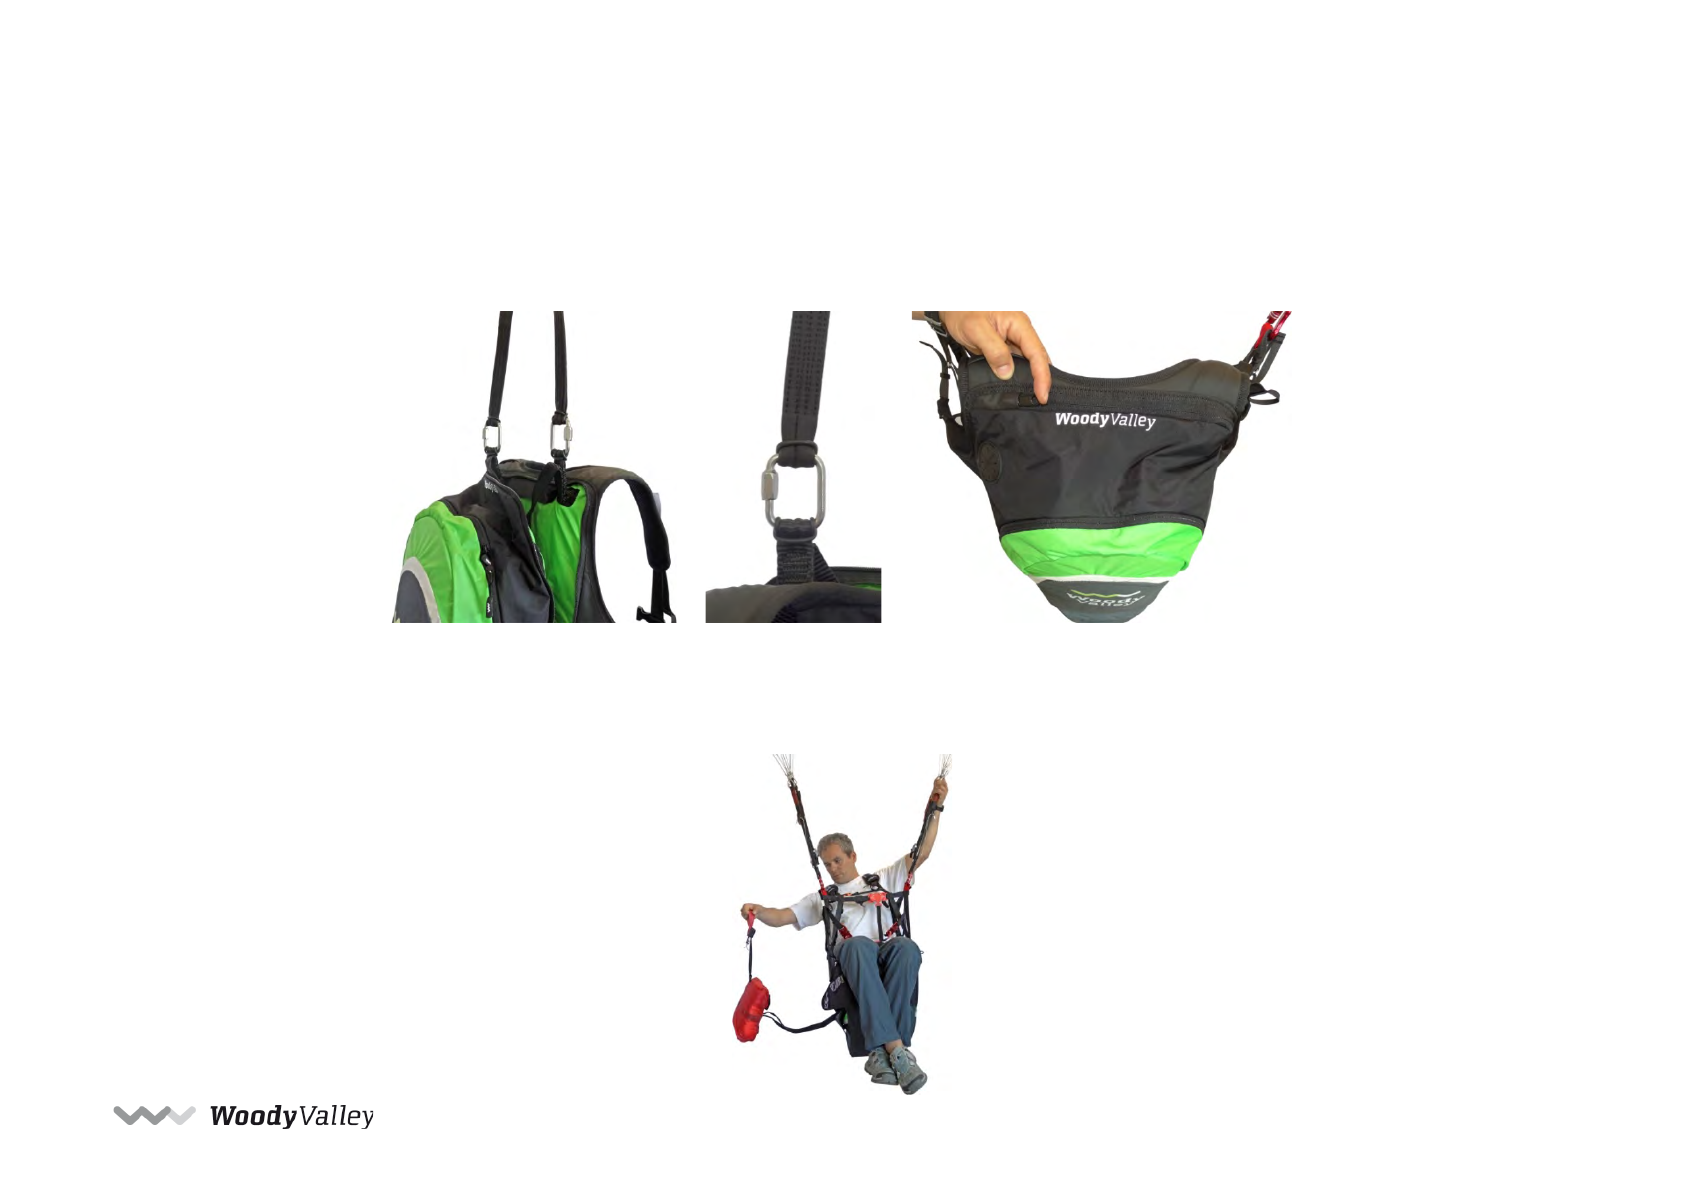
Third system:
If you are using a reserve parachute with directional control and dual bridle, or if your reserve parachute has a double-riser bridle, it can be
connected to the harness using the two loops positioned at the base of the harness bridle, near the padded shoulder straps. In this case, the
harness’s reserve parachute bridle will not be used, and so it should be folded, fastened using two elastic bands, and positioned under the
cover behind the pilot’s neck.
The two connections should be made using screw-lock karabiners with a breaking strength of at least 1,400 kg. It is important to verify that
the length of the bridle is sufficient to position the reserve parachute inside the harness pocket, and that there is sufficient play to enable the
parachute to be taken out of the pocket without causing the reserve parachute deployment bag itself to open during extraction.
6
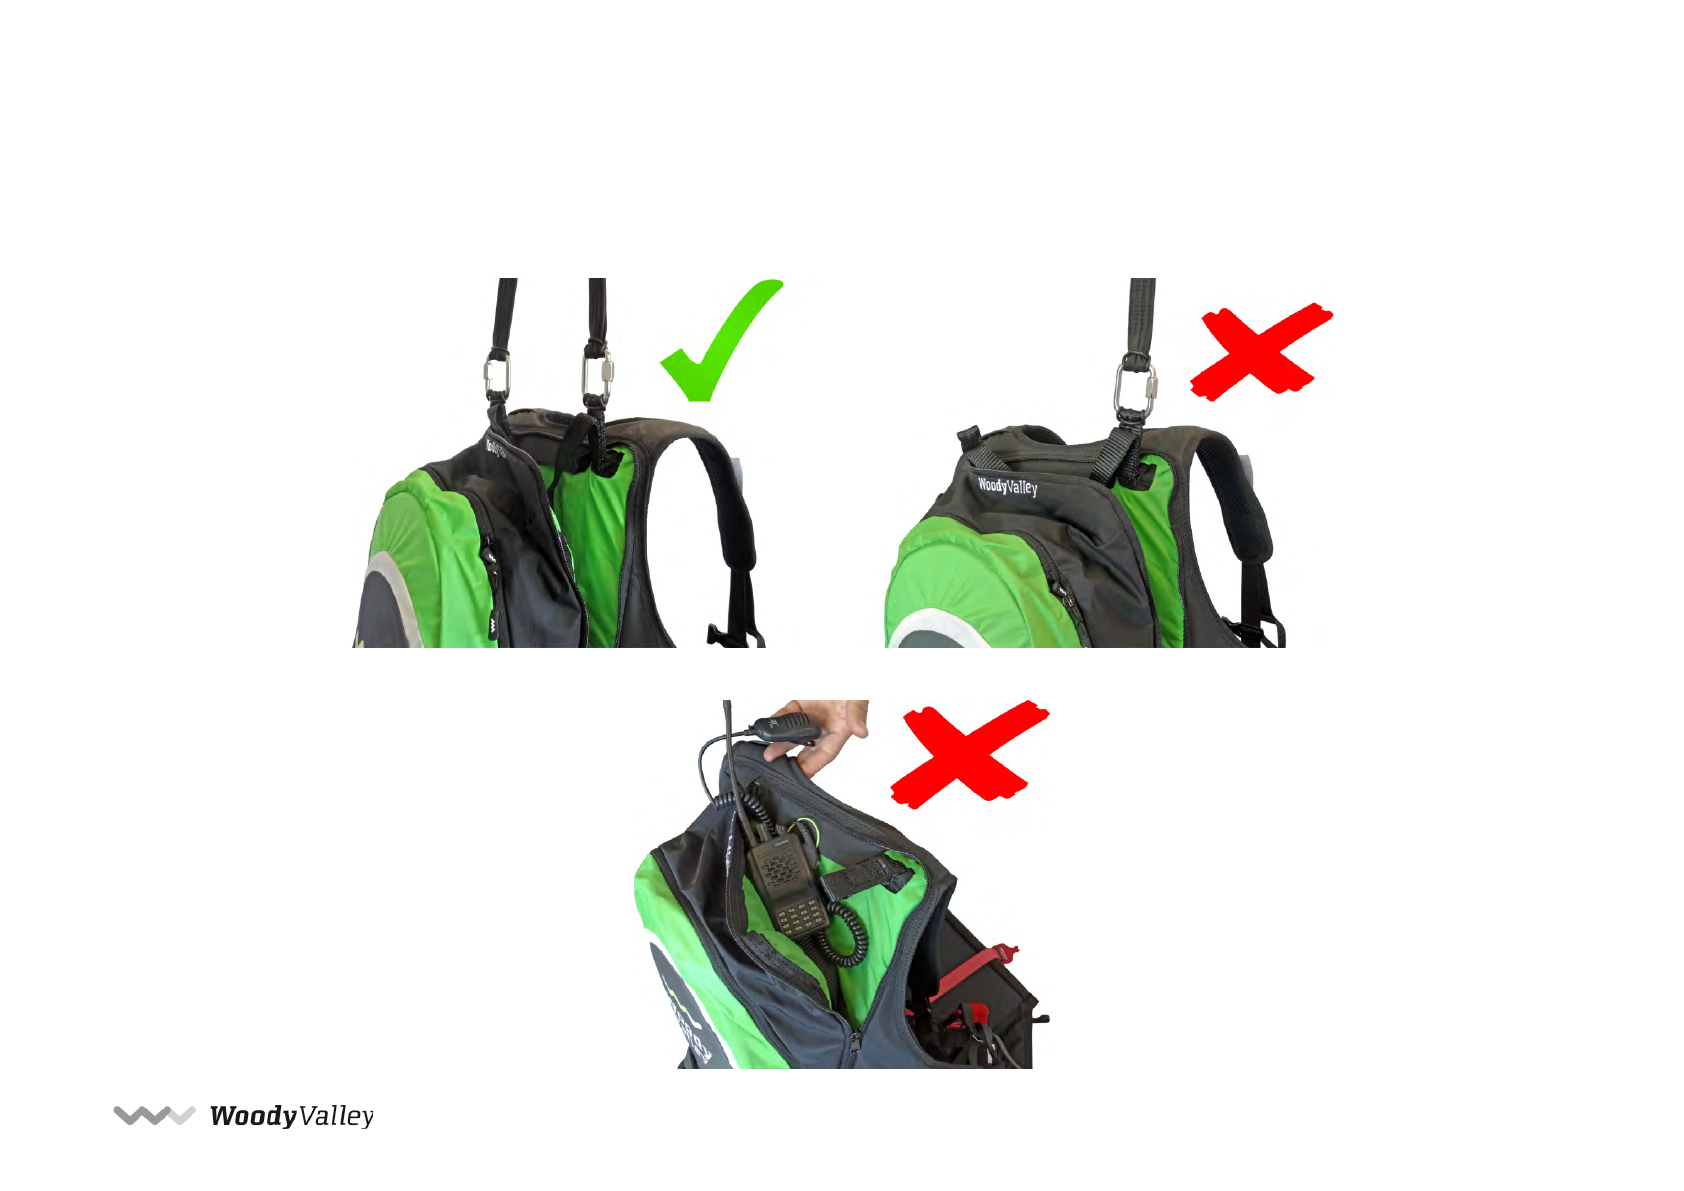
ATTENTION:
To prevent abnormal side loads, the cable is hooked to both loops on their respective shoulder-straps. Not only to one of the two.
Do not put any objects inside the bridle container.
Table of contents
Other Woody Valley Accessories manuals

Woody Valley
Woody Valley X-Rated 7 User manual

Woody Valley
Woody Valley Wani light 2 User manual

Woody Valley
Woody Valley WANI 2 User manual

Woody Valley
Woody Valley Wani 3 User manual

Woody Valley
Woody Valley QUADRO115 User manual

Woody Valley
Woody Valley Voyager Plus User manual

Woody Valley
Woody Valley Passenger User manual

Woody Valley
Woody Valley GTO LIGHT User manual

Woody Valley
Woody Valley Xpression User manual

Woody Valley
Woody Valley Transalp User manual


