Volvo Mode 2 User manual

Charging Cable
Mode 2
Volvo / Mode 2 / Type 2 Connector / Version: 1.0
EN Instructions 1
DE Anleitung 6
ES Instrucciones 11
SE Instruktioner 16
FI Ohjeet 21
FR Instructions 26
IT Istruzioni 31
NL Instructions 36
PT Instruções 41
RU инструкции 46
TR Talimatlar 51
PL Instrukcje 56
TH คําแนะนํา 61

1
IMPORTANT SAFETY INSTRUCTIONS - SAVE THESE INSTRUCTIONS
The charging cable is intended only for charging vehicles not requiring ventilation during charging.
Read the safety information and instruction carefully before you install and operate the charging cable to avoid fire and injury.
Read all the instructions before using this product.
Always follow local electrical regulation when using the charging cable.
Always conduct a visual inspection to ensure no physical damage to charge cable outlook. Stop using it
immediately and contact local Customer Support if there is any damage.
DO NOT use the charging cable with damaged socket-outlet.
DO NOT use this product if the flexible power cord or EV cable is frayed, has broken insulation, or any other
signs of damage.
DO NOT use this product if the enclosure or the EV connector is broken, cracked, open, or shows any other
indication of damage.
Children should be supervised when in the vicinity of the charging cable, when the charging cable is connected.
DO NOT put your fingers into the connector.
DO NOT use the device at potentially explosive atmosphere areas.
DO NOT pull the charging cable while it is in charging session.
DO NOT use the charging cable with an extension cord and the adapter of vehicle connector.
DO NOT make any unauthorized changes or modifications to the charging cable.
DO NOT remove any identifiers such as safety symbols, warning instructions, plates, labels or cable markings.
Must disconnect the AC plug from AC socket-outlet when using adapter plug.
Repair work to charging cable shall only be performed by the manufacturer.
GROUNDING INSTRUCTIONS
This product must be grounded. If it should malfunction or break down, grounding provides a path of least resistance
for electric current to reduce the risk of electric shock. This product is equipped with a cord having an equipment
grounding conductor and a grounding plug. The plug must be plugged into an appropriate socket-outlet that is properly
installed and grounded in accordance with all local codes and ordinances.
Safety Information
A RISK OF FIRE OR ELECTRIC SHOCK
CAUTION:
To reduce the risk of fire, connect only to a circuit provided with Type B / C 20A breaker for IEC 60309
Blue 1P16A, Type I, Type G, CEE 7/7 AC input plug, and a circuit provided with Type B / C / D 20A
breaker for IEC 60309 Red 3P16A, and Type B/C/D 40A breaker for IEC 60309 Blue 1P32A AC input
plug.
WARNING:
Improper connection of the equipment-grounding conductor is able to result in a risk of electric shock. Check
with a qualified electrician or serviceman if you are in doubt as to whether the product is properly grounded.
Do not modify the plug provided with the product – if it will not fit the socket-outlet, have a proper socket-
outlet installed by a qualified electrician.
!
English

2
Installation
Mounting
Wall mounting and cable rewind with the attached Velcro on a surface permanently or temporary is recommended.
Storage
OPERATION
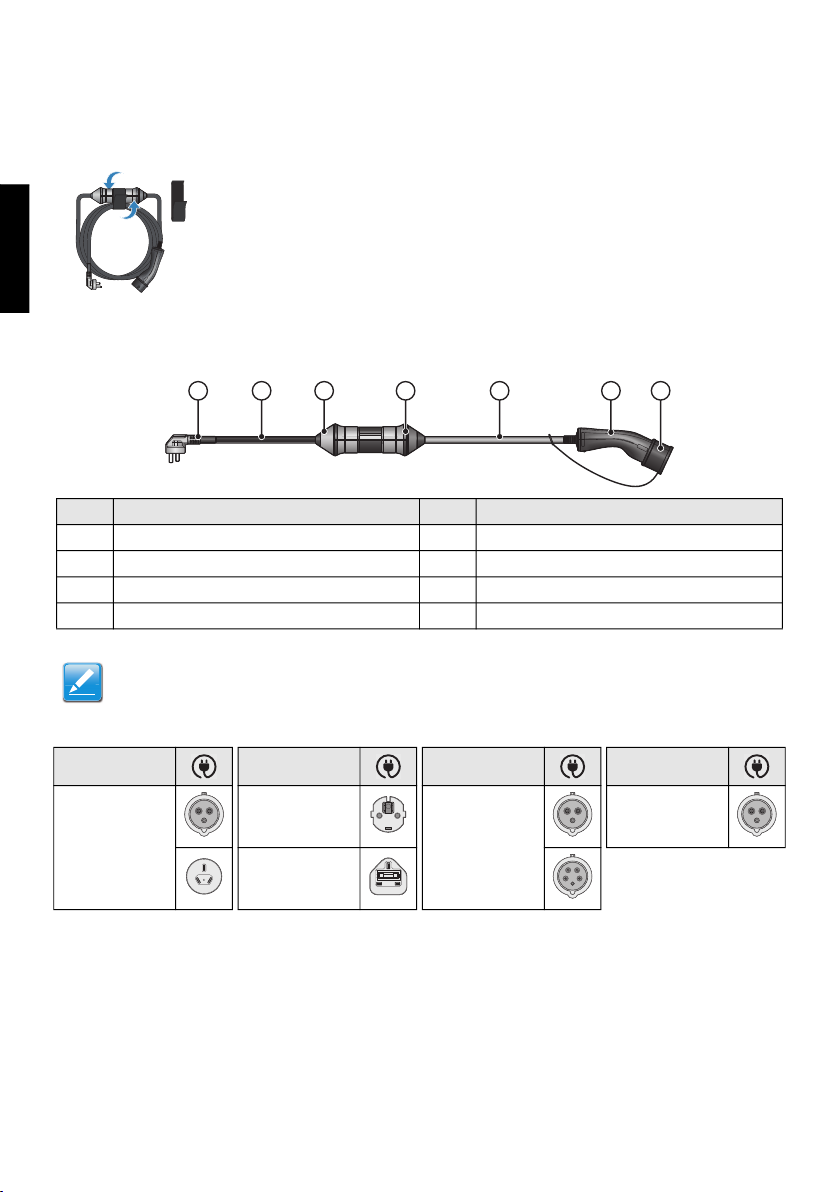
Mode 2 (Type 2) Charging Cable Overview
AC Input Plugs
Use the Velcro to tie up
the charging cable.
No. Item No. Item
1 AC input plug 2 Harness
3 Adaptor plug (if applicable) 4 LED indicator
5 Harness 6 Vehicle connector
7 Vehicle connector cap
Note:
The adaptor plug is not a standard offer depending on the applied regions.
Region Region Region Region
Australia,
New Zealand
Europe except
UK
Europe
(Optional)
Rest of the world
(Optional)
UK
1 3 4 5 6 72
English

3
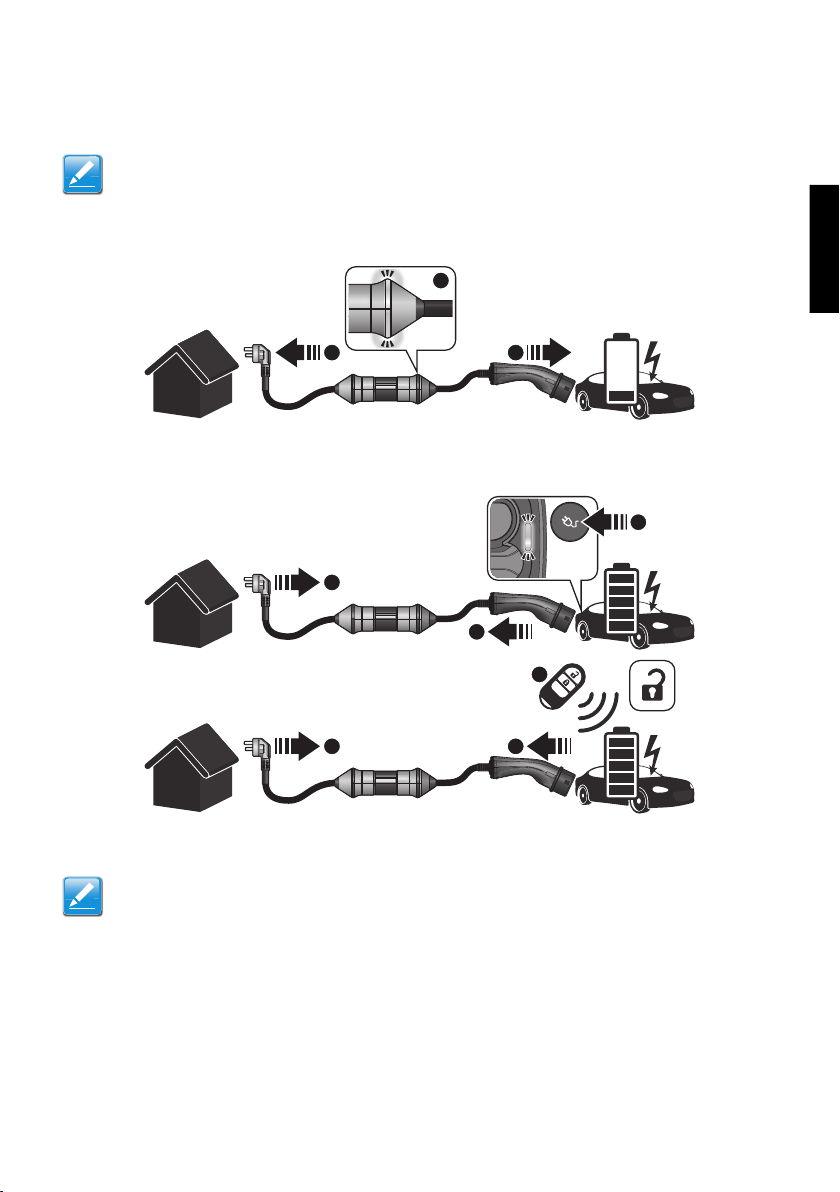
Charging an Electric Vehicle
To start charging an electric vehicle:
1. Connect the AC plug to a dedicated AC socket-outlet.
2. When the charging cable is connected to an AC socket-outlet, the LED indicator will illuminate solid white,
indicating the charging cable is ready for charging.
3. Connect the vehicle connector to electric vehicle inlet, the charging session will start automatically.
To stop charging an electric vehicle:
1. Press "unlock" on the key or press the button on the EVI.
2. Disconnect the vehicle connector from the electric vehicle.
3. Remove the AC plug from the AC socket-outlet.
Changing the AC Plug
The AC plug of the charging cable can be changed to adapt the electrical environment.
Note:
The vehicle shall be parked close enough to the AC socket-outlet for connection.
Ensure the charging cable will not be stepped on to avoid damage.
Note:
The adaptor plug is not a standard offer depending on the applied regions.
This instruction is only applicable to Mode 2 charging cable - with adaptor plug.
1 3
2
3
2
1
3 2
1
English

4
Charging Cable Status
Charging Cable Indicator
Fault and Troubleshooting
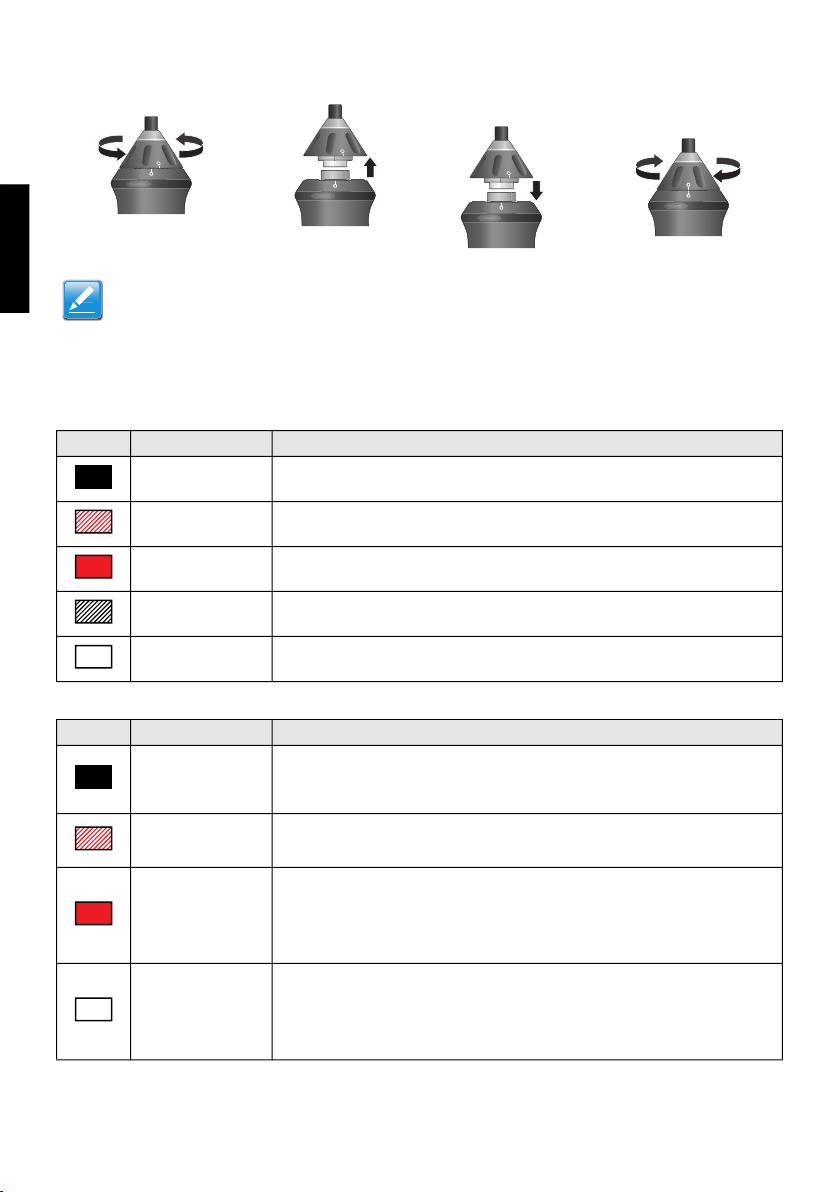
1. Disassemble the adaptor plug: rotate the adaptor
cap for loosening the plug. 2. Assemble the adaptor plug: align the mark and insert
the plug, the adaptor cap will rotate automatically.
Note:
Only the corresponding adaptor plug can be plug into the charging cable adaptor.
Must not connect other device to the charging cable adaptor.
Must disconnect the AC plug from AC socket-outlet when you change the plug.
Must not use the charging cable if the align mark is not in the right position.
Indicator Status Definition
Indicator is off No power supply to the charging cable.
Blinking red Critical Error. There is hardware fault and could not be recovered.
Solid red Temporary Error. There is general protection fault that could be recovered.
Blinking white Charging.
Solid white The charging cable is ready to charge.
Indicator Status Definition
Indicator is still off
after plug in
1. Make sure the AC input plug is well-connected.
2. Replug and power the charging cable again or try another AC socket-outlet.
3. If the problem persists, contact Customer Support.
Indicator is
blinking red
1. There is a critical error (hardware fault).
2. Unplug the vehicle connector.
3. If the situation persists, contact Customer Support.
Indicator is in
solid red
1. There is a temporary error.
2. Unplug the vehicle connector.
3. Wait the charging cable recover from temporary error.
4. Plug in the vehicle connector.
5. If the situation persists, contact Customer Support.
Indicator is in solid
white and charging
cable cannot
process to charging
session
1. Unplug the vehicle connector, then plug in the vehicle connector to vehicle
inlet again.
2. If the white indicators still do not blink after 10 seconds, disconnect the
vehicle connector and AC input plug firstly, disconnect the vehicle connector
and AC input plug firstly, then plug in the vehicle connector and AC input
plug again.
3. If the situation persists, contact Customer Support.
English

5
User Maintenance
Environmental Specifications
Cleaning
Only clean the charging cable in unplugged condition.
Clean the charging cable with a dry cloth and make sure no water enters the pins.
Do not use cleaning agent to clean the charging cable.
Disposal
Warranty
Customer Service can provide more information on the terms of the warranty. However, the following cases are not
covered by the warranty.
Defects or damage caused by not using the product as specified in this instruction.
Costs and damage caused by repair work that is provided by unauthorized specialist.
Volvo Cars Support
Go to support.volvocars.com to visit the site.
The support site contains contact details to customer support and your nearest Volvo retailer.
For more information and customer service, please refer to vehicle user manual or contact local dealership.
Storage Environment
Humidity: < 95%RH
Temperature: -40°C ~ +85°C (-40°F ~ +185°F)
Altitude: 4,000 m (13,120 ft.)
Operation Environment
Humidity: < 95%RH
Temperature: -40°C ~ +60°C (-40°F ~ +140°F)
Altitude: 4,000 m (13,120 ft.)
External magnetic field: Not exceeding five times the earth's magnetic field in any direction
Frequency: Rated Value (As defined in spec label)
Sinusoidal wave distortion: Not exceeding 5%
The charging cable is an electronic device and must be disposed of separately from normal house
wastes. Please have it disposed in compliance with the waste disposal and recycle local regulation.
English

6
WICHTIGE SICHERHEITSHINWEISE - BEWAHREN SIE DIESE
ANLEITUNGEN AUF
Das Ladekabel ist ausschließlich für das Aufladen von Fahrzeugen vorgesehen und es muss während des Ladevorgangs
nicht belüftet werden.
Lesen Sie die Sicherheitshinweise und -informationen vor der Montage und der Bedienung des Ladekabels aufmerksam
durch, um Brand- und Verletzungsgefahren zu vermeiden.
Lesen Sie alle Anleitungen, bevor Sie dieses Produkt benutzen.
Beachten Sie während der Verwendung des Ladekabel stets die geltenden örtlichen Elektro-Vorschriften.
Unterziehen Sie das Ladekabel stets einer Sichtprüfung auf Schäden. Verwenden Sie niemals ein
beschädigtes Kabel und wenden Sie sich ggf. und den Kundendienst.
Verwenden Sie das Ladekabel NICHT, wenn die Steckdose beschädigt ist.
Das Produkt NIEMALS verwenden, wenn flexible Stromkabel oder EF-Kabel beschädigt sind, die Isolierung
defekt ist oder bei anderen Anzeichen von Beschädigungen."
Das Produkt NIEMALS verwenden, wenn das Gehäuse oder der EF-Steckverbinder beschädigt, gerissen oder
offen ist oder bei anderen Anzeichen von Beschädigungen."
Kinder müssen in der Nähe des Ladekabels und des angeschlossenen Ladekabels beaufsichtigt werden.
NIEMALS die Finger in den Anschluss einführen.
Das Gerät NIEMALS in explosionsgefährdeten Bereichen verwenden.
Während des Ladevorgangs NIEMALS am Ladekabel ziehen.
Das Ladekabel NIEMALS Mit einer Verlängerungsschnur oder dem Adapter des Fahrzeuganschlusses
verwenden.
KEINE unautorisierten Änderungen oder Modifizierungen am Ladekabel vornehmen.
KEINE Hinweise entfernen, beispielsweise Sicherheitssymbole, Warnhinweise, Typenschilder, Etiketten
oder Kabelmarkierungen.
Bei der Verwendung des Adaptersteckers muss der AC-Stecker aus der AC-Steckdose gezogen werden.
Reparaturen am Kabel sind ausschließlich dem Hersteller vorbehalten.
ERDUNGSANWEISUNGEN
Dieses Produkt muss geerdet werden. Bei einer Funktionsstörung oder Ausfall des Produktes bietet die Erdung dem
abfließenden Strom den geringsten Widerstand und schützt so vor elektrischen Schlägen. Dieses Produkt ist mit einer
Schnur mit einem Erdungsleiter und einem Erdungsstecker ausgestattet. Der Stecker muss in eine geeignete
Steckdose eingesteckt werden, die im Einklang mit den elektrischen Vorschriften richtig montiert und geerdet ist.
Sicherheitshinweise
FEUERGEFAHR UND STROMSCHLAGGEFAHR
VORSICHT:
Zur Reduzierung der Feuergefahr nur mit einem Stromkreis mit Leistungsschaltern des folgenden Tpys
verbinden:
Typ B/C 20 für IEC 60309
Blau 1P16A, Typ I, Typ G, CEE 7/7 AC Eingangsstecker und Typ B/C/D 20A für
IEC 60309 Rot 3P16A und Leistungsschalter Typ B/C/D 40A für Eingangsstecker
IEC 60309
Blau 1P32A AC
WARNUNG:
Improper connection of the equipment-grounding conductor is able to result in a risk of electric shock. Check
with a qualified electrician or serviceman if you are in doubt as to whether the product is properly grounded.
Do not modify the plug provided with the product – if it will not fit the socket-outlet, have a proper socketoutlet
installed by a qualified electrician.
!
Deutsche
7
Installation
Montage
Die dauerhafte oder temporäre Wandmontage und die Kabelaufwicklung mithilfe des beiliegenden Klett-Bands wird
empfohlen.
Lagerung
BEDIENUNG
Modus 2 (GB) Ladekabel-Übersicht
AC-Eingangsstecker
Verwenden Sie das Klett-Band als
„Kabelbinder“ für das Ladekabel.
Nr. Element Nr. Element
1 AC-Eingangsstecker 2 Kabelbaum
3 Adapterstecker (wenn zutreffend) 4 LED-Anzeige
5 Kabelbaum 6 Fahrzeugstecker
7 Fahrzeugsteckerkappe
HINWEIS:
Regional abhängig ist der Adapterstecker nicht standardmäßig enthalten.
Region Region Region Region
Australien
Neuseeland
Europa, außer
GB
Europa
(Optional)
Restliche Welt
(Optional)
GB
1 3 4 5 6 72
Deutsche
8
Ein Elektrofahrzeug laden
So laden Sie ein Elektrofahrzeug auf:
1. CVerbinden Sie den AC-Stecker mit einer geeigneten Wechselstromsteckdose.
2. Sobald das Ladekabel mit der Wechselstromsteckdose verbunden ist, leuchtet die LED-Anzeige weiß. Das
bedeutet, dass das Ladekabel für den Ladevorgang bereit ist.
3. Verbinden Sie den Fahrzeugstecker mit dem Anschluss am E-Fahrzeug. Die Ladesitzung beginnt
automatisch.
Laden des Elektrofahrzeugs beenden:
1. Drücken Sie am Schlüssel auf „Unlock“ (Entriegeln) oder drücken Sie die Taste auf der EVI.
2. Trennen Sie den Fahrzeugstecker vom E-Fahrzeug.
3. Ziehen Sie den AC-Stecker aus der Steckdose.
Ladekabel-Anzeigestatus
Der AC-Stecker des Ladekabels kann passend zur elektrischen Umgebung (Stromkreis) angepasst werden.
HINWEIS:
Parken Sie das Fahrzeug in geeigneter Nähe zur Wechselstromsteckdose.
Stellen Sie sicher, dass niemand auf das Ladekabel treten kann, um dessen Beschädigung zu
vermeiden.
HINWEIS:
Diese Anleitung betrifft lediglich das Ladekabel Mode 2 - mit Adapterstecker.
Regional abhängig ist der Adapterstecker nicht standardmäßig enthalten.
1 3
2
3
2
1
3 2
1
Deutsche
9
Ladekabel-Anzeigestatus
Ladekabelanzeige
Störungs- und Fehleranzeigen
1. Demontage des Adaptersteckers: Drehen Sie die
Adapterkappe, um den Stecker zu lösen. 2. Montieren des Adaptersteckers: Die Markierung
ausrichten und den Stecker einführen. Die
Adapterkappe dreht sich automatisch.
HINWEIS:
Der Adapterstecker kann nur in den richtigen Ladekabeladapter eingesteckt werden.
Andere Gegenstände/Geräte dürfen nicht mit dem Ladekabeladapter verbunden werden.
Während der Stecker gewechselt wird, muss der AC-Stecker aus der AC-Steckdose gezogen werden.
Das Ladekabel darf nicht verwendet werden, wenn der Ausrichtungspfeil nicht richtig ausgerichtet ist.
Anzeige Status Definition
Anzeige erlischt Keine Stromversorgung des Ladekabels.
Blinkt rot Kritischer Fehler. Ein Hardwarefehler konnte nicht behoben werden.
Statisch rot Temporärer Fehler. Ein allgemeiner Schutzfehler konnte nicht behoben werden.
Blinkt weiß Laden
Statisch weiß Das Ladekabel ist bereit für den Ladevorgang.
Anzeige Status Definition
Kabel eingesteckt,
keine Anzeige
1. Stellen sie sicher, dass der AC-Eingangsstecker richtig eingesteckt ist.
2. Stecken Sie das Ladekabel aus und wieder ein oder wählen Sie eine andere
AC-Steckdose.
3. Falls das Problem weiterhin besteht, wenden Sie sich an Kundendienst.
Anzeige blinkt rot 1. Es liegt ein kritischer Fehler vor (Hardwarefehler)
2. Stecken Sie den Fahrzeugstecker aus.
3. Falls das Problem weiterhin besteht, wenden Sie sich an Kundendienst.
Anzeige statisch rot
1. Es liegt ein temporärer Fehler vor.
2. Stecken Sie den Fahrzeugstecker aus.
3. Warten Sie, bis der temporäre Fehler behoben ist, bevor Sie das Ladekabel
wieder einstecken.
4. Stecken Sie den Fahrzeugstecker ein.
5. Falls das Problem weiterhin besteht, wenden Sie sich an Kundendienst.
Anzeige ist statisch
weiß und das
Ladekabel kann die
Ladesitzung nicht
fortsetzen
1. Unplug Stecken Sie den Fahrzeugstecker aus, stecken Sie den
Fahrzeugstecker dann wieder in den Eingang am Fahrzeug ein.
2. Wenn die weißen Anzeigen nach 10 Sekunden nicht blinken, trennen Sie
zuerst den Fahrzeugstecker und den AC-Stecker. Stecken Sie den
Fahrzeugstecker und den AC-Stecker dann wieder ein.
3. Falls das Problem weiterhin besteht, wenden Sie sich an Kundendienst.
Deutsche Deutsche
Table of contents
Languages:
Other Volvo Automobile Accessories manuals

Volvo
Volvo 31285547 User manual

Volvo
Volvo 31285547 User manual

Volvo
Volvo 9491354 User manual

Volvo
Volvo 31269364 User manual

Volvo
Volvo Ski box User manual

Volvo
Volvo 31285564 User manual

Volvo
Volvo Link System Reference manual

Volvo
Volvo SKI HOLDER User manual

Volvo
Volvo M3602654 User manual

Volvo
Volvo TRAVEL ACTIVE 500 User manual

Volvo
Volvo 283283-0 User manual

Volvo
Volvo 2000 User manual

Volvo
Volvo Load carriers User manual

Volvo
Volvo 1128720 User manual

Volvo
Volvo 30664381 User manual

Volvo
Volvo EVSE-VX User manual

Volvo
Volvo 31265619 User manual

Volvo
Volvo XC60 - ANNEXE 541 User manual

Volvo
Volvo 31265663 User manual

Volvo
Volvo 281350 User manual


