TrueNAS R20A User manual

TrueNAS®R20A
Version 1.1
Page 1
The R20A is a 2U Hybrid Storage Array that has 12 3.5” drive bays and 2 SSD drive bays, redundant power supplies,
and a single TrueNAS controller. It is provided as an alternate form factor to the R20. These instructions cover those
procedures that are specic to the R20A. Additional R-Series setup instructions are provided in the R-Series Basic
Setup Guide.
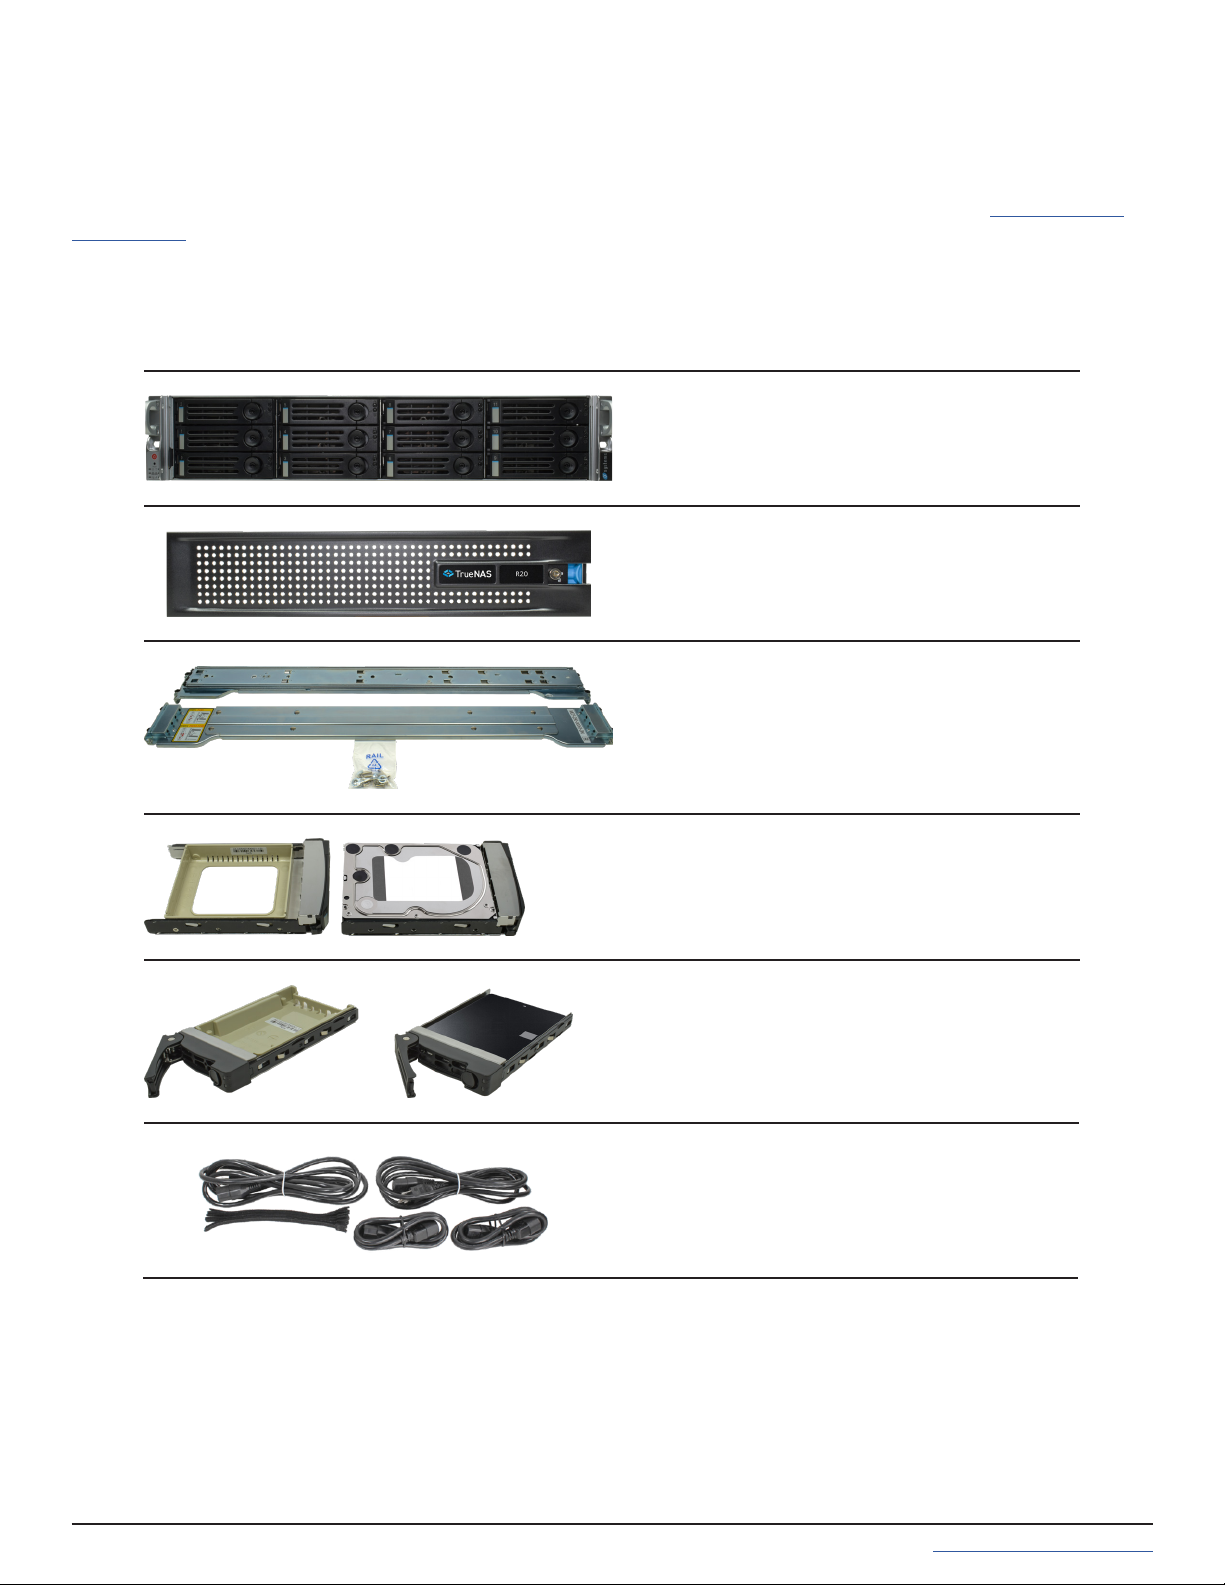
You will nd these items when opening the R20A packaging:
R20A
Set of rackmount rails with mounting hard-
ware
12 3.5” drive trays with up to 12 hard drives
installed
Accessory kit with 2 IEC C13 to NEMA 5-15P
power cords, 2 IEC C13 to C14 cords, and a
set of velcro cable ties
R20A Components
2 SSD drive trays with up to 2 SSDs installed
Locking Bezel
R20A Hybrid Storage Array

Page 2
The left ear has lighted buttons for power (1) and system ID (2). There are also fault and network activity (3) indica-
tors. Both ears have screw holes for securing the system to a rack.
The fault indicator is on during the initial power-on self-test (POST) and off during normal operation. It also turns on
if the TrueNAS software issues an alert. For details about software alerts and how to congure them, see “Alerts” in
the TrueNAS Documentation Hub (https://www.truenas.com/docs/).
The back panel has the power supplies and connection ports:
1. Power supplies #1 and #2
2. SSD Drive Bays
3. Serial port
4. 1Gb Ethernet Out of Band Management port and two USB 2.0 ports
5. Two USB 3.0 ports
6. Two 10Gb SFP+ networking ports
7. VGA monitor port
Ports and Indicators
R20A buttons and indicators are located on the left “ear” of the system front.

Page 3
Racking the R20A
Drives should only be installed in a system after it has been placed in the rack. It is also recommended to remove all
installed drives before unracking a system.
Always team-lift a system when installing to a rack.
Rack Requirements
Attach the Chassis Rails
Each rail has two components, the outer rack rail and the inner chassis rail. To protect it during shipping, the chassis
rail is inserted into the rack rail and must be removed before attaching to a system. Slide the chassis rail forward
until the metal catch stops it in place. Push in the catch and continue to slide the chassis rail forward until it is free
of the rack rail.
PUSH
SLIDE
Take the chassis rail and align the closed end toward the front of the system. Fit the rail tab holes over the mount-
ing tabs on the side of the system and slide it into place. Use one of the included short M4 screws to secure the rail
to the system.
Follow this procedure to slide out and attach the second chassis rail to the other side of the system.
The R20A requires an EIA-310 compliant rack. To properly install the rack rails, the front and rear vertical rack posts
need to be spaced between 23” - 35.75” (584mm-908mm) apart.
Short M4 Screw

Page 4
Install the Rack Rails
Push the System into the Rack
Before installing the rack rail, make sure the rack has enough space for the system. The R20A needs 2U of rack
space, with the rack rails installed into the bottom 1U.
Take a rack rail and align the end with the yellow instructional sticker with the front of the rack. The yellow instruc-
tional sticker must be facing outside the rack so the chassis rails can slide into the rack rails. Align the rail front tabs
and black retaining buttons just above the rack attach points and push the rail into the attach points until the black
buttons are fully depressed, then slide the rail tabs into the attach points. Use two of the small screws with ush
washers to secure the rail to the rack.
The rail kit also includes four retention screw hole extenders that can be screwed into the middle rail attach point.
With the front of the rail installed, extend the back of the rack rail towards the equivalent attach points on the rear
rack post. Make sure the rail remains level from front to back. Follow this process to install the other rack rail.
Team-lift the system and align the chassis rails with the rack rails. Slide the ends of the chassis rails into the rack
rails and push the system forward until the metal safety catches click into place. Push the safety catches down and
continue to push the system forward until it is ush with the front of the rack.
The rail kit includes additional M5 screws that can be used to secure the system to the rack rails.

Page 5
To mount a hard drive in a tray, remove the two rear screws holding the ller (1). Gently spread both sides of the
tray away from the ller (2) until the pins release (3), then remove the ller. Place the hard drive into the tray (4) and
mount the hard drive in the tray with four screws (5).
To remove a drive, release the latch by pushing the large circular button to the right (1). Once the latch swings out-
ward, pull on it to begin sliding the tray out. Grip the top and bottom of the tray and gently remove it (2).
The R20A has two 2.5” SSD drive bays.
To remove the tray, release the latch by sliding the button down (1). Gently swing the latch up (2), then slide the tray
out (3).
To install a hard drive tray into a system, push the tray into a slot until the locking arm begins to swing closed. Gen-
tly push the arm into place to seat the tray and secure it in the system.
Drive tray buttons can be locked to prevent tray removal. The tray button is unlocked when the slot is horizontal
and locked when the slot is vertical. Lock a tray button by inserting a at-head screwdriver into the slot in the cen-
ter of the button and gently turn it ninety degrees clockwise so the slot is vertical.
SSD Drive Trays
Hard Drive Trays
Table of contents
Other TrueNAS Storage manuals

TrueNAS
TrueNAS M Series Manual

TrueNAS
TrueNAS Mini X+ Installation and operation manual

TrueNAS
TrueNAS M Series Manual

TrueNAS
TrueNAS R30 Manual

TrueNAS
TrueNAS X Series Manual

TrueNAS
TrueNAS M Series User manual

TrueNAS
TrueNAS M Series User manual

TrueNAS
TrueNAS Mini R Manual

TrueNAS
TrueNAS ES60 Manual

TrueNAS
TrueNAS X-Series Manual


